WWBeds Face Assembled Alpha Murphy User manual

Alpha Murphy Bed
Assembly Instructions Face Assembled
Questions call 501.753.9699
Designed to exceed International ISO 9002
Standards for Residential Specifications
Revised 3/31/2021

Table Of Contents
Unpacking Your Bed
Videos
Installing The Springs
Mounting Lift Mechanism
Assemble the Bed Cabinet
Attach Bed Cabinet Securely to Wall
Install the Bed Face Panel Unit
Install Legs
Mounting the Face
Plug in the Lights:
Follow up to Initial Assembly
Additional Options
Bookcase Option
Desk Option
Desk Step D-1 | Attach the Desk Riser to the Desktop.
Desk Step D-2 | Attach the Desk Mechanism to Desk
Desk Step D-3 | Place Desk Hinge into Hinge Clip
Desk Step D-4 | Reattach Base
Desk Step D-5 | Check Operation

Unpacking Your Bed
Remove all boxing, foam, and shrink wrap and make sure all components are there. Each customer piece will
vary but in general you should have:
Do not throw away packaging until you are complete (smaller items could be lost in packaging)
Parts Provided
Tool Needed
❏2- Verticals
❏1-Top panel/Header
❏1-Headboard
❏1-Center Section
❏Unassembled face may be 4
individual panels and the metal frame
boxed
❏Package of screws
❏Extras may include:
❏Crown or base molding
❏Bookcases (adjustable shelves will be
packed separately)
❏Desk
❏Power drill
❏3/16” drill bit
❏Phillips bit
❏½” wrench
❏7/16” wrench or nut driver
❏Hammer
❏Flathead Screwdriver
❏Stud Finder
❏Tape Measure
❏½” socket
Additional tools if the Face isn’t already assembled:
❏5/16” socket, wrench or nut driver
❏#2 Square drive for your drill
Videos
To make the assembly easier, we created a couple of video playlists. As with these instructions, the videos are
generic and not all may apply to your specific set-up.
Play all Videos | Entire Playlist
Individual Videos
Parts
Tools Required
Adding Springs
Mounting the Lift Mechanism
The Cabinet Part 1
Lights
Cabinet part 2
Attaching to wall
Locking Spring
Frame Bolts and Straps
Legs
Mounting the Face
Finishing Up

Installing The Springs
Video: Adding Springs
NOTE: Some models may have the correct number of springs already installed. Check the chart and if your
bed already has them installed then skip this section.
1-1. The Number of springs in the Lift Mechanism will vary by size and application of the Murphy Bed. Check
chart below.
SPRING APPLICATION CHART
Please Note: These are recommendations only. Actual number of springs required will depend on the total weight of the bed face unit including the
mattress
and all bedding
BED SIZE
STANDARD FACE (NO DESK)
STANDARD FACE (ADDED DESK)
Single/Twin
4 Springs Vertical (3 Horizontal)
5 Springs Vertical (4 Horizontal)
Double/Full
5 Springs Vertical (4 Horizontal)
6 Springs Vertical (5 Horizontal)
Queen
6 Springs Vertical (5 Horizontal)
7 Springs Vertical (6 Horizontal)
King
8 Springs Vertical
9 Springs Vertical
After you have completed installing and checking the operation of your bed, you may find it necessary to add or remove springs to achieve the correct
lift effort of between 5 to 10 pounds.
1-2. There are nine locations for springs. If the bed requires an even number of springs, do not use the center
hole (#5 from the top). If the bed requires an odd number of springs, start with the center hole (#5 from the top)
and work outward in both directions evenly.
1-3. Hook the springs so the open ends are facing
outward. You may have to gently pry up the tension
arm and slide the spring under and snap them into
place in the proper hole, matching the same
numbered hole from the top of the mechanism
back plate. You should have an equal number of
springs on each side of the center hole.
1-3. Repeat for the other Lift Mechanism.
Use the same number of springs and the same
layout on both Mechanisms

Mounting Lift Mechanism
Video: Mounting the Lift Mechanism
NOTE: Some models may have the Lift Mechanism already
mounted to the verticals. If this is the case with your
Murphy bed then you can skip this section.
2-1. The left and right Lift Mechanism hole pattern will line
up with the hole pattern on the Side Panels (B). The bolts
will be fed through the side that has the counter sink holes
drilled.
2-2 Hole A will not have a standard nut. It is either a
threaded hole or it will use a disk like bolt “Arm Lock Stop”.
Get Hole A started.
2-3 Insert the bolt in the other holes and loosely tighten
onto the nuts.
2-4. Once all Bolts and Nuts have been started tighten all of
them.
Assemble the Bed Cabinet
Video: The Cabinet Part 1
● If possible, the Bed Cabinet should
be assembled in the room where it
will be used.
● Be sure Lift Mechanisms are
securely installed.
Headboard and Top Panel Installation
On a soft surface like a blanket lay out
the verticals.
3-1. Insert the headboard dowels into the
ends of the headboard (two on each side).
No need to measure, The dowels will align
the headboard to where it needs to be. With
the pocket screw holes facing toward the
back, insert the headboard dowels into the
side of the verticals.

3-2. Lay the verticals on the floor with the mechanism facing up and the head of the bed toward the wall.
3-3. Place the dowels in the end of the headboard into the dowel holes in the vertical making sure the
headboard screw pockets are facing toward the back and the finished edge of the headboard is facing what
would be up (when lying on the floor, finished edge will be away from the wall)
3-4. Secure headboard to the verticals with 1 ½” screws (4 each side).
3-5. Carefully rotate the headboard and the one vertical so that the other end of the headboard/dowels can be
inserted into the second vertical. The unit should now be face down.
3-6. Secure this other end of the headboard to the verticals with 1 ½” screws (4 each side).
Top Panel
3-7. With the bed still face down on the floor attach the top panel. Top panel should be flush with the top of the
verticals and the front.
3-8. Secure each side with five 1-½” screws.
STOP IF YOU HAVE LIGHTS
(If you do not have lights skip to Step 3)
Video: Lights
IMPORTANT: If you have lights, you will want to make sure your wiring and control box are in place before
mounting to the wall. These steps will be performed while the cabinet is face down.
Figure L-1a (Inset Lights)

Figure L-1b (Outset Lights)
L-1 Mount control box to the back of the headboard using 2” screws. Mount this centered and toward the
bottom of the headboard.
L-2. Mount the Touch Plate to the top/back of the headboard, centered, using a ¾” screw.
Note: drawing shows a knob instead of a plate. We now use a touch plate.
L-3. Run the thin single wire from the control box that has an Eyelet on the end, to the Touch Plate, and
connect it with a ¾” screw.
NOTE: If you have Outset lights there will be a second single wire connected to the back of the Touch
Plate. This wire will be routed to the second Touch Plate Location. If there are no bookcases the
location will be on the side of the murphy bed. If you have bookcases, the second Touch Plate location
will vary depending on the type of bookcase you have, but normally on the side toward the back.
L-4. Plug the female wire coming out of the control box into the extension cord.
NOTE: With lights on the inside (Inset Lights) there will be a small control box inline on the extension
cord.The small control box will be attached to the frame later. If your lights on Outset (designed to
overhang on the outside of the cabinet, you will have a standard light duty extension cord.
(see figure L-1a)
L-5. Starting from the top. Leave 3-4” of cord above, and insert the extension cord into the groove in the back
of the Vertical. With a hammer, lay the cord flat and carefully tap it into place.

NOTE: Some pre-installed models may already have the cord installed in the groove.
L-6. Plug the other side (top side) of the extension cord into the lights.
L-7. Plug the control box that you connected to the headboard into into a wall outlet. Test the lights. With the
outset lights the, lights should come on when the touch plate is touched on the headboard.
If your lights are on the inset style, you will have to also make sure the arrow on the small control box is
pointing up. When the arrow is turned down the lights could go off.

BACK TO REGULAR INSTRUCTIONS
Video: Cabinet part 2
Stand the unit up and into its approximate place in the room. Check that the cutout made to clear your
base molding is sufficient. If not make the height it needs to be. Lay the unit back down on the face,
and adjust the cutout.
Bottom Rear Base and Bottom Kick
Bottom Rear Base and Bottom Kick will be the same width (4”) Some drawings may show them different sizes.
If you have the added base molding this base molding may be attached to the Front Bottom Kick as in this
example.
3-9 Prep the Bottom Rear Base and Bottom Kick by adding 2 brackets on each end.
(NOTE: Some models this step may be done for you or you may see where the brackets were once put
on)
Lay both Bottom Rear Base and Bottom Kick face down on a clean soft surface. Mount the two brackets flush
on each end (about ½”-¾” from the top and bottom edge). Secure with ¾” screws.
(NOTE: Face will be the best side. If you can not tell which side is the best, then it will not matter.)
3-10. Attach the Bottom Rear Base. Both the Bottom Rear Base and Bottom Kick will be the same height. You
may want to use the better one for the front Bottom Kick. With the brackets facing toward the front, bring the
Bottom Rear Base in so that it clears any cutouts that were made for the base molding
3-11. Attach the Bottom Kick by setting it back 1” from
the front of the Side Panels. These brackets will face
the wall/inside. Secure with ¾” screws.
Special application: If you have added base
molding, the Bottom Kick may be attached to that
base molding and may not have the 1” set back. Also in some cases the Bottom Kick will be replaced
by added base molding.
NOTE: The small control box will be just sitting there and will be attached to the frame later.
(See the section on lights)

Attach Bed Cabinet Securely to Wall
Video: Attaching to wall
4-1: Find Studs
Prior to placing the cabinet against the wall, locate 3-4 studs on queen size (4-5 on King) or other wall frame
members at the level of the Top Panel (top of bed). Alert: The cabinet must be secured to studs or other wall
structural members or injury and damage could occur. If the wall is not a wood stud wall, use metal stud
screws, toggle bolts or concrete expansion bolts if necessary.
Tip: for help finding studs there are several websites of video available online, just do a google search. One
example: https://www.lowes.com/n/how-to/how-to-find-studs-in-walls
4-2: Attach to wall
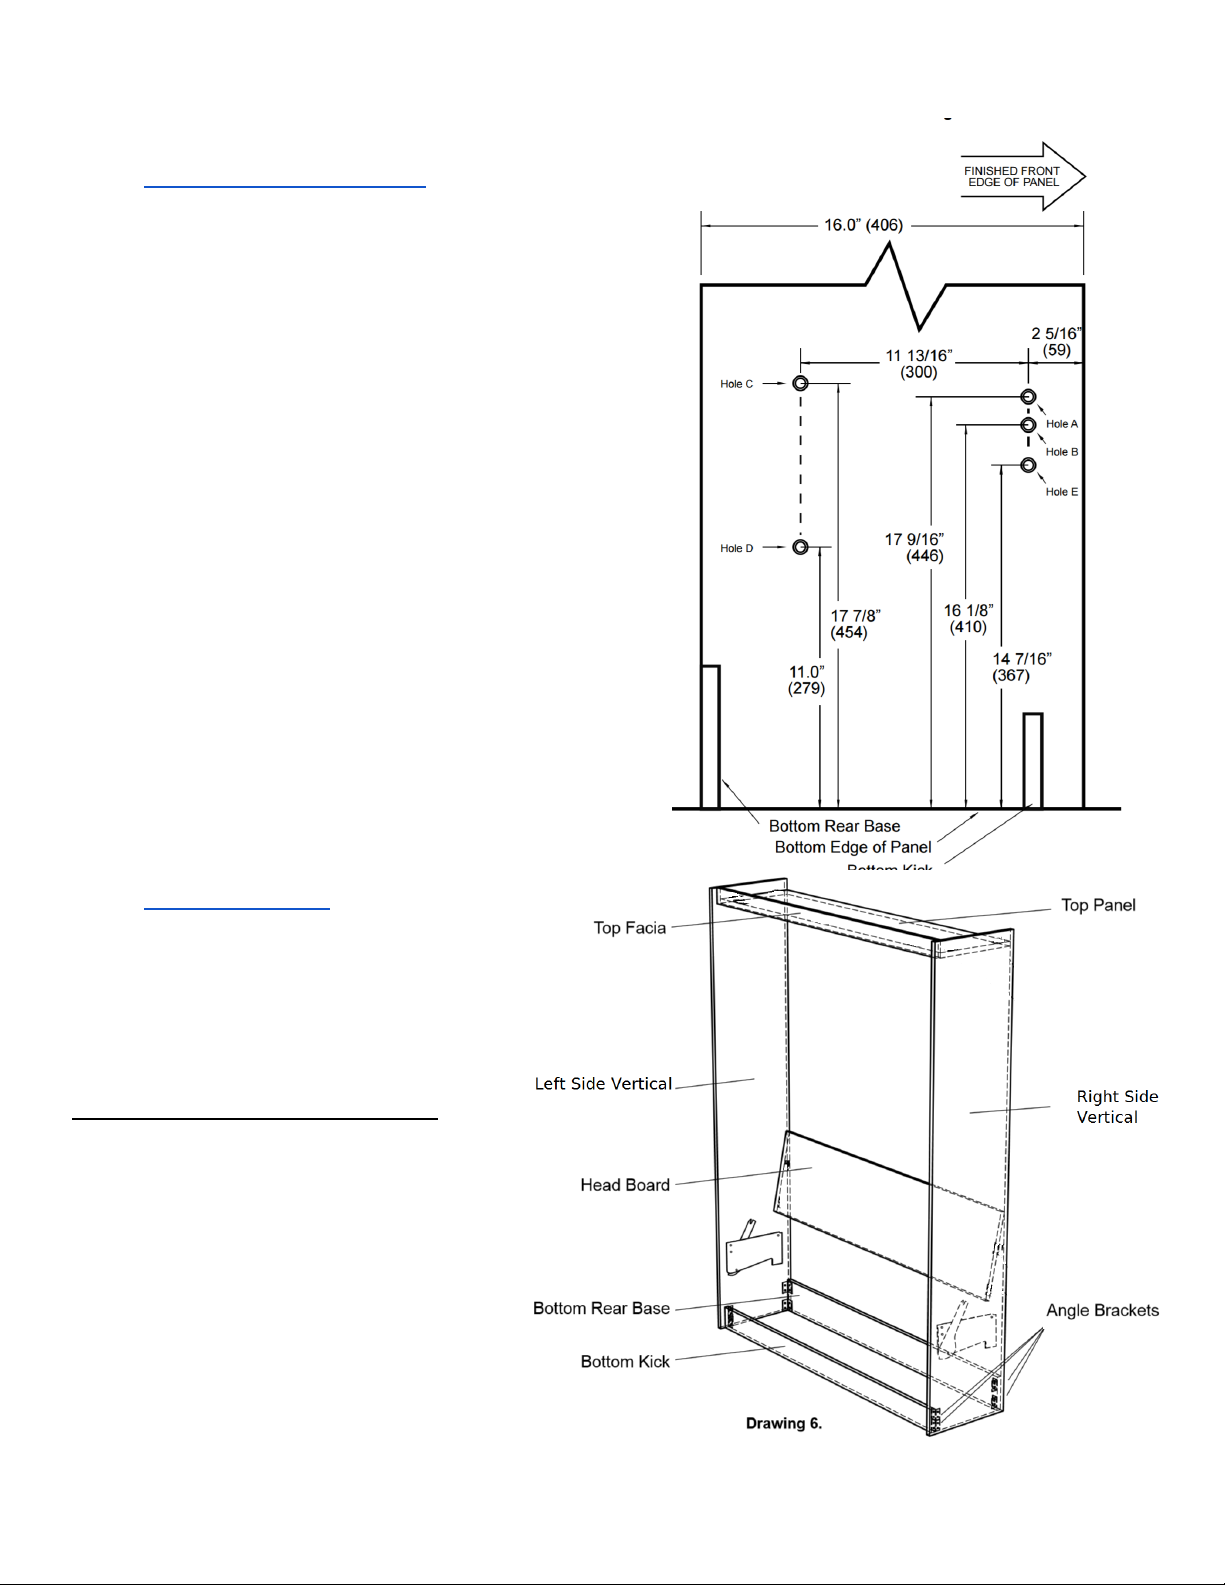
Now that the cabinet is square and plumb,
pre-drill a hole in that backboard of the
Top Panel/header at the stud location
using a 3/16” drill bit. Only pre-drill that
back board and not the entire depth into
the stud. Fasten cabinet to wall using 3”
screws. Repeat this for other stud
locations.
If the wall is CONCRETE, MORTAR OR
BRICK Construction, use masonry screws:
Drill three pilot holes through the rear rail of
the bed header into the wall for a twin or full
and four for a queen size bed. Using a
5/32” concrete drill bit, drill through the pilot
holes into the wall 2” deep. Anchor the bed
by screwing 3/16 x 2 ¼” masonry screw
through the rear rail of the bed header into
the wall.
IMPORTANT:
After the cabinet is securely fastened to the wall, pull on the top of the cabinet. If any movement away
from the wall is detected, repeat the previous steps.

Install the Bed Face Panel Unit
Lock the arm into place
Videos: Locking Spring and Frame Bolts and Straps
Caution: If possible have a helper assist in the setting of the mechanism and loading of the bed face panel. DO
NOT reach behind the tension arm when you are doing the setting procedure. To avoid reaching behind the
Tension Arm, use a pencil or screw driver to move the Arm Lock into place.
Holding one foot against the bottom front
edge of the side panel and using the
“Tension Arm Lever Tool”, pull the tension
arm out until you can set the arm lock to
the hex nut at the hole A (see drawing 13.).
This is the hex nut at the top front corner of
the mechanism.
Tip: If you set the “Arm Lock” on top of
the bolt before you pull the Tension
Arm back it will fall into place. Do not
put your fingers back there while pulling it back!
5-1: Insert a Allen Head Bolt through Hole #1 (This hole
should be the one about 6 3/4” from the end of the side
frame) on both left and right side frames (see Drawing).
NOTE: On some Models this Allen Head Bolt may
already be installed.
NOTE: Holes shown in the video may be slightly different.
5-2 On each side, install 5/16“ (M8x20mm) Hex Head Bolts from the outside of the frame through Hole #3.
Only thread the nut until it is flush with the Nut end. Do not
tighten.

Install Legs
Video: Legs
7-1 Install legs with the washers on the inside of the Rails and the Nylon washer on the outside. Tighten nut to
have a small amount of friction when leg assembly is rotated from the up to the down position.
7-2 Install leg connector rod between legs and secure with 1/4”x1 1/4” (M4x32mm) Hex head bolts and star
washers. Be sure they are securely tightened so as not to become loose.

Mounting the Face
Video: Mounting the Face
NOTE: Two people are needed for this step.
6-1. Lift the unit vertically to a height where the bolts in holes #3 are several inches above the top of the
Tension Arms. Gently fit the unit between the arms, tilt it back approximately 10 degrees so that the head end
of the until clears the Bottom Kick, then lower it so that the #3 bolts slide into the slots at the end of the Arms.
Be sure the Allen Head cap seats at the bottom of the slots on the tension arm. Slowly tilt the panel unit
back just enough to allow the #1 Allen Head Cap bolts to be fully seated in the notches at the bottom of the
Mechanism. As in Drawings 14, 15, and 16.
6-2 Continue to tilt the Bed Panel Unit outward to an angle of about 45 degrees, during which action you will
hear a click as the Arm Locks disengage. With your assistant holding the bed at roughly this angle, install the
#2 bolts and Nuts. Still holding the panel unit at this angle securely tighten the #2 and #3 nuts.
6-3 When all bolts are securely tightened, you may tilt
the panel outward to approximately 45 degrees to
release the arm locks. You will hear a click as they
disengage.
Caution:
Hold the Face Panel securely, Do Not let it slam shut. Balance is not achieved until the mattress is loaded in
the bed otherwise it will not stay down. Also make sure the legs are folded around and above the mattress
space.
Holding the upper edge of the Bed Panel Unit, gently let the bed close. If all is well, you should have even
clearance between the side edges of the panel unit and the insides of the Side Panels.
If the Cabinet is not square and the Bed Panel Unit binds try the following adjustments.
● Nudge the Bed Cabinet along the floor, pushing from the base of the Side Panel
● Shim (or reshim the bottom of the Side Panels for floors that may be out of square.

Plug in the Lights:
Mount the small control box to the back of the “Frame and face Panel”. Remove the tape backing and stick the control
box to the back of the metal frame. Make sure the arrow is facing up and toward the wall.
Complete Bed Assembly
Follow up to Initial Assembly
Video: Finishing Up
Check that the Bed Cabinet is level and square so the Bed Face has equal clearance of the Cabinet on both
sides, top to bottom. If the Cabinet is leaning to one side, nudge it at the floor level. If the top is uneven, place
shims under the Side Panels. If bed is too heavy to operate easily or slams shut, remove the Bed Face Panel
and add or subtract springs. At this time, you may decide to use one more or less spring(s) on the left or right
side Lift Mechanism.
7-1 Add Cover Plates
You should have a left and right cover plate and two
1-½” wood screws. The cover plates have tabs on
them. Slide those tabs into the slot in the top if the
mechanism.
Slip the Mechanism Cover over the Mechanism so
that the tabs on the cover fit into the notches. Line
up the hole with the barrel support and anchor in
place using the 1-½” screw provided Repeat on the
other Mechanism.
7-2 Load and strap the mattress into place. Two
people are needed.
7-3 Add any accessories like crown or bookcases.

Additional Options
Bookcase Option
The bookcase will mount to the bed at the top using 1 ¼” screws. You can also put one inside the lower
section by pulling out a drawer. We may not have pre-drilled for these holes so you can place them anywhere.
Desk Option
Note: On some applications we have put the screws back in
on the face (right above the Desk Bracket) and also at the
bottom, into the Side panels. If this is the case remove
those screws and use them to assemble the desk. If not
you should find them labeled in your hardware pack.
Desk Step D-1 | Attach the Desk Riser to the Desktop.
If they are not already inserted, insert the hardwood dowels
into the bottom of the Desk Riser. The Desk Riser will attach
to the Desktop by inserting the dowel side into the dowel
holes on the Desktop. Keep in mind there is usually a front
and a back to the Desk Riser. Make sure the good side is
facing forward.
Note: the holes cut in the Desktop are elongated and allow left to right movement. Make sure the
edges of the Desk Riser and Desktop are even and insert the 1 ½” screws.
Desk Step D-2 | Attach the Desk Mechanism to Desk
The Desk Mechanism has holes in the Desk Upper Bracket that
forms an “L”. Attach the desk to the mechanism using 20 - ⅝”
pan head screws.

Desk Step D-3 | Place Desk Hinge into Hinge Clip
NOTE: Two people are needed for this step
With the Desk rotated 90° up, place the loose end of the hinge into
the Hinge Clip and secure with ⅝” flat-head screws.
Desk Step D-4 | Reattach Base
Rotate the desk back down and re-insert the ⅝” pan-head screws
that were removed from Step D-1.
Desk Step D-5 | Check Operation
Check the desk for level and open and close the bed to make sure
the bed is operating properly.
Notes:
Table of contents
Other WWBeds Indoor Furnishing manuals
Popular Indoor Furnishing manuals by other brands

Tenn-Tex Plastics
Tenn-Tex Plastics QuickTray installation instructions

Costway
Costway JV10850 quick start guide

Dorel Living
Dorel Living DL8559-R manual

KEUCO
KEUCO Stageline 32842 180000 Mounting instruction

firplak
firplak GEOS 210 Assembly instructions

DIVERSIFIED WOODCRAFTS
DIVERSIFIED WOODCRAFTS CDTC-60 Assembly instructions