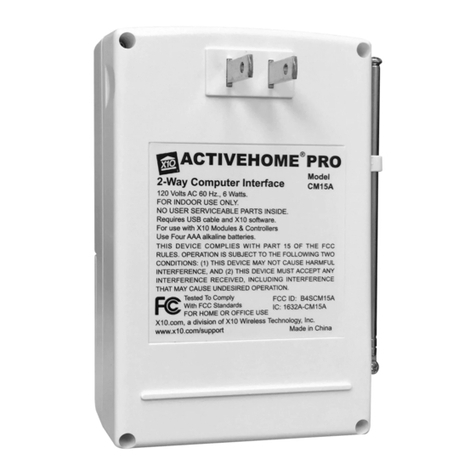
X10 CM15 User manual

ACTIVE HOME PRO
PC USB / RF Interface and ActiveHome Pro
Home Automation System
CM15
User Guide 3
Bedienungsanleitung 7
Gebruikershandleiding 13
Användermanual 17
Guide Utilisateur 21
Guía del usario 27
Manual do utilizador 33
Manuale per l’utente 37
UK
D
NL
SE
F
ES

22-2-2008 2P/N#033000=XXXXXX

22-2-2008 3P/N#033000=XXXXXX
Please note that the CM15 can be use indoor only and in dry rooms.
To be used with one 6LR61-9Volts DC alkaline battery only.
INTRODUCTION
Welcome to the world of Home Automation. You now have the power to control
your whole home from your computer! With ActiveHome Pro and your X10 Modules
you can create schedules for your lights and appliances, set up groups of
commands for your daily life, and keep lights and appliances off when they’re not
in use. Use ActiveHome Pro to make your home more comfortable, and more
secure. The X10 ActiveHome Pro software, in conjunction with the Interface, lets
you control lights and appliances around your home when used with X10 Modules.
This Installation Guide will explain you how to install your ActiveHome Pro system.
Use it as a guide to get you started, but be sure to run the Intro Wizard (Help àRun
Intro Wizard) and read the Help Information file after the installation of the software
is complete.
Controllers and Modules
The first thing you need to understand is that there are two different devices you
need to control your home -Controllers and Modules. Any light or appliance that
you want to control is plugged into a Module and that Module is then plugged into
a standard AC wall outlet.
Modules receive commands from Controllers. Examples of Modules are the Lamp
Module, Appliance Module, and Wall Switch Module.
The CM15 Interface is a Controller: Controllers are also plugged into standard AC
wall outlets and send commands to Modules over your existing electrical wiring in
your home, without affecting your electricity in any way.
The CM15 Interface is also a Transceiver: When it receives a command from a
wireless remote control it sends digital signals over your existing house wiring to
Modules that receive the signals and execute the command.
The CM15 Interface connects to your PC’s USB port and then plugs into a standard
AC wall outlet. The ActiveHome Pro software tells the Interface what to do. The
Interface then sends digital signals over your existing house wiring to Modules that
receive the signals and execute the commands sent by the Interface. With your
ActiveHome Pro Home Automation Interface and software, your PC becomes a
very intelligent Controller for all of your home automation tasks.

22-2-2008 4P/N#033000=XXXXXX
UNPACKING YOUR STARTER KIT
Your ActiveHome starter kit will contain the following items:
Item
Software CD Contains ActiveHome programs
Home Automation Interface CM15 Sends commands to Lamp/Appliance
Modules*
USB Cable Connects your PC to the Interface
* (Modules may be included or sold separately depending on which kit you
purchased).
SOFTWARE INSTALLATION INSTRUCTIONS
Please read through these installation steps completely before you start to install
your ActiveHomePro software.
Installation from CD ROM for Windows XP or Windows Vista
•Insert ActiveHome Pro CD in your CD ROM drive.
•After a few seconds the installation should start and the ActiveHome Pro Setup
windows should appear on your PC screen.. The software installation process
will install the driver for your CM15 Interface and the main ActiveHome Pro
Application. If the installer does not start automatically, open your CD drive
using Explorer and double-click on Setup_ahp_eu_xxx.exe*.
•Follow the installer prompts which appear on your screen.
•After the installation is complete, please review the Helpfile in the application
for further assistance.
* where xxx is the version of the software.
HARDWARE INSTALLATION INSTRUCTIONS
Please read through these installation steps completely BEFORE you start to install
your ActiveHome hardware.
•Take the USB cable that came with your ActiveHome Pro Starter Kit and plug it
into a free USB port of your PC.
•Plug the other end of the USB cable into the CM15 interface.
•Open the battery compartment and insert one6LR61-9Volts alkaline battery
(for retaining the time of day if there’s a power outage). Respect the polarity.
Replace the cover.
•Plug the CM15 interface into an AC outlet near your PC, but preferably away
from the PC’s main unit as this can cause interference.
•When you connect the Interface your computer will automatically recognize
the new hardware and install it.

22-2-2008 5P/N#033000=XXXXXX
Your computer portion of the hardware is now set-up to control the lights and
appliances in your home! To complete the hardware setup, you need to install
Modules for the devices that you wish to control.
The first time you run ActiveHome Pro it will load a file called "MYHOME.AHX".
"MYHOME.AHX" will show a graphical representation of a Lamp Module and
Appliance Module as well as a sample Macro. The Lamp Module has been named
"My Lamp" and the Appliance Module is named "My Appliance."
"My Lamp" is already set to address A1 (Housecode A, Unit Code 1 located on the
Top right corner of the "on screen" module). This should correspond to the setting of
the physical Lamp Module that you will install (may have been included or sold
separately depending on the kit you purchased).
The "My Appliance" on screen module is set to Housecode A and Unit Code 2 to
correspond to the setting of the physical Appliance Module that you will install
(sold separately).
Make sure the Address Dials on the face of the Modules are set correctly. The red
dial should be set to A on both Modules. The black dial on the Lamp Module
should be set to 1 and the black dial on the Appliance Module should be set to a
2. If they are not set correctly, you can reset the dials with a small screw-driver or
coin (anything small enough to fit the slot in the dials).
To control a lamp using the ActiveHome program, follow these steps:
Please read through these installation steps completely before you start to install a
Lamp Module (sold separately).
1. Plug the Lamp Module into a nearby AC outlet. If this outlet is controlled by a
wall switch, make sure the wall switch is turned on.
2. Unplug the lamp from the wall outlet and plug it into a Lamp Module (sold
separately).
3. If you have not already done so, start your ActiveHome Pro software by
double clicking on the ActiveHome Pro icon.
4. Using your mouse, click the switch of "My Lamp Module" as shown on your
computer screen. There may be a delay of one or two seconds from the time
you click the "on screen" module switch and when the light actually turns on.
You can also dim the lamp by moving the slide switch up and down.
Controlling an appliance is just as easy!
Please read through these installation steps completely before you start to install an
Appliance Module (sold separately).
1. Plug the Appliance Module into a nearby AC outlet. If this outlet is controlled
by a wall switch, make sure the wall switch is turned on.

22-2-2008 6P/N#033000=XXXXXX
2. Unplug the appliance from the wall outlet and plug it into an Appliance
Module (sold separately).
3. If your ActiveHome Pro software is not running, start it by double clicking on the
ActiveHome Pro icon.
4. Using your mouse, click the switch of "My Appliance" as shown on your
computer screen. There may be a delay of one or two seconds from the time
you click the "on screen" module switch and when the appliance actually turns
on.
You can schedule each of your Modules to turn on or off any time by clicking on
the small clock at bottom left hand side of your "on screen" modules. If you have
trouble scheduling modules, check the on-line helps for details on how to schedule
events (turning Modules on or off).
You can also define your own automated Macros for the lights and appliances in
your home!
Macros are a useful way to group commands for your X10 modules. If you have
lights and appliance that you frequently use in similar ways, you can easily turn
them into a macro.
Included with your ActiveHome Pro software are two sample macros: My Macro 1
and My Macro 2. These 2 sample Macros show up as "on screen" modules also
Click on the Edit button located on the "on screen" macro to get an idea of what
you can do with macro.
My Macro 1 with House Code/Unit Code of address of A3-On will be executed
when the command A3-On is received.
My Macro 2 with House Code/Unit Code of address A3-Off will be executed when
the command A3-Off is received.
Again, check the on-line helps for details on how setup macro.
Safety Considerations
Remember to exercise good common sense when using ActiveHome Pro --
especially when scheduling unattended devices. There can be some unexpected
consequences if not used with care. For example, an empty coffee pot can be
remotely turned on. If that should happen, your coffee pot could be damaged from
overheating. If an electric heater is turned on by remote control while clothing is
draped over it, a fire could result. USE CAUTION when using the system for the
control of high power heating appliances such as portable heaters.
Technical Data:
AC supply: 230 VAC/50 Hz-30mA
X10 Powerline: 120 KHz/2.5vp-p
RF frequency: 433.92MHz
Backup battery : 6LR61-9Volts DC alkaline battery
Backup time: 1 Week typ.

22-2-2008 7P/N#033000=XXXXXX
Das CM15 ist nur für den Gebrauch im Haus und in trockenen Räumen geeignet.
Benötigt eine Alkali-Batterie 6LR61-9 Volt.
EINLEITUNG
Willkommen in der Welt der Heim-Automatisierung. Sie haben jetzt die Macht, Ihr
ganzes Haus von Ihrem Computer aus zu bedienen! Mit ActiveHome Pro und Ihren
X10 Modulen können Sie Zeitpläne für Ihre Lichter und Geräte erzeugen,
gruppieren Sie Befehle für Ihren täglichen Bedarf und schalten Sie Lichter und
Geräte aus, wenn diese nicht benötigt werden. Benutzen Sie ActiveHome Pro, um
Ihr Heim gemütlicher und sicherer zu machen. Die X10 ActiveHome Pro Software
ermöglicht Ihnen, in Verbindung mit dem Interface, die Steuerung aller Lichter und
X10 ActiveHome Pysteo, um
Xnlie euernur fi344tschaltchri (B. deiLice Hilf Ihren) Tj0 Tc -0.093 Tw ( ) Tj0 -11.04 TD 1-0.006 1.75763343 Twd schalten beiWelt Instungutoonshilf auchomegramm(X10 ActiveHome (Helpgen,) Tj0 Tc 0.027 Tw ( )33 Tj3.84 0 TD 0.012 Tc 0 Tw (-) 5.44 0 TD 098.006 1.7168Tc 0 > RuIhren

22-2-2008 8P/N#033000=XXXXXX
AUSPACKEN IHRES STARTER KITS
Ihr ActiveHome Starter Kit enthält folgende Teile:
Artikel
Software CD Enthält die ActiveHome Programme
Heim-Automatisierungs-Interface CM15 Sendet Befehle an die Lampen-und
Geräte-Module *
USB-Kabel Verbindet Ihren PC mit dem Interface
* Module können enthalten sein oder getrennt gekauft werden, abhängig vom
gekauften Kit
SOFTWARE INSTALLATIONSANLEITUNG
Bitte lesen Sie die vollständigen Installationsschritte, bevor Sie die ActiveHome Pro-
Software installieren.
Installation von CD für Windows XP oder Windows Vista
•Legen Sie die ActiveHome Pro CD in Ihr CD-ROM-Laufwerk.
•Nach ein paar Sekunden sollte die Installation beginnen und das ActiveHome
Pro Setup-Fenster auf Ihrem PC-Bildschirm erscheinen. Die Software-Installation
wird den Treiber für Ihr CM15 Interface und das Haupt-Programm ActiveHome
Pro installieren. Sollte die Installation nicht automatisch starten, so verwenden
sie den Windows Explorer, gehen auf Ihr CD-ROM-Laufwerk und starten Sie das
Programm Setup_ahp_eu_xxx.exe durch einen Doppel-Klick.
•Folgen Sie den Installations-Anweisungen, die auf Ihrem Bildschirm erscheinen.
•Nach Beendigung der Installation, beachten Sie die Hilfe-Datei der
Anwendung für weitere Hilfe.
* wobei xxx die Software-Version bedeutet.
HARDWARE INSTALLATIONSANLEITUNG
Bitte lesen Sie die vollständigen Installationsschritte, BEVOR Sie die ActiveHome
Hardware installieren.
•Stecken Sie das USB-Kabel aus dem ActiveHome Pro Starter Kit in einen freien
USB-Port Ihres PCs.
•Stecken Sie das andere Ende des USB-Kabels in das CM15 Interface.
•Öffnen Sie das Batterie-Fach des CM15 und stecken Sie eine 9 Volt Alkali-
Batterie 6LR61 ein (um die Datum und Uhrzeit bei einem Stromausfall zu
speichern). Beachten Sie die Polarität. Schließen Sie den Deckel des Batterie-
Faches.
•Stecken Sie das CM15 Interface in eine Wandsteckdose in der Nähe Ihres PCs.
•Sobald Sie das Interface anschließen, wird Ihr Computer die neue Hardware
automatisch erkennen und installieren.

22-2-2008 9P/N#033000=XXXXXX
Die computerseitige Hardware-Installation ist nun vorbereitet, um die Lichter und
Geräte in Ihrem Heim zu steuern! Um die Hardware-Installation zu vollenden,
müssen Sie nur noch die Module an die zu steuernden Lichter und Geräte
anschließen.
Wenn Sie das erste Mal ActiveHome Pro starten, wird eine Datei namens
„myhome.ahx“ geladen. „myhome.ahx“ zeigt eine grafische Darstellung eines
Lampen-Moduls, eines Geräte-Moduls und eines Beispiel-Makros. Das Lampen-
Modul heißt „My Lamp Module“ und das Geräte-Modul „My Appliance“.
“My Lamp Module” ist auf Adresse A1 gestellt (Hauscode A, Gerätecode 1, zu
finden auf dem auf dem Bildschirm angezeigten Modul rechts oben). Diese
Einstellung sollte der wirklichen Einstellung des Lampen-Moduls entsprechen, das
Sie installieren. Das Modul kann enthalten sein oder kann getrennt gekauft werden,
abhängig vom gekauften Kit.
Das Modul „My Appliance“ ist auf Hauscode A und Gerätecode 2 eingestellt,
entsprechend dem wirklichen Geräte-Modul, das Sie installieren.
Stellen Sie sicher, dass die Adress-Wahlscheiben auf den Modulen korrekt
eingestellt sind. Die rote Wahlscheibe sollte bei beiden Modulen auf A gestellt sein.
Die schwarze Wahlscheibe sollte bei dem Lampen-Modul auf 1 und auf dem
Geräte-Modul auf 2 stehen. Wenn die Einstellungen nicht richtig sind, so können Sie
diese mit einem kleinen Schraubenzieher oder Münze ändern.
Um eine Lampe mit dem ActiveHome Programm zu steuern, folgen Sie diesen
Schritten:
Bitte lesen Sie diese Installationsanleitung vollständig, bevor Sie ein Lampen-Modul
einbauen (separat erhältlich).
1. Wählen Sie eine in der Nähe stehende Lampe mit einer normalen Glühbirne
und stellen Sie sicher, dass der Ein/Aus-Schalter auf Ein steht.
2. Nehmen Sie den Lampen-Stecker aus der Wandsteckdose und stecken diesen
in das Lampen-Modul (separat erhältlich).
3. Stecken Sie das Lampen-Modul in die Wand-Steckdose. Sollte diese
Wandsteckdose durch einen Wandschalter gesteuert werden, so stellen Sie
diesen auf „Ein“.
4. Falls noch nicht geschehen, starten Sie das ActiveHome Pro Programm durch
einen Doppel-Klick auf das ActiveHome Pro Symbol.
5. Klicken Sie mit Ihrer Maus auf den Schalter des „My Lamp Moduls“ auf Ihrem
Computer-Bildschirm. Es kann eine Verzögerung von 1 bis zwei Sekunden
geben, bis das Licht eingeschaltet wird. Sie können mit dem Regler das Licht
auch heller und dunkler einstellen.
22-2-2008 10 P/N#033000=XXXXXX
Ein Gerät zu steuern ist genauso einfach!
Bitte lesen Sie diese Installationsanleitung vollständig, bevor Sie ein Geräte-Modul
einbauen (separat erhältlich).
1. Wählen Sie ein kleines Gerät aus, z.B. ein Radio und stellen Sie sicher, dass der
Ein/Aus-Schalter eingeschaltet ist.
2. Nehmen Sie den Stecker aus der Wand-Steckdose und stecken Sie ihn in das
Geräte-Modul (separat erhältlich)
3. Stecken Sie das Geräte-Modul in die Wand-Steckdose. Sollte diese Wand-
Steckdose durch einen Wandschalter gesteuert werden, so stellen Sie diesen
auf „Ein“.
4. Falls noch nicht geschehen, starten Sie das ActiveHome Pro Programm durch
einen Doppel-Klick auf das ActiveHome Pro Symbol.
5. Klicken Sie mit Ihrer Maus auf den Schalter des „My Appliance“ auf Ihrem
Computer-Bildschirm. Es kann eine Verzögerung von 1 bis zwei Sekunden
geben, bis das Gerät eingeschaltet wird.
Sie können jedes Ihrer Module zeitlich automatisch ein-und ausschalten, indem Sie
auf die kleine Uhr auf dem jeweiligen auf dem Bildschirm angezeigten Modul
klicken. Sollten Sie Schwierigkeiten haben, Module zeitlich festzulegen, so
verwenden Sie bitte die Online-Hilfe (turning Modules on or off).
Sie können auch Ihre eigenen automatisierten Makros für die Lichter und Geräte in
Ihrem Heim definieren!
Makros sind ein guter Weg, um Befehle für Ihre X10-Module zusammenzufassen.
Wenn Sie Lichter und Geräte häufiger gleichzeitig verwenden, so können Sie dies
einfacher mit einem Makro ausführen.
In Ihrer ActiveHome Pro Software sind zwei Beispiel-Makros: „Sample Macro 1“ und
„Sample Macro 2“. Diese beiden Beispiel-Makros werden auf dem Bildschirm
angezeigt. Klicken Sie auf den Edit-Knopf, um eine Vorstellung zu bekommen, was
mit einem Makro gemacht werden kann.
„Sample Macro 1” mit dem Geräte-Code A3-On wird ausgeführt, sobald der Befehl
A3-An empfangen wird.
„Sample Macro 2” mit dem Geräte-Code A3-Off wird ausgeführt, sobald der
Befehl A3-Aus empfangen wird.
Bitte beachten Sie die Online-Hilfe für nähere Angaben zu der Makro-
Programmierung.

22-2-2008 11 P/N#033000=XXXXXX
Sicherheits-Hinweise
Überlegen Sie gut bei der Verwendung von ActiveHome Pro –insbesondere wenn
Sie unbeobachtete Geräte zeitlich gesteuert bedienen. Es kann zu unerwarteten
Auswirkungen kommen. Z.B. kann eine leere Kaffee-Maschine eingeschaltet und
durch Überhitzung beschädigt werden. Ein elektrisches Heizgerät kann, sollte z.B.
Wäsche darauf liegen, nach dem ferngesteuerten Einschalten überhitzen und
Feuer fangen. SEIEN SIE VORSICHTIG bei der Verwendung dieses Systems um
Heizgeräte zu steuern.
Technische Daten:
Stromversorgung: 230 VAC/50 Hz-30mA
X10 Powerline: 120 KHz/2.5vp-p
Funk-Frequenz: 433.92MHz
Backup-Batterie: 6LR61 9 Volt Alkali-Batterie
Backup-Zeit: 1 Woche

22-2-2008 12 P/N#033000=XXXXXX

22-2-2008 13 P/N#033000=XXXXXX
De CM15 mag alleen binnen gebruikt worden, in een droge ruimte!
Gebruik een goedgekeurde batterij van het type 6LR61-9Volts alkaline.
INTRODUKTIE
Welkom in de wereld van de Home Automation, u kunt nu in uw gehele huis uw
lampen en apparaten bedienen vanaf uw computer!
M.b.v. ActiveHome Pro en uw X10 Modules kunt automatisch op gezette tijden uw
lichten en apparaten in dan wel uit schakelen, met één knop meerder lichten en
apparaten schakelen of deze uitschakelen wanneer ze niet meer gebruikt worden.
Kortom, met ActiveHome Pro en X10 wordt uw huis comfortabeler en veiliger.
Deze installatie handleiding vertelt u hoe de ActiveHome Pro software
geïnstalleerd dient te worden op uw computer.
U kunt deze handleiding gebruiken als een hulpmiddel om op weg te komen,
maar vergeet niet ook de ‘Intro Wizard’ (Help àRun Intro Wizard) te doorlopen en
lees de help informatie door wanneer de installatie van de software afgerond is.
Controllers en Modules
Er zijn twee verschillende componenten nodig om uw huis te kunnen
automatiseren –controllers en modules. Elke lamp of apparaat dat u wil bedienen
dient in een module gestoken te zijn, welke vervolgens in een standaard
stopcontact gestoken dient te worden. Deze modules ontvangen hun
commando`s van een controller. Enkele voorbeelden van modules zijn
lampmodules, apparaatmodules en inbouwmodules.
De CM15 interface is een controller: controllers worden net als modules in een
standaard stopcontact gestoken en zendt zijn commando`s over de bestaande
bekabeling in uw huis zonder uw elektriciteit te beïnvloeden.
Daarnaast is de CM15 ook een zender/ontvanger: wanneer een commando
ontvangen wordt van b.v. een afstandbediening worden deze draadloze signalen
omgezet naar digitale signalen op de bestaande bekabeling van het stopcontact
waarmee vervolgens de diverse modules geschakeld kunnen worden.
De CM15 interface wordt met uw computer verbonden d.m.v. de USB poort en
aan de andere kant wordt de interface via een stekker in het stopcontact
gestoken.
De ActiveHome Pro software verteld de CM15 interface welke commando`s
gegeven dienen te worden, deze commando`s worden via het stopcontact naar
de desbetreffende modules gestuurd. De modules ontvangen deze commando`s
en voeren ze vervolgens uit.
Met de ActiveHome Pro Home Automation Interface en software wordt uw PC een
uitermate intelligente controller voor al uw Home Automation taken!

22-2-2008 14 P/N#033000=XXXXXX
Uw ActiveHome Pro Start Pakket
Uw Active Home start pakket bevat de volgende onderdelen:
Item
Software CD Bevat ActiveHome programma
Home Automation Interface CM15 Zend commando`s naar de
Lamp/Apparaat Modules*
USB Kabel Verbind uw PC met de Interface
* (Modules kunnen in het pakket aanwezig zijn of worden afzonderlijk verkocht.
Afhankelijk van welk pakket u aangeschaft heeft).
SOFTWARE INSTALLATIE INSTRUCTIES
Leest u aub onderstaande stappen aandachtig door voor u de ActiveHome Pro
software installeert.
Installatie van CD ROM voor Windows XP of Windows Vista
Stop de ActiveHome Pro CD in u CD ROM drive.
•Na een aantal ogenblikken zal de installatie uit zichzelf starten en zal het
ActiveHome Pro Setup scherm op uw monitor verschijnen. De software zal nu
het ActiveHome Pro programma alsmede de besturing software voor uw CM15
interface installeren. Mocht het installatie proces niet uit zichzelf starten, dan
kunt u dit handmatig doen door via Windows Explorer naar uw CD-Rom drive
te gaan en vervolgens te dubbelklikken op Setup_ahp_eu_xxx.exe*.
•Volg nu de installatie instructies die op u scherm verschijnen.
•Wanneer de installatie is afgerond, kunt u voor meer informatie de helpfile
raadplegen.
* xxx is de versie van de software.
HARDWARE INSTALLATIE INSTRUCTIES
Leest u aub de onderstaande installatie instructies nauwkeurig door voor u met de
installatie start.
•Steek de bij geleverde USB kabel in een vrije USB poort van u PC
•Steek de andere zijde van deze USB kabel in de CM15 interface.
•Open het batterij compartiment en plaats een 6LR61-9Volts alkaline batterij
(deze batterij is bedoeld om de datum en tijd te bewaren in geval van een
stroom uitval). Let op de polariteit. En sluit het deksel.
•Steek de stekker van de CM15 interface in een stopcontact in de buurt van uw
PC.
•Wanneer de interface op de juiste manier is verbonden, zal uw PC de nieuwe
hardware automatisch herkennen en installeren.

22-2-2008 15 P/N#033000=XXXXXX
Het computer deel van uw hardware is nu klaar om de lampen en apparaten in u
huis te kunnen bedienen! Om de installatie van uw hardware af te ronden dienen
nu de modules die u wenst te bedienen geïnstalleerd te worden.
De eerste keer dat ActiveHome Pro gestart wordt, zal een bestand geladen
worden met de naam "MYHOME.AHX". In "MYHOME.AHX" zullen de volgende
objecten aanwezig zijn, een lamp module, apparaat module en twee voorbeeld
macro`s. De Lamp Module heet “My Lamp” en de apparaat module heet “My
Appliance”.
“My Lamp” heeft als standaard adres A1 (Huiscode ‘A’, Unit Code 1 zoals op het
computerscherm te zien is in de rechter bovenhoek van de module). Dit zou
overeen moeten komen met de instelling op de fysieke Lamp Module die u heeft
geïnstalleerd (Modules kunnen in het pakket aanwezig zijn of worden afzonderlijk
verkocht. Afhankelijk van het door u aangeschafte pakket).
De “My Appliance” module heeft als Huiscode ‘A’ en Unit Code ‘2’ welke overeen
moet komen met de fysieke apparaat module. (apparaat modules worden
afzonderlijk verkocht)
Let erop dat de adressen van de modules juist zijn. Het rode codewiel zou als adres
‘A’ geconfigureerd moeten zijn, het zwarte codewiel zou bij de lamp module op 1
moeten staan en bij de apparaat module op 2. Wanneer deze niet juist
geconfigureerd zijn kunt deze veranderen door met een kleine schroevendraaier
of ander klein voorwerp het codewiel naar de juiste positie te draaien.
Om een lamp via het ActiveHome Pro programma aan te sturen dienen de
volgende stappen uitgevoerd worden:
Leest u aub de onderstaande stappen aandachtig door voor u start met de
installatie van de Lamp Module. (Modules kunnen in het pakket aanwezig zijn of
worden afzonderlijk verkocht. Afhankelijk van het door u aangeschafte pakket)
1. Selecteer een lamp dichtbij uw computer in de buurt, let erop dat het een
standaard gloeilamp is, en zorg ervoor dat de schakelaar aan geschakeld is.
2. Neem de stekker uit het stopcontact en steek deze in de Lamp Module.
3. Steek deze Lamp Module vervolgens in het stopcontact.
4. Start nu de ActiveHome Pro software door op het ActiveHome Pro icoon te
dubbelklikken.
5. Schakel nu de lamp aan door op de schakelaar in uw computerscherm te
klikken. Er kan een vertraging van enkele seconden tussen het commando en
het werkelijk aanschakelen van de lamp zitten.
U kan de lamp dimmen door de schuif op en neer te bewegen.

22-2-2008 16 P/N#033000=XXXXXX
Een apparaat schakelen is net zo makkelijk!
Leest u aub de onderstaande stappen aandachtig door voor u start met de
installatie van de Apparaat Module. (Optioneel verkrijgbaar)
1. Selecteer een klein apparaat, zoals b.v. een koffiezetapparaat, en zorg
ervoor dat het apparaat aan staat.
2. Neem de stekker uit het stopcontact en steek deze in de apparaat Module.
(Optioneel verkrijgbaar)
3. Steek deze Apparaat Module vervolgens in het stopcontact.
4. Start nu de ActiveHome Pro software door te dubbelklikken op het
ActiveHome Pro icoon.
5. Schakel nu het apparaat aan door op de schakelaar in uw computerscherm
te klikken. Er kan een vertraging van enkele seconden tussen het commando
en het werkelijk aanschakelen van de apparaat zitten.
Voor elke module kan een tijd ingesteld worden waarop deze automatisch aan
dan wel uitgeschakeld kan worden, dit kunt u doen door te klikken op het kleine
klokje in de linker onderhoek van de modules op uw computer scherm.
Mocht u problemen hebben met deze functie kunt u extra informatie vinden in het
on-line help menu (turning Modules on or off).
Daarnaast kunt u Macro`s defineren om uw lichten en apparaten te schakelen!
Marco`s zijn erg handig om meerdere X10 modules op hetzelfde moment
gezamenlijk aan te sturen. Als u b.v. lichten en/of apparaten hebt die u altijd op
dezelfde manier of volgorde bediend, kunt u deze commando`s samenvoegen in
een Macro.
In de ActiveHome Pro software zijn twee voorbeeld Macro`s opgenomen: “My
Macro 1” en “My Macro 2”. Deze 2 Macro`s zijn op uw scherm te zien als
“modules”, u kunt op de knop “Edit” in de rechter onder hoek van deze module
klikken om een idee te krijgen wat een Macro zoal in zou kunnen houden.
My Macro 1, met Huis en Unit code A3 zal uitgevoerd worden als het commando
A3-ON ontvangen wordt.
My Macro 2, met Huis en Unit code A4 zal uitgevoerd worden als het commando
A4-ON ontvangen wordt.
Wederom, mocht u problemen ondervinden tijdens het configureren van Macro`s
kunt u de online help raadplegen voor meerdere informatie.
Technische Data:
Voeding: 230 VAC/50 Hz-30mA
X10 Powerline Carrier: 120 KHz/2.5vp-p
RF frequency: 433.92MHz
Backup batterij : 6LR61-9Volts alkaline battery
Backup tijd: 1 Week typ

22-2-2008 17 P/N#033000=XXXXXX
OBS! CM15 kan endast användas inomhus och i torra utrymmen.
Använd endast 6LR61-9volts alkaliska batterier.
INTRODUKTION
Välkommen till Hem Automationens värld. Du har nu kraften att kontrollera hela ditt
hem från din dator!
Med ActiveHome Pro och dina X10 moduler kan du skapa schemalagda
händelser för din belysning och din kringutrustning, konfigurera grupper av
kommandon för din vardag, och hålla ljus och kringutrustning av stängt när det ej
används. Använd ActiveHome Pro till att göra din vardag mer komfortable och
mer säker. X10 ActiveHome Pro mjukvaran i samband med interfacet låter dig
kontrollera ljus och din kringutrustning i ditt hem när du använder X10 moduler.
Denna installationsguide förklarar hur du installerar ditt ActiveHome Pro system.
Använd guiden till att komma igång men glöm inte att köra ”Intro Wizard” (Hjälp à
Kör Intro Wizard) och läs Hjälp informations filen när installationen är klar.
Kontrollers och Moduler
För att kunna kontrollera ditt hem måste du två olika produkter –Kontrollers och
Moduler.
Den belysning eller utrustning som du vill kontrollera måste vara ansluten till en
Modul och Modulen måste vara ansluten till ett standard 230Volts vägguttag.
Modulerna tar emot kommandon från Kontroller. Exempel på Moduler är: Lamp-
Modul och Vägg switch-Modul.
CM15 interfacet är en Kontroller. Kontrollern är även den ansluten till ett standard
230Volts vägguttag, och sänder kommandon till Moduler anslutna i det befintliga
elnätet i ditt hem, utan att påverka övrig elutrustning på något sätt.
CM15 är även en transciver: När den tar emot ett kommandon från en strådlös
fjärrkontroll sänder den digitala signaler över ditt befintliga elnät i ditt hem till de
anslutna Modulerna som utför kommandona.
CM15 interfacet ansluts med USB till din PC och till ett standard 230Vols vägguttag.
ActiveHome Pro mjukvaran talar om för interfacet vad det skall göra. CM15
interfacet sänder den digitala signaler över ditt befintliga elnät i ditt hem till de
anslutna Modulerna som utför kommandona. Med ActiveHome Pro Automations
Interface och mjukvaran blir din PC en intelligent Kontroller för alla dina hem
automations uppgifter.
PACKA UPP DITT START KIT
Ditt ActiveHome start kit innehåller följande delar:
Mjukvaru CD Innehåller ActiveHome program.
Hem Automations Interface CM15 Sänder kommandon till Lamp/Tillbehörs
Moduler*
USB Kabel Ansluter din PC till Interfacet.
*(Moduler kan vara inkluderade eller säljs separat beroende på vilket kit du köper)

22-2-2008 18 P/N#033000=XXXXXX
MJUKVARU INSTALLATIONS INSTRUKTIONER
OBS! Läs igenom följande installations steg fullständigt INNAN du börjar installera
din ActiveHome Pro mjukvara.
Installera från CD-ROM för Windows XP eller Windows Vista.
•Sätt in din ActiveHome Pro CD i din CD-ROM drive.
•Efter ett par sekunder skall installationen starta och ActiveHome Pro
installations fönster visar sig på skärmen. Mjukvaran installerar drivrutiner för ditt
CM15 Interface och ActiveHome Pro applikationen. Om inte installationen
startar automatiskt, öppna CD-Rom driven i Utforskaren och dubbel-klicka på
Setup_ahp_eu_xxx.exe*.
•Följ installations instruktionerna på skärmen.
•När installationen är klar, läs Hjälp filen i applikationen för ytterligare hjälp.
*xxx = mjukvaru versionen.
HÅRDVARU INSTALLATIONS INSTRUKTIONER
OBS! Läs igenom följande installations steg fullständigt INNAN du börjar installera
din ActiveHome hårdvara.
•Anslut USB kabeln som med följer i ditt ActiveHome Pro start Kit till en ledig USB
port på din PC.
•Anslut andra änden av USB kabeln till CM15 interfacet.
•Öppna batteri paketet och montera 1st 6LR61-9Volts alkaliskt batteri (batteriet
är till för att hålla klock och kalender data i modulen även vid ström bortfall)
Kontrollera polariteten. Åter montera locket.
•Anslut CM15 interfacet till ett 230Volts vägguttag nära din PC.
•När du ansluter Interfacet till din PC detekteras och installeras drivrutinerna
automatiskt.
Din PC är nu installerad att kontrollera belysning och tillbehör i ditt hem! För att
färdigställa din hårdvaru installation behöver du installera Moduler för det du vill
kontrollera.
Första gången du kör ActiveHome Pro kommer den att ladda en fil som heter
”MYHOME.AHX”. ”MYHOME.AHX” en grafisk presentation av alla dina belysningar
och tillbehörs Moduler även ett exempel Macro. Lamp Modulen döps till ”My Lamp
Module” och Tillbehörs Modulen ”My Appliance”.
”My Lamp Module” på skärmen är konfigurerad till ”Housecode A och Unit Code
1” placerat i nederkant centerat på Modulen på skärmen. Denna inställning skall
svara på retur kommandon från den fysiska ”Lamp Modulen som är installerad.
(Modulen kan vara inkluderade eller säljs separat beroende på vilket kit du köper).

22-2-2008 19 P/N#033000=XXXXXX
”My Appliance” på skärmen är konfigurerad till ”Housecode A och Unit Code 2”
för att svara på retur kommandon från den fysiska Tillbehörs Modulen som är
installerad (Tillbehörs Modulen säljes separat).
Kontrollera att Adress Visarna på fronten av Modulerna är rätt inställda. Den röda
visaren skall stå på A på båda Modulerna. Den svarta visaren på Lamp Modulen
skall stå på 1 och den svarta visaren på Tillbehörs Modulen skall stå på 2. Om
visarna inte är rätt konfigurerade kan dom justeras med en liten skruvmejsel eller ett
mynt (eller något tillräckligt litet så att det passar i spåren på visarna).
För att kontrollera en belysning med ActiveHome programmet, följ följande steg:
OBS! Läs igenom följande installations steg fullständigt INNAN du börjar installera
din Lamp Modul. (säljes separate)
1. Välj en belysning nära dig, en belysning med en standard GLÖD-LAMPA
monterad. Kontrollera att av/på brytaren står i på-läge.
2. Koppla ur belysningen ur vägguttaget och anslut den i Lamp Modulen.
3. Koppla Lamp Modulen till ett närbeläget 230Volts vägguttag, om vägguttaget
är kontrollerat med en strömbrytare, se till att den stå i ”på” läge.
4. Om du inte rdan gjort det, starta din ActiveHome Pro mjukvara genom att
dubbel klicka på ActiveHome Pro ikonen.
Använd musen, klicka på brytaren för ”My Lamp Module” som visas på skärmen.
Det kan vara en fördröjning på 1-2 sekunder från det att du klickat på Modulen till
dess att belysningen verkligen tänds. Du kan också dimmra din belysning upp och
ner genom att dra sliden brytaren upp och ner.
Kontrollera dina tillbehör är presic lika enkelt!
OBS! Läs igenom följande installations steg fullständigt INNAN du börjar installera
din Tillbehörs Modul. (säljes separate)
1. Välj ett litet tillbehör, exempelvis en 230Volts driven RADIO, kontrollera att
av/på brytaren står i ”på” läge.
2. Koppla ur den ur vägguttaget och koppla den till Tillbehörs Modulen.
3. Koppla Tillbehörs Modulen till ett närbeläget 230Volts vägguttag, om
vägguttaget är kontrollerat med en strömbrytare, se till att den stå i ”på” läge.
4. If your ActiveHome Pro software is not running, start it by double clicking on the
ActiveHome Pro icon.
5. Använd musen, klicka på brytaren för ”My Appliance Module” som visas på
skärmen. Det kan vara en fördröjning på 1-2 sekunder från det att du klickat på
Modulen till dess att tillbehöret slås ”på”.
Du kan schema lägga varje Modul att slå av eller på vilken tid som helst genom att
klicka på den lilla klockan i nedre vänsta delen på Modulen som visas på skärmen.
Om du har problem att schema lägga händelser kontrollera med ”OnLine hjälpen”
hur detta skall göras.
Du kan även definiera automatiska Macron för belysnings styrningen i ditt hem!

22-2-2008 20 P/N#033000=XXXXXX
Macros är användbara för att gruppera styrningen av dina X10 Moduler. Om du
har Belysning och Tillbehör som du använder frekvent kan du enkelt konfigurera
dem till ett Macro.
Inkluderat i ditt ActiveHome Pro mjukvara finns 2st exempel Macron: Sample Macro
1 och Sample Macro 2.
Dessa 2 macro visas på skärmen som moduler, klicka på Edit knappen på modulen
på skärmen för att få en idé på vad du kan göra med macron.
Exempel Macro 1 har House Code/Unit Code med adresserna A3-On då kommer
dessa kommandon att utföras när kommando A3-On är mottaget.
Exempel Macro 2 har House Code/Unit Code med adresserna A3-Off då kommer
dessa kommandon att utföras när kommando A3-Off är mottaget.
Glöm ej att kontrollera ”on-line” hjälpen för mer detaljer om konfigurering av
macron.
Säkerhets överväganden!
Kom ihåg att alltid bruka sunt förnuft när du använder ActiveHome Pro –särskilt när
du schema lägger obevakade enheter.
Det kan bli oönskade konsekvenser om inte försiktighets vid tas. Exempel en tom
kaffe-bryggare kan blir på slagen, om detta skulle hända kan kaffe-bryggaren ta
skada av överhettning. Om en elektrisk värme fläkt slås på och den är över täckt
kan det orsaka en brand.
VA FÖRSIKTIG när utrustningen används för att slå på en elektrisk utrustning med
hör effekt som t.ex. en värme fläkt.
Teknisk Data:
Nätspänning: 230Volt AC/50 Hz-30mA
X10 Powerline: 120 KHz/2.5vp-p
RF frekvens: 433.92MHz
Backup batteri: 6LR61-9Volts alkaliskt batteri
Backup tid: 1 vecka ca.
Table of contents
Languages:
Other X10 Home Automation manuals

X10
X10 Stick-A-Switch Model SS15A User manual

X10
X10 HR10 User manual

X10
X10 UM506 User manual

X10
X10 RR501 User manual

X10
X10 CK11A User manual

X10
X10 HK10A SUPERREMOTE User manual

X10
X10 KR22A User manual

X10
X10 Mini Controller User manual

X10
X10 CM15A User manual

X10
X10 Stick-A-Switch Model SS13A User manual