XCHARGE C2EU User manual

Copyright | C2EU Software Service Manual, Version 1.0.0
C2EU Service Manual
--------Software--------

Copyright | C2EU Software Service Manual, Version 1.0.0
Revision
Version
Name
Update
date
UPV1.0.0
Yi Han
C2EU application program update, ADB
introduction, OCPP backend related
configuration, local white list
19.07.2019
UPV1.0.0
Liweilan Ma
Double check contents
22.07.2019

Copyright | C2EU Software Service Manual, Version 1.0.0
Content
1. ADB tool introduction..............................................................................................................1
2. Application software update ...................................................................................................3
3. Driver software update............................................................................................................4
4. Connection with OCPP backend...............................................................................................4
4.1 Communication Protocol Settings......................................................................................4
4.2 APN Settings......................................................................................................................4
4.3 Update of APN list file........................................................................................................5
4.4 Update of the OCPP configuration file ...............................................................................5
5. Get log file...............................................................................................................................6
6. Local list for authentication .....................................................................................................6
6.1 Search and edit Local whitelist...........................................................................................6
6.2 Add the card to local whitelist ...........................................................................................7
6.3 Add the card to blacklist ....................................................................................................7

1
Copyright | C2EU Software Service Manual, Version 1.0.0
1. ADB tool introduction
ADB tool is used to conduct the application software update. One Micro USB cable is needed to
connect laptop with C2EU.
Figure 1.1 Micro USB cable
Figure 1.2 A8 board
After the connection with laptop, you can open the ADB tool in laptop. You can use this ADB
tool in Windows systems. Uncompressing and open the file, operate adb.exe and then open
1.bat.
Through Micro USB connected to laptop
SIM card slot
LAN cable connection
Connector for the input AC power cable
USB port for the wired mouse

2
Copyright | C2EU Software Service Manual, Version 1.0.0
Figure 1.3
Then you will see this window below:
Figure 1.4
Type in the command " adb remount" and press “enter”:
Figure 1.5
Note:
If you want to restart the charger, please disconnect the micro USB cable from your computer.
After you have disconnected, connect laptop with C2EU again and use the command “adb
remount”to ensure the connection is working.

3
Copyright | C2EU Software Service Manual, Version 1.0.0
2. Application software update
If you wish to update your firmware, please follow these steps:
1) Press the home button for 5 seconds to assess the current firmware version, for
example here the current version is 2.2.08.04.ocpp(de).
Figure 2.1 Screenshot for the version displayed on C2EU
2) Then open the ADB tool like shown in 1. Part. After “adb remount”we can start to push the
apk file through operating command " adb
push C:\Users\admin\Desktop\xcharger.apk /system/app"
Note:
C:\Users\admin\Desktop\xcharger.apk is the local address of apk file in your computer that
you received from XCharge, /system/app is the target address in C2EU for apk file, please do
not change it for such updates. Here is just an example, be careful with the space in command.
Figure 2.2
3) If you see "xxxx KB/s (xxxxxxx bytes in xxxxs)", it means that you have successfully pushed the
apk file to C2EU.
4) After successful pushing, you can check the firmware version by pushing the home
button for 5 seconds and see whether the version has been updated.

4
Copyright | C2EU Software Service Manual, Version 1.0.0
3. Driver software update
When it’s needed to upgrade the driver software in C2EU, please follow the steps below:
1) Receive the new version of driver software -update.zip and command- from XCharge.
2) Then open the ADB tool like shown in 1. Part. After adb remount execute command " adb
push C:\Users\admin\Desktop\command /cache/recovery/command".
3) Execute command " adb
push C:\Users\admin\Desktop\update.zip /cache/recovery/update.zip".
4) Execute command
“
adb shell”.
5) Execute “reboot recovery” and then C2EU will restart automatically to finish the update.
Note:
C:\Users\admin\Desktop\........ is the local address of file in your computer that you received
from XCharge, /cache/recovery/…… is the target address in C2EU for corresponding file, please
do not change its name for such updates. Here is just an example, be careful of the space in
command.
4. Connection with OCPP backend
4.1 Communication Protocol Settings
1) Connecting a wired mouse to the charging station.
2) Clicking with the left mouse button on the logo area in the upper part of the
screen to get to the configuration page.
3) Select "Protocol setting", select the desired protocol, e.g. OCPP, and fill out the
required information about URL, model and vendor. Click "save and reboot" to
save changes.
4.2 APN Settings
1) Turn on the C2EU to check the icon at the top of the screen. If this icon appears, it
means that there is no internet connection.
2) In the state of no internet connection, press the button at the bottom of the screen for 5
seconds, then a window will pop up. In the third line, the status of the current communication
module is shown. A sim status value of "absent" indicates that the SIM card is not detected.

5
Copyright | C2EU Software Service Manual, Version 1.0.0
Check whether the SIM is inserted correctly. (The SIM card should be inserted with the chip side
down)
3) Set up the APN configuration by:
a. Connecting a wired mouse to the charging station.
b. Clicking with the left mouse button on the logo area in the upper part of the screen to get to
the configuration page.
c. Select "APN setting" and fill out the required information about carrier, mcc, mnc, apn, user
and password. Click "Modify" to save changes.
4) Insert the SIM card and see whether the internet connection is successful.
4.3 Update of APN list file
If needed, you might upgrade the APN list of C2EU.
1) Please connect C2EU with laptop using a Micro USB cable and initialize the ADB tool;
2) Execute “adb shell”;
3) Then “cd /data/data/com.android.providers.telephony/databases”;
4) Execute “ls”;
5) Execute “rm telephony.db” to delete the telephony.db file;
6) Execute “rm telephony.db-journal” to delete the telephony.db-journal file;
7) Execute “ls” again and check whether there are no files under the folder “databases”;
8) Execute “exit”;
9) Execute command “adb push C:\Users\admin\Desktop\apns-conf.xml /system/etc and
enter;
(C:\Users\admin\Desktop\apns-conf.xml is the local path of apns-conf.xml file in the laptop,
/system/etc is the target address in C6EU. The file apns-conf.xml would be sent by XCharge)
10) After pushing, please restart the charger and then the new APN list will be available.
4.4 Update of the OCPP configuration file
1) Please connect C2EU with laptop using a Micro USB cable and initialize the ADB tool;
2) Receive the “ocpp_cfg.json” file from XCharge;
3) Execute “adb push C:\Users\admin\Desktop\ocpp_cfg.json
/data/data/com.xcharge.charger/files/ocpp_cfg.json” to push the OCPP configuration file to
the charger (C:\Users\admin\Desktop\ ocpp_cfg.json is the local path of ocpp_cfg.json file in
laptop, /system/etc is the target address in C2EU);

6
Copyright | C2EU Software Service Manual, Version 1.0.0
4) Restart the charging station to make the configuration to take effect.
5. Get log file
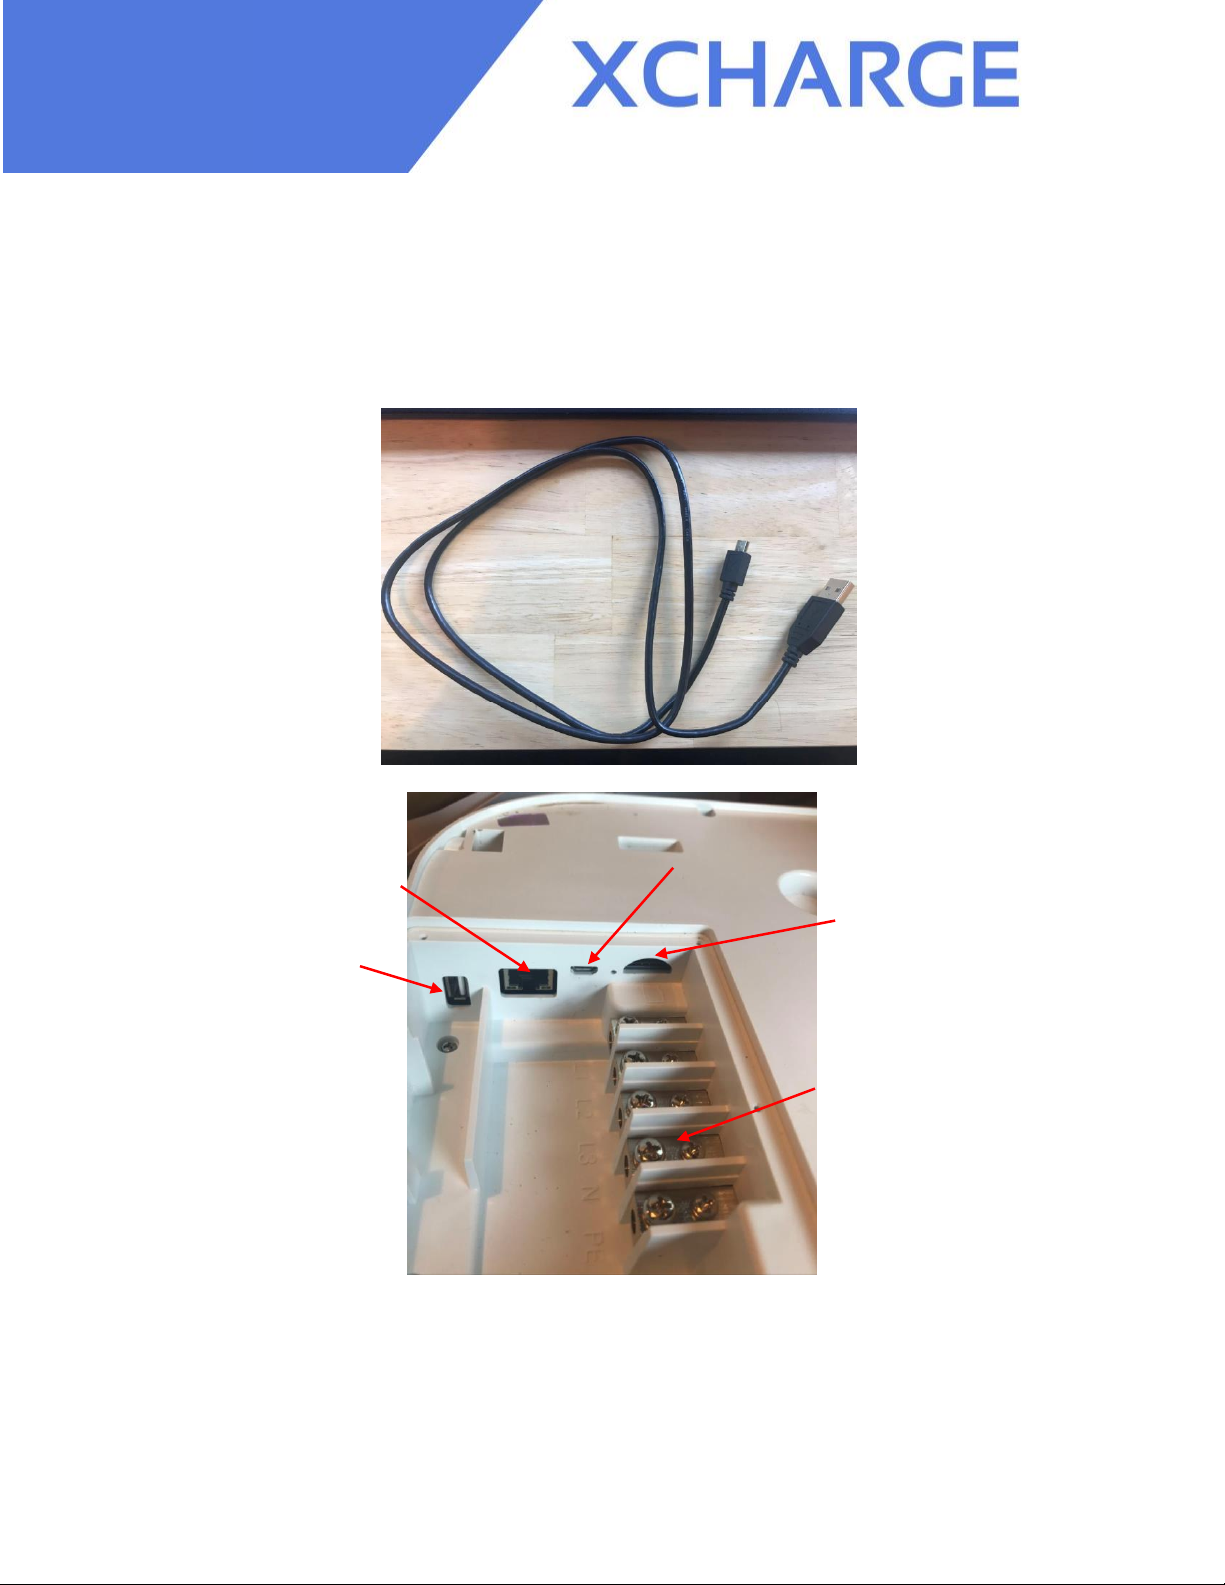
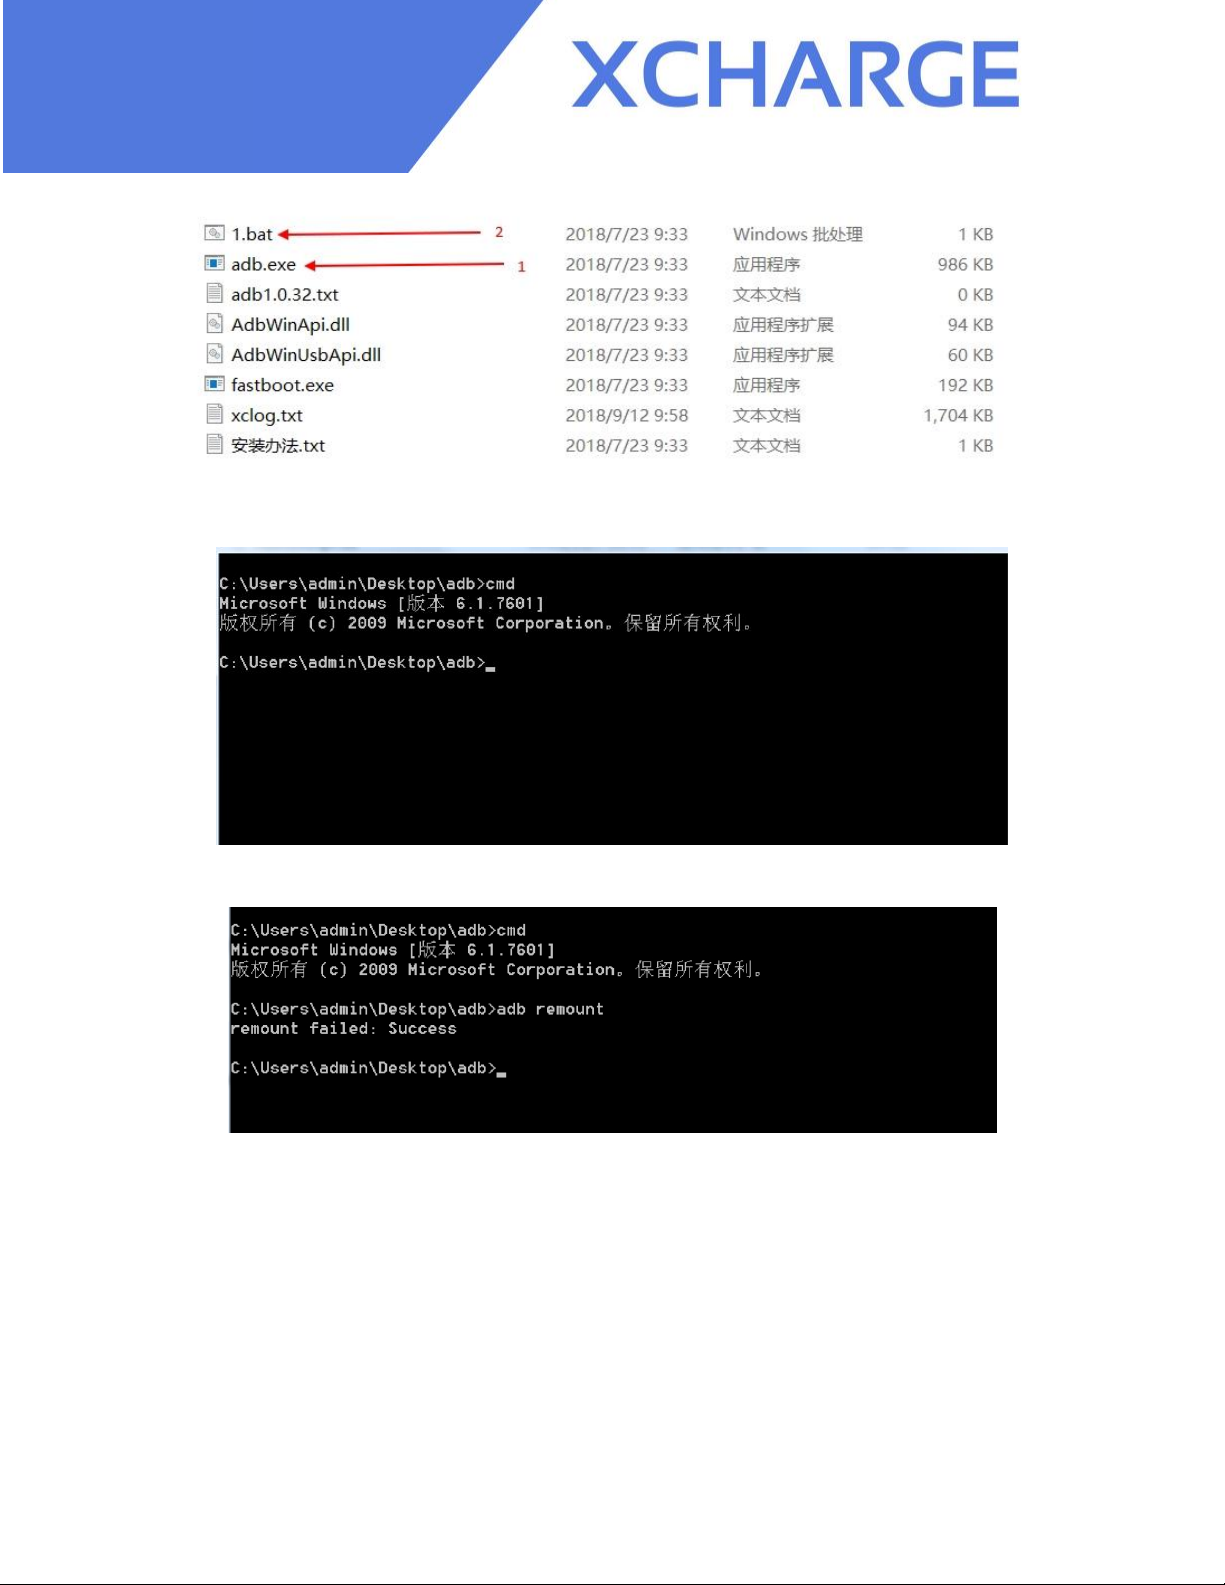
1) Please connect A8 board with laptop through Mini USB cable and then open the ADB tool.
2) Execute command “adb pull /data/data/com.xcharge.charger/logs/charger_app.log
C:\Users\admin\Deskop” and press “enter”.
Note:
/data/data/com.xcharge.charger/logs/charger_app.log is the address where the log file
“charger_app.log” in C2EU is.
The file “charger_app.log” is the newest log written in the charger and is max. 512KB. If you
need older logs, please try “charger_app.log.x”, “x” is a number between 1 and 10 (for example
“charger_app.log.10” is the oldest log in charger).
C:\Users\admin\Deskop is the local address in laptop where the log file will be stored. It can be
selected by yourself and after the successful pulling you can find the log file on this address in
laptop.
Please note that the phrases in green below are the comments for the command.
6. Local list for authentication
6.1 Search and edit Local whitelist
1) Connect the C2EU through Micro USB with your laptop. Open the ADB tool and execute adb
remount and then adb shell;
2) Execute sqlite3 /data/data/com.xcharge.charger/databases/content.db;
3) Execute .table; ##search all the table in databank
4) Execute select * from table name; ##select the table you want, please replace the table name
with the real name like below:
for example:select * from tb_auth_info;
5) Execute insert into table name(field name) values(values); ##insert data
for example:insert into tb_auth_info(_id,idTag,expiryDate,parenIdTag,status)
values(1,'123','2018-10-24'T'14:40:40+01:00','456','Accepted');
Note: form of parameter "expiryDate": yyyy-MM-dd'T'HH:mm:ss+00:00
values of status: "Accepted", "Blocked", "Expired", "Invalid", "ConcurrentTx".

7
Copyright | C2EU Software Service Manual, Version 1.0.0
"expiryDate" and "parenIdTag" can be empty.
6) Execute update Table name set field name=new value where field name=old value; ##data
update
for example:update tb_auth_info set status='Invalid' where _id=1;
If you want to update more values for a single time (note: please use comma to separate
different values):
for example:update tb_auth_info set parenIdTag='123',status='Invalid' where _id=1;
7) Execute delete from table name where field name=value; ##delete the data
for example:delete from tb_auth_info where _id=1;
other operations:
to show the field name: .header on
Note:
At the end of each command, add a semicolon (command separator).
6.2 Add the card to local whitelist
1) Connect C2EU through Micro USB with laptop. Open ADB tool and execute adb remount
2) Execute adb shell sqlite3 /data/data/com.xcharge.charger/databases/content.db;
3) Execute select count(*) from tb_auth_info; ##get the number of all data in table N
4) Execute insert into tb_auth_info(_id,idTag,status) values(N+1,'card ID','Accepted'); ##insert
the card ID into N+1 line
6.3 Add the card to blacklist
1) Connect C2EU through Micro USB with laptop. Open ADB tool and execute adb remount
2) Execute adb shell sqlite3 /data/data/com.xcharge.charger/databases/content.db;
3) Execute select count(*) from tb_auth_info; ##get the number of all data in table N
4) Execute insert into tb_auth_info(_id,idTag,status) values(N+1,'card ID','Invalid'); ##insert
the card ID into N+1 line
5) Execute update tb_auth_info set status='Invalid' where _id=N+1; ##When die ID exists in
datebank, just use the data update command to set it invalid
Table of contents
Other XCHARGE Batteries Charger manuals
Popular Batteries Charger manuals by other brands

Choetech
Choetech Magnetic Leap Duo 3-in-1 user manual

Stateurop
Stateurop Motorline MX14 quick start guide

MW POWER
MW POWER MW-SC6B user manual

DT Research
DT Research ACC-001-33THK Basic operation guide

NVision
NVision Multi Chemistry 50W instruction manual

Lutron Electronics
Lutron Electronics seeTouch SO Series installation guide

Chargetek
Chargetek RTIC-1120-FC installation manual

efacec
efacec EFAPOWER EV PC G2 Installation and user manual

Snap-On
Snap-On BATTERY CHARGER PLUS manual

William Sound
William Sound CHG 408 installation instructions

Hitachi
Hitachi UC 7SB Handling instructions

Blueshape
Blueshape CVTR2P operating instructions