XiteSolutions XSG3NA-MB9 User manual

XiteSolutions North America Inc.
1
XSG3NA-MB9
INFOTAINMENT CENTER
Owner’s Manual

Disclaimer
XiteSolutions North America Inc.
2
Before using this product, please read this manual fully to ensure correct operation.
Keep the manual at hand for future reference.

Content
XiteSolutions North America Inc.
3
Content.…………………………………………………..…………………3
Disclaimer……………………………………………………………. 2, 4-6
1. Features………………………………………………………………….7
2. Display……………..……………………………………………….........8
2.1 Monitor Display……….....…………………………………………8-9
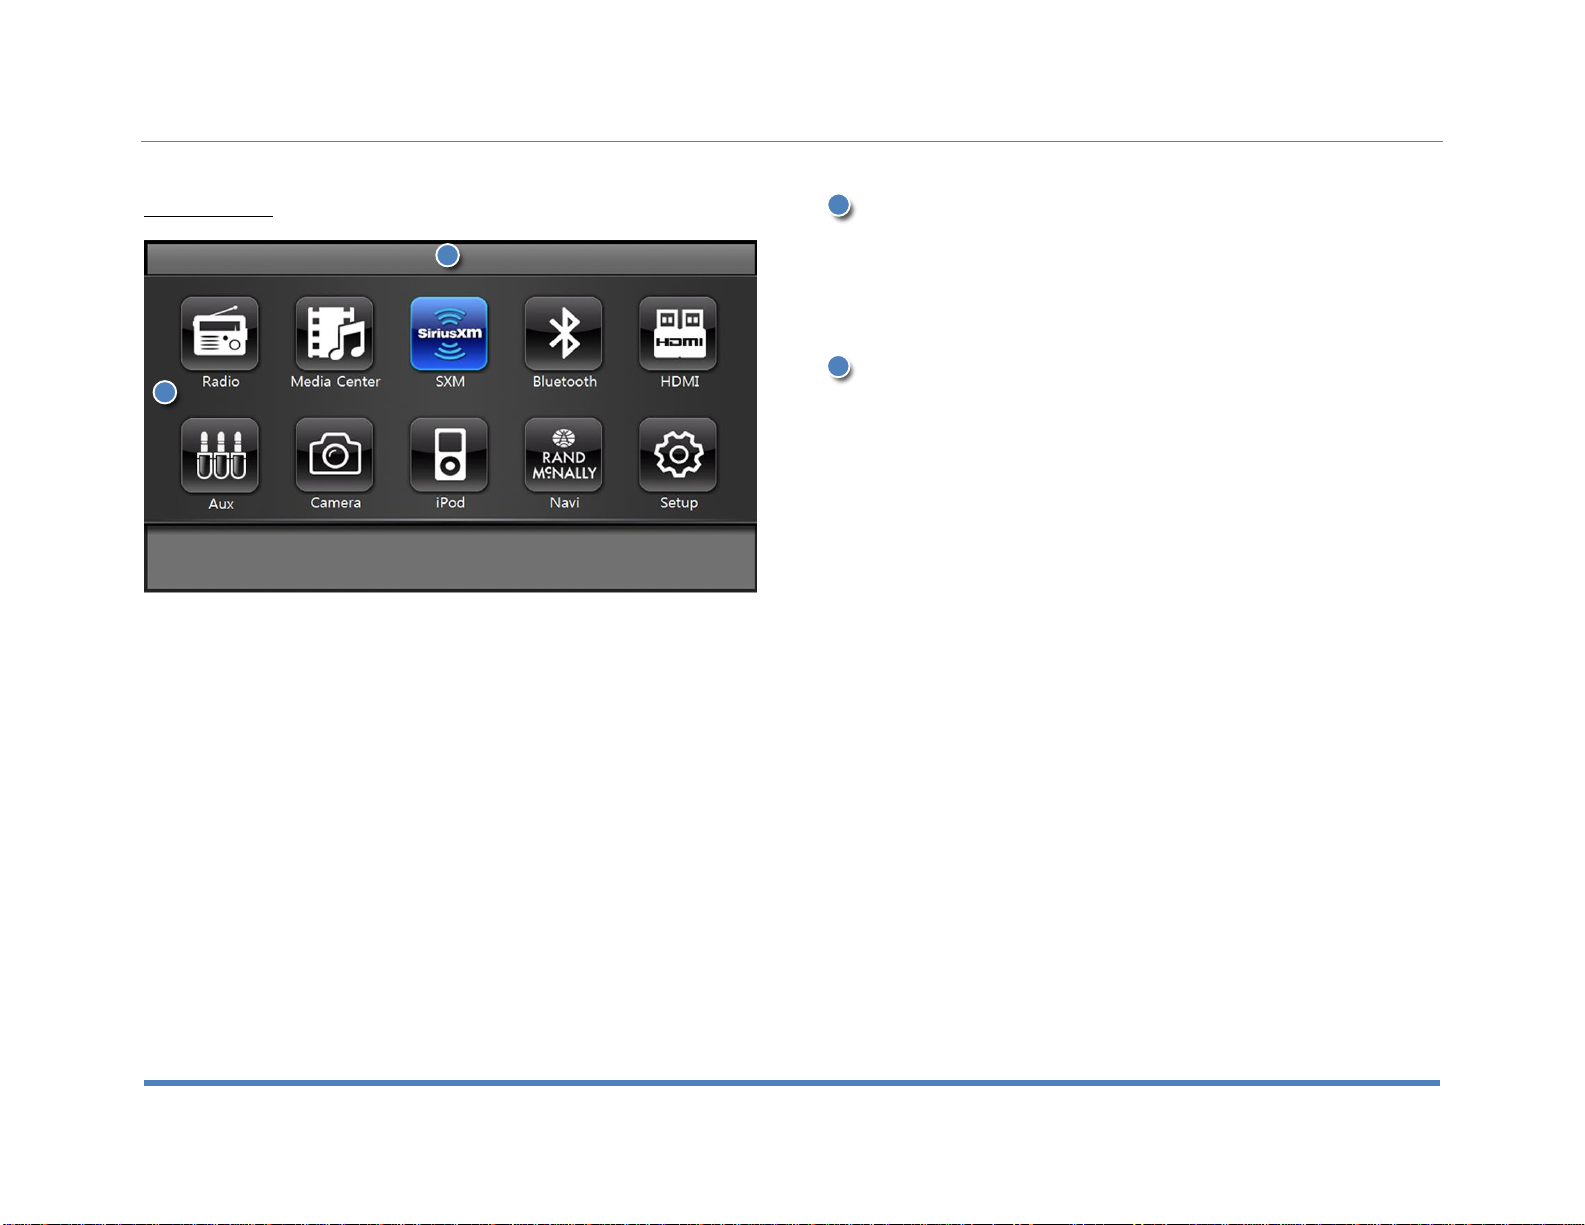
2.2 Main Menu………………………………………............................10
3. Setup..…………………………………………………………………..11
3.1 System Setup…….…………………………………………......11-12
3.2 Video Setup………………………………………………………….13
3.3 Audio Setup……………………………………………………........14
4. Radio Operation…………………………………………………....15-16
5. Media Center…………………………………………………………...17
5.1 Copy, Paste, Delete, Select All, File View…………………….....17
5.2 Play Audio/Video Files…………………………………….……….18
6. Bluetooth Operation……………………………...……………………19
6.1 Bluetooth Setup……………………………………………………..19
6.2 Pairing Your Phone……………………………………………..20-21
6.3 Incoming Calls………………………………………………………22
6.4 Outgoing Calls………………………………………………………22
6.5 AV (A2DP Audio Playback over Bluetooth)……………………...23
7. SiriusXM®……………… …………………………............................24
7.1 Subscribing to SiriusXM……………………………………………24
7.2 Operating SiriusXM…………………………………………………25
7.3 Tuning to a channel…………………………………………………26
7.4 Parental Control Channel Locking and Skipping………………..27
7.4.1 Lock Code………………………………………………………. 27
7.4.2 Lock Mode/Unlock Mode……………………………………….27
7.4.3 Mature Channel Locking………………………………………..27
7.4.4 Channel Locking……………………………………………...…27
7.4.5 Channel Skip…………………………………………………….27
7.5 Artist & Song Alerts…………………………………………………28
7.5.1 Setting Alerts…………………………………………………….28
7.5.2 Viewing & Managing Alerts…………………………………….28
7.5.3 My Artists & My Songs Virtual Categories……………………28
7.6 Replay………………………………………………………………..29
7.7 SiriusXM Settings Menu……………………………………………30
7.8 Understanding SiriusXM Advisory Messages……………………31
8. iPod & iPhone AV Interface…………………………........................32
9. HDMI…………………………………………………………………….33
10. Split Screen……………………………………………...……………34
11. Camera (Optional)…………………..…………………...………35-36
11.1 Single High Definition Camera………………………………….35
11.2 Multiple Camera System ...……………………………………..35
11.3 Automatic Viewing ………………………………………...…….36
12. Navigation (Optional)………………………………………………..37
13. Premium Remote Control (Optional)………………………..…38-40
Customer Feedback………………………………..…………………….41
Product Registration………………...…………………..………………..42
Notes……………………………………………………………………….43

Disclaimer
XiteSolutions North America Inc.
4
THIS IS A DISCLAIMER OF LIABILITY AND DAMAGE RESPONSIBILITY AS REGARDS TO THE INFOTAINMENT CENTER MANUFACTURER
AND YOUR USE OF THE PRODUCT. YOU ASSUME TOTAL RESPONSIBILITY AND RISK FOR USING THIS SYSTEM.
Failure to properly focus on the operation of your motor vehicle can result in death, serious injury and property damage. The Infotainment Center should never be used at a time or in a manner that
distracts you from properly focusing on operation of the motor vehicle in which it is installed.
Always operate the vehicle in a safe manner and in full compliance with speed limits, road safety signs and all other laws and devices which regulate operation of a motor vehicle.
Always remain aware of driving conditions at all times when using this system while operating a motor vehicle.
Operation of this unit, including its camera, navigation, audio and other features can be distracting to your operation of the motor vehicle. While the system is intended to provide both entertainment
and helpful vehicle and navigation information, it is not intended to, nor should you allow it to, distract you from properly focusing on operating the motor vehicle in which it is installed. It is up to you to
minimize or prevent such distraction.
Learn how to use this system before placing the vehicle in operation. Minimize the amount of time spent viewing the screen of the unit while driving and use voice prompts whenever possible. Do not
attempt to adjust settings of the system or resolve any malfunction with it while driving. Instead, pull off the road in a safe and legal manner, and then adjust its settings or deal with any malfunction.
In the event of serious malfunction, disable the unit (turn power off or remove power from the system) and contact qualified service personnel.
Your optional navigation feature is intended to assist you with guidance to your destination. The navigation is NOT intended to replace, supersede or take precedence
over any traffic signs, street signs, hazard signs, etc. IT IS YOUR RESPONSIBILITY TO ENSURE THE ROADS YOU ARE TRAVELLING ARE APPROPRIATE FOR THE
VEHICLE YOU ARE DRIVING.
Do not enter destinations, change settings or access any functions requiring prolonged use of the controls of the unit while operating your motor vehicle. For safety, pull off the road before making
any adjustments to the system or resolving any navigation discrepancies or questions.
If your Infotainment Center includes optional navigation features please refer to your navigation user manual for further specific information regarding its features, warnings, instructions and
disclaimers.
IMPORTANT SAFETY INFORMATION
CAUTION: TO REDUCE THE RISK OF ELECTRIC SHOCK, DO NOT REMOVE COVER
(OR BACK). NO USER SERVICEABLE PARTS INSIDE. REFER SERVICING TO
QUALIFIED SERVICE PERSONNEL.
CAUTION: THIS DVD VIDEO RECORDER IS A CLASS 1 LASER PRODUCT. USE OF CONTROLS, ADJUSTMENTS OR PERFORMANCE OF
PROCEDURES OTHER THAN THOSE SPECIFIED HEREIN MAY RESULT IN HAZARDOUS RADIATION EXPOSURE. DO NOT OPEN
COVERS AND DO NOT REPAIR THE PLAYER YOURSELF. REFER SERVICING TO QUALIFIED PERSONNEL.
CAUTION: FOLLOW THE LAWS AND REGULATIONS OF YOUR STATE, PROVINCE OR COUNTRY FOR INSTALLATION.

Disclaimer
XiteSolutions North America Inc.
5
Safety Information
Read the operating instructions for the Infotainment Center and all other components of the system carefully before using the system. FAILURE TO OBSERVE THE INSTRUCTIONS GIVEN IN THIS
MANUAL MAY CAUSE INJURY OR DAMAGE AND VOID THE WARRANTY.
Warnings!
Observe the following warnings when using this unit:
•The driver should neither watch the display nor operate the system while driving.
Watching the display or operating the system will distract the driver from looking ahead of the vehicle and can cause accidents. Always stop the vehicle in a safe location and use the
parking brake before watching the display or operating the system. While navigating please use voice prompts.
•Use the proper power supply.
This product is designed for operation with a negative grounded 12 V DC battery system.
Never operate this product with other battery systems, especially not with a 24 V DC battery system.
•Do not disassemble or modify the unit.
Do not disassemble or modify the unit, or attempt to repair the product yourself. This may cause serious injury or damage and your warranty will be null and void. If the product needs
repair, consult your dealer or contact technical support (see page 5).
•Do not use the unit when it is out of order.
If the unit is out of order (no power, no sound) or in an abnormal state (has foreign objects in it, is exposed to water, is smoking, or smells), turn it off immediately and consult your dealer.
Refer installation to qualified personnel
USA-Federal Communications Commission (FCC)
This device complies with part 15 of the FCC Rules. Operation is subject to the following two conditions:
(1) this device may not cause harmful interference; and (2) this device must accept any interference received, including interference that may cause
undesired operation.
This equipment has been tested and found to comply with the limits for a Class B digital device, pursuant to Part 15 of FCC Rules. These limits are
designed to provide reasonable protection against harmful interference in a residential installation. This equipment generates, uses, and can radiate
radio frequency energy. If not installed and used in accordance with the instructions, it may cause harmful interference to radio communications.
However, there is no guarantee that interference will not occur in a particular installation. If this equipment does cause harmful interference to radio
or television reception, which can be determined by turning the equipment off and on, the user is encouraged to try and correct the interference by
one or more of the following measures:
- Reorient or relocate the receiving antenna.
- Increase the distance between the equipment and the receiver.
- Connect the equipment to outlet on a circuit different from that to which the receiver is connected.
- Consult the dealer or an experienced radio/TV technician for help.
Any changes or modifications not expressly approved by the party responsible for compliance could void the user’s authority to operate the
equipment.

Disclaimer
XiteSolutions North America Inc.
6
Notes on Use: Video Sources and On-Screen Display
•Your Infotainment Center is designed to only display video when the parking brake is fully engaged.
•Never attempt to circumvent, defeat or bypass any of these safety features. These designs are intended to reduce driver distractions.
•Failure to use the safety features as designed could lead to serious injury, death and property damages. Your manufacturer and partners will not be liable for any injury or loss.
Notes on Use: Liquid Crystal Panel
•Do not cause impact to the liquid crystal panel. Only use your finger to gently touch the LCD panel.
•Do not touch the liquid crystal fluid if the LCD is damaged or broken. The liquid crystal fluid may be hazardous to your health or fatal. If the liquid crystal fluid from LCD contacts your bod
y or clothing, wash it off with soap immediately.
•When the temperature is very cold or very hot, the image may appear unclear or may move slowly.
•In order to protect the liquid crystal panel, keep it out of direct sunlight while the unit is not in use.
•Sudden changes in the temperature inside the vehicle such as those which occur immediately after the vehicle’s air conditioner or heater has been turned on may cause condensation
(droplets of water) to form and, as a result, the panel may not work properly. Do not use the unit while these symptoms are in evidence but leave the unit standing for about an hour and
then resume or start use.
•To clean the monitor, wipe only with a dry silicone cloth or soft cloth. Do not use a stiff cloth or volatile solvents such as paint thinner and alcohol.
2014
All rights reserved. No part of this manual may be reproduced, copied, transmitted, disseminated, transcribed, downloaded or stored in any storage medium, in any form or for any purpose without
the express prior written consent of River Park Inc. Furthermore, any unauthorized commercial distribution of this manual or any revision hereto is strictly prohibited. Information in this document is
subject to change without notice. The Manufacturer reserves the right to change the content herein without the obligation to notify any person or organization of such changes.
All trademarks used herein remain the exclusive property of their respective owners. Nothing contained in this manual should be construed as granting, by implication or otherwise, any license or
right to use any of the trademarks displayed herein. Misuse of any trademarks or any other content in this manual is strictly prohibited.
Sirius, XM and all related marks and logos are trademarks of Sirius XM Radio Inc. All rights reserved.

1. Features
XiteSolutions North America Inc.
7
9” Capacitive Touch Screen LCD Display
Favorite Source Hot Key
GPS Navigation (Optional)
SiriusXM-ReadyTM
AM/FM/RDS Stereo Radio
iPod/iPhone Interface and Control1
Split Screen Interface
Media Center
Bluetooth Hands-Free Calling and Streaming Audio Player (A2DP)2
Rearview High Definition Camera Connectivity3
Auxiliary Monitor Support4
USB and HDMI Inputs
High Power MOSFET Speaker Output 4 X 50W
Steering Wheel Control Compatible
Premium Remote Control (Optional Accessory)
Temperature Sensor/OS Display (Optional Accessory)
Compass Heading Display (Optional)
1iPod/iPhone device not included
2 Compatible mobile phone required
3Will connect to vehicle camera system video/audio output
4Auxiliary monitor sold separately.

2. Display
XiteSolutions North America Inc.
8
2.1 Monitor Display
Functions:
Bluetooth Microphone.
LDR (light dependent resistor) and IR (infra-red) receiver
1. LDR is used for the dimming of the display and is active when Auto dim in
System Settings is set to Sensor
2. IR receiver is used with remote control operations
MENU
1. Tap MENU button once to go to the Main Menu (or Home Page)
2. When in the Main Menu, you can either use the touch screen to select the
desired icon (source) or you can keep tapping the Menu button to select
different icons on the screen. When icon is highlighted for more than 1
second, the system will automatically open that icon
3. You can also access the Main Menu from any screen by tapping the
function icon in the top left corner of the current screen
Note: When viewing video in full screen, touch the screen once to bring up the icon
header which will display the function icon. Tap the icon to return to the Main Menu
NAVI
1. Press the NAVI button once to go to the navigation system
2. While viewing your navigation press the NAVI button to return to the
active source (Radio, or SXM, or DVD, etc.). If the navigation route is
running, navigation audio voice prompts will continue to be heard over the
speakers according to the Navigation audio settings you have selected in
the Settings menu (See section 3.3 of this manual for more information).
3. To hear only the navigation audio voice prompts, press and hold NAVI
button for 2 (two) seconds. This will mute the active source until you
leave the navigation screen.
DIM
1. Press DIM button to select the desired brightness of the screen. There are
5 different levels, and level 5 is the brightest.
Note: DIM will not work if Auto dim option is set to Sensor.
5
6
7
4
3
2
1
1
2
3
4
5

2. Display
XiteSolutions North America Inc.
9
Functions (continued):
FAV
1. You Infotainment Center is equipped with a favorite source hotkey. Press
the FAV button once to directly access your favorite audio source.
2. Favorite audio source is defaulted to Sirius XM, and it can be changed by
going to Setup -> System -> Favorite Mode.
Rotary button VOLUME/MUTE/POWER
1. Turn on the ignition to power up the Infotainment Center. When powered
up, it will immediately go to the last mode (memory on playback) before it
was turned off
2. Turn the rotary button left/right to adjust the volume to the desired level
3. Press the rotary button once to MUTE the volume. Press it again to
UNMUTE
4. In order to put the unit in standby mode, press and hold the rotary button.
During standby, your vehicles graphics together with date, time and
temperature will be displayed (Please see section x on turning the
Standby mode on/off)
5. Press and hold the rotary button again to turn the unit on
Note: When in standby mode, Infotainment Center consumes power. To completely turn the
system of, remove the ignition key and / or ensure any auxiliary battery power to the system is
turned off.
6
7

2. Display
XiteSolutions North America Inc.
10
2.2 Main Menu
Information Bar
1. The top area of the screen is the source information bar. It displays the
current source together with temperature, compass, and time information
as well as the Bluetooth connection status
Note: One needs to select a source to be able to see all the information
mentioned above.
Main Menu
1. Infotainment Center is designed for simple maneuvering. The screen
shown on the left is the MAIN MENU screen. From here, you can choose
what source to access by tapping the appropriate icon on the touch
screen.
2. For more information on how to navigate through the Main Menu, please
see the Function 3 in the Section 2.1 of this manual
2
1
1
2

3. Setup
XiteSolutions North America Inc.
11
Settings
Access the Settings by selecting the Setup icon in the Main Menu. There are three
Settings that can be changed and these are System, Video, and Audio. In addition,
there are Settings for Radio, Sirius XM, and Bluetooth and to access these, you
must go to the setup icon while one of these sources is active.
To exit the Settings menu at any time, press the Settings icon in the top left of the
screen.
3.1 System Setup
By touching the SYSTEM button, the settings for the system part of the Infotainment
Center can be changed.
Beep Tone: Turn ON/OFF audible sound when touching the LCD screen. The
Beep tone will also provide warning of LCD display closing and other cues.
Rear View: When ON, the display will automatically switch to camera mode
when the reverse gear is engaged or a trigger signal is received. When no camera
is connected, select OFF.
Standby Screen: Selecting ON, the Infotainment Center will display logo, date,
time and temperature when the unit is powered off by pressing and holding the
power button (rotary button) while the vehicle remains on.
Language: The language of the user interface can be selected from the following
options: English, Spanish, or French.
Auto dim: The brightness of the LCD display will be adjusted depending on the
selected preference: Sensor / Manual / Auto / Auto(GPS).
Sensor option uses LDR (please see function 2 of the section 2.1 in this manual for
more information). Cannot be adjusted via DIM button.
Manual always stays on the selected level (1 through 5). Can be adjusted via DIM
button
Auto uses illumination signal from the vehicle to determine what level to set the
brightness to. Can be adjusted via DIM button.
Auto (GPS) uses information from GPS to determine what level to set the brightness
to. Can be adjusted via DIM button.
Screen Saver: Can be turned ON and OFF. When ON, the screen will enter
sleep mode after a period of no user interaction.
Temperature: Select units (Fahrenheit or Celsius) to display temperature in the
Information Bar. Temperature display can be turned off.

3. Setup
XiteSolutions North America Inc.
12
Compass Display: Select Direction or Bearing. Compass display can be turned off.
Time Set: Select Auto or Manual. Auto selected will pick up information
from the GPS signal and report the correct time depending on the Time Zone. Time
can also be set manually.
Favorite Mode: Select favorite mode that can be accessed from the FAV button
on front of the monitor. Available selections are: SXM, Bluetooth, AUX, HD CAM,
HDMI, Media center, iPod, PIP (picture-in-picture), and Radio
Factory Set: Select Factory set to reset the Infotainment Center to factory
settings.
Note: All stored settings, presets, SiriusXM content alerts, etc. will be erased and returned to original
factory settings. Locked/Skipped channels, lock code in SiriusXM will remain unchanged.

3. Setup
XiteSolutions North America Inc.
13
3.2 Video Setup
By touching the VIDEO button, the settings for the video part of the Infotainment
Center can be changed.
Brightness:Sets the brightness level (-10 to +10)
Contrast:Sets the contrast level (-10 to +10)
Tint:Sets the tint level (-10 to +10)
Sharpness: Sets the sharpness level (0 to 8)
Note: The Infotainment Center has a factory default for optimal LCD settings, however the level can be
adjusted to set the display according to individual preference.

3. Setup
XiteSolutions North America Inc.
14
3.3 Audio Setup
By touching the AUDIO button, the settings for the audio part of the Infotainment
Center can be changed.
Treble Gain: Sets the treble level (-10 to +10).
Mid Gain: Sets the mid level (-10 to +10).
Bass Gain: Sets the bass level (-10 to +10).
Equalizer: Here a selection can be made for the equalizer to fit a music style. The
following options are available:
FLAT ( normal level )
POP
JAZZ
CLASSIC
LIVE
ROCK
Fader: Sets the fader level between rear and front (R10 –F10). 0 is the center level.
Balance: Sets the balance level between left and right (L10 –R10). 0 is the center
level.
Center /Woofer Volume: Sets the volume level for an optional center speaker when
connected (-10 to +10). 0 is the center.
Loudness: Sets the volume level of speaker when connected (0 to 10).
NAV Volume: Sets the gain of navigation volume (-10 to +10). 0 is the center. This
feature will help balance the navigation audio prompts with the system volume level
according to the individual user preference.
NAV Audio Mix: This option allows setting the way of navigation voice behavior in
relation to the normal audio playback. The following options are available:
1. OFF: Navigation voice will not be audible.
2. MIX: Navigation voice will mix through normal audio.
3. FULL: Normal audio will be muted on the front speakers during navigation
voice instructions.
Note: Navigation voice prompts can only be heard on front speakers.

4. Radio Operation
XiteSolutions North America Inc.
15
Radio can be selected from the Main Menu by pressing the RADIO icon on the LCD
display. The Radio can be left at any time by pressing the Radio icon at the top left
corner of the display.
There are two different radio modes (Basic and Extended). To select between the
two modes, from the Radio Menu go to the Main Menu, and from there select
SETUP icon. In addition to SYSTEM, VIDEO, and AUDIO options, there will be
RADIO option. Select Radio option, and in the Radio Mode select either Basic or
Extended. Basic mode is shown on the top left image, and Extended mode is shown
at the top left image on the next page.
The radio interface contains several buttons that all have their specific purpose.
Below is an explanation of each button and its functionality.
Tap to allow the selection between three different FMs (FM1/FM2/FM3).
Tap to allow the selection between two different AMs (AM1/AM2).
Tap to allow fine tuning or manual searching for radio stations.
Tap to start automatic searching for the next radio station.
Tap LO/DX to switch between LO and DX. DX means long distance signals, and
when selected, it will pick up frequencies that are far away and possibly weak, with
background noise. When LO is selected, the sensitivity of the radio receiver is
reduced so that only the strongest (noise free) radio signals are found.
These six (6) buttons can be used to switch between the radio stations saved in
memory. Tap a button to change the station, or press and hold the button for 2
seconds to save the station into memory. These are called presets, and there are
six for each band.
A/S means Auto Store and will store received stations in the memory. Six stations
will be stored per radio band.
P/S means Program Scan and will go through all the frequencies stored in the
memory and pauses for 10 seconds. To stay at a specific station, press the Seek
button.
1
2
1
1
1
5
6
7
8
2
3
4
2
3
4
5
6
7
8

4. Radio Operation
XiteSolutions North America Inc.
16
Tap to allow the selection between the FM and AM bands. There are 3 FM and
2 AM ranges available, all with 6 available presets.
TA means Traffic Announcement and will interrupt any audio source when a traffic
announcement message is relayed from a radio station supporting this functionality.
When the volume is set lower then 10, a TA message will automatically raise the
volume to 10.
AF means Alternative Frequencies. When this function is activated, the radio will
search for other frequencies on which the same station is present to offer the best
reception. The AF button will blink when activated.
REG means Regional and this functionality will support the AF functionality by
searching for local broadcasts to improve reception of local radio stations.
PTY means Program Type. Some radio stations broadcast their program type.
When the PTY button is pressed, use the TUNE and SEEK buttons to select the
program type to search and listen to
POP M
ROCK M
EASY M
LIGHT M
CLASSICS
OTHER M
JAZZ
COUNTRY
NATION M
OLDIES
FOLK M
NEWS
AFFAIRS
INFO
SPORT
EDUCATE
DRAMA
CULTURE
SCIENCE
VARIED
WEATHER
FINANCE
CHILDREN
SOCIAL
RELIGION
PHONE IN
TRAVEL
LEISURE
DOCUMENT
Note: The reception and audio quality is highly dependent on the strength of the incoming
signal from the radio broadcasting. When experiencing difficulties with getting a good
reception, moving the vehicle to a different location can improve the audio reception. When
problems persist, please contact your dealer for a solution.
12
9
10
11
13
9
11
10
12
13

5. Media Center
XiteSolutions North America Inc.
17
5.1 Copy, Paste, Delete, Select, Select All, File View
Media center can be selected from the Main Menu by tapping the Media Center icon
on the LCD display. The Media Center can be left at any time by tapping the Media
Center icon at the top left of the LCD display.
Once the USB is connected, you will see USB_DISK root folder and all the folder
and subfolders available (see top left image) in the Media Center. Folders and
subfolders are located on the left side, and music, videos, and pictures files that are
located inside the selected subfolder will be listed on the right side of the Media
Center.
Media Center is the local folder containing files that are saved on the Infotainment
System’s internal storage. It can be selected in order to either expand or collapse
the subfolders and files inside the Media Center folder.
USB_DISK is the USB master folder of the inserted USB device containing folders,
subfolders and files that are saved on it.
Select. When tapped, every folder, subfolder and file gets a check box beside it
(bottom left screen). To exit from check box, just tap Select again.
File View. When tapped, it displays file name, size, and the date the file was
created.
The Infotainment Center comes with an on-board memory, where you can download
your favorite files to permanently store them on the radio. To select folder,
subfolder, or a file, press Select button and check off everything that you want to
either copy, paste, or delete.
Copy. When tapped, it will copy all of the folders, subfolder, and files that have been
selected to the clipboard.
Paste. When tapped, it will paste all of the folders, subfolders, and files that have
been copied to the clipboard into the location of your preference. To copy and paste
onto internal memory, chose Media Center folder as a paste folder destination.
Note: Paste operation may take few minutes to complete depending on the number
of files that are being copy and pasted.
Delete. When tapped, it will permanently delete selected folder, subfolders and files.
Select All. When tapped, it will check box select all of the files in a folder or
subfolder that is highlighted.
1
2
5
3
6
7
8
4
1
2
3
4
5
6
7
8

5. Media Center
XiteSolutions North America Inc.
18
5.2 Playing Audio/Video Files
Media Center supports the following file formats: MP3, MP2, WAV, WMA, FLAC,
APE, HE-AAC, OGG, BSAC, MPEG4-ASP, MPEG4, AVC, MPEG1/2, VC-1, H.263,
RV, Sorenson H.263(S/W), WMV7, WMV8(S/W), AVI, ASF, MP4, M2TS, RMFF,
FLV, MKV, TS.
To play the audio, video or image file, tap on one of the files in the folder or
subfolder on the right hand side of the Media Center.
Once tapped, playback will go through all the files available in either folder or
subfolder.
Functions:
Tap to pause or start playing a track.
Tap to stop playback. This will take you back to the folder and subfolder section.
Selecting the same file to play will continue playing from where it left off.
Tap to skip to previous track.
Tap to skip to the next track.
Tap to set how the available tracks should playback. Options can be seen next to
the timer (All –will play all the tracks available on the USB device, 1 –will play one
track over again, and Folder –will play all the tracks within a specified folder).
This is the random option that will allow random playback. Tap it to turn it either On
or Off (Option can be seen next to the timer).
Tap the magnifying glass to bring up a keypad where the user can directly enter the
track number to play.
Tap the timer to bring up the slider. Using the slider, one can skip back or forward
within a track. Please note that there is no timer option available for picture files.
Note: If a file cannot be found by the Infotainment System, please make sure that
the extensions of your files are correct. The compatibility and performance of the
playback is highly dependent on the specifications of the source file. Data transfer
speed from USB compatible devices can also affect the playback of your media files
when high bitrate files are selected.
1
2
3
7
6
5
4
8
1
2
3
4
5
6
7
8

6. Bluetooth Operation
XiteSolutions North America Inc.
19
Bluetooth can be selected from the Main Menu by tapping the Bluetooth icon on the
LCD display. The Bluetooth can be left at any time by tapping the Bluetooth icon at
the top left of the Bluetooth screen.
The Infotainment Center supports Bluetooth wireless connections. It can set up a
wireless link with a Bluetooth mobile phone. The unit supports a hands-free profile
and A2DP (Audio Advanced Distribution Profile).
Before using the Bluetooth functionality, please make sure your mobile phone
is equipped with Bluetooth and turn it on in your phone menu. Please check
your mobile phone user manual for instructions using Bluetooth.
6.1 Bluetooth Setup
To access the Bluetooth Setup, select the Bluetooth icon from the Main Menu and
press found in the bottom left corner of the Bluetooth Screen (top left screen).
Another way to access the Bluetooth settings is by going to the Main Menu from the
Bluetooth source and selecting Setup. In addition to a standard buttons (System,
Video, and Audio) there will be a Bluetooth button.
Bluetooth Settings
Connecting Role: This is the profile setting for the connection role between the
Infotainment Center and the mobile phone.
HF/HS: Connecting Hands-Free or Headset (Default setting)
AV: Connecting for only playing audio files from the mobile phone
HF/HS + AV: connecting both HF/HS and AV
Auto Connect: This enables the Infotainment Center to search and connect with
any paired mobile phones after power up. You will see the icon flashing in the
top right hand corner while searching for devices when enabled.
Bluetooth Gain: Setting the volume level of Bluetooth operation (-10 to +10).
MIC Gain: Setting the sensitivity level of the microphone (0 to 7).
PIN Code: Customizable PIN code for mobile phone connection.

6. Bluetooth Operation
XiteSolutions North America Inc.
20
6.2 Pairing your Phone
To pair your compatible mobile phone to the Infotainment Center please have your
user manual for your mobile phone and follow the instructions below:
1. Go to the Bluetooth screen by selecting the Bluetooth icon from the Main
Menu.
2. When Bluetooth is accessed for the first time, it will show NO
CONNECTION on the screen (Above picture).
3. Tap to access the device list. If accessing for the first time, the
screen will show NO PAIRED DEVICE.
4. Tap to start pairing mode. The screen will show PAIRING. This
means that your Infotainment System is now visible to your mobile phone.
5. Follow the pairing instructions for your mobile phone. In general, one will
have to turn the Bluetooth on, and then scan for the available devices.
6. If completed successfully, scan will return a list of available devices that
are ready for pairing. Your Infotainment System will be recognized as
XSG3. Select XSG3 on your mobile phone to begin pairing.
7. If your mobile phone supports phonebook transfer, tap .
PHONEBOOK DOWNLOAD will appear on the screen. This will download
all of your phone contact into Infotainment Center.
Notes on Pairing:
1. If PAIR START appears temporarily, the pairing cannot start due to an
active connection. Please disconnect any active mobile phones.
2. Only when PAIRING is displayed, the Infotainment Center becomes
visible for mobile phones. Use your mobile phone to search for the
Infotainment Center to connect to your mobile phone.
3. When connecting, the Infotainment Center will identify itself to your phone
as “XSG3”. The mobile phone will ask for a PIN code. The factory default
code is “0 0 0 0” (this code can be changed, see Bluetooth settings).
Once the mobile phone confirms that it has established a new paired
connection, authorize the Infotainment Center to make an automatic
connecting.
4. When the pairing procedure is completed successfully, the display will
show PAIR OK. When PAIR FAIL appears on the display, repeat the
pairing procedure.
5. Once the Bluetooth pairing is completed between your mobile phone and
the Infotainment Center, both will be automatically recognized and the
connection can be made automatically from that moment on.
6. If there are more mobile phones paired to the Infotainment Center and
within range, the connecting priority is given to the last paired mobile
phone.
7. In case that pairing fails after each attempt, please turn off both your
mobile phone and the Infotainment Center. Turn both on again and repeat
the procedure as above.
Table of contents
Other XiteSolutions Car Video System manuals

XiteSolutions
XiteSolutions XSG3CB2 User manual

XiteSolutions
XiteSolutions XSG4NA-X4S User manual

XiteSolutions
XiteSolutions XSG2NA-X1S User manual

XiteSolutions
XiteSolutions CT GENERAL User manual

XiteSolutions
XiteSolutions XSG3NA User manual

XiteSolutions
XiteSolutions XS90116CA User manual

XiteSolutions
XiteSolutions XSG2NA-X1DM User manual

XiteSolutions
XiteSolutions XSG2NA-X2DM/L User manual