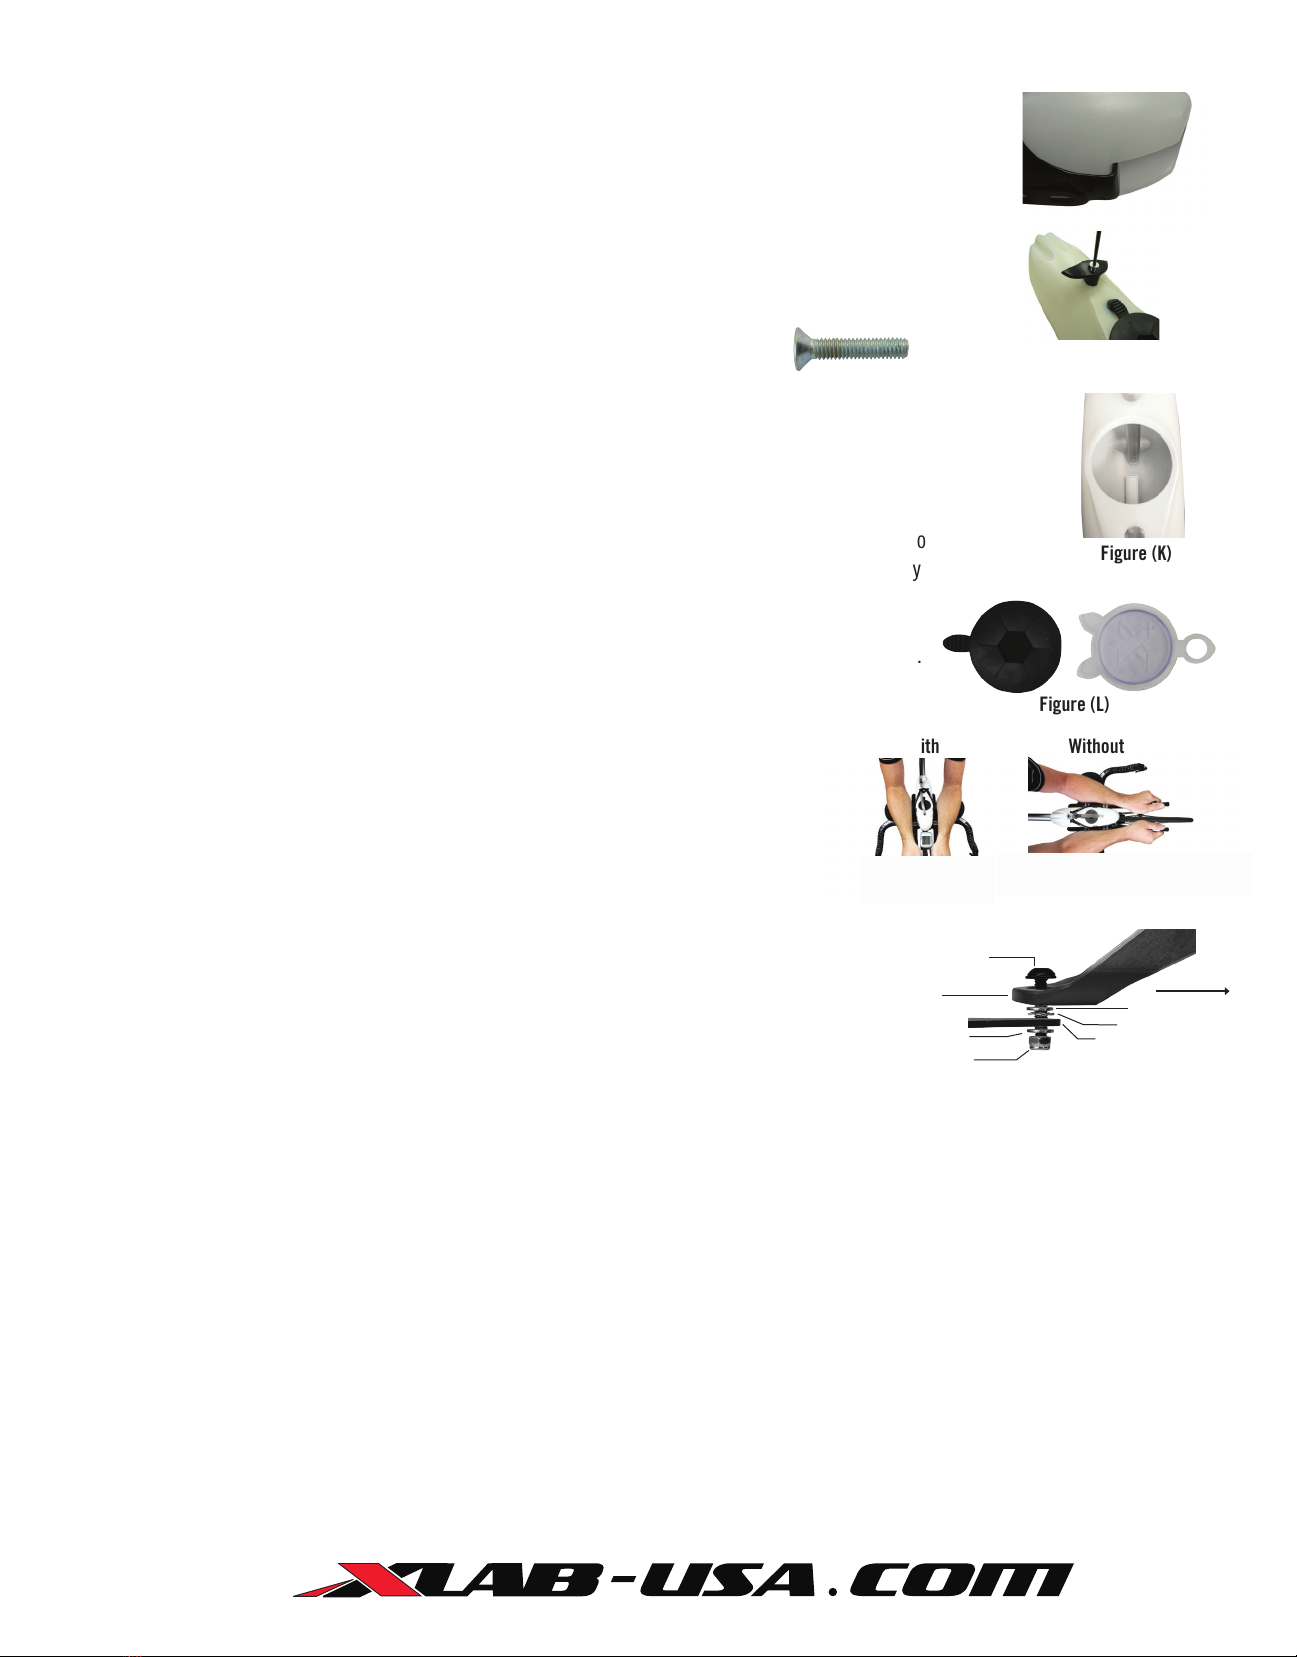
manuals.online logo
Brands
  1. Home
  2. •
  3. Brands
  4. •
  5. xLab
  6. •
  7. Bicycle Accessories
  8. •
  9. xLab TORPEDO SYSTEM 100 User manual

xLab TORPEDO SYSTEM 100 User manual

TORPEDO SYSTEM 100
TORPEDO SYSTEM 100
AERODYNAMICACCESSORIES
TOOLS REQUIRED:
2.5mm non-ball ended Allen wrench
4mm non-ball ended Allen wrench
8mm open ended wrench.
IMPORTANT:
PLEASE COMPLETELY UNDERSTAND ALL USER INSTRUCTIONS AND SAFETY INFORMATION BEFORE USING THIS PRODUCT. AS WITH ANY HIGH TECH PRODUCT YOU
WILL NEED TO ROUTINELY CHECK FOR LOOSE HARDWARE, CRACKS OR OTHER DAMAGE AND REPLACE ITEMS AS NECESSARY.
DO NOT USE PRODUCT IF ANY OF THESE CONDITIONS EXIST.
STEP 1 MINI MOUNT AND CAGE ATTACHMENT
1. REMOVING BOTTLE. Hold Mount and twist bottle clockwise,
lift nose and pull bottle forward and out of the cage. Figure (A)
2. REMOVING CARDBOARD PLATFORM. Using 4mm Allen wrench and 8mm open ended wrench loosen the two screws. Tear off the cardboard.
3. POSITIONING CAGE AND MINI MOUNT. Ensure the rear screw is as at the rear
of the cage and in the rear of the slot in the Mount Figure (B). IMPORTANT: Make
sure that the black spacer is positioned just underneath the rear screw head, followed
by the M5 at washer before putting the screw through the cage. Ensure the Aero
Spacers have the tails pointing to the rear of the Mount. Figure (C) Tighten the
screws.
4. INSERT 4 STRAPS ONTO MOUNT. Install per Figure (D) with buckles beneath the mount.
5. ATTACHING MOUNT. Lay the Mount onto the aerobars. Position the rear straps as far back on the bars as possible.
If any parts of the mount or screws touch the stem, then add the Velcro Pads to the mount. Figure (E)
Thread straps through buckles and tighten.
6. CHECKING CAGE HEIGHT. Standing opposite a mirror put your arms in the aerobars.
If the bottle shows more above your arm then use the smaller spacers.
If the bottle shows more below your arm then use the larger spacers. It may be that
no spacers are used in order to get the proper height. Tighten screws to 30 in lbs. of torque.
Figure (F) & Figure (G)
7. FINAL STRAP TIGHTENING. The non-slip silicone on the straps should be touching the aerobars.
Center the Mount and tighten opposite straps. Then go back and re-tighten all straps
to ensure all straps are as tight as you can get them. Make sure that the reinforced
(double thickness) section of the polyester strap is in the slot on the TORPEDO
MINI MOUNT. Figure (H)
Figure (A)
Figure (C) Figure (D)
Figure (H)
Figure (F)
Correct
Figure (G)
Incorrect
Figure (E)
Figure (B)
Installation video online at www.xlab-usa.com/torpedo-system
™
SPACER HARDWARE
INSTALLED
M5X16mm
M5X15mm Washer
M5 Lock Washer
M5 Flat Washer
M5 Nylon Insert
Lock Nut
If no spacers
Dolphin Tail
Screw
.25” spacers
.60” spacers
Use if you need
both .25” and
.60” spacers
M5X18mm
M5X12mm
M5 Flat Washer
Rear Spacer
M5 Nylon Insert
Lock Nut
M4X20mm M5X25mm M5X30mm M5X40mm
Rear Bolt
40mm
Rear Bolt
40mm
Rear Bolt
40mm
Rear Bolt
40mm
M5X30mm
M5X18mm
M5X25mm
COMPUTER MOUNT HARDWARE
Figure (K)
Figure (L)
Computer Mount
Torpedo Mount
M5 Lock Washer
M5 Nylon Insert Lock Nut
M5 Flat Washer
M5X16 mm Screw
M5X15mm Washer
DIRECTION OF BIKE
Figure (O)
Figure (I)
WARRANTY
VEE CAGE – Limited 1 Year
MINI MOUNT ALUM – Limited 2 Year
TORPEDO BOTTLE – Limited 1 Year
All Other Parts – Limited 6 Months
With
Figure (J)
Figure (M) Figure (N)
Without
STEP 2 BOTTLE INSTALL
1. EASY INSTALL. Rotate the bottle clockwise approximately 1/2 inch. Push rearwards, ensuring the rear tab of the
cage slides into the rear bottle recess. Next ensure the rear cage screw head clicks into the long recess on
the bottom of the bottle. The rear cage tab should now sit against the vertical surface inside the back of the
bottle. Figure (I) Please see video online www.xlab-usa.com/torpedo-system
2. DOLPHIN TAIL INSTALL. Decide if you want to fold your straw or keep it upright. If you decide to keep it upright,
set the DOLPHIN TAIL straw retainer and screw aside. In order to fold your straw you will need to use the
DOLPHIN TAIL straw retainer. Using a 2.5 mm Allen wrench and the supplied M4X20mm screw, attach the
Tail into the top of the bottle. Torque to 10 in. lbs maximum. Figure (J)
3. STRAW INSTALL. Determine which hole is best suited for you. Install the plug from the inside of the bottle. Start the
plug at an angle and push up around the perimeter of plug. Ensure the top of the plug is completely through the hole.
The straw is designed to t tightly in the straw hole to prevent leaking. To best insert the straw, pinch and fold the
end of the straw while pushing it into the hole. For the straw to be vertical, tuck the end of the straw
behind the groove in the bottom of the bottle. Figure (K) If you intend to fold the straw down then
place the bottom of the straw in front of the bottle groove. After each ride, gradually trim the straw to
your optimum length. Be sure to trim the straw opposite the bite valve. The bite valve is permanently
installed in the straw.
4. LID INSTALL. The split lid provides the fastest relling but there may be some splashing over bumps.
The solid lid will be much dryer but there is a very small breather hole that may emit very small
amounts of liquid at times. Choose whichever you prefer. The solid lid has a tether hole.
Put the straw through this hole to avoid losing the lid when relling. Figure (L)
STEP 3 COMPUTER INSTALL
The TORPEDO SYSTEM is designed to be used with or without a computer in front of the
bottle for optimal visibility and functionality. Figure (M) & Figure (N)
1. Mount the XLAB AERO COMPUTER MOUNT on the nose of the TORPEDO MINI MOUNT with the supplied hardware.
2. Place the black 16mm long M5 screw through AERO COMPUTER MOUNT, through
the M5X15mm washer, through the M5 lock washer, through the TORPEDO MOUNT,
through the M5 at washer and into the M5 nylon insert lock nut. Figure (O)
3. The front edge of the computer should sit slightly behind the rider’s wrist. Slide the mount along the slot on the TORPEDO MOUNT
to accomplish this placement and tighten completely to 30 in. lbs of torque.
STEP 4 BOTTLE CARE
WASH YOUR TORPEDO BOTTLE, STRAW, PLUG, BITE VALVE AND LID EVERY TIME YOU USE IT AND BEFORE INITIAL FIRST USE.
Dishwasher
1. Remove all accessories from the bottle before washing (straw, plug and lids) The DOLPHIN TAIL can remain attached.
2. Wash in top rack only.
Hand Wash
1. Not necessary to remove accessories when cleaning by hand.
2. Fill bottle with soapy water.
3. Use one hand to cover the holes on top of the bottle.
4. Shake bottle vigorously.
5. Rinse and repeat.
Straw: Use a long thin brush to clean tube.
M4X20mm

Other xLab Bicycle Accessories manuals

xLab TORPEDO VERSA 500 User manual

xLab

xLab TORPEDO VERSA 500 User manual

xLab TORPEDO SYSTEM 50 User manual

xLab

xLab TORPEDO SYSTEM 50 User manual

xLab TORPEDO SYSTEM 50 User manual

xLab

xLab TORPEDO SYSTEM 50 User manual

xLab Torpedo Kompact User manual

xLab

xLab Torpedo Kompact User manual

xLab TORPEDO VERSA 200 User manual

xLab

xLab TORPEDO VERSA 200 User manual

xLab TORPEDO SYSTEM 400 User manual

xLab

xLab TORPEDO SYSTEM 400 User manual

xLab TORPEDO KOMPACT 100 User manual

xLab

xLab TORPEDO KOMPACT 100 User manual

xLab TORPEDO VERSA 200 User manual

xLab

xLab TORPEDO VERSA 200 User manual

Popular Bicycle Accessories manuals by other brands

Profile Design Split Second installation instructions

Profile Design

Profile Design Split Second installation instructions

POST-MODERNE PM-MT171 Service & Repair Instructions

POST-MODERNE

POST-MODERNE PM-MT171 Service & Repair Instructions

Rose electronics airik RT-CNC owner's manual

Rose electronics

Rose electronics airik RT-CNC owner's manual

Cateye OS 1.1 reference guide

Cateye

Cateye OS 1.1 reference guide

Rose electronics RACE ATTACK GF AERO owner's manual

Rose electronics

Rose electronics RACE ATTACK GF AERO owner's manual

VDO Z Series instruction manual

VDO

VDO Z Series instruction manual

Yoshimura 070BG118010 manual

Yoshimura

Yoshimura 070BG118010 manual

SKS Germany AIRSPY TL manual

SKS Germany

SKS Germany AIRSPY TL manual

SRAM eTap AXS manual

SRAM

SRAM eTap AXS manual

Saris 882 Assembly instructions

Saris

Saris 882 Assembly instructions

Rose electronics DIRT BLOCKER RACE owner's manual

Rose electronics

Rose electronics DIRT BLOCKER RACE owner's manual

HERRMANS H-BLACK MR4 EBIKE user manual

HERRMANS

HERRMANS H-BLACK MR4 EBIKE user manual

Harman JBL WIND3 quick start guide

Harman

Harman JBL WIND3 quick start guide

Oase LUNAQUA operating instructions

Oase

Oase LUNAQUA operating instructions

Fox LiveValve 32 Step Cast owner's guide

Fox

Fox LiveValve 32 Step Cast owner's guide

Felt BRUHAUL FOOTPLATE KIT installation guide

Felt

Felt BRUHAUL FOOTPLATE KIT installation guide

Winther Kangaroo General instruction manual

Winther

Winther Kangaroo General instruction manual

Swytch Universal eBike Conversion Kit instruction manual

Swytch

Swytch Universal eBike Conversion Kit instruction manual

manuals.online logo
manuals.online logoBrands
  • About & Mission
  • Contact us
  • Privacy Policy
  • Terms and Conditions

Copyright 2025 Manuals.Online. All Rights Reserved.