manuals.online logo
Brands
  1. Home
  2. •
  3. Brands
  4. •
  5. xLab
  6. •
  7. Bicycle Accessories
  8. •
  9. xLab TORPEDO VERSA 200 User manual

xLab TORPEDO VERSA 200 User manual

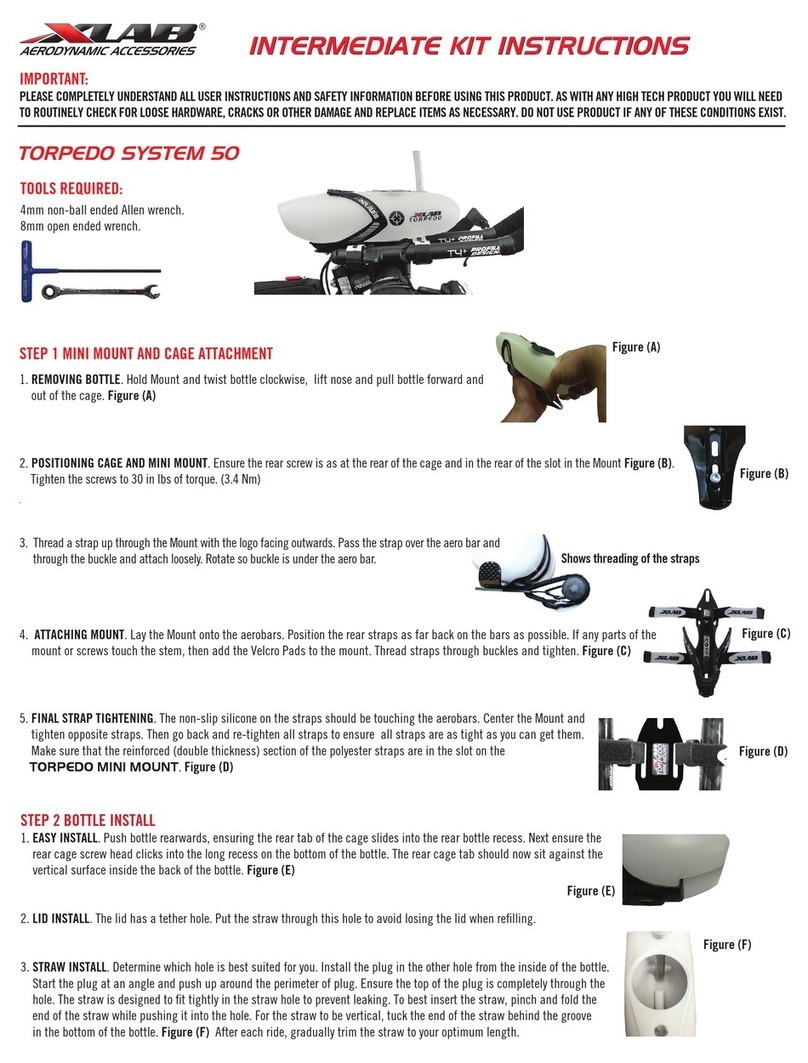
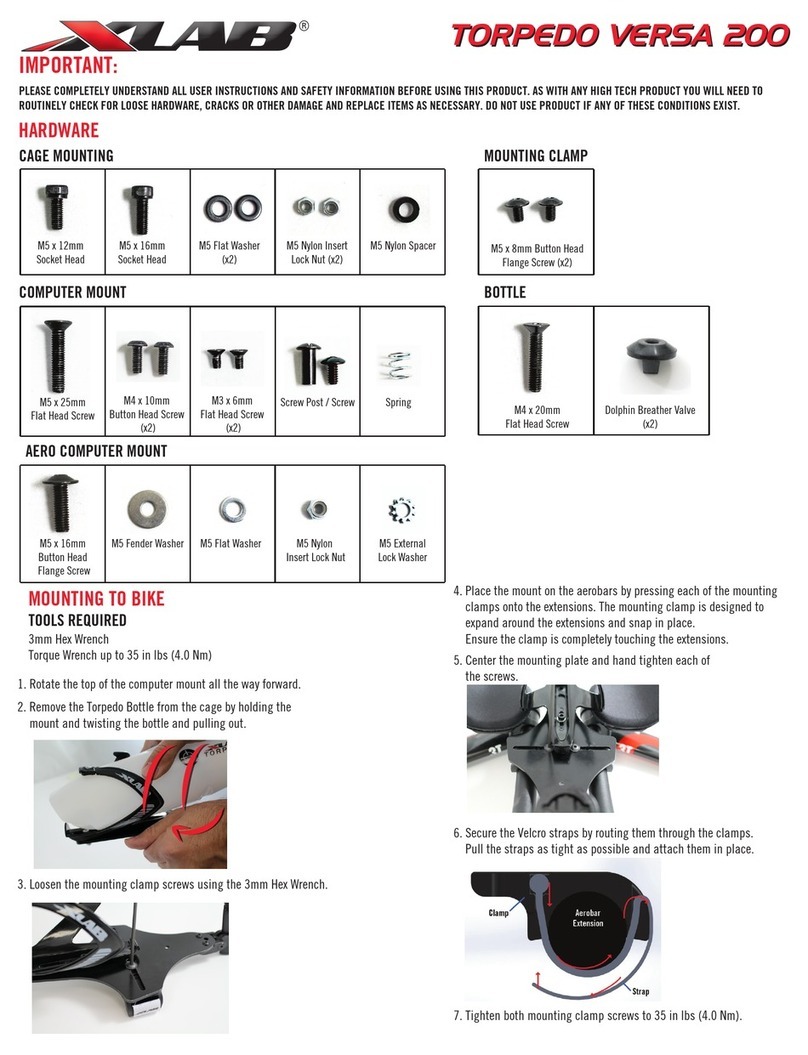
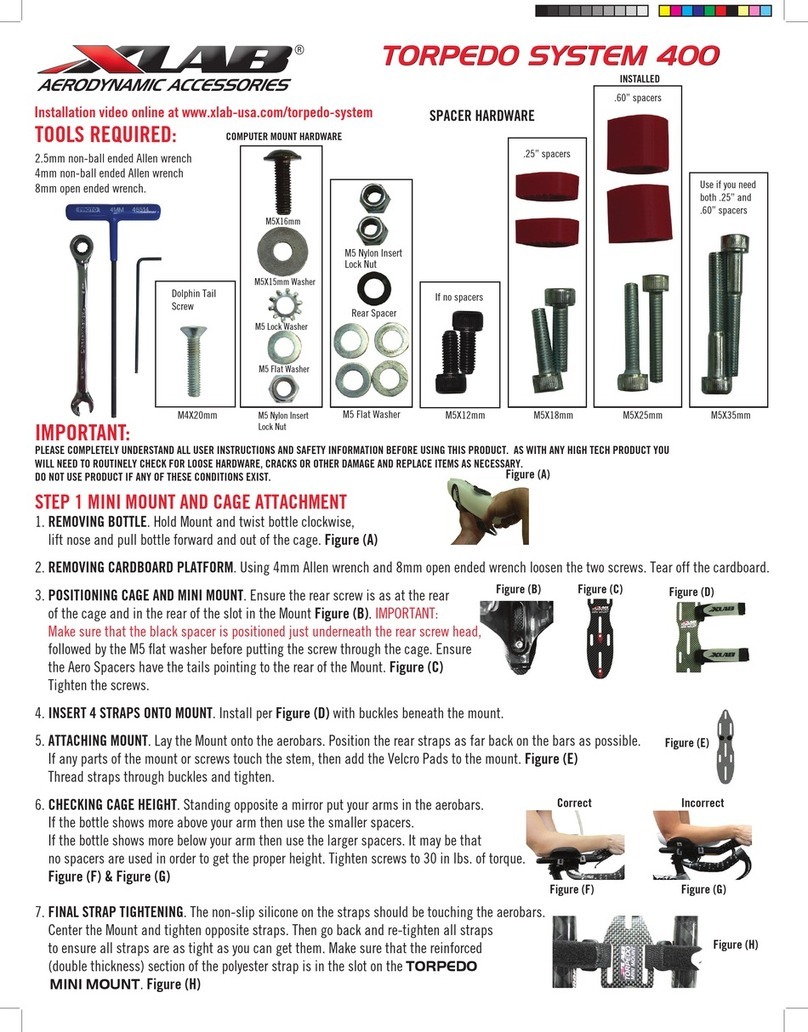
2. Remove the Torpedo Bottle from the cage by holding the mount and twisting the
bottle and pulling out.
4. Place the mount on the aerobars by placing each of the mounting
clamps onto the extensions. Ensure the clamp is secure and
completely touching the extensions.
3. Loosen the mounting clamp screws using the 3 mm Hex Wrench.
5. Center the mounting plate and hand tighten each of
the screws.
6. Secure the Velcro straps by routing them through the clamps.
Pull the straps as tight as possible and attach them in place.
7. Tighten both mounting clamp screws to 4.0 Nm (35 in-lbs).
TOOLS REQUIRED
MOUNTING TO BIKE
3 mm Hex Wrench
Torque Wrench up to 4.0 Nm (35 in-lbs)
HARDWARE
CAGE MOUNTING
M5 x 12 mm
Socket Head
M5 x 16 mm
Socket Head
M5 Flat Washer
(x2)
M5 Nylon Insert
Lock Nut (x2)
M5 Nylon Spacer
M4 x 20 mm
Flat Head Screw
M5 x 12 mm Button Head
Flange Screw (x2)
MOUNTING CLAMP BOTTLE
M4 x 10 mm
Button Head Screw
(x2)
M3 x 6 mm
Flat Head Screw
(x2)
Screw Post / Screw Spring
M5 x 25 mm
Flat Head Screw
IMPORTANT:
PLEASE COMPLETELY UNDERSTAND ALL USER INSTRUCTIONS AND SAFETY INFORMATION BEFORE USING THIS PRODUCT. AS WITH ANY HIGH TECH PRODUCT YOU WILL NEED TO
ROUTINELY CHECK FOR LOOSE HARDWARE, CRACKS OR OTHER DAMAGE AND REPLACE ITEMS AS NECESSARY. DO NOT USE PRODUCT IF ANY OF THESE CONDITIONS EXIST.
COMPUTER MOUNT
TORPEDO VERSA 200
TORPEDO VERSA 200
1. Rotate the top of the computer mount all the way forward to allow room for the bottle.
Dolphin Breather Valve
CAGE HARDWARE
DIAGRAM
REAR OF CAGE
M5 NYLON
SPACER
M5 x 16 mm
SOCKET HEAD
M5 FLAT
WASHER
M5 FLAT
WASHER
M5 x 12 mm
SOCKET HEAD
3. Insert the straw by pinching the end and pushing through the
appropriate hole. If using the solid lid, make sure the straw goes
through the tether hole in the lid.
2. Trim the straw to the appropriate length for your use. Cut at an
angle to make it easier to install.
6. The pre-installed Dolphin Tail can be used to tuck the straw
underneath to keep it out of the way while riding.
3 mm Hex Wrench
Torque Wrench up to 2.8 Nm (25 in-lbs)
1. Loosen the side screw at the base of the mount.
2. Adjust the computer mount to the correct height by moving the
post. The top can then be rotated to the preferred angle.
3. Tighten the side screw to lock in place and torque to 2.8 Nm (25 in-lbs).
The screw must be fully tightened for the computer
mount to stay in place.
4. Attach the computer and rotate as needed.
ADJUST VERSA COMPUTER MOUNT
TOOLS REQUIRED
4. At the bottom of the Torpedo bottle, there is a groove. Place the
straw in front of the groove to have the straw sit more horizontal;
place the straw behind to make the straw more vertical.
1. Select the appropriate straw hole. There are two straw holes on either side of
the lid for a more forward or rearward straw position. The plug will go in the
opposite hole of the straw and is pre-inserted in the rear straw hole. To
switch, push the plug in from the top and remove from the bottle. Insert the
plug in the new hole by pushing up from inside the bottle to seat it.
BOTTLE INSTALL
5. Place the bottle in the cage by pushing the bottle straight back until it
clicks and the bottle is locked in place. Make sure the rear tab of the cage
slides into the rear bottle recess.
7. DOLPHIN BREATHER VALVE INSTALL. The bottle comes pre-installed with
a breather valve to completely seal the Torpedo Bottle from leaks. If it is
ever removed. 1. Remove the old breather valve and clean off any
remaining adhesive from the valve. 2. Apply a small amount of
food-grade silicone adhesive onto the underside of the new breather
valve head. Insert into the hole, making sure the valve is fully inserted in
the bottle per the Drawing. The top of the valve should be at against the
top of the bottle. 3. Clean up any silicone that comes out the sides of the
valve using a wet rag. The top of the valve should be completely at
against the bottle. 4. Allow adhesive to set for at least 24 hours prior to
using/washing. See Figure (F) for the prole of the valve in the bottle to
see how the ange of the valve should t in place.
Figure (F)
Inside of
Torpedo Bottle
Ensure the ange
is completely below
the bottle surface.
FOR GARMIN MULTISPORT WATCHES & WAHOO COMPUTERS
Note 1: Torpedo Versa Computer Mount is compatible with Garmin® & Wahoo® bike computers and watches. Optional adapters are
available to purchase separately for Polar®, and strap-mounted computers.
TOOLS REQUIRED
2 mm Hex Wrench
Torque Wrench up to 1.1 Nm (10 in-lbs)
1. Remove the two screws at the top of the computer mount using the 2 mm Hex Wrench.
2. Rotate the holder 90 degrees.
3. Reinsert the screws and tighten.
4. Torque both screws to 1.1 Nm (10 in-lbs)
BOTTLE CARE
HAND WASH YOUR TORPEDO BOTTLE, STRAW, PLUG, BITE VALVE, AND LID EVERY TIME YOU USE IT AND BEFORE INITIAL FIRST USE.
When cleaning by hand it is not necessary to remove the accessories.
1. Fill Torpedo Bottle with soapy water.
2. Use one hand to cover the holes on top of the bottle.
3. Shake bottle vigorously.
4. Rinse and repeat.
STRAW CARE
Hand wash straw in lukewarm water only. Use a long thin brush to clean tube. Hot water or the dishwasher will damage straw material.
REV 04/2021
WARRANTY
Versa Aluminum Mounting Plate - 3 Year
Vee Cage - 3 Year
Torpedo Computer Mount - Limited 3 Year
Torpedo Bottle - Limited 3 Year
All Other Parts - Limited 6 Month
Note 2: The Computer Mount’s default position will accommodate Garmin® bike computers - no adjustment is necessary.

Other xLab Bicycle Accessories manuals

xLab TORPEDO SYSTEM 100 User manual

xLab

xLab TORPEDO SYSTEM 100 User manual

xLab TORPEDO VERSA 200 User manual

xLab

xLab TORPEDO VERSA 200 User manual

xLab TORPEDO VERSA 500 User manual

xLab

xLab TORPEDO VERSA 500 User manual

xLab TORPEDO SYSTEM 400 User manual

xLab

xLab TORPEDO SYSTEM 400 User manual

xLab TORPEDO KOMPACT 100 User manual

xLab

xLab TORPEDO KOMPACT 100 User manual

xLab TORPEDO SYSTEM 50 User manual

xLab

xLab TORPEDO SYSTEM 50 User manual

xLab Torpedo Kompact User manual

xLab

xLab Torpedo Kompact User manual

xLab TORPEDO SYSTEM 50 User manual

xLab

xLab TORPEDO SYSTEM 50 User manual

Popular Bicycle Accessories manuals by other brands

Cateye V2C - Quick start manual

Cateye

Cateye V2C - Quick start manual

NVO Components STEM manual

NVO Components

NVO Components STEM manual

Deda Elementi SUPERBOX user manual

Deda Elementi

Deda Elementi SUPERBOX user manual

NUBEAM NB-600 user manual

NUBEAM

NUBEAM NB-600 user manual

Bryton Rider 50 user manual

Bryton

Bryton Rider 50 user manual

Fidlock VACUUM manual

Fidlock

Fidlock VACUUM manual

Shimano XTR Service instructions manual

Shimano

Shimano XTR Service instructions manual

Akku Vision e-bike vision 10046 Manual/Safety Notes

Akku Vision

Akku Vision e-bike vision 10046 Manual/Safety Notes

FlexiModal RUNNER RT1 Assembly, operation and maintenance instructions

FlexiModal

FlexiModal RUNNER RT1 Assembly, operation and maintenance instructions

Pioneer SGX-CA600 user guide

Pioneer

Pioneer SGX-CA600 user guide

blackburn ATOM SL3.0 user manual

blackburn

blackburn ATOM SL3.0 user manual

Verve navi2coach quick start guide

Verve

Verve navi2coach quick start guide

Cateye MITY 8 user manual

Cateye

Cateye MITY 8 user manual

ZUUUM iBike quick start guide

ZUUUM

ZUUUM iBike quick start guide

MRP G3 Steel user manual

MRP

MRP G3 Steel user manual

Giant NEOS GPS quick start guide

Giant

Giant NEOS GPS quick start guide

Conrad Electronic F16S instruction manual

Conrad Electronic

Conrad Electronic F16S instruction manual

Cane Creek 100 Classic instruction manual

Cane Creek

Cane Creek 100 Classic instruction manual

manuals.online logo
manuals.online logoBrands
  • About & Mission
  • Contact us
  • Privacy Policy
  • Terms and Conditions

Copyright 2025 Manuals.Online. All Rights Reserved.