XPLORA KIDS series User manual

More information: myxplora.com
Thank you for choosing XPLORA!

User manual

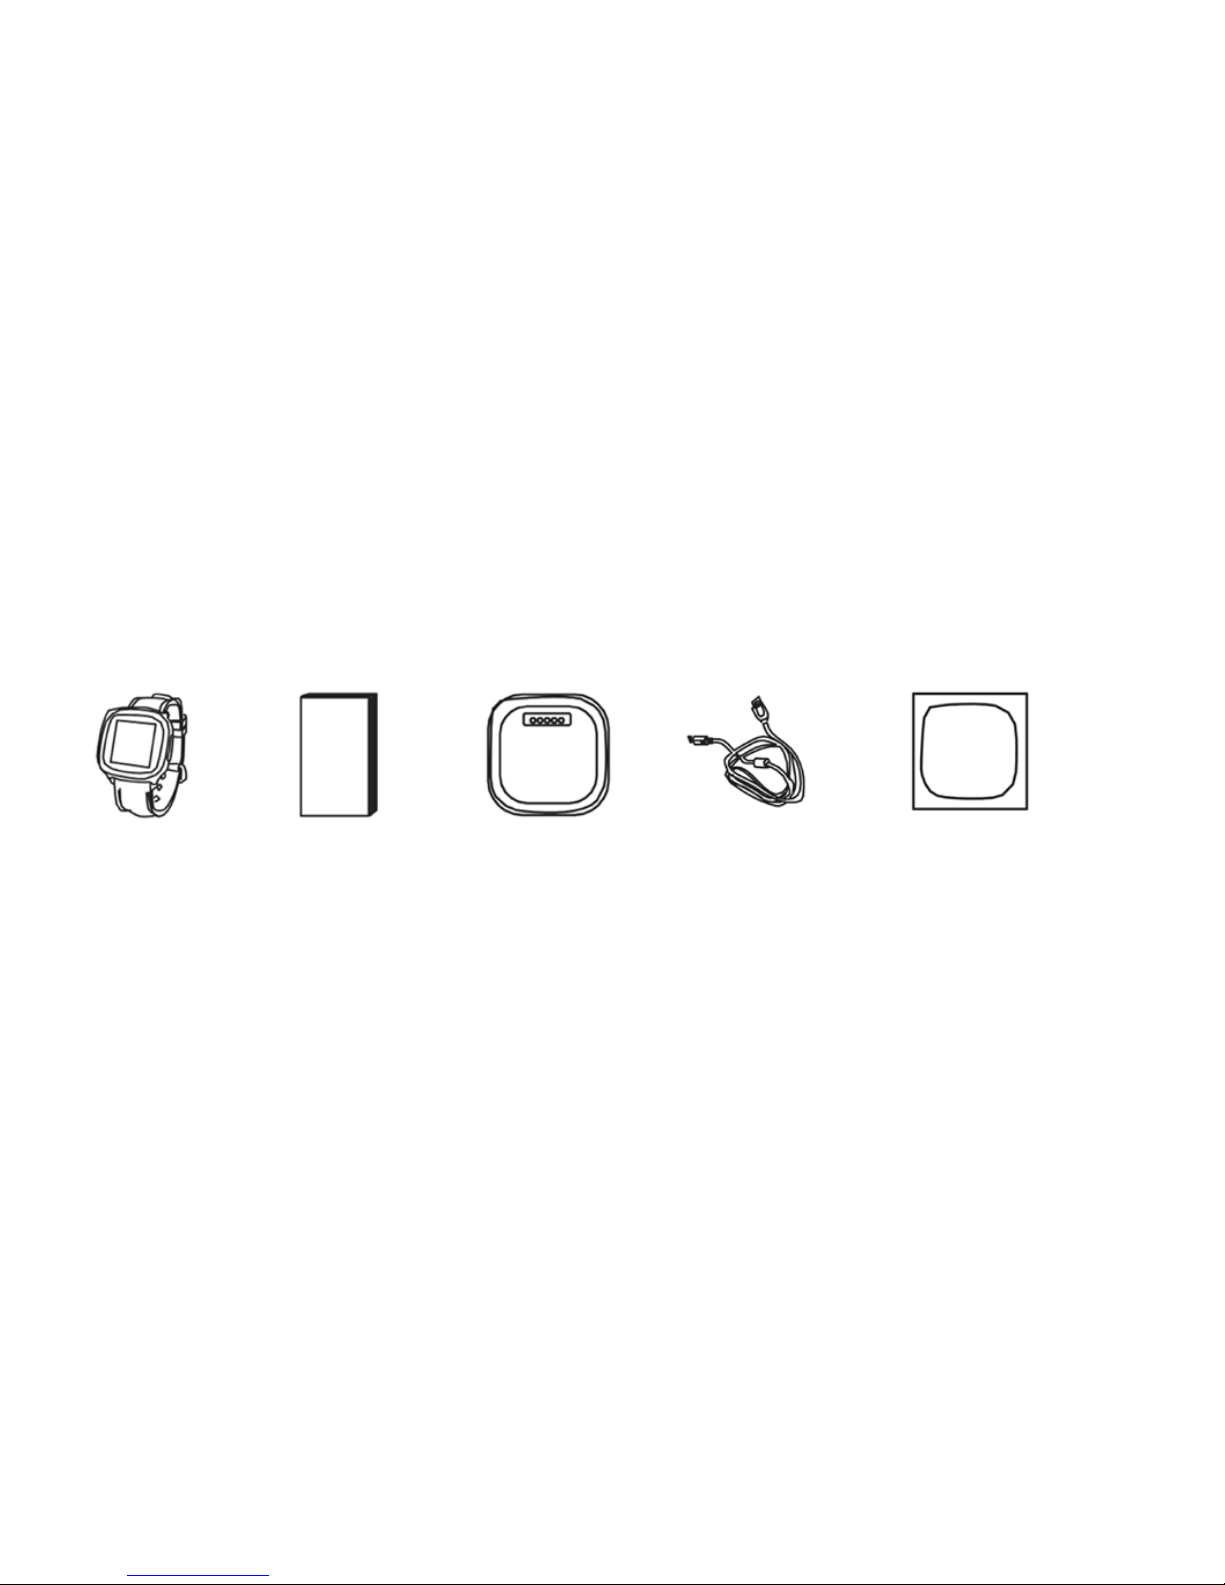
Package contents ………………………………………… 3
Device layout ……………………………………………… 4
Charging the battery of the XPLORA Watch …………… 5
Replacing the watch strap of the XPLORA Watch ……… 6
Power ON/OFF ……………………………………………… 7
Description of the touch function ………………………… 8
Ul Screen …………………………………………………… 8
Making a call………………………………………………… 9
Volume adjustment ………………………………………… 9
Receiving a call……………………………………………… 10
Message receiving ………………………………………… 10
Message viewing …………………………………………… 11
Calling/deleting a message ……………………………… 11
Send my location …………………………………………… 12
Software upgrade…………………………………………… 12
Install XPLORA app ………………………………………… 13
Activate the app …………………………………………… 14
Create XPLORA account ………………………………… 15
Add XPLORA watch………………………………………… 16
Main menu…………………………………………………… 17
Setting menu………………………………………………… 18
Contacts …………………………………………………… 19
Silent period ………………………………………………… 20
Main menu:
Location, Schedules, Safety Zones, and Messages …… 21
Location ……………………………………………………… 22
Schedules …………………………………………………… 23
Safety Zones, Messages…………………………………… 24
Wallpaper …………………………………………………… 25
Auto position report………………………………………… 26
PAGE CONTENT

Check the product box for the following items:
Body with wrist band User Manual Charging Cradle Micro USB Cable Protection Film
Note!
- The supplied items are designed only for this XPLORA WATCH and may not be compatible with other devices.
- Use only manufacturer-approved accessories. Using unapproved accessories may cause the performance problems and malfunctions that are not covered by
the warranty.
- Appearancesandspecicationsaresubjecttochangewithoutpriornotice.
Package contents
3

Device layout
SOS Emergency Call
Mike
Connection Bar
for Watch Strap
SIM cover Charging terminal
Power ON/OFF
Home Key
LCD ON/OFF
4

Charging the battery of the XPLORA Watch
Connect the USB cable and the adaptor on the cradle. (Any common
adaptor for XPLORA WATCH can be used. No adaptor is necessary when
connecting the phone to the USB terminal of the PC directly.)
As shown abowe, check the direction of the charging terminals on the cradle
and the XPLORA WATCH and securely connect the cradle on the XPLORA
WATCH. The magnet mounted on the cradle makes connection easy.
Once the cradle is normally seated, and battery charging starts, the LED
lights on the cradle. If the LED does not light, check the adaptor whether
it is connected properly or the cradle if it is fully seated in the terminal.
1
1
2
3
23
Charging cradle
Mikro USB cable
Charger
indicator
Charging Charging Charging
complete error
Red Green Blinking
orange
5

Replacing the watch strap of the XPLORA Watch
1. Slightly push down the
watch strap on the connection
section between the XPLORA
Watch and the watch strap.
2. Hook the spring bar for the
watch, which is exposed when
pushing the strap down, on the
spring bar hook with an ade-
quate tool and pull down the
spring bar to disconnect the
bar from the XPLORA Watch.
3. Remove the spring bar
from the disconnected
watch strap and insert the
bar into the watch strap to
connect.
4. Insert the spring bar of
the watch strap to replace
into the mounting hole of
the spring bar on the side
of the XPLORA Watch.
5. Push down the opposite
fastened spring bar to
insert it into the spring
bar groove of the other
spring bar.
12 4 5
3
6

Power ON/OFF
Power ON
Pressing the right middle button on the XPLORA Watch turns power on.
Power OFF
Poweristurnedoonlybylong-pressingtherightmiddlepowerbutton
on the XPLORA Watch. This feature is designed to prevent your child from
accidentallyturningpowero.
7

Description of the touch function UL screen
A touch screen is mounted on the front of the XPLORA Watch.
Touchthetouchscreenwithangerandusetheslidingfunction
to move left/right and up/down to display the desired menu.
You can use the touch screen as follows:
1.WhentheLEDscreenisturnedo,pressanybuttonontheXPLORAWatch
to turn the screen on. The screen is turned on.
2. Slide the screen to left. The menu screen is displayed.
3. The menus screen consists of Message, Send my location and MY Watch
screens. Slide the screen to the left and right to display the desired menu.
Touching the menu screen displays the default menu screen.
4. After moving the default menu screen, you can select the desired screen by
sliding left/right and up/down or touching the screen.
5. To go to the previous menu again, press the SOS button momentarily or slide
the top of the screen downward.
Touching Sliding to right Sliding to left Sliding upward Sliding downward
8

1. Slide the screen from right to left to display the phone menu screen.
Touching the phone menu screen displays the phone directory screen.
2. Slide the screen to the left and right until the desired number is displayed.
Touch the screen indicating the desired number to make a voice call.
3. Touching the call termination image on the screen during a call terminates
the call.
4. Touching the volume image on the screen during a call activates the volume
adjustment function. You can adjust the volume by touching the function.
5. To go to the previous menu again, press the SOS button momentarily or
slide the top of the screen downward.
Making a call SOS emergency call
When pressing the left SOS button for 3 seconds or longer, XPLORA Watch
automatically makes a call to the phone number of one of the administrators,
(Primary Contact).
- The call is made to the phone number of one of the administrators
depending on the settings of the XPLORA Watch.
- An SOS emergency call message is sent to the phone numbers of
up to 6 registered administrators.
* Phone numbers for emergency calling can be set on the XPLORA Watch
Mobile app of the smart phone.
9

1. When a message is received on the
XPLORA Watch, a message receiving
window appears.
2. Touching View displays an incoming
message.
Message receiving
Receiving a call
1. Touching the incoming call image
on the screen lets you receive an
incoming call.
2. Touching call termination on the screen
during a call terminates the call.
1. Sliding the menu screen downward displays the status indication/volume
adjustment screen.
2. Touching the volume adjustment bar allows adjusting the volume.
3. Touching the volume adjustment image allows muting the volume.
4. Touch the bottom of the screen to go to the menu screen.
Volume adjustment
10

Message viewing
1. Slide the screen from right to left to display the Message menu screen.
2. Touch the Message menu screen to go to the message screen.
3. You can slide the message screen to the left and right to view the
received messages.
4. To go to the previous menu again, press the SOS button momentarily
or slide the top of the screen downward.
1. Sliding the message screen upward displays the menu.
2. When you touch the Call button, a call is made to the phone number
that sent the incoming message.
3. Touching the Delete button displays the Delete/Delete All/Cancel screen.
4. Touching the Delete button deletes the selected message.
5. Touching the Delete All button displays the Delete All Messages screen.
6. Touching the Yes button deletes all messages.
Calling/deleting a message
11

Send my location
“Send my location” is a function used by the user of the XPLORA Watch to
send to his/her parents or administrators a simple message indicating his/
her current location. For example, when the user of the XPLORA Watch uses
this function when heading home from school, administrators can know that
the user is heading home from school even if the user does not make a call
to them. Administrators can identify the current location of the user of the
XPLORA Watch immediately by viewing the location information message
contained in the “Send my location” message sent by the user.
1. Slide right or left to choose
“Send my location” menu.
2. Touch “Send my location”
menu to “Send my location” screen.
3. Touching “Send my location” screen
sends maximum 6 administrators
text message with the location
information.
1. Slide right or left to choose Information menu.
2. Touch Information menu to display the data such as My Phone Number,
Model Name, S/W Version, Serial Number, Network Status, and
S/W upgrade button.
3. S/W upgrade is located in the end of Information screen.
4.TouchS/Wupgradetocheckthelatestrmwareandautomatically
download and install it.
-Nodatachargetodownloadarmware.
- Device should connect in power charging for S/W upgrade.
-Devicemayautomaticallyturnon/oseveraltimesifrequired.
- In order to proceed the S/W upgrade, please connect the charging cable.
- Please do not disconnect the charging cable or touch the device in the
middle of S/W upgrading.
Checking information/Software upgrade
12

Install XPLORA app
iOS app Android app
The XPLORA app is compatible with many mobile devices that support Android
and iOS operating systems. If you want to add new user(s) to be a guardian who
is authorised to manage XPLORA device, he or she needs to follow the same
procedures.
1. Make sure the XPLORA app is compatible with your mobile device by checking
http://www.myxplora.co.uk/devices.
2. Find the XPLORA app by entering “XPLORA” in the search box at the top of
the Google Play Store for Android devices or Apple App Store for iOS devices.
3. Install the app. Note that you’ll need an account with the applicable store
before you can download even a free app such as XPLORA.
4. When the app is installed, open it and tap “Start” to get started. You’ll be
guided through the process of creating a XPLORA account and connecting
(paring) your XPLORA watch to your mobile device. Paring makes sure the
XPLORA and mobile device can communicate with one another.
13

Activate the app
IfyouusetheXPLORAappforthersttime,youarerequiredtoactivatetheapp.
1. Choose the country code of your phone number and enter the rest of numbers. Tap “Next”.
2. 4 digit code will be sent to your mobile device via SMS (text) message. Note that in case the code is
not arrived in 3 minutes (180 seconds), you can request resending the code.
3. Once SMS (text) message arrives, enter 4 digit code in the box and tap “Next”.
4. If the app is successfully activated, you will be asked to create XPLORA account or log in if already
have an account. If not successful, you will be advised to follow the activation procedure again.
Note that if you already activate the XPLORA app but log out from the app, you will be asked to activate
the app again.
14

Create XPLORA account
You will need to create an account to use
XPLORA service. The login ID should be an unique
identication.Incasesomeoneelseisalready
usingit,youwillbeinformedtochoosedierent
login ID.
1.Forthersttimeuse,youneedtocreateyour
account. Tap “Register” to create an account.
2. Enter your ID and password to log in the app.
Open account
1. Select a user name of at least 6 characters.
2. Select your password at least 6 characters.
3. Verify your password by typing it in again.
4. Then tap Create Account.
15

Add XPLORA watch
You are able to add (pairing) XPLORA watch(s). Your XPLORA watch should come with the pre-installed
SIM card and phone number information inside the package. You need the phone number of XPLORA
watch to add it.
1. Ensure your XPLORA watch is turned on and connect to relevant mobile network by checking the
signal bar on the top of XPLORA display.
2. From the app, choose the country code of your XPLORA phone number and enter the rest of
numbers. Tap “Next”.
3. 4 digit code will be appeared on your XPLORA display. Note that in case the code is not appeared
in 3 minutes (180 seconds), you can request resending the code.
4. Enter 4 digit code in the box and tap “Next”.
5. If the XPLORA device is successfully added (paired), you are able to see the main menu and location
of the XPLORA. If not successful, you will be advised to follow the adding procedure again.
16

William
Main menu
1.ChooseXPLORAwatchesifyouaddmorethanonewatchandcongure
the XPLORA functions.
2. Display the list of product and service information about the product and
service.
3. Last known location of the XPLORA watch.
4. The child name and phone number of XPLORA watch. By tapping the
phone number, you are able to make a call to the child.
5. Main features such as Location, Schedule, Safety Zone and Message.
The main features may be vary by the app version or XPLORA devices.
2
3
5
1
4
17

William
Setting menu
If you added more than one XPLORA watch, multiple XPLORA icons will display on the top
of Setting menu. You can choose which XPLORA watch you want to manage.
1.Add/update/deleteXPLORAwatch(s).YoucanupdatetheuserproleofXPLORAwatch
by taping the XPLORA watch from the list. You can update the photo and name of XPLORA
watch.
2.CongurethedetailenvironmentoftheselectedXPLORAwatch.
3. Display the detail information of the current application.
4. Display the useful information about the service and contact information for further help
5. Log out from the app. To log in, you will be asked to activate the app again.
Refer to Activate the app guide.
1
2
3
5
4
18

Contacts
Guardians are the group of people or single user who is authorised to manage the app and contacts.
1.XPLORAwatchoersanoptiontoblocktheincomingcallsfromunknownphonenumbers.
If it turns on, it rejects all incoming calls except the phone numbers registered either Guardians
or Contacts.
2. If it turns on and SOS button from the watch is activated, it will make a high volume of Siren sound
to grab the attentions from the people nearby.
3. Guardians can be added maximum 4 people. A guardian should install and activate the app.
4. You can change the order of guardians. If SOS button is activated, the watch will make an
emergency call to the 1st guardian from the list. In case 1st guardian doesn’t answer the
emergency call, the watch will attempt to make a call to next guardian and repeat.
5. It displays the list of contacts.
6. You can add new contact who’s allowed to make and receive a call from the XPLORA watch.
If a contact is registered in the list, the contact person will be automatically added to the XPLORA
watch.
1
2
4
6
3
5
19
Table of contents
Other XPLORA Watch manuals

XPLORA
XPLORA 3S Instruction manual

XPLORA
XPLORA X5 Play Instruction manual

XPLORA
XPLORA 3S Instruction manual

XPLORA
XPLORA X5 Play Instruction manual

XPLORA
XPLORA CARE User manual

XPLORA
XPLORA X6 Play User manual

XPLORA
XPLORA XGO2 Instruction manual

XPLORA
XPLORA XGO3 User manual

XPLORA
XPLORA XGO2 Instruction manual

XPLORA
XPLORA XGO2 Instruction manual