XS Temp74 PT100 Vio User manual

INSTRUCTION MANUAL
Temp74 PT100

1
UM Temp74 PT100 Vio EN rev.1 19.05.2023
Italiano:
Per ridurre gli sprechi questo manuale è stato stampato solo in Italiano e Inglese.
Contatta il tuo distributore per la copia digitale multilingua.
English:
In order to be eco-friendly, this manual was printed in Italian and English only.
Contact your distributor, if you need the digital and multilingual copy.
Español:
Para reducir los gastos este manual ha sido impreso exclusivamente en italiano e inglés.
Contacta tu distribuidor para recibir la copia digital multi-idioma.
Deutsch:
Um umweltfreundlich zu sein, wurde diese Betriebsanleitung nur auf Italienisch und Englisch gedruckt.
Wenden Sie sich an ihren Händler, ob Sie die mehrsprachige digitale Kopie erhalten möchten.
Français:
Ce manuel a été imprimé seulement en Italien et en Anglais pour réduire les déchets.
Pour la version digitale multilingue veuillez contacter votre revendeur.

2
UM Temp74 PT100 Vio EN rev.1 19.05.2023
Summary
Security Information ................................................................................................................................4
•Definitions of warning words and symbols....................................................................................4
•Reporting deadlines ......................................................................................................................4
•Additional documents providing security information ..................................................................4
•Intended use .................................................................................................................................4
•Basic requirements for safe use ....................................................................................................5
•Unauthorised use ..........................................................................................................................5
•Device Maintenance......................................................................................................................5
•Responsibility of the instrument owner ........................................................................................5
Instrumental Characteristics ....................................................................................................................6
•Technical Data ...............................................................................................................................6
Description Instrument ............................................................................................................................6
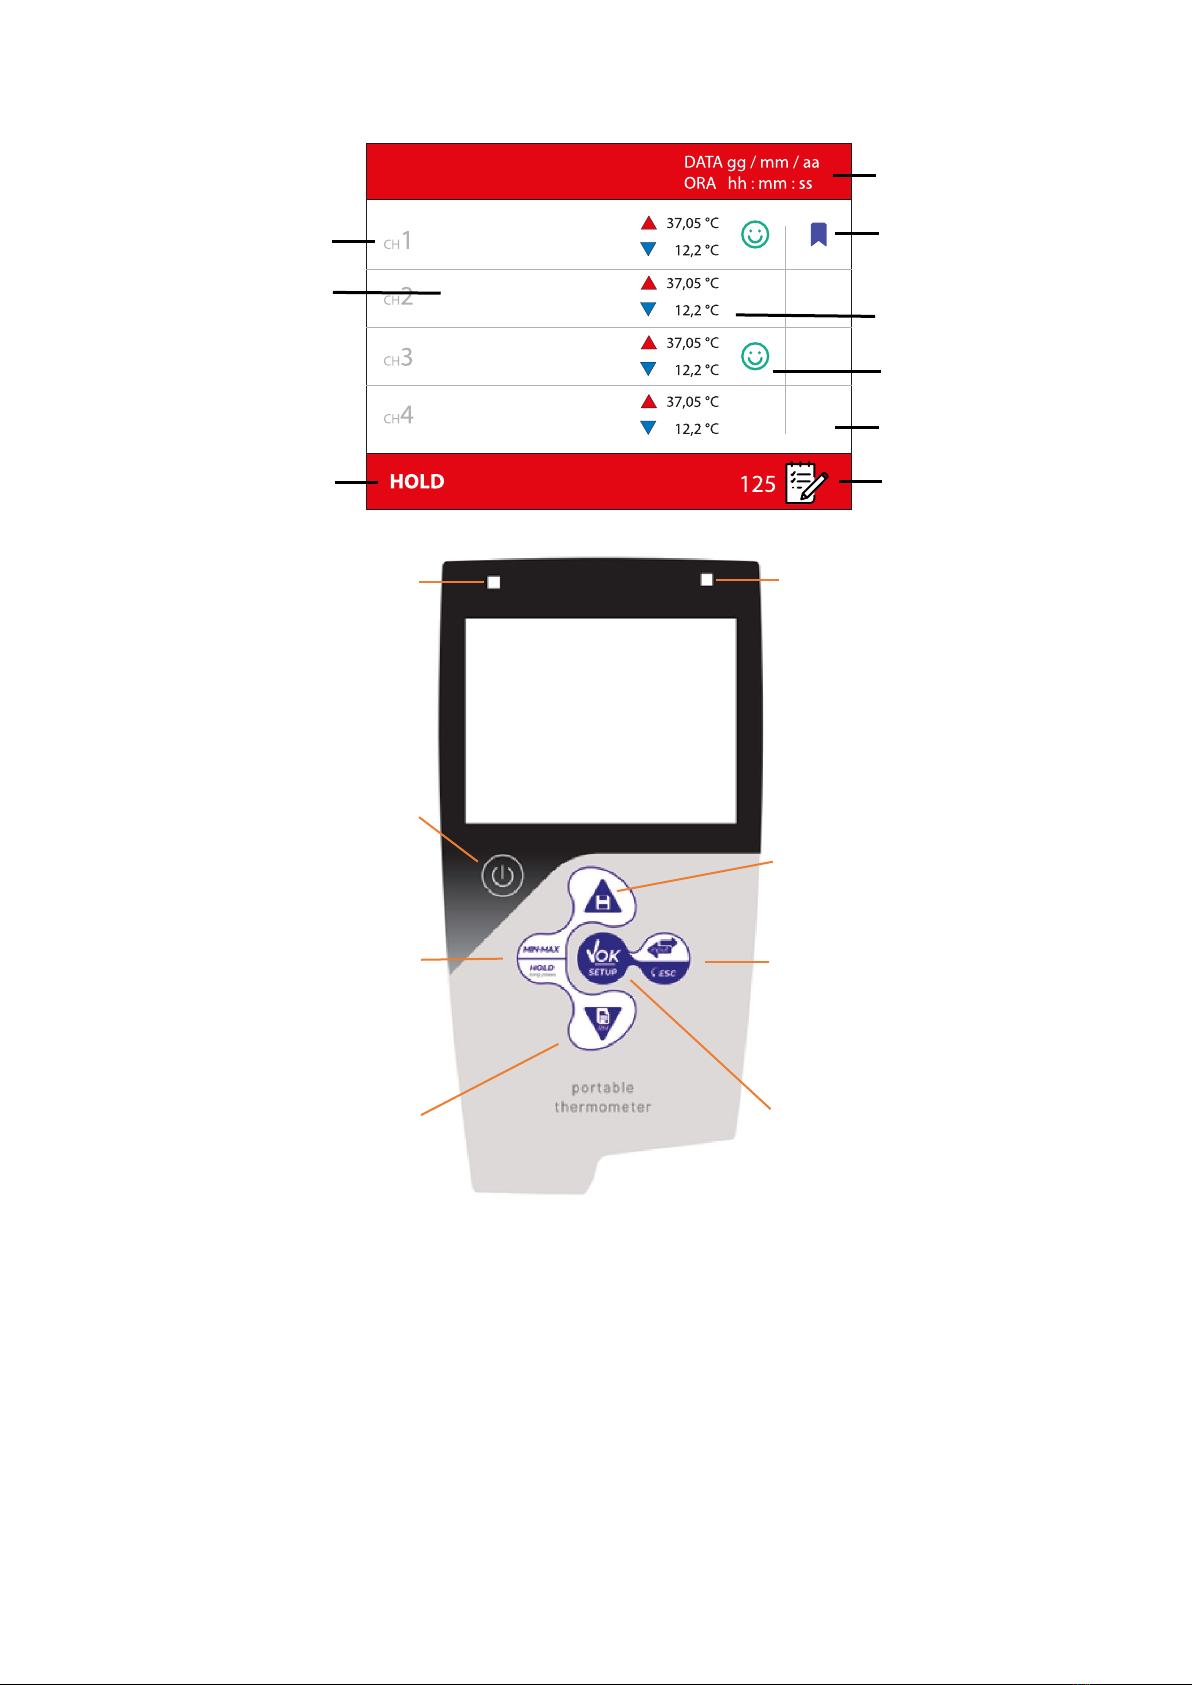
•Display single channel ...................................................................................................................6
•Multiview screen...........................................................................................................................7
•Keyboard .......................................................................................................................................7
•Key Functions ................................................................................................................................8
•LED ................................................................................................................................................8
Installation ...............................................................................................................................................8
•Supplied Components ...................................................................................................................8
•Commissioning..............................................................................................................................8
•Switching on and off......................................................................................................................8
•Replacing batteries........................................................................................................................9
•Instrument transport.....................................................................................................................9
•Input / Output Connections ..........................................................................................................9
•Symbols and icons on the display..................................................................................................9
Setup Menu ...........................................................................................................................................10
Temp Settings Menu ..............................................................................................................................10
•Sensor ID .....................................................................................................................................10
•Reference probe..........................................................................................................................11
•Offset...........................................................................................................................................11
•Calibration data ...........................................................................................................................11
•Resolution ...................................................................................................................................11
•Stability filter ...............................................................................................................................11
•Alarms .........................................................................................................................................12
•Reset ...........................................................................................................................................12
Log Settings Menu .................................................................................................................................12
•Logger Settings............................................................................................................................12

3
UM Temp74 PT100 Vio EN rev.1 19.05.2023
•Memory.......................................................................................................................................13
•Erase memory .............................................................................................................................13
Instrument Configuration Menu ............................................................................................................13
•Screen Settings............................................................................................................................14
•Date and time..............................................................................................................................14
•Units of Measurement ................................................................................................................14
•Language .....................................................................................................................................14
•Auto-off .......................................................................................................................................14
•Sound ..........................................................................................................................................14
•Password .....................................................................................................................................15
Temperature measurement ...................................................................................................................15
•Measure ......................................................................................................................................15
•MAX/MIN function ......................................................................................................................15
•HOLD function.............................................................................................................................15
Other functions......................................................................................................................................15
•Automatic switch-off ...................................................................................................................15
•Offset adjustment........................................................................................................................16
DataLink+ Software ................................................................................................................................16
Warranty ................................................................................................................................................17
•Warranty Duration and Limitations .............................................................................................17
Disposal..................................................................................................................................................17

4
UM Temp74 PT100 Vio EN rev.1 19.05.2023
Security Information
•Definitions of warning words and symbols
The safety information in this manual is very important in order to avoid personal injury, damage to the instrument,
malfunction or incorrect results due to non-compliance. Please read this manual carefully in its entirety and make
sure you familiarise yourself with the instrument before you start working with it.
This manual must be kept close to the instrument so that the operator can refer to it if necessary.
Safety instructions are indicated by warning terms or symbols.
•Reporting deadlines
WARNINGfor a medium-risk hazardous situation, which could lead to serious injury or death if not avoided.
WARNING for a hazardous situation with reduced risk which, if not avoided, may result in damage materials,
loss of data or minor or moderate injuries.
NOTICE for important product information.
NOTE for useful product information.
Warning symbols:
•Additional documents providing security information
The following documents can provide the operator with additional information to work safely with the measuring
system:
•specific notes on product safety.
•Intended use
This instrument is designed exclusively for temperature measurements both in the laboratory and directly in the
field. Pay particular attention to the technical specifications in the table INSTRUMENTAL CHARACTERISTICS /
TECHNICAL DATA; any other use outside these is considered unauthorised. This instrument left the factory in
perfect technical and safety condition.
Attention
This symbol indicates a potential risk and warns of proceeding with caution.
Attention
The instrument must be used according to the instructions in the reference manual.
Read the instructions carefully.
Notice
This symbol draws attention to possible damage to the instrument or instrumental
parts.
Notes
This symbol highlights further information and tips.
Attention
This symbol draws attention to a possible danger from electric current.

5
UM Temp74 PT100 Vio EN rev.1 19.05.2023
The proper functioning of the device and the safety of the operator are only guaranteed if all normal laboratory
safety regulations are observed and if all specific safety measures described in this manual are followed.
•Basic requirements for safe use
The proper functioning of the device and the safety of the operator are only guaranteed if all of the following
points are observed:
•the instrument may only be used in accordance with the mentioned specifications;
•the instrument must only operate under the environmental conditions described in this manual;
•the only part of the instrument that can be opened by the user is the battery compartment.
Perform other operations only if explicitly authorised by the manufacturer.
•Unauthorised use
The instrument must not be operated if:
•it’s visibly damaged (e.g. due to transport);
•it has been stored for a long period of time under adverse conditions (exposure to direct light, heat sources or
places saturated with gas or vapours) or in environments with conditions other than those mentioned in this
manual.
•Device Maintenance
If used correctly and in a suitable environment, the instrument requires no special maintenance procedures.
It is recommended to occasionally clean the instrument casing with a damp cloth and mild detergent. This
operation should be carried out with the instrument switched off and only by experienced and authorised
personnel. The housing is made of ABS/PC (acrylonitrile butadiene styrene/polycarbonate). This material is
sensitive to certain organic solvents, e.g. toluene, xylene and methyl ethyl ketone (MEK). If liquids were to enter
the housing, they could damage the instrument. Do not open the instrument housing: it contains no parts that can
be serviced, repaired or replaced by the user. In case of problems with the instrument, please contact your local
distributor. It is recommended to use only original spare parts. Contact your local distributor for information. The
use of non-original spare parts can lead to malfunction or permanent damage to the instrument. Furthermore, the
use of spare parts not guaranteed by the supplier can be dangerous for the user.
•Responsibility of the instrument owner
The person who owns and uses the instrument or authorises its use by others is the owner of the instrument and
as such is responsible for the safety of all users of the instrument and third parties. The owner of the instrument
must inform users of its safe use at their place of work and of the management of potential risks and provide the
required protective equipment. When using chemicals or solvents, follow the manufacturer's safety data sheets.

6
UM Temp74 PT100 Vio EN rev.1 19.05.2023
Instrumental Characteristics
•Technical Data
Tool
Temp74 PT100 Vio
Probes
PT100 (x4)
Inputs
4 x 3-pin connector
Measuring range
-200,0...+999,9 °C
Resolution
0.01 °C (-99.99 to +99.99 °C) / 0.1 °C in the rest of the scale
Accuracy
± 0.03 °C (-99.99 to +99.99 °C) / ± 0.1 in the rest of the scale
Display
TFT- 4" high definition
Brightness and contrast management
Manual and automatic with integrated sensor
Sleep Mode
Yes
Auto power-off
Yes, 20 minutes (can be deactivated)
LED Indication
Yes
Reading stability indicator
Yes Adjustable (Low-Nor-High)
Reading Hold (HOLD)
Yes
MAX/MIN reading
Yes
Offset Adjustment
Yes for each channel independently
Internal memory
200,000 data
Data logger
Manual- Automatic- Programmed
Sampling
1 min...99 hours
Working conditions
Temperature: 0...+60 °C / Humidity: <95% R.H. (non-condensing)
Maximum altitude of use
2000 m
Dimensions
185 x 85 x 45 mm
Weight
400 g
Degree of protection
IP 56
Sound level during operation
< 80 dB
Power supply
3 x 1.5V 'AA' alkaline
Battery life
> 550 hours
Reference Standards
EMC 2014/30/EU / RoHS 2011/65/EU / EN 61326-1
Description Instrument
•Display single channel
123456789
37,05 °C
12,2 °C 37,05 °C
min max
Measuring channel
Battery level
Stability indicator
Minimum value
HOLD function active
Date and time
Measured value
Sensor ID
Maximum value
Recorded Values
Data logger
Connection to PC
Temperature
System

7
UM Temp74 PT100 Vio EN rev.1 19.05.2023
•Multiview screen
•Keyboard
+0,02
-0,05
+0,04
37,05 °C
37,07 °C
37,00 °C
37,09 °C
Multiview
Measuring channel
Measured value
HOLD function active
Recorded Values
Deviation from
reference channel
Stability indicator
Min and max value
detected
Reference channel
(settable)
Date and time
Brightness sensor
On-Off button
to switch the device on and off
Max/Min key + HOLD
Short press to activate MAX/MIN
recording function, display MAX
and MIN values recorded.
Press for 3 seconds to activate
and deactivate the HOLD function
and to deactivate the MAX/MIN
recording function (if active)
Directional key DOWN / RM
to scroll through menus and values in
the Setup and manage data retrieval
LED
Directional Key Up/ Save
to scroll through menus and
values in Setup. Short press to
activate/deactivate
the data logging function
Directional INPUT/ ESC button to
change the screen type only with
both probes connected: channel
1, channel 2 or two channels
simultaneously. Short press
within a menu to return to
measurement mode
OK / Setup button
to confirm the chosen values and
enter Setup from measurement mode

8
UM Temp74 PT100 Vio EN rev.1 19.05.2023
•Key Functions
Key
Pressure
Function
Brief Press to switch the device on or off
Brief In measurement mode, press to enter Setup.
In the Setup menus, press to select the desired programme and/or value
Brief
Activating and deactivating the MAX/MIN recording function
Long
Activation and deactivation of the HOLD function.
Brief
Scroll through the measurement channel screens (CH 1-2-3-4-multiview).
Only channels to which a probe is connected are displayed.
Within the Setup menu, press to return to measurement mode
Brief
Used to scroll through and change parameter values in the Setup menu.
Manual- automatic data logger activation/deactivation
Brief
Used to scroll through and change parameter values in the Setup menu.
Recalling saved data
IMPORTANT:
•When Sleep mode is active (by default after two minutes of non-use of the instrument) press any key to
reactivate the display brightness.
•Only at this point do the buttons regain their function.
•LED
All instruments are equipped with a two-colour LED (red and green) that provides the user with important
information on the status of the system:
Function
LED
Description
Ignition
GREEN
Fixed
Shutdown
RED
Fixed
Instrument in Standby
GREEN
Flashing every 20 s
Stable size
GREEN
Flashing every 3 s
Error during measurement
RED
Flashing every 3 s
Confirmation of a selection / DataLogger (data storage)
GREEN
On for 1 s
Recalling saved data
GREEN/RED
0.5 seconds green and 0.5 seconds red
Installation
•Supplied Components
The instrument is always supplied in its own carrying case.
Inside the case there is always:instrument with batteries, user manual, connection cable and power supply.
•Commissioning
•The device leaves the factory ready for use by the user.
•Batteries are already included.
•Switching on and off
Switch the system on by pressing the button.
They will be displayed:
•device model and software;
•offset of the 4 channels;
•temperature measurement screen;
•to switch off the instrument, press the button in measurement mode.

9
UM Temp74 PT100 Vio EN rev.1 19.05.2023
•Replacing batteries
The instrument runs on 3 AA 1.5V batteries. For replacement:
1. switch off the device;
2. turn the instrument downwards, with the connector part resting on a table top, so that the battery
compartment cap is facing upwards, towards the user;
3. while holding the battery compartment cap with two fingers, completely unscrew the screw next to the battery
symbol with a screwdriver;
4. remove the battery compartment cap;
5. remove the 3 spent batteries and insert new ones. Pay attention to correct polarity. Follow the diagram above
the battery symbol in the rear compartment of the instrument;
6. reinsert the battery compartment cap; hold it in place with two fingers, insert the screw and screw in.
•Instrument transport
The instrument always comes with its own carrying case. Only use the original carrying case to transport the
instrument. Contact your local distributor if you need to buy it back. The inside of the case is shaped to
accommodate the instrument and sensors.
•Input / Output Connections
Only use original accessories guaranteed by the manufacturer. If necessary, contact your local distributor.
Read the manual before connecting the probes
•Symbols and icons on the display
Symbol
Description
Error in measurement
Battery charge indication
Measurement Stability Indicator
Automatic Datalogger
Programmed Datalogger
Number of data stored in data logger mode on instrument memory
Press the arrow buttons to change the parameter or value on the display
Instrument connected to the DataLink+ software
Reference channel
Minimum and maximum values
Measuring channel displayed
Micro USB
PC and Power supply connection
CH4
3 pin connector
for PT100 sensor
CH2
3 pin connector
for PT100 sensor
CH3
3 pin connector
for PT100 sensor
CH1
3 pin connector
for PT100 sensor

10
UM Temp74 PT100 Vio EN rev.1 19.05.2023
Setup Menu
TEMP: Measurement Settings
LOG: Data logger settings
SETTINGS: General Instrument Settings
•In measurement mode, press the button to enter SETUP mode.
•Within the setup, move through the different menus using the buttons and press the button to access
the submenu you wish to edit.
•Press to return to the previous menu and to exit without saving.
Temp Settings Menu
The TEMP Settings menu contains all settings concerning the measurement.
TEMP: Measurement Settings
LOG: Data logger settings
SETTINGS: General Instrument Settings
•In measurement mode, press to enter the SETUP menu.
•Press the button to access the TEMP SETTINGS menu.
•Use to select the programme you wish to access.
The table below shows the Setup menu structure for the parameter, for each programme the options the user can
choose and the default value:
Description
Options
Factory Settings
Sensor ID
Probe 1- Probe 2- Probe 3- Probe 4
Reference probe
Probe 1- Probe 2- Probe 3- Probe 4
Offset
Probe 1- Probe 2- Probe 3- Probe 4- Align all
Calibration Data
Resolution
1 °C- 0.1 °C- 0.01 °C
0,01 °C
Stability filter
Low- Normal- High
High
Alarms
Probe 1- Probe 2- Probe 3- Probe 4
Deactivated
Reset
No- Yes
No
•Sensor ID
Access this menu to enter an ID (identification code) to one or more connected channels.
•Select which channel you wish to identify.
•Starting with the digit with the flashing curs o r, enter the desired value using the keys and press to
move to the next digit.
•A code with a maximum length of 10 digits can be entered.
Note
: If you select a channel with no probe connected, the display will show the error message: "CONNECT THE
PROBE", accompanied by the icon flashing .

11
UM Temp74 PT100 Vio EN rev.1 19.05.2023
•Reference probe
Through this menu we can select the Reference Probe. In the right column of the Multiview screen, for each
channel, the difference of the measurement from the reference channel will be displayed.
•Offset
The Offset menu allows you to adjust the measurement of each individual channel independently or to align all
measurements to the reference channel.
Offset adjustment (single channel)
•Select which individual channel you wish to adjust (Probe 1-2-3-4-) or select Align All to align all readings to the
reference channel.
•Choosing a single channel will open the screen allowing adjustment of the channel value in real time.
At the top the real-time reading is shown, at the bottom the adjustment value.
•Using the buttons change the 'Adjustment' value until the desired 'Current Temperature' is reached and
press to confirm.
Note
: An adjustment of a maximum of ± 5.00 °C from the current temperature can be made.
If you select a channel with no probe connected, the display will show the error message: "CONNECT
THE PROBE", accompanied by the icon flashing . If the offset has never been changed or a reset
has been carried out, the message ''Offset 0.00 °C'' will be shown for each channel.
Offset adjustment (align all)
This function allows the measurements of all channels to be aligned to the reference channel.
•Select our reference channel from the Setup menu Temp Settings-> Reference Probe and press to
confirm.
•In the Offset Probes menu, select Align All.
•The measurements of all channels will be aligned to the measurement of the reference channel.
•Calibration data
Accessing the Calibration Data menu will display the calibration data for each channel.
In addition to the value of the adjustment, the date and time at which it was made are displayed.
If no offset has been entered, 0.00 °C appears. The same screen is displayed each time it is switched on.
•Resolution
The Resolution menu allows you to select how many decimal digits to show in measurement.
By default, the instrument is set with the highest resolution (0.01 °C).
Using the buttons select the desired resolution and press to confirm.
•Stability filter
In order for a value reading to be considered true, it is advisable to wait for measurement stability, indicated by
the icon . Using the buttons select the desired degree of stability and press to confirm.
•Low: with variations less than or equal to 3 hundredths of a degree, the stability icon remains fixed and
indicates the stable value.
•Nor: with variations less than or equal to 2 hundredths of a degree, the stability icon remains fixed and
indicates the stable value.
•High: with variations less than or equal to 1 hundredth of a degree, the stability icon remains fixed and
indicates the stable value.
+0,02
-0 ,05
+0,04
37,05 °C
37,07 °C
37,00 °C
37,09 °C
Multiview

12
UM Temp74 PT100 Vio EN rev.1 19.05.2023
•Alarms
A range, consisting of a minimum and a maximum value, can be set for each channel.
If the alarm is enabled, the moment the measurement exceeds the set range the instrument will signal an error.
•Select the channel on which we want to set the alarm.
•Press to enable the alarm on the channel.
•The cursor will move to the value 'Minimum Threshold: Set the minimum threshold using the keys and
press to confirm.
•The cursor will move to the value 'Maximum threshold: set the maximum threshold using the keys and
press to confirm.
Once in measurement, should the channel measurement exceed the values entered, the instrument will signal the
alarm both visually and by an acoustic signal.
Note
: The blue-coloured measurement indicates that the temperature has fallen below the set minimum threshold.
The red-coloured measurement indicates that the temperature has risen above the maximum set
threshold.
•Reset
Access this Setup to reset the thermometer to its factory settings.
Resetting will reset all values to the default values shown in the table above.
Note
: When the reset is complete, the instrument returns to measurement mode and the parameters are reset to
default settings.
Log Settings Menu
TEMP: Measurement Settings
LOG: Data logger settings
SETTINGS: General Instrument Settings
The table below shows the Setup menu structure for the parameter, for each programme the options the user can
choose and the default value:
Description
Options
Factory Settings
Logger settings
Manual- Automatic- Programmed
Automatic
Memory
Erase memory
No- Yes
No
•Logger Settings
Access this menu to select the data acquisition mode:
•
Manual
: The data is only acquired when the user presses the button;
•
Automatic
: The data is acquired autonomously by the instrument at regular intervals, set in this menu.
The acquisition interval (1 second to 99 hours) and the departure delay (00:00:00 = no delay) will be
requested;
•
Scheduled
: allows you to enter start date and time, end date and time, and acquisition interval.
The instrument will autonomously save data starting at the start date and time and stopping at the end date and
time.
Automatic logger- Setting the Automatic Data Logger
First set the acquisition interval (hh:mm:ss) then the delay (hh:mm:ss). Use the arrows to change the flashing
value. Press to confirm and move to the next value.

13
UM Temp74 PT100 Vio EN rev.1 19.05.2023
Automatic start/stop of the data logger
In measure press to start or stop automatic recording. When automatic data storage is running, the icon
flashes on the display. When set, but not in operation, the icon on the screen remains fixed. When the memory is
complete, recording stops automatically.
Note
: Entering the Setup menu stops recording. If recording takes place while there is a single channel
measurement on the display, data concerning only that channel will be saved. If recording takes place
while the display is showing the multiview screen, data concerning all channels available at the same
time will be saved.
Programmed logger- Setting the Programmed Data Logger
Set in order: start date (dd:mm:yy)- start time (hh:mm:ss)- end date (dd:mm:yy)- end time (hh:mm:ss)-
acquisition interval. Use the arrows to change the flashing value. Press to confirm and move to the next
value.
Programmed Data Logger Start/Stop
A flashing icon will appear in measurement. The instrument will start recording data independently once the
set date and time is reached and will stop.
Note
: If recording takes place while there is a single channel measurement on the display, data
concerning only that channel will be saved. If recording takes place while the display is showing the
multiview screen, data concerning all channels available at the same time will be saved.
•Memory
This menu shows the percentage of memory available, memory used and the number of saved data.
•Erase memory
Access this menu and select 'Yes' to delete saved data. At the end of deletion, the instrument returns to the
measurement screen.
Instrument Configuration Menu
TEMP: Measurement Settings
LOG: Data logger settings
SETTINGS: General Instrument Settings
The table below shows the Setup menu structure for the parameter, for each programme the options the user can
choose and the default value:
Description
Options
Factory Settings
SCREEN SETTINGS
THEME COLOUR
Light theme- Dark theme
Clear theme
STANDBY
No- 30 sec- 1, 2, 5 minutes
30 seconds
BACKLIGHTING
Car- Indoor- Outdoor
Cars
BRIGHTNESS
Low- Normal- High
Normal
DATE AND TIME
---
---
UNIT OF MEASUREMENT
°C- °F
°C
LANGUAGE
Ita- Eng- Fra- Deu- Esp
Ita
AUTO SWITCH-OFF
No- Yes, after 20 minutes
No
SOUND
No- Alarm only- Yes
No
PASSWORD
---
---
RESET SETTINGS
No- YES
No

14
UM Temp74 PT100 Vio EN rev.1 19.05.2023
•Screen Settings
This menu contains the display configurations:
Colour Theme
You can select Light Theme or Dark Theme, depending on your personal preferences or conditions of use.
Standby
Access this Setup menu to select whether and after how long to activate the device's power-saving mode.
•OFF: Mode deactivated.
•30 sec, 1,2,5 MIN: The instrument enters standby mode if no key is pressed for the set time.
When the device is in standby mode, the brightness of the display is reduced to a minimum, which saves
significantly on battery consumption.
Note
: To exit standby mode and return the display to normal brightness, press ANY button. Once the
display brightness is restored, the buttons regain their function (section 'Button Functions').
Backlighting
Access this Setup menu to adapt the visibility of the display to the environment:
•INDOOR (In) - Recommended when using the device indoors;
•OUTDOOR (Out) - Recommended if using the device outdoors;
•AUTO - Factory setting. Thanks to the brightness sensor, the display automatically adapts to the ambient
conditions. This mode also guarantees a longer battery life.
Brightness
Access this Setup menu to choose between three different display brightness levels:
•Low
•Normal
•High
Note
: Keeping the display at high brightness at all times negatively affects battery life.
•Date and time
Access this setup menu to update the date and time of the device. Use to change the time, confirm with
and repeat the same operation for minutes, day, month and year.
•Units of Measurement
Access this setup menu to select the desired unit of measurement, ° Celsius or ° Fahrenheit.
Important
: by setting a different unit of measurement, the offset will also be converted to the new unit of
measurement. The offset correction is also visible when the instrument is switched on.
•Language
Access this setup menu to select the language of the instrument from the 5 selectable languages:
•Italian, English, French, German and Spanish.
•Auto-off
Access this Setup menu to activate or deactivate the instrument's auto switch-off.
•No: The instrument always remains switched on.
•Yes: The instrument switches off automatically after 20 minutes of inactivity.
Note
: With an automatic or programmed data-logger set, the auto-off is automatically deactivated.
•Sound
Access this menu to set whether the sound should always be on (every time a button is pressed), always off or
only activate when the instrument detects an alarm.

15
UM Temp74 PT100 Vio EN rev.1 19.05.2023
•Password
Through this menu it is possible to enter a 4-digit password, which will be required later to enter the Temp and
Log menus, in order to safeguard sensitive settings. To enter or change the password, proceed as follows:
•access the Password menu;
•enter the current password (*) using to change the digit with the blinking cursor, and press to confirm
and move to the next digit;
•the words change password appear: you can now enter the desired password;
•press the button until you return to the measurement screen.
The password is now set correctly and will be required to access the TEMP settings and LOG settings menus.
Note:
*When first set up after purchase, the factory password is 0000.
To deactivate the password lock, set password: 0000.
Temperature measurement
•Measure
•Switch the instrument on with the button.
•When switched on, they are displayed in order:
- start page with software version;
- calibration data page: the calibration data of each channel are shown;
- if several probes are connected, the instrument shows the multiview screen;
- if only one probe is connected, the dedicated channel page is accessed.
•Place the probe(s) at the point to be measured and wait for stability.
•When the reading becomes stable, the icon appears on the display. Always wait for the measurement to
become stable.
Note
If no temperature probe is connected, the message 'CONNECT A PROBE' appears.
When connecting or disconnecting probes, the instrument will automatically update the measurement
screen to show the temperatures of the connected probes on the display.
•MAX/MIN function
During measurement, press the button to display the minimum and maximum values.
The following symbols will appear on the display:
The values are updated in real time, as long as the function remains active.
To deactivate the MAX/MIN function, press the button, the values will disappear from the display.
Note
: If auto switch-off is set, then the instrument will switch off after 20 minutes. If you intend to record minimum
and maximum values over a longer period of time, it is necessary to disable the auto switch-off.
MAX/MIN values are not saved in the instrument's memory and cannot be exported.
However, they can be easily obtained from the Excel file available on the DataLink+.
•HOLD function
During measurement, press and hold the button for 3 seconds to freeze the reading. HOLD appears on the
display and the reading is no longer updated. Press and hold for 3 seconds to unlock the reading.
Other functions
•Automatic switch-off
The instrument switches off automatically after 20 minutes of inactivity.
To disable auto power off, go to SetupSettingsAuto Power Off and select No.
Maximum measured value
Minimum measured value

16
UM Temp74 PT100 Vio EN rev.1 19.05.2023
•Offset adjustment
All instruments are factory pre-calibrated and remain stable over time, but in the event of a reading error, the
measuring chain can be recalibrated to eliminate this error.
In the setup menu- Temp Settings- Probe Offset it is possible to adjust the measurement of each individual
channel independently or to align the measurements of all channels to the reference channel.
Example: Single channel calibration at 0.0 °C
To recalibrate the instrument at 0.0°C, proceed as follows:
•prepare ice with double-distilled water;
•put ice cubes in a 500 ml beaker up to half the volume;
•add double-distilled water to ¾ of the volume;
•place the beaker on a magnetic stirrer under gentle agitation;
•immerse the probe in the beaker, ensuring that it is immersed in water and does not touch the beaker wall;
•cover the beaker with polystyrene to isolate the water/ice mixture from the air as much as possible;
•leave to stir for about 10 minutes;
•wait until the temperature reaches 0°C.
If the instrument reads 0.0°C (± measuring chain accuracy), this means that the measuring chain is correctly
calibrated. Otherwise:
•access the Setup menuTemp SettingsOffset probes;
•select the channel to be adjusted;
•the display will show the current temperature, which is to be corrected, and the adjustment value, with
flashing cursor;
•using the keys correct the value to 'Current Temperature' to 0.0 °C;
•press to confirm and record the adjustment.
Note
: The adjustment affects the entire measurement scale, e.g. if you correct by -1.0°C, then the
measurement shifts by -1.0°C over the entire range. The setting made in this way remains in memory
both after switching off the instrument and in case of replacement of batteries.
If the sensor is replaced, we recommend resetting the factory calibration from the Temp Settings
menu
Reset and proceed with a new calibration if necessary. If the sensor is replaced, we recommend resetting
the factory calibration from the Temp Settings menu
Reset and proceed with a new calibration if necessary.
If there is no probe connected to the selected channel, the offset cannot be changed.
DataLink+ Software
It is possible to connect the Temp 74 to a PC and use the DataLink+ software to perform data downloads,
recording directly on the PC and exports to Excel and PDF.
The software can be downloaded free of charge from the site:
•https://www.giorgiobormac.com/it/download-software_Download.htm.
•Connect the USB cable inside each package to the USB port on the top panel of the instrument and the other
end to a COM port on your computer.
•Only use the USB cable supplied with each instrument.
•Start the programme and then switch on the instrument.
•Wait for the connection to be established (connection data are shown at the bottom left of the display).

17
UM Temp74 PT100 Vio EN rev.1 19.05.2023
Warranty
•Warranty Duration and Limitations
•The manufacturer of this appliance offers the end user of the new appliance a three-year warranty from the
date of purchase in the event of proper maintenance and use;
•During the guarantee period, the manufacturer will repair or replace defective components;
•This guarantee applies only to the electronic part and does not apply if the product has been damaged,
misused, exposed to radiation or corrosive substances, if foreign materials have penetrated into the product, or
if modifications have been made that have not been authorised by the manufacturer .
Disposal
This equipment is subject to regulations for electronic devices.
Dispose of in accordance with existing local regulations.

18
UM Temp74 PT100 Vio EN rev.1 19.05.2023
XS Instruments
Via della Meccanica n.25
41012 Carpi (MO) ITALY
Tel.+39059.653274 Fax
This manual suits for next models
1
Table of contents
Other XS Analytical Instrument manuals