XTM Racing Baja Outlaw User manual

1
Need help or have any questions? Email us at service@globalhobby.net
Thank you for purchasing the XTM Racing Baja Outlaw 4WD nitro truck. These Operating Instructions and separate Quick
Start Guide are provided to help you enjoy your new Baja Outlaw nitro truck without any of the hassles you might expect.
Please read through all of the literature that is provided with your truck. Doing so will help you become familiar with how
your truck, engine and radio system operates.
IMPORTANT
Before running your new truck, please read and understand the warnings listed on the next page. Failure to do so could lead
to bodily harm and/or injury. The Baja Outlaw 4WD nitro truck is not intended for those under 12 years of age, unless
closely supervised by an adult.
XTM Racing products are distributed exclusively by Global Hobby Distributors 18480 Bandilier Circle, Fountain Valley, CA 92728
All contents copyright © 2001, Global Hobby Distributors Version V1.0 May 2001
OPERATING
INSTRUCTIONS
OPERATING
INSTRUCTIONS

2Need help or have any questions? Call us at 1-714-963-0329
FOR YOUR SAFETY - PLEASE READ THESE WARNINGS!
ENGINE WARNINGS
●Never use any other fuel in your engine other than glow
fuels specifically designed for use in model car engines. Use of
any other types of fuel can cause severe damage to the engine
and/or personal injury. NEVER use gasoline!
●Never operate your model on any public streets. This could
cause traffic accidents, personal injury or property damage.
●Glow fuel engines emit exhaust vapors that are poisonous
and can be dangerous to your health. It is important that you
operate your engine in a very well ventilated area, preferably
outdoors.
●Before starting the engine, make sure that the throttle trim is
set to the idle position. Starting the engine at any setting above
idle can cause the truck to lurch out of your hands.
●When the engine is running, there are certain parts that ro-
tate at high speeds. Be careful not to touch the drive shafts,
gears, clutch assembly or any other moving parts. Serious in-
jury could result.
●It is normal for the engine and tuned pipe to get very hot
during operation, especially the cylinder head and muffler or
tuned pipe. Never touch the engine or muffler assembly while
they are hot.
●Model car engines produce vibration when they are run-
ning. It is important to periodically check the engine mounting
screws, muffler screws and other assemblies to ensure they are
tight. Running the engine with the engine mounting screws loose
can lead to severe engine and/or chassis damage.
FUEL WARNINGS
●Nitro fuels like those used in your XTM Racing nitro truck
are poisonous. Follow all the precautions that are printed on the
fuel manufacturer's container.
●Keep fuel out of the reach of children.
●Nitro fuel is extremely flammable. Keep away from high
heat, sparks and flame.
GENERAL TRUCK WARNINGS
●Under no circumstances should you operate your model in
crowds of people. Serious injury could result.
●Never operate your model on busy streets or if there are cars
around. Never drive your model at night, either.
●Do not use your model to chase pets or other animals.
●The radio system included in your model is not waterproof.
Therefore, do not drive through water, wet grass or mud.
●Because your model is operated by radio control, it is im-
portant to make sure you always are using fresh and/or fully
charged batteries. Never allow your batteries to run low or you
could lose control of the model.
●If your model becomes stuck, allow the engine to idle, then
retrieve your model by hand.
●To prevent excessive r.p.m.'s from damaging the engine
and/or drive-train components we suggest reducing throttle while
in the air during jumps.
If you should have any trouble with any of the steps listed in these Operating Instructions, we have provided extensive Troubleshooting
Guides beginning on page # 12. The troubleshooting guides are provided to help you find a quick and immediate resolution to any
number of problems that might occur. If you cannot solve a problem using the troubleshooters, or if you have any other questions or
concerns, please contact us below:
XTM Racing Customer Service
18480 Bandilier Circle
Fountain Valley CA 92728
Phone (714) 963-0329
Fax (714) 964-6236
Email: service@globalhobby.net
For Your Information
Replacement Parts
Eventually you will need to purchase replacement parts for your nitro truck. For your convenience, we have listed beginning on
page # 14 the replacement parts that are available for purchase. When you need to purchase any parts, please check with your local
XTM Racing dealer. If your local dealer does not carry XTM Racing products you can order replacement parts directly from us by
calling us at the phone number listed above.

3
Need help or have any questions? Email us at service@globalhobby.net
Our Recommendations
This section lists the recommended items necessary to run and maintain your new Baja Outlaw nitro truck. We have tested these items
extensively with the Baja Outlaw and found that they offer the best in reliability and value.
FUEL
Fuel can make a big difference in the way your engine performs. For the break-in period you should use a fuel specifically designed for
R/C car engines that contains no more than 20% nitromethane. Once the engine has been adequately broken in (about 30 minutes of
run-time) you can switch to an R/C car fuel containing up to, but no more than, 30% nitromethane.
☛We do not recommend using fuels designed for R/C airplane engine use. These fuels do not contain the proper amount of
lubricants; therefore, they will cause the engine to overheat and severe damage to the engine will result.
Use the following fuels for the best performance:
Trinity 16% Nitro Car Fuel - Part # 837826 (use this for break-in)
Trinity 30% Nitro Car Fuel - Part # 837832 (use this after break-in)
GLOW PLUG WRENCH
A long reach glow plug wrench is necessary to easily and quickly
remove and replace glow plugs. The Magnum Long Reach Glow
Plug Wrench is a good choice.
YOU SHOULD ALSO PURCHASE SOME SPARE GLOW PLUGS
Even though your Baja Outlaw comes with a glow plug already installed in the engine, glow plugs wear out, especially during the
break-in period; therefore, it's a good idea to have a couple of spares handy. The glow plug can make a big difference in how your
engine performs. We recommend using a "hot" type glow plug intended specifically for performance engines like the Thunderbolt
Standard Long # 115568 or the McCoy MC-59 # 690215. Do not use "cold" glow plugs or those intended for four cycle airplane
engines. Using the wrong type of glow plug will cause the engine to run erratically and make it difficult to tune properly.
GLOW STARTER
A glow starter is a battery operated device that when attached to the
glow plug, heats the glow plug so that the engine can start. The
glow starter is then removed after the engine is running. The Mag-
num Long Reach Glow Started is a perfect choice.
FUEL BOTTLE
Because fuel is packaged in quarts or gallons, you will need to use a
smaller bottle with an extension tube or wand to fill the fuel tank.
Fueling using this method is much easier and a lot less messy. The
Magnum 1/2A Fueling Bottle is a good choice.
Fuel Bottle Part # 237360
Glow Plug Wrench Part # 237425
Glow Starter Part # 237428

4Need help or have any questions? Call us at 1-714-963-0329
Other Recommended Items
●Trinity "8 Pack" AA Alkaline batteries for the transmitter -- Part # 837801
●Trinity "4 Pack" AA Alkaline batteries for the receiver -- Part # 837800
●Pacer After-Run Oil to "wet" the air filter and to lubricate the engine -- Part # 339127
●Emerald Nitro Car Cleaner to clean the chassis and engine -- Part # 340196
●Small flat blade screwdriver to make engine adjustments
●Adjustable wrench to make chassis adjustments
Becoming Familiar with Your Baja Outlaw Nitro Truck
Continued on Next Page
●Each radio system comes with crystals and stickers on the back of the transmitter and on the receiver showing which frequency the
radio operates on (either in the 27Mhz or 75Mhz band). No two radio systems can operate nearby each other if they are on the same
frequency. You can purchase transmitter and receiver crystals separately and change them if you plan on running your truck with other
people. Listed below are the frequencies available for your radio system.
Battery Cover: This cover houses the 8 AA Alkaline batteries that power the transmitter.
Crystal: This is the frequency crystal of the transmitter. You can change crystals in both the transmitter and the receiver (in the truck)
so that you and your friends can drive at the same time. No two radio systems nearby can be on the same frequency.
On/Off Switch: Turns the transmitter on and off. Two L.E.D.'s show the power of the batteries.
Servo Reversing Switches: Allows you to quickly and easily switch the direction the servos rotate by just flipping the switches on the
top of the transmitter.
Steering Wheel: Controls the trucks steering. Turn the wheel to the right and the truck turns right. Turn the wheel to the left and the
truck turns left.
Throttle/Brake Trigger: Controls the speed and braking ability of your truck. Pull the trigger to accelerate, release the trigger to
decelerate and push the trigger to brake.
Trim Levers: These levers, one for steering and one for throttle/brake control, allow you to fine tune the servo's center by sliding the
levers on the transmitter.
Channel # Frequency Part # (tx/rx)
67427xx/66427xx
01 16.995
02 27.045
03 27.095
04 27.145
05 27.195
06 27.255
61 75.410
90 75.990
Through 67475xx/66475xx
Notethat"xx"istheactualchannelnumberyouwant
to purchase.
27Mhz
75Mhz

5
Need help or have any questions? Email us at service@globalhobby.net
Antenna: The antenna is part of the receiver. It receives the signals broadcast by the transmitter.
Battery Holder: The batter holder holds the 4 AA Alkaline batteries that power the receiver.
Body Post: The body is held to the chassis using four body posts. The body posts are adjustable so you can adjust the height of the
body on the chassis.
Bumper: The bumper is molded from high-impact plastic to provide excellent dampening in case of a front-end crash.
Engine: The engine is a nitro fuel powered device that uses a glow plug to ignite the fuel/air mixture. Modern R/C car engines are very
simple compared to "full-size" engines.
Fuel Tank: The fuel tank holds the fuel that your engine uses. This fuel tank includes a pump to prime the engine and a fuel pressure
nipple that connects to the tuned pipe to pressurize the fuel system.
Shock: The shocks used on the Baja Outlaw are oil-filled and use a spring that is well suited for most off-road conditions. The shocks
can be easily tuned for different driving conditions.
Steering Servo: This servo controls the truck's steering. A "servo saver" is installed to help prevent the servo gears from being
stripped out.
Tie-Rod: The tie-rod connects between the steering linkage and the castor block. The tie-rods are adjustable to you can make toe angle
adjustments.
Tuned Pipe: The tuned pipe is an expansion muffler that greatly increases the power output of the engine.
Throttle/Brake Servo: This servo controls both the engine's throttle and the truck's brake.
Wheel/Tire Assembly: The Baja Outlaw includes molded rubber tires with a tread pattern that is good for most off-road applications.
The wheels are spoke-style and molded from high-impact plastic for strength.

6Need help or have any questions? Call us at 1-714-963-0329
Preparing to Run Your Baja Outlaw Nitro Truck
Now that you are familiar with the major component parts of your truck, and with the functions of the Hitec Lynx Sport transmitter, it's
time to prepare your model for it's first run.
❑Follow steps # 1 through # 16 in the Quick-Start Guide to prepare your model for its first run.
Range Checking the Radio System
To prevent any chance of a runaway model, the radio system should be range checked before the first run of the day and/or after a crash.
To range check the radio system, do the following:
❑Turn the transmitter on first, followed by the receiver.
❑Extend the transmitter antenna completely.
❑With the truck on the ground (without the engine running) walk away from the truck about 150 feet. Move the steering wheel while
looking at the truck's wheels. The wheels should pivot smoothly back and forth as you rotate the steering wheel back and forth.
☛If the radio system does not operate properly, please refer to the troubleshooting guide on page # 12 before going further.
WARNING
Never attempt to operate your model if the radio control system is not functioning properly. Doing so could be harmful to others around
you and/or to your model.
Double Check the Steering and Throttle/Brake Controls
❑With the transmitter and the truck turned on, rotate the
transmitter's wheel forward (to the right). The front wheels on the
truck should turn right.
☛If they don't, flip the steering servo reversing switch on the
top of the transmitter to change the direction.
❑Rotate the transmitter's wheel backward (to the left). The front
wheels on the truck should turn left. Let go of the wheel. The
truck's wheels should return to center.
☛If the wheels do not point straight ahead (center) after you
return the steering wheel to center, move the steering trim lever on
the transmitter to adjust the wheels so that they point straight ahead.
Continued on Next Page

7
Need help or have any questions? Email us at service@globalhobby.net
❑Pull back on the throttle trigger. The carburetor rotor should
open completely.
❑Let go of the trigger and the carburetor rotor should go back to
its idle position - open about 1/16".
☛If the carburetor rotor does not open when you pull back on
the trigger, flip the throttle servo reversing switch on the top of the
transmitter to change the direction.
☛If the carburetor rotor does not open completely, move the
throttle trim lever on the transmitter until the rotor is opened com-
pletely when you pull back completely on the trigger.
❑Push the throttle trigger forward. The carburetor rotor should
stay in the idle position and the brake lever should move forward to
engage the brake.
❑Let go of the trigger and the brake lever should disengage.
☛You can adjust the brake linkage by sliding the wheel collar
(on the brake linkage wire) forward or back. See page # 11 for
more details.
Installing the Body
❑Using a pair of scissors cut out each decal along its outer edges.
❑Carefully adhere the decals to body using the photos on the box cover to position the decals.
❑Double check that no parts of the
body touch the tires or the exhaust pipe. If
any parts are touching, remove the body
and use a pair of scissors to trim the body
to clear any obstructions.
❑The body height can be adjusted by re-
moving the screws holding the body posts
in place, readjusting the height of the posts,
then reinstalling and tightening the screws.
☛Make sure to leave enough clearance
for shock travel.
❑Place the body onto the chassis, mak-
ing sure the four predrilled holes in the body
slide over the four body posts.
❑Place one plastic washer over each
body post and secure the body in place us-
ing four metal body clips.

8Need help or have any questions? Call us at 1-714-963-0329
Becoming Familiar with Your Engine
Please refer to the photo below to familiarize yourself with your engine's carburetor. You should have a small flat blade screwdriver
handy to make adjustments to the carburetor.
☛For even more information about the XTM engine in your Baja Outlaw nitro truck, refer to the separate XTM Engine Instructions
included with your truck kit.
Idle Stop Screw:
The idle stop screw is preset from the factory and should not
require adjustment. The idle stop screw adjusts the closure of
the throttle barrel. We recommend that the idle stop screw be
adjusted so that the carburetor barrel stays open about 1/16".
Turning the screw clockwise will cause the barrel to stay open
more. Turning the screw counterclockwise will allow the barrel
to close more.
High Speed Needle Valve
The high speed needle valve is preset from the factory for the initial starting procedure. Do not make adjustments to it at this time. The
high speed needle valve is used to meter the air/fuel mixture at full throttle. Turn the needle clockwise to lean the mixture or turn the
needle counter-clockwise to richen the mixture. When you start the engine for the very first time, the needle valve should be turned in
completely, then backed out 2-1/2 turns. When you start the engine after that, leave the needle valve in the same position it was in when
you shut down the engine.
Low Speed Needle Valve
The low speed needle valve is preset from the factory for the initial starting procedure. Do not make adjustments to it at this time. The
low speed needle valve meters the air/fuel mixture at idle and during transition from idle to full throttle. Turn the low speed needle
clockwise to lean the mixture. Turn it counterclockwise to richen the mixture. The low speed needle valve is preset from the factory,
but minor adjustments may need to be made to suit your application: fuel used, glow plug and environment all contribute to the setting.
To reset the low speed needle valve to the factory setting, follow these simple steps:
❑Open the carburetor barrel completely.
❑While holding the barrel open with your finger, use a small flat blade screwdriver to turn the idle mixture needle clockwise until it
stops. From this point, turn the needle counterclockwise 5-1/2 turns. This is the factory setting.
Fuel Recommendation
Fuel can make a big difference in the way your engine performs. For the break-in period you should use a fuel specifically designed for
R/C car engines that contains no more than 20% nitromethane. Once the engine has been adequately broken in (about 30 minutes of
run-time) you can switch to an R/C car fuel containing up to, but no more than, 30% nitromethane.
☛We do not recommend using fuels designed for R/C airplane engine use. These fuels do not contain the proper amount of
lubricants; therefore, they will cause the engine to overheat and severe damage to the engine will result.
Glow Plug Recommendation
The glow plug can make a big difference in how your engine performs. We recommend using a "hot" type glow plug intended
specifically for performance engines like the Thunderbolt Standard Long # 115568 or the McCoy MC-59 # 690215. Do not use "cold"
glow plugs or those intended for four cycle airplane engines. Using the wrong type of glow plug will cause the engine to run erratically
and make it difficult to tune properly.
Air Filter
The air filter is a very important part of your engine. Failure to use the air filter will damage the engine in a very short period of time.
The foam air filter element needs to be oiled with after-run oil to work properly. See steps # 15 and # 16 in the Quick-Start Guide for
further information.
Breaking In the Engine

9
Need help or have any questions? Email us at service@globalhobby.net
Engine Break-In
☛XTM .15 series engines are ABC engines. The cylinder
sleeve is tapered at the top, causing severe resistance when the
piston moves through the top of the stroke. This is normal. When
the engine heats up to operating temperature, this resistance will
decrease and the proper clearance will be achieved. The break-
in procedure will guide you through the steps necessary to prop-
erly break in your new XTM .15 series engine. Please follow
the steps closely.
☛The break-in process allows the engine parts to perfectly
fit to each other and properly protect each part from premature
wear. The engine should be broken in using a good quality R/C
car fuel that contains no more than 20% nitromethane.
❑Follow steps # 17 through # 22 in the Quick-Start Guide to
fill the fuel tank and to become familiar with the engine's start-
ing and shut down procedures.
❑Once the engine starts, keep the glow starter attached to
the glow plug and let the engine to run for about 1 minute with-
out giving it throttle. This will allow the engine to warm up. At
this point the engine should be running very “rich” and there
should be excessive white smoke coming from the exhaust pipe.
❑After the engine has been running for about 1 minute, re-
move the glow starter from the glow plug. Advance the throttle
in short, quick bursts and drive the truck around for about 2-3
minutes. If the engine is running rich enough, you should notice
excessive white smoke coming from the exhaust and the engine
should sound like it’s running very rough. Also, the truck will
barely be moving. If there is not excessive white smoke coming
from the exhaust, richen the high speed needle valve. After 2-3
minutes stop the engine by pinching the fuel line to the carbu-
retor (see Quick-Start Guide, step # 22).
❑Let the engine cool for approximately 10 minutes, then re-
startit. Setthehighspeedneedlevalve mixture to a slightly leaner
setting, about 1/8 turn more in. Repeat the step above then stop
the engine and let it cool for approximately 10 minutes.
❑Repeat the procedure in the step above, while leaning the
needle valve slightly more each time. In all, you should run the
engine a total of about 30 minutes. After 30 minutes of run-time
the engine will be broken in. Run the engine with the needle
valve set slightly rich, but lean enough to power the truck. At
this point the engine should hold a good setting on the high
speed needle valve and you can begin to fine tune the needle
valve settings to increase performance.
WARNING - Please Read Before Starting your Engine
If at any time the pull-start becomes very tight or difficult to pull - STOP! The engine has become flooded and the excess fuel must be
removed or damage to the pull-start and/or engine could occur. To remove the excess fuel from the engine follow the steps listed below:
❑Completely close the high speed needle valve (turn clockwise) until it bottoms out.
❑Remove the glow plug from the cylinder head.
❑With the top of the engine pointing away from you, pull the pull-start cord several times to clear the excess fuel from the engine.
❑Check to make sure the glow plug has not been fouled, then reinstall it.
❑Reset the high speed needle valve 2-1/2 turns out from bottom.
☛Itisoftheutmostimportancethat the engine never be leaned
out too much. When running the engine, you should always be
able to see a trail of white smoke coming from the exhaust pipe.
If you can’t, stop the engine immediately and richen the mix-
ture. You should also make sure there is plenty of air flowing
over the cylinder head to keep the engine from overheating.
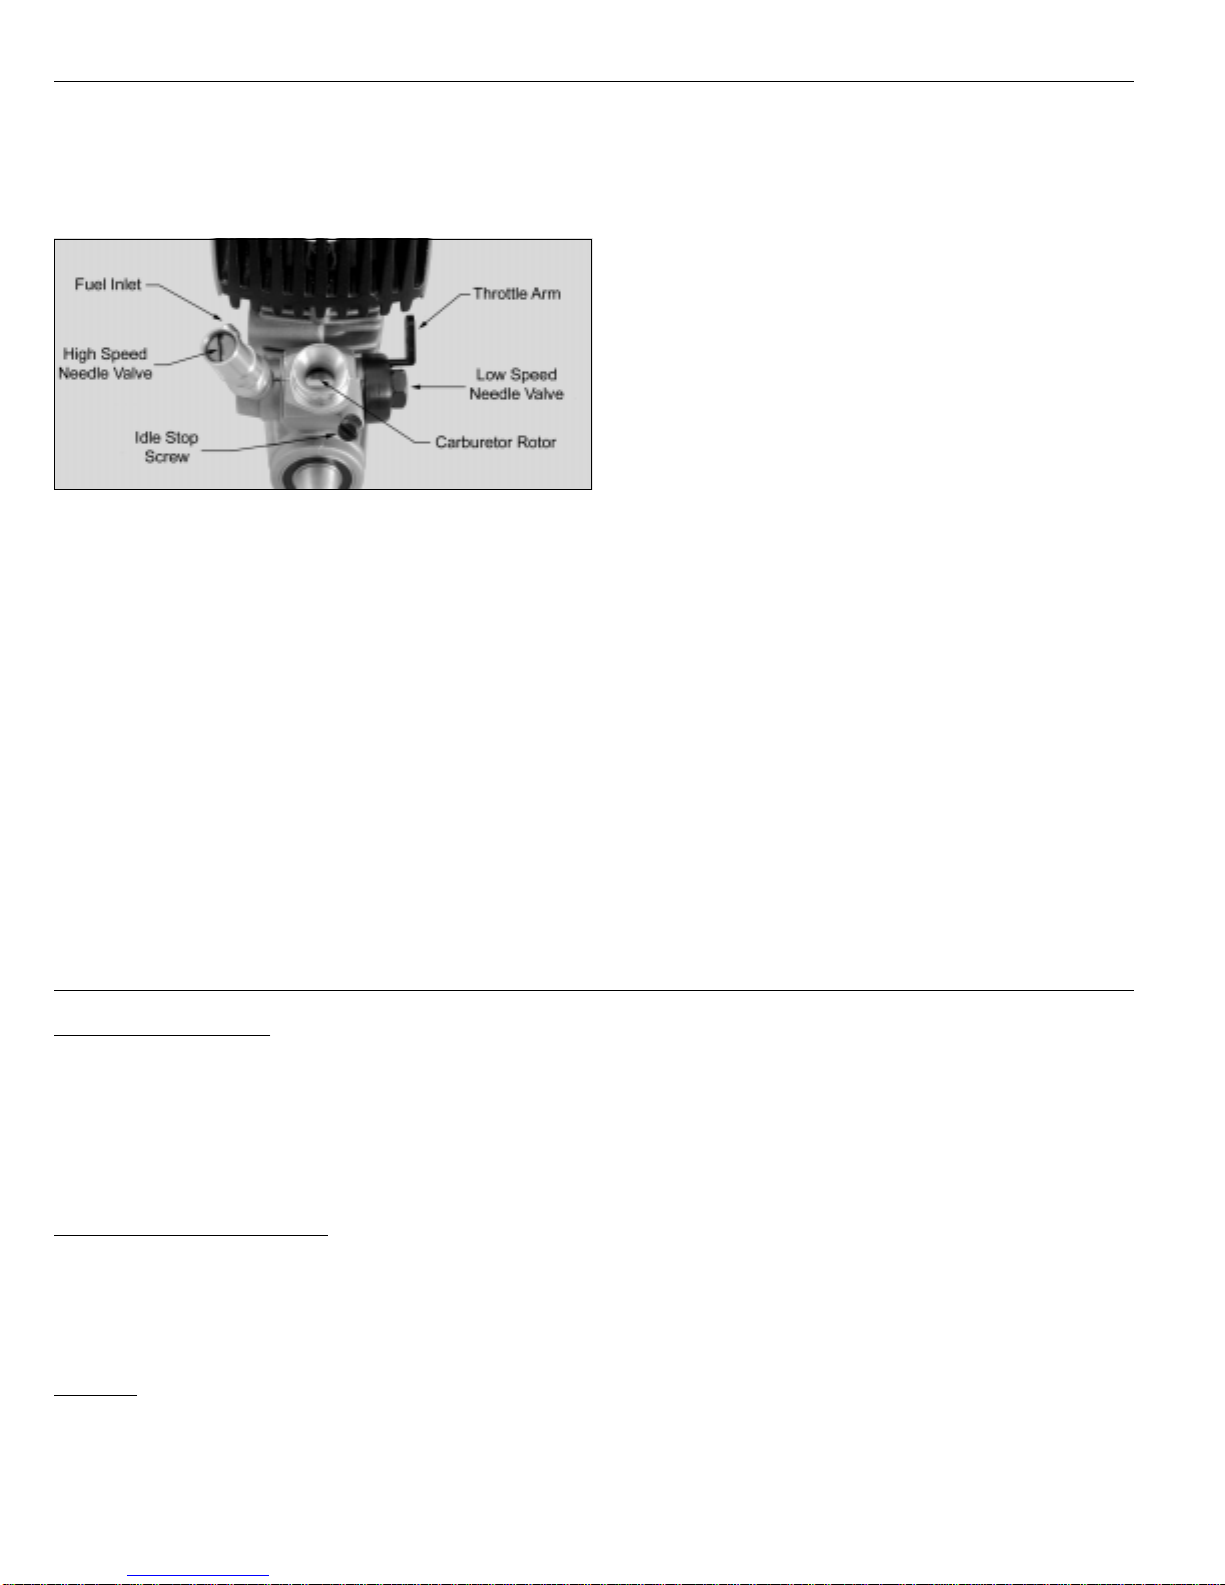
Fine Tuning Your XTM Engine
After your engine has been broken-in, you can set the high and
low speed needle valves for optimum engine performance.
☛Be careful to never lean the engine out too much. Re-
member that the lubricants for your engine are suspended in
the fuel. If you lean out the fuel mixture too much you will
also be lowering the amount of lubricant entering your engine.
Less lubricant means more chance of your engine overheating
and possible engine failure.
Setting the High Speed Needle Valve
❑Start the engine and remove the glow starter from the glow
plug. Allow the engine to warm up for about 1 minute.
❑After the engine has warmed up, drive the car as you nor-
mally would. If the engine seems to be running rich, lean the
mixture screw about 1/16 of a turn at a time until the desired
setting is achieved. Always make sure you run the engine slightly
rich - you want to be able to see a white exhaust trail at all times.
❑To get more power from your engine you can use fuels
containing up to 30% nitromethane. We must caution you,
though, that once you run the engine with increased nitro you
may not get satisfactory results if you decide to go back to a
lower nitro content. Also, if you use fuels containing 30% nitro,
we highly suggest replacing the stock .01mm head gasket with a
thicker .02mm head gasket (available separately: P/N 148186)
to lower the compression ratio. If you don’t lower the compres-
sion ratio, overheating and erratic running will likely occur.
Setting the Low Speed Needle Valve
❑Start the engine and lean out the high speed needle valve
as per the previous steps. Close the throttle until the engine slows
down enough so that the clutch is disengaged and the wheels
don’t turn when the car is lifted from the ground. Allow the
engine to idle for about 10-15 seconds.
Continued on Next Page

10 Need help or have any questions? Call us at 1-714-963-0329
❑While holding the car off the ground (making sure to keep your fingers out of the moving parts) quickly open the throttle in a short
burst. If the engine just stops running as soon as the throttle is advanced, the idle mixture is too lean. With the engine stopped, richen
the idle mixture about 1/16 of a turn.
❑Restart the engine and repeat the step above until the engine will transition smoothly and quickly. Very slight hesitation in the
transition is normal.
❑If you quickly advance the throttle and the engine seems to be very rich during transition (i.e., lots of smoke coming from the
exhaust and very rough sounding), the idle mixture is too rich. With the engine stopped, lean the idle mixture about 1/16 of a turn.
❑Restart the engine and repeat the step above until the engine will transition smoothly and quickly. Very slight hesitation in the
transition is normal.
❑Now drive the car as you normally would for a while to get a feel for how the engine reacts to throttle. Now that you know the
proper way to tune the engine, you can make slight adjustments to the carburetor until you are satisfied with the performance.
Baja Outlaw Chassis Adjustments
Chassis alignment and geometry are important if you want your truck to perform good. A good performing truck means a truck that is
easier to drive, too. Follow our guidelines in this section to get the most out of your truck.
☛It's very important that when making changes to the settings of your truck that you make the settings the same for each side.
For example, if you change the camber angle on the right front tire, you must change the camber angle of the left front tire the same
amount. If you change the spring tension on the left front shock, you must change the spring tension on the right front shock the
same amount, and so on.
☛Do not make any changes that are more than 3 degrees from the initial settings listed or the handling characteristics of your truck
will become very poor.
Camber
Camber changes the amount of the tire's surface that contacts the ground. Tires that are exactly perpendicular to ground have 0 degrees
of camber. If the tops of the tires lean toward each other, the tires have negative camber. If the tops of the tires lean out away from each
other, the tires have positive camber.
Recommended Initial Settings:
For driving on smooth surfaces set both the front and back wheels at 0 degrees.
For driving on rough surfaces set the front wheels at -1 degrees and the back wheels at -2 degrees.
☛Camber settings should be measured with the truck at its normal ride height.
☛For more precise camber adjustments, use the R.P.M. Precision Camber Gauge (P/N 708099).
Castor
Castor is the angle of the front wheel spindles. With a lower degree of castor angle the steering will become much more sensitive than
with a higher degree of caster angle. The Baja Outlaw comes stock with 20 degree castor blocks. You can purchase after-market 5
degree castor blocks if you plan on running your truck mostly on-road.
Continued on Next Page
Negative Camber Positve Camber
☛Adjust the camber by turning the upper
turnbuckles using an adjustable wrench.
(Camber angles exaggerated for photo clarity)

11
Need help or have any questions? Email us at service@globalhobby.net
Toe Angle
The toe angle is the angle of both front tires to each other - when viewed from above. Toe-in (both tires pointing toward each other) will
make your truck more stable and it will track straighter. Toe-out (both tires pointing away from each other) will make your truck turn
quicker, but it will be less stable.
Recommended Initial Settings:
0 degrees toe-in for overall best 4WD driveability.
☛Adding more than 3 degrees or more of toe-in will result in excessive loss of speed and
difficulty steering the truck. Adjust the toe-in by turning the tie-rods with an adjustable
wrench.
☛For more precise toe-in adjustments, use the R.P.M. Toe-in Gauge (P/N 708049).
Spring Tension
By adjusting the spring tension of the shocks, you can increase steering sensitivity and increase the ride-height of the truck. How you
drive your truck will dictate what settings you should be using. As an example, if you're using your truck off-road and going over lots
of jumps, you may want to increase the spring tension of the front shocks to help prevent the front of the truck from bottoming out.
●Increase the spring tension by turning down the threaded spring tensioners at the top
of each shock.
Recommended Initial Settings:
Turn the spring tensioners so that they are at the uppermost portion of the shock.
☛When adjusting the spring tension, make sure to adjust the right and left sides equally.
☛For precision shock adjustments, use the Trinity Off-Road Shock Dyno (P/N 840021).
Shock Oil
Changing the shock oil (the oil inside the shocks) will change the dampening characteristics of the shocks. Typically, if you are running
on smooth surfaces, use a heavier weight oil. If you are running on rough surfaces, use a lighter weight oil.
☛We recommend using only 100% Silicon Shock Oil. Do not use motor oil. The shock oil in the Baja Outlaw's shocks is good for
most off-road applications.
Adjusting the Brake Linkage
The throttle/brake linkage in your Baja Outlaw nitro truck is preset from the factory; however, after running your truck you may find
that the brake linkage needs adjusting.
❑With the transmitter and the receiver turned on, and the throttle/brake trim lever cen-
tered, the truck should roll smoothly (i.e. the brake should be disengaged). If the brake is
dragging when the throttle trigger is at neutral, the brake disc will wear out very quickly.
To ensure that the brake is disengaged, always make sure that there is a 1/8" gap between
the linkage spacer and the brake lever.
☛Your Baja Outlaw nitro truck includes a safety spring connected from the throttle
servo arm to the rear bulkhead. Do not remove this spring. If you lose radio control
contact with the truck, the spring will mechanically pull the throttle back to idle, prevent-
ing a runaway truck and potential accident.

12 Need help or have any questions? Call us at 1-714-963-0329
Maintenance
Following a simple maintenance schedule will ensure that your truck, engine and radio system operate in top condition every time you
use them. It is strongly suggested.
●Check the foam air filter element for dirt blockage. If the
foam is dirty, remove it from the rubber filter housing and wash it
in liquid soap and warm water. Dry the foam element with a
paper towel, reinstall it and "wet" it with after-run oil.
●Check the chassis for any loose screws, especially the engine
and exhaust mounting screws. Tighten them if necessary.
●Check the steering linkage and the throttle/brake linkage for
any signs of wear or misalignment. Tighten and/or readjust them
if necessary.
●Once in a while, remove the wheels and clean the wheel bear-
ings using a bearing cleaner. This will remove any dust and grit
that may over time, damage the bearings.
●Check the fuel system, including the fuel tank and fuel lines,
for any signs of cracking or looseness. Replace any fuel line you
suspect may be damaged.
●After a period of time the chassis will accumulate a lot of dirt
and debris, especially around the engine area. This build-up should
be cleaned off using a high-powered spray cleaner like Emerald
Nitro Car Cleaner. Some nitro car cleaners will damage anodized
and/or plated parts. Test on an inconspicuous area first.
●After cleaning the chassis and engine with Nitro Car Cleaner
you should oil the moving parts of the chassis. Do not oil the clutch
bell or spur gear (large exposed plastic gear) or the brake disc.
●Periodically check the condition of the transmitter and re-
ceiver batteries. If you think they might be low, replace them
with a fresh set.
●Always use new fuel and keep the cap on the fuel tightly
closed. As fuel ages it absorbs water, which degrades the fuels
performance and will cause erratic engine operation.
●After you have finished using the engine for the day, remove
the glow plug and squirt several drops of a high quality after-run
oil into the cylinder. Reinstall the glow plug and crank the engine
over a couple of times (without the glow starter attached) to dis-
tribute the oil. This will prevent corrosion inside the engine.
●Never leave unused fuel in the fuel tank for more than a couple
of days. The Nitromethane and methanol in the fuel will evapo-
rate, leaving the oil behind. This will eventually turn into a thick
sludge that will require replacement of the fuel tank to fix.
Troubleshooting Guide
This troubleshooting guide has been provided to help you diagnose and solve most problems that you may encounter with your Baja
Outlaw nitro truck. Most problems encountered can be solved by carefully following the problem-cause-solution sections. If you
cannot solve the problem using this troubleshooting guide, please feel free to contact us at the address, phone number or email address
shown on page # 2 of these instructions.
Hitec Lynx Sport Radio System
PROBLEM CAUSE SOLUTION
1) Radio system does not operate A) Transmitter and/or receiver batteries low A) Replace transmitter and/or receiver batteries
B) Batteries are installed incorrectly B) Check that the polarity of the batteries is correct
C) Receiver battery connector is loose C) Check that receiver battery connector is plugged in and tight
2) Operating range is short A) Transmitter antenna is retracted A) Extended transmitter antenna completely
B) Receiver antenna is not extended B) Extend receiver antenna completely
C) Receiver antenna is cut C) Return receiver to Hitec/RCD for repair
D) Transmitter and/or receiver batteries are low D) Replace transmitter and/or receiver batteries
3) Servos do not operate normally A) Transmitter and/or receiver batteries low A) Replace transmitter and/or receiver batteries
B) Servo gear stripped or otherwise damaged B) Return to Hitec/RCD for repair
4) When engine is running, radio A) Receiver crystal loose A) Remove and reinstall the receiver crystal
system operates erratically B) Receiver battery connector is loose B) Check that receiver battery connector is tight
C) Damage to receiver after a crash C) Return to Hitec/RCD for repair
Continued on Next Page

13
Need help or have any questions? Email us at service@globalhobby.net
PROBLEM CAUSE SOLUTION
1) Engine does not start A) Failed glow plug A) Replace glow plug with new one
B) Glow Starter not charged and/or faulty B) Fully charge glow starter and/or replace
C) Idle mixture screw set too lean C) Reset idle mixture to factory setting
D) Old or contaminated fuel D) Replace with new fuel
E) Engine flooded with too much fuel E) Remove glow plug and expel fuel from cylinder
F) Air leak in fuel system and/or engine F) Replace fuel lines and/or tighten all engine bolts
2) Engine does not draw fuel A) Air leak in fuel system and/or engine A) Replace fuel lines and/or tighten all engine bolts
B) High speed needle valve fully closed B) Reset high speed needle valve to factory setting
C) Idle mixture screw set too lean C) Reset idle mixture to factory setting
D) Fuel lines kinked D) Check and straighten fuel lines
E) Defective fuel tank E) Replace fuel tank
3) Engine does not transition A) Failed and/or wrong type glow plug A) Replace with new recommended glow plug
B) Old and/or wrong type fuel B) Replace with new recommended fuel
C) High speed needle valve set too rich C) Reset high speed needle valve to leaner setting
D) Idle mixture set too lean D) Set idle mixture richer
E) Idle mixture set too rich E) Set idle mixture leaner
F) Air leak in fuel system and/or engine F) Replace fuel lines and/or tighten all engine bolts
4) Engine overheats A) Engine running too lean A) Richen high speed needle valve
B) Body to Restrictive B) Open larger vents in body to allow air to enter and exit
C) Wrong type of fuel used C) Use fuel recommended only for R/C cars
D) Engine not fully broken in D) Allow engine further break-in time
5) Engine vibrates excessively A) Engine and/or engine mounts loose A) Tighten all engine mounting bolts
6) Engine does not idle down A) Idle stop screw out of adjustment A) Adjust idle stop screw so carb barrel stays open 1mm
XTM .15 Engine with Rotary Carb and Pull-Start
XTM Racing Baja Outlaw Nitro Truck Chassis
PROBLEM CAUSE SOLUTION
1) Truck pulls to one side A) Steering trim out of adjustment A) Readjust trim to center both wheels
B) Toe-in not equal B) Readjust the toe-in to 1 - 2 degrees.
C) Wheel on one side is hanging or has damaged bearing C) Remove wheel and clean bearing. Replace if necessary
2) Brake seems ineffective A) Brake linkage out of adjustment A) Readjust brake linkage
B) Brake disc worn B) Replace brake disc
3) Clutch does not engage A) Clutch shoes damaged or worn A) Replace clutch shoes
B) Clutch bell damaged or worn B) Replace clutch bell
4) Clutch does not disengage A) Clutch springs worn or damaged A) Replace clutch springs
5) Truck does not "go" A) Stripped spur gear A) Replace spur gear
B) Stripped differential gear B) Replace differential gear
6) Suspension not smooth or free A) One or more shocks sticking A) Clean and/or rebuild the affected shock
B) Bent shock shaft B) Rebuild affected shock
C) Bend or otherwise damaged hinge pin C) Replace hinge pin
7) Shocks leaking oil A) Shock seals worn A) Replace shock seals
B) Bent shock shaft B) Rebuild affected shock

14 Need help or have any questions? Call us at 1-714-963-0329
Replacement Parts
Listed below and on the next few pages are the replacement parts that are available for your XTM Baja Outlaw nitro truck. The part
numbers for each part are provided for ordering convenience. Replacement parts are available through your local authorized XTM
Racing dealer or directly from us.
148860
Support Wire for Tuned Pipe 148863
Turnbuckle - 34.5mm 148864
Output Joints to Axles 148868
Truck Tires (1 pair)
148869
3 Spoke Truck Wheels 148874
Screw Set for Truck 148881
Throttle Link Rod Set 148901
Differential Gear Assembly
148902
Output Gear 148904
Dogbones - Rear & Drive Shaft 148905
Axle Shaft FT & RR 148906
Rear Hub Carriers L & R
148907
Hex Wheel Adapters - 4 148909
Suspension Arm Set - Rear 148910
Shock Mounting Studs 148911
Suspension Pins - Inner
No Photo
Available
First, Visit Your Local Dealer:
To locate the dealer nearest you, please call us at (714) 963-0133 or visit our dealer directory on the Internet at
www.globalhobby.com/where2buy.htm
or Order Directly From Us:
XTM Racing
18480 Bandilier Circle
Fountain Valley, CA 92728
Phone (714) 963-0329
Fax (714) 964-6236

15
Need help or have any questions? Email us at service@globalhobby.net
148912
Copper Ball - For Links 148913
Shock Tower - Rear 148914
Sway Bar Set 148916
Output Joints - To Driveshafts
148917
Body Pins - Bag of 12 148918
Main Gear Assembly 148919
Brake Cam 148920
Camber Linkage Set
148921
Shock Tower - Front 148922
Steering Arm L & R 148923
Steering Arm Screws - 4 148924
Steering Upright - 5º Castor
148925
Steering Upright - 20º Castor 148926
Shock Set (1 pair) 148927
Bumper - Front 148928
Output Joints - Middle Gear
148930
Suspension Pins - Outer 148931
Differential Inner Gears 148932
Differential Housing - Outer Gear 148933
Center Gear Output Housing
148934
Shock Ends - w/Ball (1 pair) 148935
Turnbuckles - Steering 148937
Gearbox Housing 148938
Body Mount & Posts Set

16 Need help or have any questions? Call us at 1-714-963-0329
148939
Universal Joints - Front 148940
Turnbuckles - Upper 148941
Exhaust Manifold Set 148942
Exhaust Gasket
148944
Flywheel for SG Shaft 148945
Clutch Shoes w/Spring 148946
Clutch Spring 148947
Air Filter Set
148948
Clutch Nut/E-Clip for SG Shaft 148955
Chassis Plate 148956
Upper Plate - Radio Tray 148957
Fuel Tank Assembly
148958
Center Gear/Brake Support 148959
Brake Support Rod 148960
Brake Pads (1 pair) 148961
Steering Bellcrank Assembly
148962
Upper Plate Stand-off 148963
Brake Disc 148964
Servo/Antenna Mounts 148965
Engine Mount Set
148988
Tuned Pipe - Plastic 148989
Exhaust Connector 148993
Clutch Bell - 14T
148966
Suspension Arms - Front

17
Need help or have any questions? Email us at service@globalhobby.net
148995
Ball Bearings - 5 x 10 x 4 (4) 148996
Ball Bearings 8 x 14 x 4 (2) 148998
Center Gear 149000
Wheel Nuts
149001
E Clips for Shock Mounting 149002
3mm Nylon Insert Nuts (4-pack) 149003
4mm Grub Screws (4) 149005
Shock Springs (1 pair)
149006
Tuned Pipe - Aluminum 149007
Springs for Brake Pins/Axles 149009
Foam Inserts for Tires 149010
Shock Rebuild Kit
149011
Shock Shaft & Piston (1 pair) 149012
Front Suspension Pin Plate

18 Need help or have any questions? Call us at 1-714-963-0329

19
Need help or have any questions? Email us at service@globalhobby.net

20 Need help or have any questions? Call us at 1-714-963-0329
Warranty Service
Before returning your Baja Outlaw nitrotruck for warranty consideration, the status of the unit must be within the guarantee as stated
above. Do not return your truck to the place of purchase. They are not authorized or equipped to perform warranty work on XTM
Racing products. When requesting warranty service, please observe the following:
●Crash damage will not be covered under warranty. Do not request warranty service for a crash-damaged product.
●If you are requesting warranty on anything other than just the radio control system, always send your Baja Outlaw complete with
the transmitter. Please unplug and/or remove the batteries both from the transmitter and the truck before returning it. We like to have
the truck complete so it can be thoroughly tested before returning it to you.
●If you are requesting warranty service for only the radio system do not send the radio system or the truck to us. Remove the radio
system from the truck and return it to Hitec/RCD for warranty consideration. See Special Notice above.
●Include a note detailing the problem or service you are requesting. Service cannot be provided without this information. Include
your daytime phone number, shipping address and/or email address in the event we need more details pertaining to the service re-
quested.
●If your Baja Outlaw is out of the warranty period you may request an estimate of services at the time you return your truck for
service. An omission of this request implies permission for XTM Racing to service your truck at our discretion.
●Include a method of payment for any service charges.
●Send the unit to us by United Parcel Service, Federal Express or by Insured Mail. Postage is non-refundable. Send your
package to:
XTM Racing Customer Service
18480 Bandilier Circle
Fountain Valley, CA 92728
Phone (714) 963-0329
Fax (714) 964-6236
Email: service@globalhobby.net
Warranty Information - Please Read
Your XTM Baja Outlaw 2WD nitro truck is warranted against manufacturer defects in materials and workmanship for a period of 90
days from the date of purchase. Warranty service will be provided within 90 days of the date of purchase only if you are able to provide
the original (or a copy of) the original dated sales receipt.
Special Notice
The radio control system preinstalled in your XTM Baja Outlaw 2WD nitro truck is manufactured and warranted by Hitec/RCD North
America. This includes the transmitter, receiver, servos, battery box and on/off switch. Do not return the radio system to XTM
Customer Service. It must be removed from the truck and returned to Hitec/RCD at the address shown:
Hitec/RCD, Inc.
Attn: Customer Service Center
12115 Paine Street
Poway, CA 92064
This manual suits for next models
1
Table of contents
Other XTM Racing Motorized Toy Car manuals

XTM Racing
XTM Racing Mammoth User manual

XTM Racing
XTM Racing X-Cellerator Racer User manual

XTM Racing
XTM Racing Rage 1/18th 4wd User manual

XTM Racing
XTM Racing XT2 Racer User manual

XTM Racing
XTM Racing X-Factor2 User manual

XTM Racing
XTM Racing X-Terminator 2 User manual

XTM Racing
XTM Racing X-Terminator 2e User manual

XTM Racing
XTM Racing Mammoth ST User manual

XTM Racing
XTM Racing XST 4WD Truggy RTR User manual

XTM Racing
XTM Racing X-Factor Nitro Monster Truck User manual