XTRONIC 9050-PRO User manual

X-TRONIC USA
X-Tronic®Model
9050-PRO
Instructions


- 1 -
TABLE OF CONTENTS
Introduction
Package Contents..................................................2
Product Features ...................................................2
Product Specifications ...........................................3
Getting Started
Product Set-Up ......................................................4
User Interface ........................................................5
Operating Guidelines .............................................6
Function Set-Up .....................................................7
Safety Precautions.................................................9
Maintenance
Main Unit................................................................9
Install/Remove Hot Air Attachment ........................9
Troubleshooting Guide..........................................10
Replacing Heating Elements................................. 11
Warranty..................................................................12
Contact Information...............................................14

- 2 -
Package Contents
1 - X-Tronic 9050-PRO Main Hot Air Power Unit
1 - X-Tronic Micro Hot Air Short Shank Pencil (attached to main
unit)
6 - Micro Hot Air Nozzles (1.5mm, 2.0mm, 2.5mm, 3.0mm,
3.5mm & 4mm)
1 - Hot Air Pencil Holder
1 - Sponge
1 - Anti-static Ground Wire wtih Alligator Clip
Product Features
• ESD Safe
• PID Technology (Magic Temperature Compensation Technology)
• Centigrade to Fahrenheit Switchable Temperature Function
• Auto or Manual Hot Air Pencil Function
• Digital Temperature Correction/Calibration Function
• Hot/Cold Air Function
• 3 Programmable Memory Presets for Temperature & Air Speed
• Antistatic Designed
• Adjustable Display

- 3 -
Product Specifications
Model XTR-9050-PRO
Input voltage 110/120V 60Hz
Maximum Power 200W
Rated Power 82W
Dimensions 8.7 x 4.7 x 6.0 in / 22.2 x 12.0 x 15.2 cm
Weight 6.3 lbs / 2.88 kg
Working Environment 32°F ~ 104°F / 0°C ~ 40°C
Storing Environment -4°F ~ 176°F / -20°C ~ 80°C
Storage Humidity 35%-45%
Airflow Type Air Supply Mode - Air Pump
Airflow ≤3.5m/s(testedwith2mmnozzle)
Temperature Range 212°F ~ 896°F / 100°C ~ 480°C
Temperature Stability ± 2°C (static)
Display Type LCD
Hot Air Gun Cord Length ≥100cm(includinghandlelength)
Noise <55dB (tested 1m from source)

- 4 -
Product Set-up
1. Unpack all of the contents of the X-Tronic 9050-PRO unit.
2. Inspect the unit and accessories for any damage. If damage is
detected, please contact X-Tronic immediately (see back of manual
for contact information).
3. Remove the 2 red screws on the bottom of the unit.
4. Place the hot air pencil into the holder next to the unit.
5. Plug the anti-static ground wire with alligator clip into the back of the
unit.
6. Plug in the power cord to the back of the unit.
7. Plug the other end of the power cord into a GROUNDED AC wall
outlet.
8. The unit is now ready to be powered on with the switch located on
the front of the unit.
WARNING
You must remove the 2 red screws on the bottom of the unit mentioned
in Step 3 before using the unit. Failure to follow this precaution could
result in undesired results and harm your unit!

- 5 -
User Interface
SMDREWORKSTATION
HOTAIR
MAXMIN
HOLD
PRESS
CH1 CH3CH2
8509
ON
OFF
POWER
3MemoriesPreset/Select
Rotatabledisplayscreen
CO OL
AI R
MANUAL
AU TO
℉2
1
1
2
3
4
5
6
7
89
10
11
12
1. Cool Air Indicator
2. Faherenheit / Celsius Indicator
3. Manual Indicator
4. Automatic Indicator
5. Temperature Display
6. Temperature Decrease Button
7. Adjustment Knob
8. Power Switch
9. Hardwired Micro Hot Air Pencil
Attachment
10. Temperature Increase Button
11. 3 Temperature/Air Flow
Memory Presets
12. Digital Simulation of Air Volume

- 6 -
Operating Guidelines
General Set-up & Use
1. Before turning on the unit, choose the nozzle that will be used and
install it on the pencil. (see page 9 for how to change nozzles).
2. Ensure that the mircro hot air pencil is in the holder.
Note: The hot air gun needs to be in the holder EVERY TIME the
unit is started.This is a saftey feature and the unit will not work
correctly if this is not followed.
3. Ensure there are no obstructions or blockages in the hot air pencil
and/or attachments.
4. Attach the anti-static grounding wire with alligator clip to the PCB
you are going to work on to help reduce the risk of sparks from
static electricy while you work.
5. Turn on the unit with the switch on the front of the unit.
6. Set the desired temperature by pressing the Temperature Increase
Button until the desired temperature displays on the screen.
Note: If you have set the Memory Presets, you can press one to
automatically take you to the predetermined temperature/air flow.
7. When you are ready to begin your work, pick up the micro hot air
gun pencil and the air supply and temperature should immediately
start to engage. Wait a couple of seconds while the unit reaches the
desired temperature and air flow - this will be shown on the display.
8. Once the dispay shows the desired temperature and air flow it is
now ready to use.
9. After using the hot air pencil, place it back into the holder, and allow
the unit to initiate the cool down procedure until the display reads
“100°C”.
10. Then power can be turned off.
Note: If the unit will not be used for more than 12 hours, the unit
should also be unplugged from the wall as a safety precaution.
11. Upon first use, white smoke may be visible from the hot air gun and
will go away shortly after heating. If the unit keeps smoking, refer to
troubleshooting section or contact the manufacturer.

- 7 -
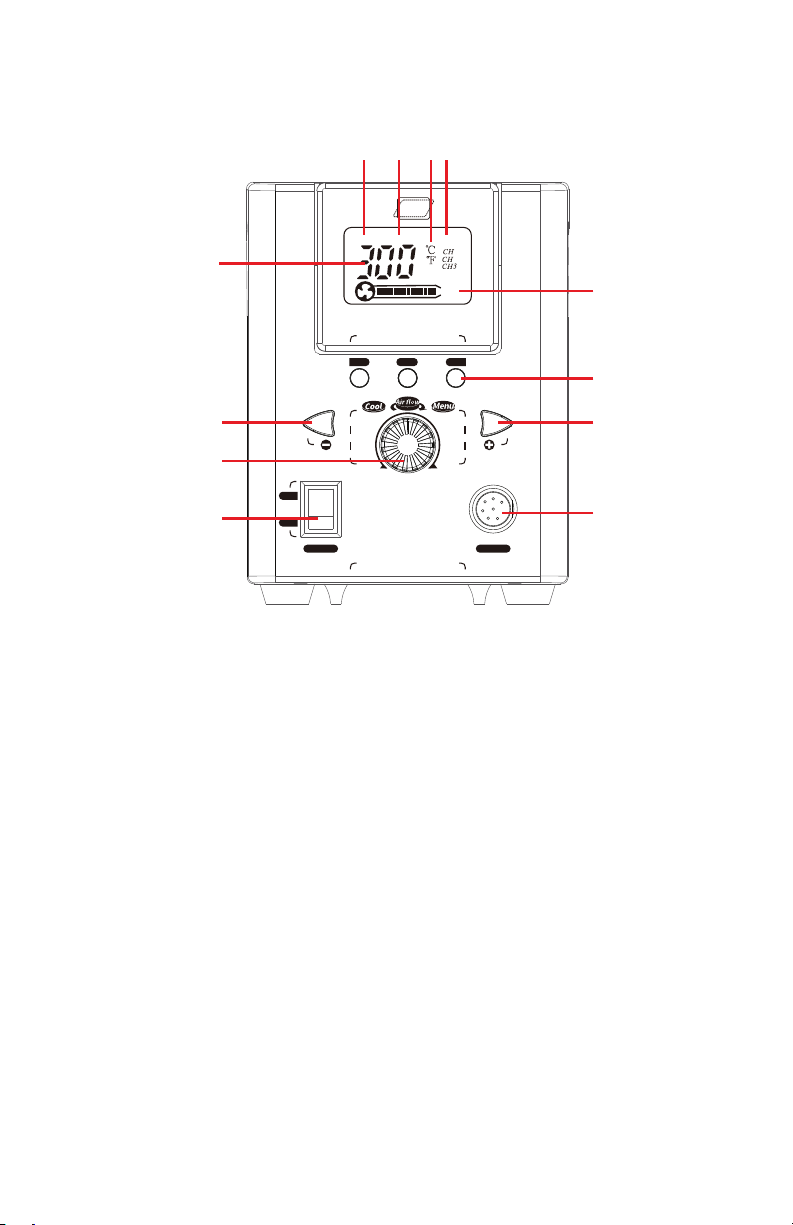
Function Settings & Program Mode
Temperature Conversion
1. Turn on the power switch.
2. Ensure the micro hot air pencil is in the holder.
3. Press and hold the Adjustment Knob for 2 seconds, the “C” will
flash on the display.
4. Rotate the Adjustment Knob to the left to select “°F” or to the
right to select “°C”.
5. Press the Adjustment Knob quickly 3 times to confirm your
selection and exit the Programming Mode.
Temperature Calibration
1. Turn on the power switch.
2. Remove the micro hot air pencil from the holder and allow it to
get to the temperature the unit is set at.
Note: The temperature will vary based on the distance from the
source.
3. If the independently measured temperature varies from the
temperature set on the unit, press and hold the Air Adjustment
Knob for 2 seconds until the display flashes.
4. Press the Air Adjustment Knob quickly 2 times to enter the
temperature calibration state. “CAL” will flash on the display.
5. Rotate the Air Adjustment Knob to the measured temperature
(the micro hot air pencil will still need to be active and not in the
holder).
6. Press the Air Adjustment Knob 3 times to confirm the calibrated
temperature and exit the Programming Mode.
Programmable Presets
1. Turn on the power switch.
2. Ensure the micro hot air pencil is in the holder.
3. Press the Programmable Preset that you want to set, the
temperature will change from “---” to the temperature that is
already proggrammed for that preset and will flash.
4. To adjust the programmed temperature, press the blue + or -
until the flashing number reflects the desired temperature.
5. To adjust the programemed temperature, rotate the Adjustment
Knob until the air flow indicator shows the desired air flow.
6. When finished, wait 2 seconds and the unit will automatically
save the settings and exit the Programming Mode.

- 8 -
Hot Air Pencil Automatic vs Manual Setting
Automatic Mode is a safety feature and it is highly recommended to
keep the unit in Automatic Mode unless using Manual Mode for a very
specific purpose. Once you are done using Manual Mode, please
return the unit to Automatic Mode.
When the unit is in Automatic Mode, the hot air pencil will go into
a standby mode when it is placed in the holder. This cools the
temperature down to 212°F/100°C and stops the air flow. When the
micro hot air pencil is removed from the holder it will immediately
heat back up to the set temperature and air flow will return to the set
speed.
1. Turn on the power switch.
2. Press and hold the Air Adjustment Knob for 2 seconds until the
display flashes.
3. Press the Air Adjustment Knob/Function Button 1 time, “AUTO”
will flash on the screen.
4. Rotate the Air Adjustment Knob to select the desired mode -
“AUTO” or “MANUAL”.
5. Press the Air Adjustment Knob 2 times to cofirm the setting and
exit the Programming Mode.
Quick Touch for Cold/Hot Air
1. Turn on the power switch.
2. Pick up the micro hot air pencil from the holder.
3. Press the Air Adjustment Knob quickly 1 time.
4. The heating element stops warming and enters the cold air
standby mode, blowing cool air (212°F/100°C) continuously until
the button is pressed again.

- 9 -
Safety Precautions
1. Never use the micro hot air pencil near any flammable substance,
material, or gas.
2. Never touch the metallic components of the micro hot air pencil
while they are in use. The items may be extremely hot and will
cause serious burns instantly. Allow the unit to properly cool to room
temperature before attempting to touch them.
3. Never point the micro hot air pencil towards any flammable material
or human skin. There is very hot air exiting the outlet that may
cause serious burns or damage.
4. Do not use pliers or any other tool to manipulate hot air nozzles.
5. Do not try to reform nozzle attachments into other shapes.
6. Ensure a minimum distance of 2mm while using micro hot air pencil.
7. Always keep the micro hot air pencil moving.
Maintenance
Unit
1. Keep the unit plugged into a GROUNDED outlet at all times during
operation.
2. Keep the unit and all components free from dirt, debris, and liquid at
all times.
3. Make sure the power cord is plugged in correctly and safely off the
floor to prevent accidents.
4. Keep all cords in the immediate workspace and avoid letting them
hang off the side of a table or bench top.
5. Wipe the unit down, when needed, with a dry, static-free cloth.
Install/Remove Hot Air Attachment
1. Turn the power off to the unit and unplug it from the power source.
2. Allow the hot air gun and attachment to reach room temperature
before proceeding.
3. Do not use excessive force when installing/removing hot air
attachments. Loosen the screw and nut from the attachment
by holding the nut with a pair of pliers and turning the screw
counterclockwise.
4. Slide the attachment off of the metallic shaft of the hot air gun.
5. Repeat in the reverse order for installation. Do not overtighten the
screen and nut on the hot air gun.

- 10 -
Troubleshooting Guide
Nothing appears to happen
when turning on the unit
• Check to ensure that the unit is plugged
in
• Make sure that the plug used is
grounded
• Make sure the main breaker in the
house is not tripped
• Contact the manufacturer
Micro hot air pencil not
getting hot
• Ensure the unit is plugged into a
grounded outlet
• Ensure the power switch is turned on
• Replace the heating element
• Contact the manufacturer
No/insufficient airflow • Ensure there are no blockages in the
nozzle or hot air pencil shaft
• Adjust the air flow knob to a higher
setting
• Contact the manufacturer.
Unit is vibrating across
workstation
• Ensure red screws are removed from
bottom of unit
• Contact the manufacturer.
Noisy unit • Ensure the unit is on a flat, level
surface
• Ensure red screws are removed from
bottom of unit
• Ensure all of the screws and brackets
are secure
• Contact the manufacturer

- 11 -
Replacing Heating Element
Micro Hot Air Pencil
Steel Pipe
Nut
Nozzle
Screw Cap
Heating Element
Silcone Grip
Handle
1. If the unit is currently on, place the micro hot air pencil in the holder
and allow the pencil to run through the cool down phase. The
display will read “---” and the air will stop flowing.
2. Turn off the unit and unplug it from the power source.
3. Allow the unit to reach room temperature before proceeding.
4. While grasping the silicone grip, unscrew the black thread head.
5. Pull the steel pipe, nut, nozzle, and thread head off and set them
aside.
6. Grasp the metal plug and play heating element and pull straight out
from the handle.
7. Replace the metal plug and play heating element with the new one.
8. Reassemble the steel pipe, nut, nozzle, and thread head, then
place them over the heating element and screw them back to the
base of the handle. Do not over tighten.

All X-Tronic Products come with 3-Year Guarantee, valid only in the 48
Contiguous United States. If you purchase this product and ship it to
a destination outside of the 48 Contiguous United States this warranty
becomes null and void. This Guarantee covers the main unit itself.
Consumable parts such as soldering tips, heating elements, nozzles, etc.
are not covered by this warranty.
The first 30 Days are covered by a Money Back or Replacement
Guarantee from the date of the receipt of the product. If your product
becomes damaged in shipment or is found to be defective in any way
during this period, we will replace or issue a complete refund for your
product upon return. We will pay all shipping involved during this first 30-
day period.
The remainder of the 3 Years (after the first 30 days) is covered by a
FREE REPAIR Guarantee (parts and labor included). If anything becomes
defective during this period we will fix the issue and provide a full service
inspection to your product, shipping (to & from) will be paid by the buyer.
Please email us at Info@XTronicUSA.com to set up a service request.
Returns of New/Unused Products
If you have Buyer's Remorse and decide that you do not want the product,
it must be returned NEW & UNUSED in the original box and you will pay
the return shipping. PLEASE NOTE: There will be a 10% Restocking Fee
and original Shipping Costs (if applicable) will not be refunded. Used
product cannot be returned.
3-YEAR WARRANTY
X-Tronic International, Inc.
2159 Magnum Circle, Lincoln, NE 68522
844-861-4762
Info@XTronicUSA.com •www.XTronicUSA.com
How To Register Your Warranty
Go to www.XTronicUSA.com. Click on "Register Your Warranty" tab and
fill out the form. This is a fully secure website. Your information will never
be sold or misused in any way. This registration site is strictly for order
verification that will be used to speed up the process should you ever
need to use your Warranty for service.


QUESTIONS, PROBLEMS
OR COMPLIMENTS?
Thank You for purchasing this
X-Tronic International Product!
We are grateful for your business!
All of our X-Tronic International Products are inspected
then sealed with our NEW Product Seal prior to
shipment. Our goal is to ensure Quality, Completeness,
and Satisfaction for your order.
For Any Questions, Problems, or
Compliments please call or email us.
If you would like to shop for other X-Tronic International Products
Please visit our website
www.XTronicUSA.com
Toll Free: 844-861-4762
Info@XTronicUSA.com
Our Business Hours are:
Monday - Thursday: 8am - 4pm CST
Friday: 8am - Noon CST
Table of contents
Other XTRONIC Ultrasonic Jewelry Cleaner manuals
Popular Ultrasonic Jewelry Cleaner manuals by other brands

Pro-Ject Audio Systems
Pro-Ject Audio Systems VC-E Instructions for use

TYROLIT Hydrostress
TYROLIT Hydrostress VCE2500D Series operating instructions

Lyman
Lyman Turbo Sonic 700 operating instructions

Midea
Midea 385611 Installation instructions & user guide

Makita
Makita DCL281SYWX instruction manual

anko
anko FD-ESC user manual

Kärcher
Kärcher A Plus SC21 Operation instruction and parts list manual

General Wire Spring
General Wire Spring 88 operating instructions

ELICTO
ELICTO ES-530 user guide

Euroflex
Euroflex Mini Monster 030 instruction manual

Caso
Caso CD-2800 Original operating manual

Stratasys
Stratasys CleanStation DT3 user guide