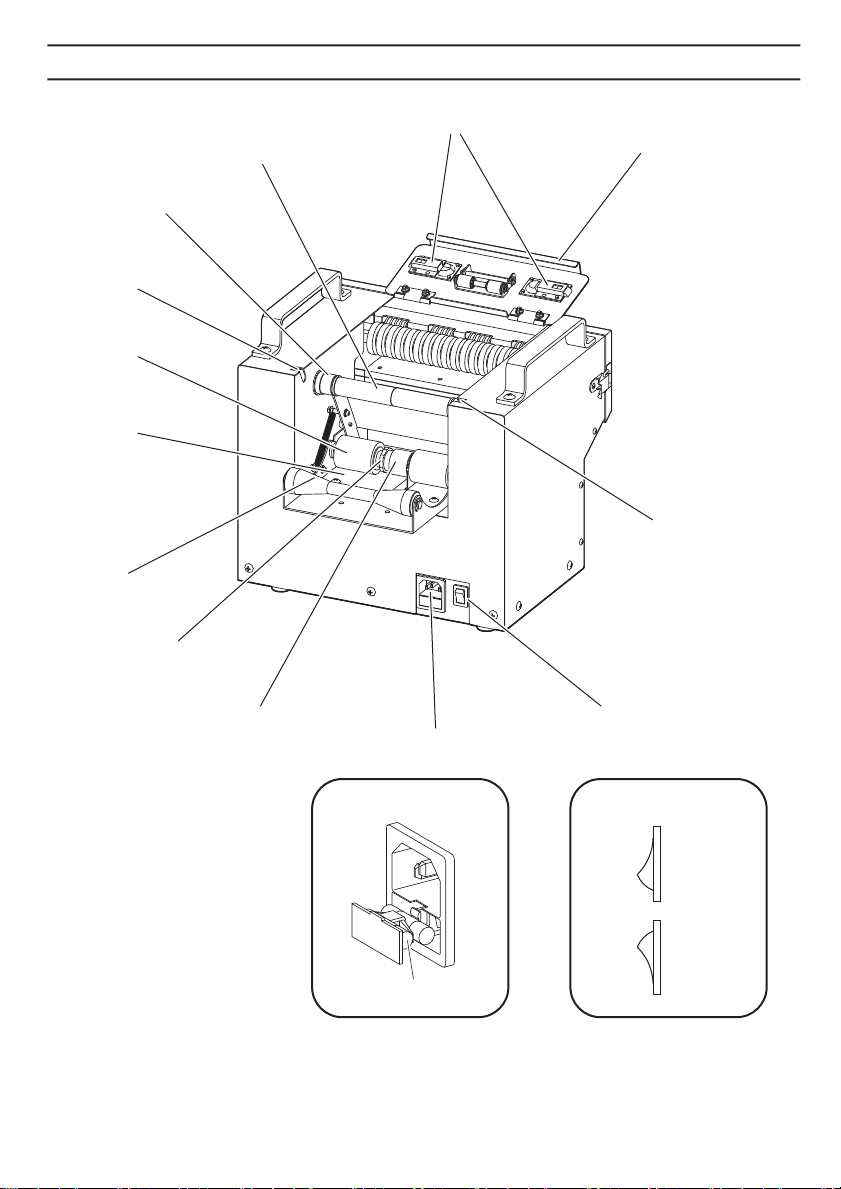
Yaesu FD-160 III User manual

AUTO FILM DISPENSER
FD-160Ⅲ
FD-200
FD-300
Ⅲ
INSTRUCTION MANUAL

2
Please Read Before Use
Thank you very much for purchasing our film dispenser FD series.
Most of the function is same as conventional models, but some of
additional function are available and durability is improved.
Most of operation is same for FD-160Ⅲ, FD-200Ⅲand FD-300.
Some of different operations are described separately.
Please read this Instruction Manual carefully.
For your Safety, please always keep this Instruction Manual for
reference, retraining and trouble shooting.
Contents
P2 Please Read Before Use
P3 Safety Instructions / Definition of Warning and Caution Symbols
P4 Warning
P4-5 Caution
P6-7 Identification of Parts
P8-9 Load the Film
P10 Set the Film Cutting Length
P10-11 Setting the Mode
P12 Memo Function
P12 Reset the Number of Cutting Quantity
P12 Maintenance
P12 Adjust Torque of Brake Roller (FD-160Ⅲ)
P13 Set the Bobbin (FD-200Ⅲ, FD-300)
P13 Adjust Torque of Bobbin (FD-200Ⅲ, FD-300)
P14 Trouble Shooting
P15 Warranty
P15 Specifications

3
A Required Action
A symbol within the circle, or the description, will indicate
the required action.
Indicates a potentially hazardous situation which if not
avoided, could result in death or serious injury.
Indicate that mishandling may result in danger and
that the operator is at risk of injury, or the machine is
at risk of damage.
Indicates Caution
A symbol within the triangle, or the description, will indicate
a specific hazard.
A Prohibited Action
A symbol within the circle, or the description, will indicate
prohibited action.
Definition of Warning and Caution Symbols
The safety guidelines in this Instruction Manual must be observed in
order to prevent damage to the machine or injury to the operator or
other persons.
The safety guidelines presciribed "Warning " and "Caution" describe
possible injury or damage that may be suffered from operating or
maintaining the machine in a manner other than as described in this
Instruction Manual.
Read and follow the safety precautions carefully.
Safety Instructions
Warning
Caution

4
Do not plug in, unplug the cord, or operate the machine with wet hands.
Failure to observe this may result in injury due to electric shock.
Never insert your finger, or any other body part, or any foreign object into
the machine.
Failure to observe this may result in injury.
Keep hair or loose clothing away from the machine while it is operating.
Failure to observe this may result in injury.
This machine is intended for industrial use only.
Do not allow untrained operators or children to operate the machine.
Failure to observe this may result in injury.
Turn off the power switch and unplug the machine prior to replacing the blade
unit or performing any maintenance on the machine.
Failure to observe this may result in serious injury.
Do not use this machine for anything other than its specified applications.
Use of the machine for any unintended applications can cause injury to the
operator or failure of the machine.
Warning
Caution
Do not expose the machine to water or other liquids.
Exposure to water or other liquid can cause injury due to electric shock, or
failure of the machine.
Never modify or disassemble the machine.
This can cause injury or failure of the machine.
Always unplug, or plug the machine in, by holding the plug.
Never pull on the cord. Pulling on the cord can result in electric shock.

Do not insert any foreign material from the film outlet.
This can cause failure of the machine.
An operator’s presence is required whenever the machine is in operation.
Turn the machine off and unplug the cord when the operator is not present.
Failure to observe this can result in injury.
Do not cut or damage the power cord.
A cut or damaged cord can result in electric shock, a short circuit or possible
fire hazard.
Make sure the cord is connected properly to the electrical outlet as well as
the receptacle on the back of the machine.
A loose connection can result in high heat or fire.
Do not use the machine in areas where moisture is present, high temperature
exist or a high content of dust or dirt is present.
This can lead to failure of the machine.
Always install and operate the machine on a flat, stable surface.
Dropping the machine may cause injury to the operator or failure of the machine.
Please take out the film every time after finished using the machine.
Leaving the film inside the machine may cause failure of the machine.
Caution
5

DIGITAL DISPLAY
−BUTTON
+BUTTON
SELECT BUTTON
FWD BUTTON
START BUTTON
LED LAMP
AUTO/MANUAL
MODE SWITCH
REV BUTTON
FILM OUTLET
IDENTIFICATION OF CONTROL PANEL
6
Identification of Parts
FEEDING ROLLER
CARRYING HANDLE
CASE
FRONT PANEL HOOK
CUTTER BLADE
FRONT PANEL
SAFETY COVER
FILM SET ROLLER
SUPPORTING ROLLER
(LOWER)
SUPPORTING ROLLER
(UPPER)
SAFETY SWITCH
FILM GUIDE
It might cause an injury.
Whenever you clean the BLADE,
do not touch the sharp edge of
the BLADE.
Caution:
Cutting edge

OFF
ON
7
Identification of Parts
SAFETY COVER HOOK
SAFETY COVER
BOBBIN SHAFT SOCKET
POWER SWITCH
POWER SWITCH
AC CORD INLET
TORQUE LIMITER
ADJUST DIAL
TAPER ROLLER
FILM HOLDER
BRAKE ROLLER
BIBBIN SHAFT
SOCKET
GUIDE STEP (LEFT/RIGHT)
GUIDE ROLLER
AC CORD INLET
SPARE FUSE
REMARK ) FD-200Ⅲand FD-300 are with Bobbin.
(FD-160Ⅲ)
(FD-160Ⅲ)
(FD-160Ⅲ)
(FD-160Ⅲ)
(FD-160Ⅲ)
(FD-160Ⅲ)
(FD-160Ⅲ)

OUTLET
AC CORD INLET
AC CORD
Set a film on
FILM HOLDER
Open the
SAFETY COVER
8
Load the Film
■The SOCKET-OUTLET shall be installed near the equipment and shall be
easily accessible.
■Set the machine only in the upright position.
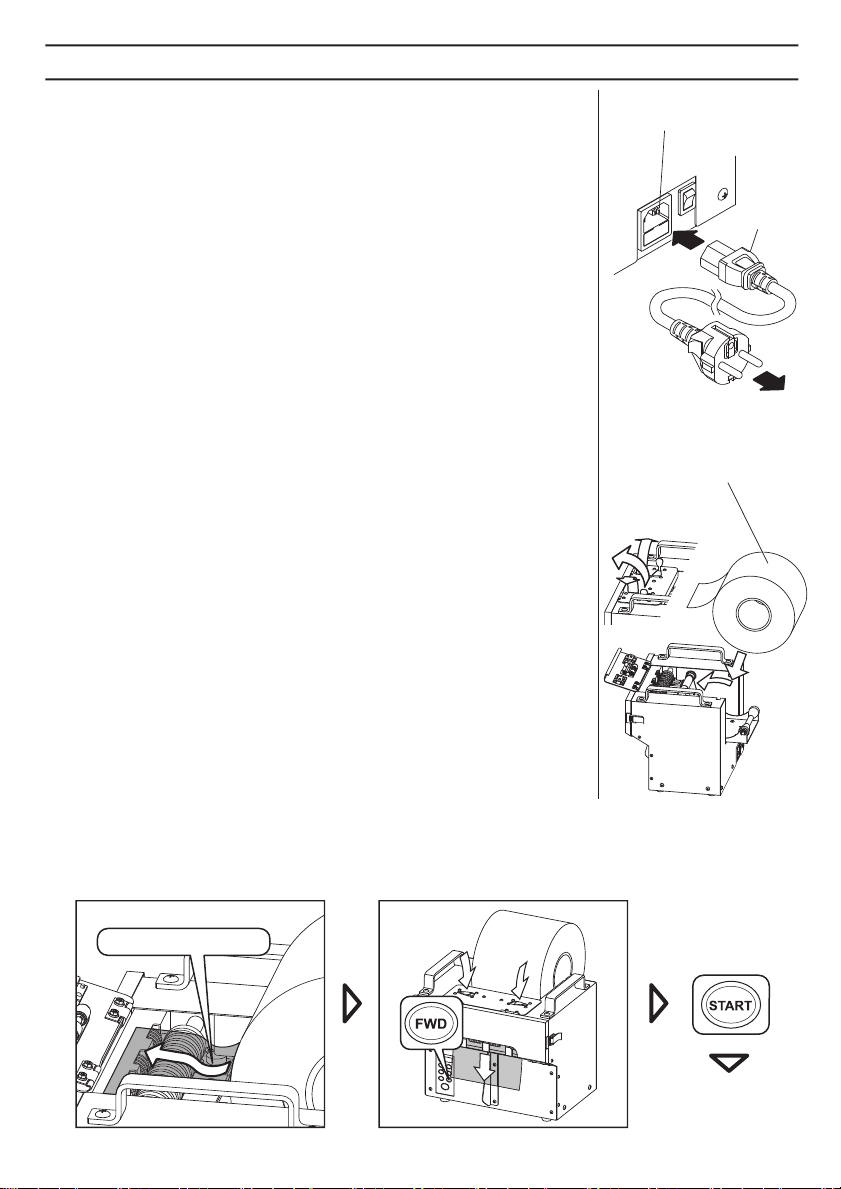
■Plug in AC CORD to the AC CORD INLET.
■Make sure the POWER SWITCH is off then plug into an appropriate
grounded AC outlet.
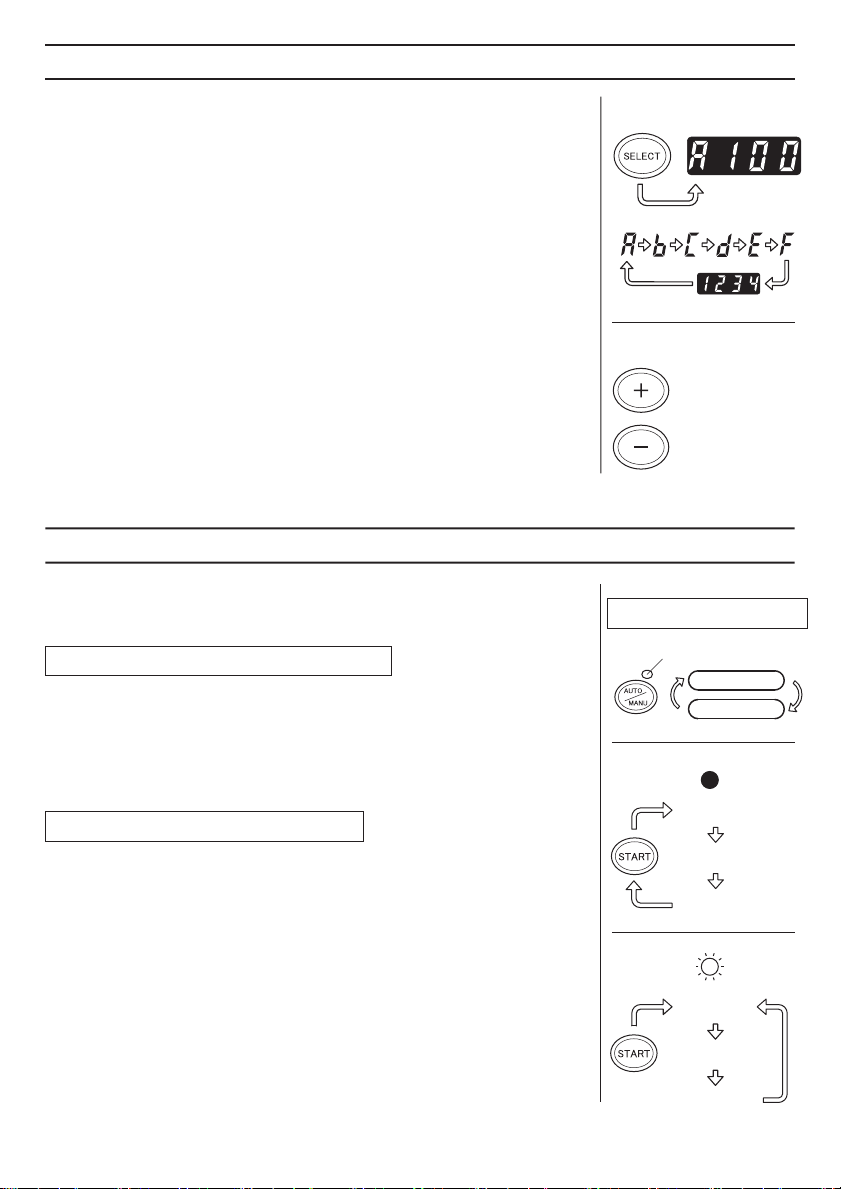
■Turn the POWER SWITCH on.
・When the POWER SWITCH is turned on, a letter, A, b, C, d, E, F and 3 or
4 digits will be displayed on CONTROL PANEL.
(Previous use cutting length will be displayed)
・When the POWER SWITCH is turned on, mode setting is set to previous use.
■Set a film on FILM HOLDER.
・Set film at center of FILM HOLDER, following to the drawing in right.
(As regards FD-200Ⅲand FD-300, set film roll into BOBBIN and place at the
BOBBIN SHAFT SOCKET. Refer to P-13.)
■Pull up SAFETY COVER HOOK and open the SAFETY COVER.
■Peel the film and put it on FILM GUIDE.
・To set the film properly, keep it a little loose as the drawing shows below.
■Close SAFETY COVER gently, and lock SAFETY COVER HOOK.
■Press the FWD BUTTON to feed out the film.
・Press the FWD BUTTON until the film comes out from the FILM OUTLET.
・If film comes out inclining, press the FWD BUTTON until film comes out
straight.
・FWD BUTTON Operates only while pressing the button.
■Make sure that the film is set properly.
■Press the START BUTTON.
・By pressing the START BUTTON after loading film by FWD BUTTON, the
cutting blade starts operation to cut the film.
・Remove first piece of film.
■When you pull out film, please follow the instruction below.
・Lift the SAFETY COVER HOOK and open the SAFETY COVER.
・Press REV BUTTON, and draw out the film from FEEDING ROLLER.
・After front edge of the film comes out between FEEDING ROLLER and
SUPPORTING ROLLER, stop pressing REV BUTTON.
Load the film
Keep the film a little loose
Confirm the setting
Cut the film
Remove the film

9
Load the Film
☆If you fail to set the film by the instruction on Page 8, try following method.
■Lift the SAFETY COVER HOOK and open the SAFETY COVER.
■Insert the film between FEEDING ROLLER and SUPPORTING ROLLER. Then press FWD BUTTON
to load the film. (FEEDING ROLLER can be rotated manually when the POWER SWITCH is off.)
・Press FWD BUTTON for a while at first, and then press FWD BUTTON longer to load the film.
・Make sure that the film comes out from the film outlet.
・If film comes out inclining, press the FWD BUTTON until film comes out straight.
・FWD BUTTON operates only while pressing the button.
■Close SAFETY COVER and lock SAFETY COVER HOOK.
■Make sure that the film is set properly.
■Press the START BUTTON.
・By pressing the START BUTTON after loading film by FWD BUTTON, the cutting blade starts operation
to cut the film.
・Remove the film.
Load the film Confirm the setting
Cut the film
Remove the film
Make sure that there is no foreign material on the machine.
Leaving foreign material on the machine may cause malfunction
of the machine.

INDICATE CUTTING LENGTH
A~F
SET THE CUTTING LENGTH
INCREASE NUMBER
DECREASE NUMBER
(exp. A-100mm)
4 digits
4 digits
CUT and STAND BY
CUT and STAND BY
REMOVE THE FILM
REMOVE THE FILM
FILM FEED
FILM FEED
LIGHTING
SET AUTO / MANUAL
LIGHTING OFF
LED LAMP
MANUAL MODE
MANUAL MODE
AUTO MODE
AUTO MODE
■Make sure that LED LAMP is off.
・When the POWER SWITCH turn on, setting mode will be previous used
setting.
■Every time pressing START BUTTON, cutting piece is ready one by one.
AUTO MODE (LED LAMP is on )
MANUAL MODE (LED LAMP is off )
■Make sure that LED LAMP is on.
・If the LED LAMP is off, press the AUTO/MANUAL BUTTON to turn it on.
■Press START BUTTON and cut a film.
・After removing the film ready, another one will come out automatically.
This machine can be set manual mode or auto mode.
Setting the Mode
■Make sure that cutting length is displayed.
・The cutting length will be displayed as A, b, C, d, E, F with 3 digits, or 4
digit number.
・If cutting length is not displayed, press SELECT BUTTON more than few
seconds to display cutting length.
■Set the cutting length.
・Set the desired length by pressing the +/−BUTTON.
・Memorize seven different length by using SELECT BUTTON.
・Select the desired cutting length.
(A-F:20mm-999mm, 4 digit number: 20mm-9999mm)
・The length can be set in 1mm by +/−BUTTON, or press the button longer
to fast forward.
■The length will be memorized automatically after 3 seconds.
■If you turn the POWER SWITCH off right after you set the length, it will
not be memorized.
Caution: Some of usable films may not cut as depends on the material.
Please have a cutting test before starting the operation.
Set the Film Length
10

設定例:100枚
SELECT
SELECT
SELECT
SELECT
SELECT
START
START
AUTO
MANU
P-MODE
A-F
PRESS LONGER
(exp.100pcs.)
(exp. A-100mm)
CONFIRM THE CUTTING LENGTH
MANUAL MODE
AUTO MODE
CONFIRM THE CUTTING LENGTH
(exp. A-100mm)
A-F
PRESS LONGER
(exp.100pcs.)
L-MODE
4 digits
4 digits
You can preset the quantity of piece which will be cut out.
(Maximum 999 pieces)
The machine will cut out the pieces based on your selected quantities then
it will stop.
■Press SELECT BUTTON and select the cutting length from A to F and 4
digit number.
■Press SELECT BUTTON longer and display Lcon mode.
■Press +or −BUTTON to set the number of cutting pieces.
■After pressing START BUTTON, it will begin the countdown and keep
cutting without stopping.
・A buzzer will sound and stop when it reaches 0.
・After buzzer sound and stop, Display shows preset cutting pieces.
・If you want to stop, please press START BUTTON.
If pressing START BUTTON again, it will resume.
L-MODE (Loop Mode)
A buzzer will sound when the number of setting pieces is completed.
You can use the mode either MANUAL or AUTO.
This setting is 999 pcs maximum.
■Press SELECT BUTTON and select the cutting length from A to F and 4
digits number.
■Press SELECT BUTTON longer and display Lcon mode.
■Press SELECT BUTTON shorter and P mode is ready.
・Display P and 3 digit as shown on right side.
■Press +or−BUTTON to set the number of cutting pieces.
■Press AUTO/MANUAL BUTTON to select the mode function.
■Cutting piece will be ready if pressing START BUTTON.
・When use in manual, press START BUTTON again after taking.
・When use in auto, another one will come out automatically.
■The setting number will be decreasing after every cutting.
■A buzzer will sound when it reaches 0.
・Return to the setting number after buzzer sounds.
・Please press AUTO/MANUAL BUTTON when changing the function.
・When use in auto and remove the cutting piece while buzzer sound, another
one will come out automatically at the same time sound finishes.
It will be minus 1 on the display.
P-MODE (Preset Mode)
11

12
Present cutting quantity can be memorized.
■Press AUTO/MANUAL BUTTON longer and display present cutting quantity.
■Press +BUTTON.
・Present cutting quantity will be forwarded and memorized.
・The data transferred is not deleted even if switching off.
■If pressing AUTO/MANUAL BUTTON longer, display the cutting length.
■Press AUTO/MANUAL BUTTON longer and display present cutting quantity.
■The number will be ZERO if pressing −BUTTON.
■Display will change to cutting length if pressing AUTO/MANUAL BUTTON
longer.
PRESS LONGER
PRESS LONGER
■Please clean up with a piece of cloth dipped in the detergent.
■Keep clean for the path of film.
・Make sure whether there is no waste of film or foreign material on Roller
and Blade.
■Basically, blade replacement should be done by manufacturer.
・Please do not disassemble by yourself. We may not accept repair and parts
replacement if you do disassemble.
■Use food grade lubricant on contact points of both upper and lower blades
as shown on the right image. (FD-160Ⅲ, FD-200Ⅲ)
TORQUE LIMITER is equipped in BRAKE ROLLER to make stable with film loading.
Depends on the usage, torque setting needs to be adjusted.
■If the torque is weak, it will cause film slack, curved film loading, and film jammed.
・Hold BRAKE ROLLER and turn ADJUST DIAL to make it stronger following to below figure.
■If the torque is strong, it may cause shorter cutting piece than setting, or failure for film feeding.
・If the torque is strong, turn ADJUST DIAL to make it weaker following to below figure.
■When you adjust the torque, remember the original position of ADJUST DIAL.
Then find the suitable torque position by turning it 1/4 rotation each time.
Memo Function
Reset the Number of Cutting pieces to ZERO
Maintenance
Adjust Torque of Brake Roller (FD-160Ⅲ)
Normal Position
SCALE MARK
ADJUST DIAL
TORQUE LIMITER
BRAKE ROLLER
Hold
Loose
Tight

13
①
①
②
③
Set the bobbin (FD-200Ⅲ, FD-300)
Adjust Torque of Bobbin (FD-200Ⅲ, FD-300)
Peel the film and set it on
FEEDING ROLLER.
BOBBIN
PIN
ROLLED FILM
①Grip BOBBIN to insert ROLLED FILM.
②Insert the ROLL to BOBBIN.
・Set the ROLL at the center of BOBBIN.
③Insert PINS at BOBBIN SHAFT SOCKET.
Bobbin of FD-200Ⅲand FD-300 have Dual Torque Limiter to make the film running stable.
Depends on the application, you need to adjust the torque setting again.
Adjust the torque of Bobbin if there is any problem with film feed or film jammed.
■If the torque is weak, it will cause film slack, curved film loading, and film jammed.
・Hold PIN and turn ADJUST DIAL to make it strong, following to the instruction below.
■If the torque is strong, it may cause shorter cutting piece than setting, or failure for film feeding.
・If the torque is strong, turn ADJUST DIAL to make it weaker following to below figure.
■When you adjust the torque, remember the original position of ADJUST DIAL.
Then find the suitable torque position by turning it 1/4 rotation each time.
・Set both side of SCALE MARK at the same position.
・Do not tighten ADJUST DIAL too mach until the scale mark cannot be seen.
■When you set the new roll, film may overrun and will slack a little bit.
However, it is not necessary to adjust Torque Limiter as long as the machine is working normally.
ADJUST DIAL
TORQUE LIMITTER
Hold
SCALE MARK
Loose Tight

14
Trouble Shooting
< Error Messages >
In the case of buzzer sound during the operation, the following massage may display
START
START
E-02 BLADE IS OUT OF POSITION
E-03 MOTOR STOPPED
A signal shows that the blade is not installed correctly or the film is jammed.
・Turn the POWER SWITCH off.
・Release FRONT PANEL and SAFETY COVER HOOK, and then, open
SAFETY COVER and check the area of Cutter Blade and Roller.
・Remove the waste of film and something if you find it.
・Close FRONT PANEL and SAFETY COVER and fix it.
・Turn the POWER SWITCH on.
・A buzzer sounds if pressing START BUTTON and E-02 will display.
Cutter Blade will take an original position if pressing START BUTTON once
again.
・Reset the film according to film setting.
Indicates that the motor stopped because of an overloaded.
・Turn the POWER SWITCH off.
・Open FRONT PANEL and SAFETY COVER.
・Check the area of FEEDING ROLLER and SUPPORTING ROLLER whether
there is a waste of film.
・Remove the waste of film in order to avoid scratching any parts if you find it.
・Close FRONT PANEL and SAFETY COVER.
・Turn the POWER SWITCH on.
・Press START BUTTON and make sure that it is properly operated.
・Reset the film according to film setting.
Do not touch the Blade when you are correcting an error under POWER
SWITCH is on.
If error massage displays again and again or something is wrong with the
machine without error message, please kindly switch off and stop using
immediately.
Blade positions in
readiness
Load the film
Load the film
POWER SWITCH is off
Open the FRONT PANEL and
SAFETY COVER
Inspect around BLADE and
ROLLERS
Remove foreign material
Close the FRONT PANEL and
SAFETY COVER
POWER SWITCH is on
POWER SWITCH is off
Open the FRONT PANEL and
SAFETY COVER
Inspect around BLADE and
ROLLERS
Remove foreign material
Close the FRONT PANEL and
SAFETY COVER
POWER SWITCH is on

15
Power Requirement 90V-264V~ 50-60Hz
Rated Current 0.45A-0.21A
Dimensions (Excluding boss) 292 W x 273 H x 232 D mm 332 W x 273 H x 232 D mm
Weight 10.6 kg (Film Holder Type)
Film Width (Max.) 160 mm 200 mm
Film Length 20~9999 mm
Feeding Speed 270 mm/sec.
Approximately 65 PCS/min. (in case of cutting 100mm with OPP film)
210mm
Operating environment Temperature 5-40 ℃
※ No condensation Humidity 35-85 % RH
※ Indoor use only Atmospheric pressure 850-1050 hPa
Accessories Power Cord
Fuse (Built-In Inlet) / 1.5A for FD-160Ⅲ and FD-200Ⅲ, 2A for FD-300
Bobbin(FD-200Ⅲ、FD-300)
Approximately 48 PCS/min.
(in case of cutting 100mm with OPP film)
FD-160Ⅲ FD-200Ⅲ FD-300
436 W x 347 H x 284 D mm
17.6 kg (Bobbin Type)
300 mm
255 mm/sec.
We warrant to the original purchaser of the product that will be free
form defects in material or workmanship for as long as the original
purchaser owns the product, when given normal wear and proper
usage.
The limited warranty for the machine shall be for a period of 180 days
form the date of purchase.
The spare parts such as Cutting Blades, Rollers, are not covered
under the warranty period as they are considered as "wear parts".
This warranty is only valid if the product.
◆Was not damaged while being installed.
◆Was operated in accordance with products's specifications,
instructions and any technical support directions.
◆Was not modified or damaged by tempering, user error, accident,
disaster, abuse, misuse, power supply, power application,
alternation, repair, modification, a fix or replacement by someone
other than the original product.
Warranty
Remarks ◆The specifications are subject to change without prior notice.
◆The length of the film may differ from the set length depending upon the type of the film or its condition.
◆Some types of film available with the machine may not be cut depending upon conditions.
Specifications
11.1 kg (Bobbin Type)
Max. Outside Dia. of Roll

19G24
39-8, Senju Motomachi, Adachi-Ku,
Tokyo, 120-0041, Japan
Phone 81-3-3888-8751
Fax 81-3-3888-1592
PLEASE VISIT OUR WEB SITE
URL:www.yaesu1965.com
YAESU KEIKOGYO CO., LTD.
This manual suits for next models
2
Table of contents
Other Yaesu Dispenser manuals
Popular Dispenser manuals by other brands

Hydro systems
Hydro systems CP-500 quick start guide

KitchenAid
KitchenAid KHWS160VWH5 installation instructions

BRAVILOR BONAMAT
BRAVILOR BONAMAT Rivero 12 BLRXL-011 user manual

Nordson
Nordson SEE-FLO 7 Customer product manual

lancer
lancer 2200 Series Operation manual

Molpir
Molpir DD-MOL-005 installation manual