Ytc YT-1000L User manual

Electro-Pneumatic Positioner PRODUCT MANUAL
YT-1000 / 1050 SERIES
VERSION 1.01

2 YT-1000/1050 series
Contents
1. Introduction …………………………………………………………………………………………… 4
1.1 General information for the users ………………………………………………………………. 4
1.2 Manufacturer Warranty …………………………………………………………………………… 4
1.3 Explosion Proof Warning ………………………………………………………………………. 3
2. Product Description ………………………………………………………………………………….. 5
2.1 General …………………………………………………………………………………………….. 5
2.2 Main Features and Functions ……………………………………………………………………. 5
2.3 Label Description ………………………………………………………………………………….. 6
2.4 Product Number …………………………………………………………………………………… 6
2.4.1 YT-1000L ………………………………………………………………………………... 6
2.4.2 YT-1000R………………………………………………………………………………… 7
2.4.3 YT-1050………………………………………………………………………………….. 8
2.5 Product Specification ……………………………………………………………………………… 9
2.5.1 YT-1000L & R …………………………………………………………………………… 9
2.5.2 YT-1050L & R …………………………………………………………………………… 10
2.6 Parts and Assembly ……………………………………………………………………………….. 11
2.6.1 YT-1000/1050L…………………………………………………………………………… 11
2.6.2 YT-1000/1050R………………………………………………………………………….. 11
2.6.3 YT-1000L+SPTM (Internal) ……………………………………………………………. 12
2.6.4 YT-1000R+SPTM (Internal) …………………………………………………………… 12
2.6.5 YT-1000R+L/S (Internal) ………………………………………………………………. 13
2.6.6 YT-1000R+SPTM+L/S (Internal) ……………………………………………………… 13
2.7 Product Dimension ………………………………………………………………………………… 14
2.7.1 YT-1000L Flameproof Type……………………………………………………………. 14
2.7.2 YT-1000L Intrinsically Safety Type ……………………………………………………. 14
2.7.3 YT-1000R Flameproof Type …………………………………………………………… 14
2.7.4 YT-1000R Intrinsically Safety Type …………………………………………………… 15
2.7.5 YT-1000L+SPTM (Internal) …………………………………………………………….. 15
2.7.6 YT-1000R+SPTM(Internal) …………………………………………………………….. 15
2.7.7 YT-1000R+SPTM+L/S (Internal) & YT-1000R + Dome Indicator …………………...15
2.7.8 YT-1050L …………………………………………………………………………………. 16
2.7.9 YT-1050R…………………………………………………………………………………. 16
3. Installation ………………………………………………………………………………………………. 17
3.1 Safety ……………………………………………………………………………………………….. 17
3.2 YT-1000/1050L Installation ………………………………………………………………………. 17
3.2.1 Installation Steps ………………………………………………………………………... 17
3.3 YT-1000/1050R Installation ……………………………………………………………………… 19
3.3.1 Bracket Information ……………………………………………………………………... 19

3 YT-1000/1050 series
3.3.2 Installation Steps ………………………………………………………………………… 20
4. Connections …………………………………………………………………………………………….. 21
4.1 Safety ……………………………………………………………………………………………….. 21
4.2 Supply Pressure Condition ……………………………………………………………………….. 21
4.3 Piping Condition ……………………………………………………………………………………. 21
4.4 Connection – Actuator ……………………………………………………………………………...22
4.4.1 Single acting actuator ……………………………………………………………………22
4.4.2 Double acting actuator ………………………………………………………………….. 22
4.5 Connection – Power ……………………………………………………………………………….. 22
4.5.1 Safety ……………………………………………………………………………………...22
4.5.2 Ground……………………………………………………………………………………. 23
4.5.3 SPTM Internal (Option) …………………………………………………………………. 23
4.5.4 L/S Internal (Option)…………………………………………………………………….. 23
4.5.5 SPTM & L/S Internal (Option) …………………………………………………………. 24
5. Adjustment ………………………………………………………………………………………………. 24
5.1 Adjustment - Cam …………………………………………………………………………………. 24
5.1.1 YT-1000/1050L………………………………………………………………………….. 24
5.1.2 YT-1000/1050R…………………………………………………………………………. 24
5.1.3 YT-1000/1050R with Internal Options (Option) ……………………………………… 25
5.2 Adjustment – Zero Point …………………………………………………………………………... 25
5.3 Adjustment – Span ………………………………………………………………………………….25
5.4 Adjustment – SPTM (Option) …………………………………………………………………… 25
5.4.1 Setting ……………………………………………………………………………………. 25
5.4.2 Calibration ……………………………………………………………………………….. 26
5.5 Adjustment – L/S (Option) ………………………………………………………………………… 26
5.6 Adjustment – A/M Switch (Auto/Manual) ………………………………………………………… 26
5.7 Adjustment – Orifice ……………………………………………………………………………….. 27
5.8 Adjustment – Potentiometer ………………………………………………………………………. 27
6. Maintenance……………………………………………………………………………………………… 28
7. Troubleshooting………………………………………………………………………………………….29

4 YT-1000/1050 series
1. Introduction
1.1 General Information for the users
Thank you for purchasing Young Tech Co., Ltd products. Each product has been fully
inspected after its production to offer you the highest quality and reliable performance.
Please read the product manual carefully prior to installing and commission the product.
For the safety, it is important to follow the instructions in the manual. Young Tech Co.,
Ltd will not be responsible for any damages caused by user’s negligence.
The manual should be provided to the end-user.
Any modifications or repairs to the product may only be performed if expressed in this
manual.
The manual can be altered or revised without any prior notice. Any changes in
product’s specification, design, and/or any components may not be printed immediately
but until the following revision of the manual.
The manual should not be duplicated or reproduced for any purpose without prior
approval from Young Tech Co., Ltd, Gimpo-si, South Korea.
1.2 Manufacturer Warranty
For the safety, it is important to follow the instructions in the manual. Manufacturer will
not be responsible for any damages caused by user’s negligence.
Manufacturer will not be responsible for any damages or accidents as a result of any
alteration or modification of the product and its parts. If any alteration or modifications
are necessary, please contact Young Tech Co., Ltd directly.
Manufacturer warrants the product from the date of original purchase of the product for
one (1) year, except as otherwise stated.
Manufacturer warranty will not cover products that have been subjected to abuse,
accidents, alterations, modifications, tampering, negligence, misuse, faulty installation,
lack of reasonable care, repair or service in any way that is not contemplated in the
documentation for the product, or if the model or serial number has been altered,
tampered with, defaced or removed; damages that occurs in shipment, due to act of
God, failure due to power surge, or cosmetic damage. Improper or incorrectly
performed maintenance will void this limited warranty.
For detailed warranty information, please contact Young Tech Co., Ltd – South Korea.
1.3 Explosion Proof Warning
Please ensure the unit is being used and installed within the explosion proof certified
environment.
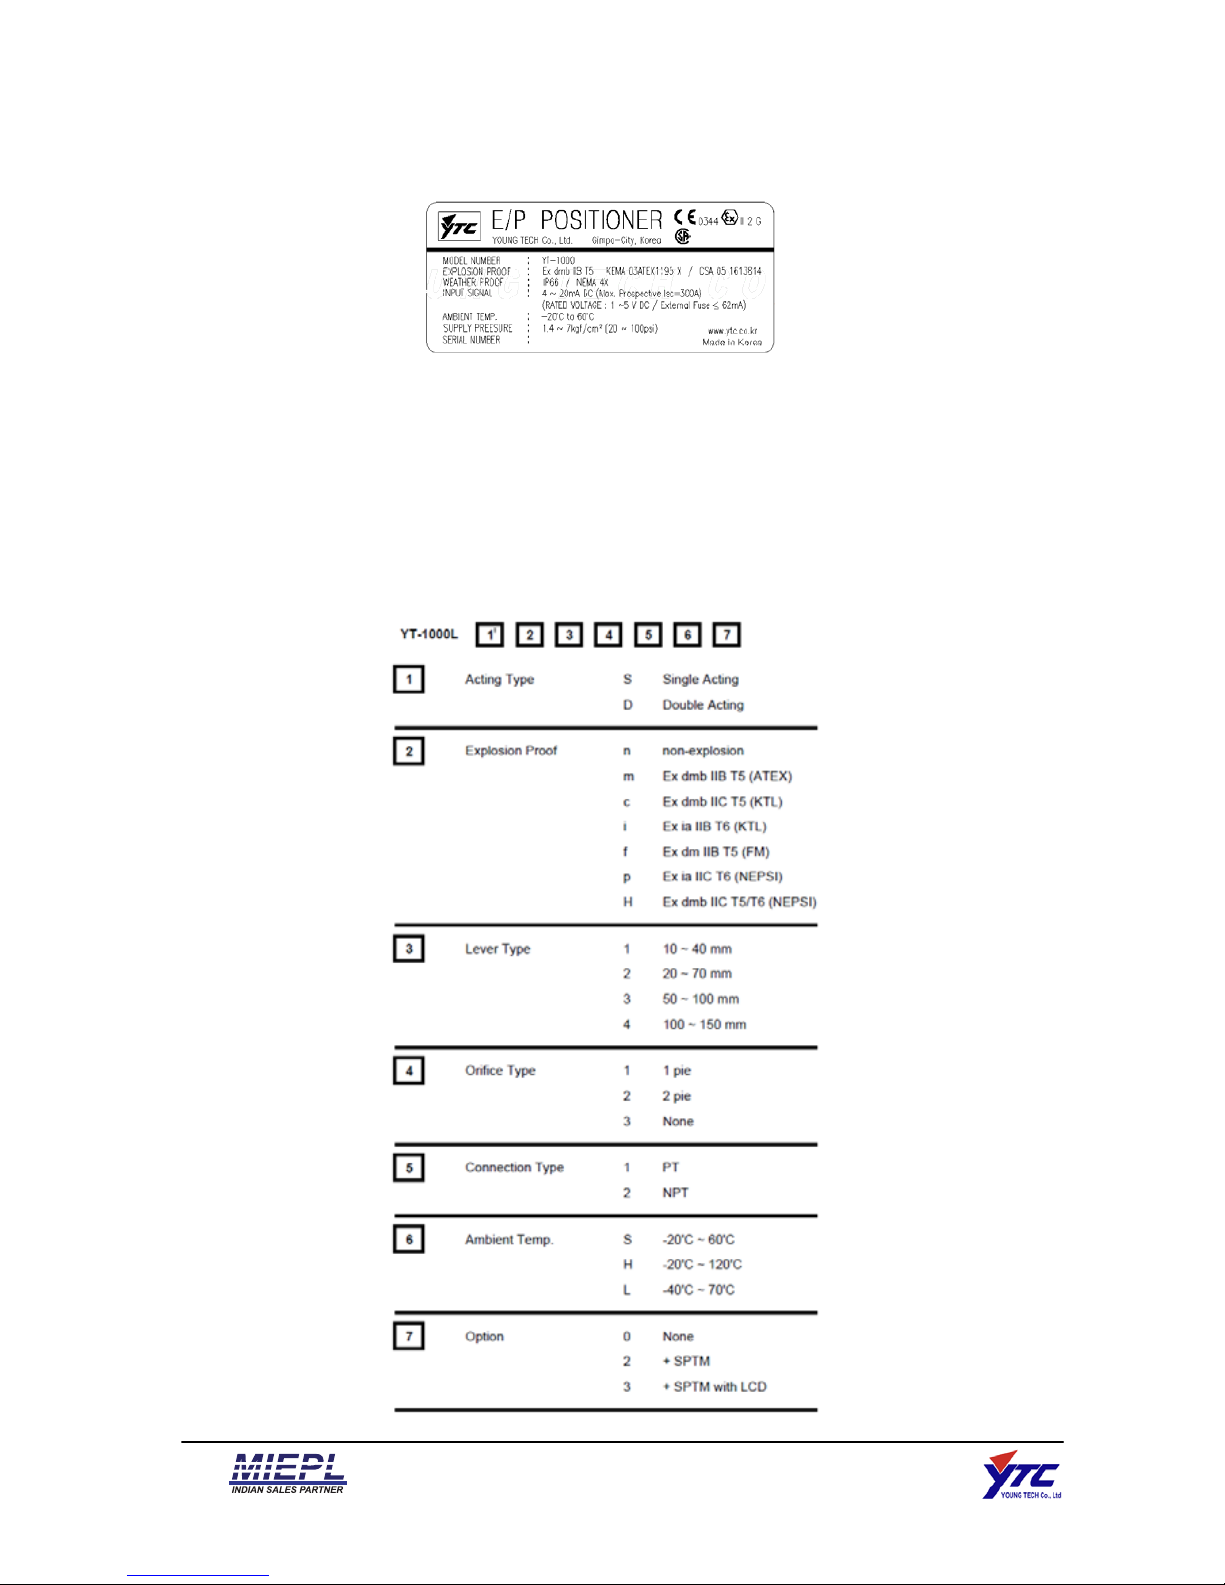
YT-1000 / 1050 series explosion proof grades are flameproof - Ex d IIB (IIC) T5 and
intrinsically safety – Ex ia IIB T6, and it can be used in zone 1 and 2.

5 YT-1000/1050 series
For other certification, please visit Young Tech Co., Ltd website (www.ytc.co.kr)
Explosion proof type of cables and gaskets should be used, when explosion gases are
present at the installation site.
Power should be turned off completely when opening product’s cover. When opening
the cover, ensure that there is no power remaining in any electrical parts nearby.
YT-1000 / 1050 series has 2 ports for power connection. Explosion proof type wires
and packing should be used. Blind plug is required when any port is not being used.
Cable rug with surface area of more than 0.195mm2with M4 spring washer should be
used to connect the power.
For external ground terminal, cable rug with surface area of more than 5.5mm2should
be used.
2. Product Description
2.1 General
YT-1000/1050 series Electro-Pneumatic Positioner accurately controls valve stroke in
response to an input signal of 4-20mA from the controller.
2.2 Main Features and Functions
2 million life cycle guaranteed
Response time is very fast and accurate.
Simple part change can set 1/2 split range.
Low air consumption
Simple Direct / Reverse Action change.
Simple Zero & Span adjustment.
Easy feedback connection.
Internal options, such as position transmitter (PTM) and/or limit switch (L/S) is available
(for non-explosion proof positioner – external options must be installed for explosion
proof positioner)
A/M switch can be used to direct supply air to the actuator or to manually operate the
positioner or valve.

6 YT-1000/1050 series
2.3 Label Description
Fig. 1: YT-1000/1050 Body Label
A. Model: Indicates the model number of the positioner.
B. Explosion Proof: Indicates certified explosion proof grade.
C. Input Signal: Indicates input signal range.
D. Amb. Temp.: Indicates the allowable ambient temperature.
E. Supply Pressure: Indicates the supply pressure range.
F. Serial Number.: Indicates the unique serial number.
2.4 Product Number
2.4.1 YT-1000L

7 YT-1000/1050 series
2.4.2 YT-1000R

8 YT-1000/1050 series
2.4.3 YT-1050

9 YT-1000/1050 series
2.5 Product Specification
2.5.1 YT-1000L & R
Model YT-1000L YT-1000R
Acting Type Single Double Single Double
Input Signal 4~20mA DC
Impedance 250 +/- 15 Ώ
Supply Pressure 0.14~0.7 MPa (1.4~7 bar)
Stroke 10~150 mm 0~90°
Air Connection PT, NPT 1/4
Gauge Connection PT, NPT 1/8
Conduit Entry PF(G) 1/2
Protection Grade IP66
Explosion Proof
Ex dmb IIB T5 (ATEX)
Ex dmb IIC T5 (KTL)
Ex ia IIB T6 (KTL)
Ex dm IIB T5 (FM)
Ex ia IIC T6 (NEPSI)
Ex dmb IIC T5/T6 (NEPSI)
Ambient Temperature
Operating Temp. :-20~70℃(Standard)
Explosion Proof Temp. : -40~60℃
Linearity ±1.0% F.S. ±2.0% F.S. ±1.0% F.S. ±2.0% F.S.
Hysteresis ±1.0% F.S.
Sensitivity ±0.2% F.S ±0.5% F.S ±0.2% F.S ±0.5% F.S
Repeatability ±0.5% F.S
Flow Capacity 80 LPM (Sup.=0.14 MPa)
Air Consumption 2.5 LPM (Sup.=0.14 MPa @ idle)
Feedback Signal (Option) 4~20mA (DC 10~30V)
Material Aluminum Diecasting
Weight gk5.3gk7.2
Painting Epoxy Polyestere Powder Coating
Tested under ambient temperature of 20’C, absolute pressure of 760mmHg, and humidity of 65%. Please contact Young Tech Co., Ltd for detailed testing
specification. * Explosion proofcertification is in progress.

10 YT-1000/1050 series
2.5.2 YT-1050L & R
Model YT-1050L YT-1050R
Acting Type Single Double Single Double
Input Signal 4~20mA DC
Impedance 250 +/- 15 Ώ
Supply Pressure 0.14~0.7 MPa (1.4~7 bar)
Stroke 10~150 mm 0~90°
Air Connection NPT 1/4
Gauge Connection NPT 1/8
Conduit Entry PF(G) 1/2
Protection Grade IP66
Explosion Proof Ex dmb IIB T5 (ATEX)
Ambient Temperature
Operating Temp. :-20~70℃(Standard)
Explosion Proof Temp. : -40~60℃
Linearity ±1.0% F.S. ±2.0% F.S. ±1.0% F.S. ±2.0% F.S.
Hysteresis ±1.0% F.S.
Sensitivity ±0.2% F.S ±0.5% F.S ±0.2% F.S ±0.5% F.S
Repeatability ±0.5% F.S
Flow Capacity 80 LPM (Sup.=0.14 MPa)
Air Consumption 2.5 LPM (Sup.=0.14 MPa @ idle)
Feedback Signal (Option) 4~20mA (DC 10~30V)
Material Stainless Steel 316
Weight gk0.6gk7.5
Tested under ambient temperature of 20’C, absolute pressure of 760mmHg, and humidity of 65%. Please contact Young Tech Co., Ltd for detailed testing
specification. * Explosion proofcertification is in progress.

11 YT-1000/1050 series
2.6 Parts and Assembly
2.6.1 YT-1000/1050L
2.6.2 YT-1000/1050R

12 YT-1000/1050 series
2.6.3 YT-1000L + SPTM (Internal)
2.6.4 YT-1000R + SPTM (Internal)

13 YT-1000/1050 series
2.6.5 YT-1000R + L/S (Internal)
2.6.6 YT-10000R + SPTM + L/S (Internal)

14 YT-1000/1050 series
2.7 Product Dimension
2.7.1 YT-1000L Flameproof Type
2.7.2 YT-1000L Intrinsically Safety Type
2.7.3 YT-1000R Flameproof Type

15 YT-1000/1050 series
2.7.4 YT-1000R Intrinsically Safety Type
2.7.5 YT-1000L + SPTM (Internal)
2.7.6 YT-1000R + SPTM (Internal)
2.7.7 YT-1000R + SPTM + L/S (Internal) & YT-1000R + Dome indicator

16 YT-1000/1050 series
2.7.8 YT-1050L
2.7.9 YT-1050R

17 YT-1000/1050 series
3. Installation
3.1 Safety
When installing a positioner, please ensure to read and follow safety instructions.
Any input or supply pressures to valve, actuator, and / or to other related devices must
be turned off.
Use bypass valve or other supportive equipment to avoid entire system “shut down”.
Ensure there is no remaining pressure in the actuator.
3.2 YT-1000/1050L Installation
YT-1000/1050L should be installed on linear motion valves such as globe or gate type which
uses spring return type diaphragm or piston actuators. Before proceeding with the
installation, ensure following components are available.
Positioner unit
Feedback lever and lever spring
Flange nut (bottom side of YT-1000/1050L)
4 pcs x hexagonal headed bolts (M8 x 1.25P)
4 pcs x M8 plate washer
3.2.1 Installation Steps
1. Proper bracket must be made in order to adapt the positioner on the actuator yoke.
Please consider following important points when a bracket is being designed.
Positioner’s feedback lever must be parallel to the ground at 50% of the valve stroke.
Feedback lever connection with the pin of the actuator clamp should be installed in
such a way that the valve stroke length coincides with the corresponding figure in
“mm” marked on the feedback lever. Improper setting may cause poor linearity and
may create unnecessary hunting during the operation.
2. Assemble the positioner with the bracket made in
previous step by fastening the bolts. Please refer to the
backside of the positioner for size of the bolts. The
standard bolt size is M8 x 1.25P. Please contact Young
Tech Co., Ltd for other bolt sizes.
3. Attach the positioner with bracket to the actuator yoke – DO NOT
TIGHTEN POSITIONER COMPLETELY.
4. Connect positioner’s feedback lever to the actuator clamp. The
hole gap on the feedback lever is 6.5mm. The connection pin’s
outer diameter should be less than 6.3mm.

18 YT-1000/1050 series
5. Connect supply pressure to the actuator temporarily. Supply enough supply pressure to
the actuator in order to position the actuator clamp at 50% of the total valve stroke.
6. Insert connection pin into the feedback lever. The pin should be inserted when the
actuator clamp is at 50% of the total valve stroke.
Proper way to connect feedback lever, connection pin, and lever spring
7. Check if feedback lever is parallel to the ground at 50% of the valve stroke. If it is not
parallel, adjust the bracket or feedback link bar to make parallel. Improper installation
may cause poor linearity and may create unnecessary hunting during the operation.
8. Check the valve stroke. The stroke marks are indicated on the feedback lever of the
positioner. Position the connection pin at the number on the feedback lever which
corresponds to the desired valve stroke. To adjust, move the bracket, the connection
pin or both.
Fig. 3: Pin Insertion when valve stroke is 40mm (up) and is 90mm (bottom)
9. After installing the positioner, operate the valve from 0% to 100% stroke by using direct

19 YT-1000/1050 series
air to the actuator (manual position). On both 0% and 100%, the feedback lever should
not touch the lever stopper, which is located on the backside of the positioner. If the
feedback lever touches the stopper, the positioner should be installed further away from
the yoke.
Fig. 4: Feedback lever should not touch lever stopper 0% ~ 100% valve stroke.
10. After the installation, tighten all of the bolts on the bracket, the feedback lever, and the
connection pin.
3.3 YT-1000/1050R Installation
YT-1000/1050R should be installed on rotary motion valve such as ball or butterfly type
which uses rack and pinion, scotch yoke or other type of actuators which stem rotates 90
degrees. Before proceeding with the installation, ensure following components are available.
Positioner unit
Fork lever and lever spring
Standard rotary bracket (included with the positioner)
4 pcs x hexagonal headed bolts (M8 x 1.25P)
4 pcs x M8 plate washer
Fig. 5: Fork lever type (left) and NAMUR lever type (right)
3.3.1 Bracket information
Standard bracket (included with the positioner) contains two components. The bracket can
be used for both fork lever and NAMUR lever type. The bracket is designed to fit onto the
actuator with 20mm stem height (H). If actuator’s stem height (H) is 30mm or 50mm,
bracket must be adjusted. Please refer to below table how to adjust the bracket.

20 YT-1000/1050 series
Actuator stem
height (H)
Markings of bolt holes
A-L B-L A-R B-R
20mm H : 20 H : 20, 30 H : 20 H : 20, 30
30mm H : 30 H : 20, 30 H : 30 H : 20, 30
50mm H : 50 H : 50 H : 50 H : 50
3.3.2 Installation Steps
1. Please check the actuator’s stem height and adjust the bracket by
referring to the bracket table.
2. Attached the bracket onto the actuator. It is recommended to use spring washer so the
bolts will not be loosen from vibration.
3. Set rotation position of the actuator stem at 0%. For single acting actuator, it is easy to
check 0% point by supplying no pressure to the actuator. For double acting actuator,
check actuator stem’s rotation direction – clockwise or counter-clockwise - by supplying
pressure to the actuator.
4. Install the fork lever after setting actuator’s stem at 0%. Check the actuator stem’s
rotation direction – clockwise or counter-clockwise. Installation angle of the fork lever
should be 45 degrees in relation to the linear shaft. For NAMUR shaft installation, the
angle does not matter.
Fig. 6: Counter-clockwise and clockwise rotation.
Other manuals for YT-1000L
2
This manual suits for next models
3
Table of contents
Other Ytc Valve Positioner manuals
Popular Valve Positioner manuals by other brands

GE
GE Baker Hughes Masoneilan SVI FF Installation and operation manual

Pepperl+Fuchs
Pepperl+Fuchs PXV F200-B25-V1D Series manual

rotork
rotork TMP-3000 product manual

Pepperl+Fuchs
Pepperl+Fuchs PMI360DV-F130-3E2-V15 manual

Heinzmann
Heinzmann PANDAROS DC 6-06 manual

DeZurik
DeZurik P200 Installation,operation and maintenance instruction