Zavio N6031 User manual

N6031 User Manual
0

N6031 User Manual
1
N6031 IP Camera
Firmware User Manual
-Contents -
CHAPTER 1. MINIMUM SYSTEM REQUIREMENT............................................................................................... 2
CHAPTER 2. USING IP CAMERA VIA WEB BROWSER ........................................................................................ 3
CHAPTER 3. USING IP CAMERA VIA MOBILE PHONE....................................................................................... 8
3.1 USING IP CAMERA VIA IPHONE............................................................................................................................... 8
3.2 MOBILE PHONE VIEWING ....................................................................................................................................... 9
CHAPTER 4. MSN MESSENGER............................................................................................................................... 10
CHAPTER 5. CONFIGURATION OF MAIN MENU................................................................................................ 15
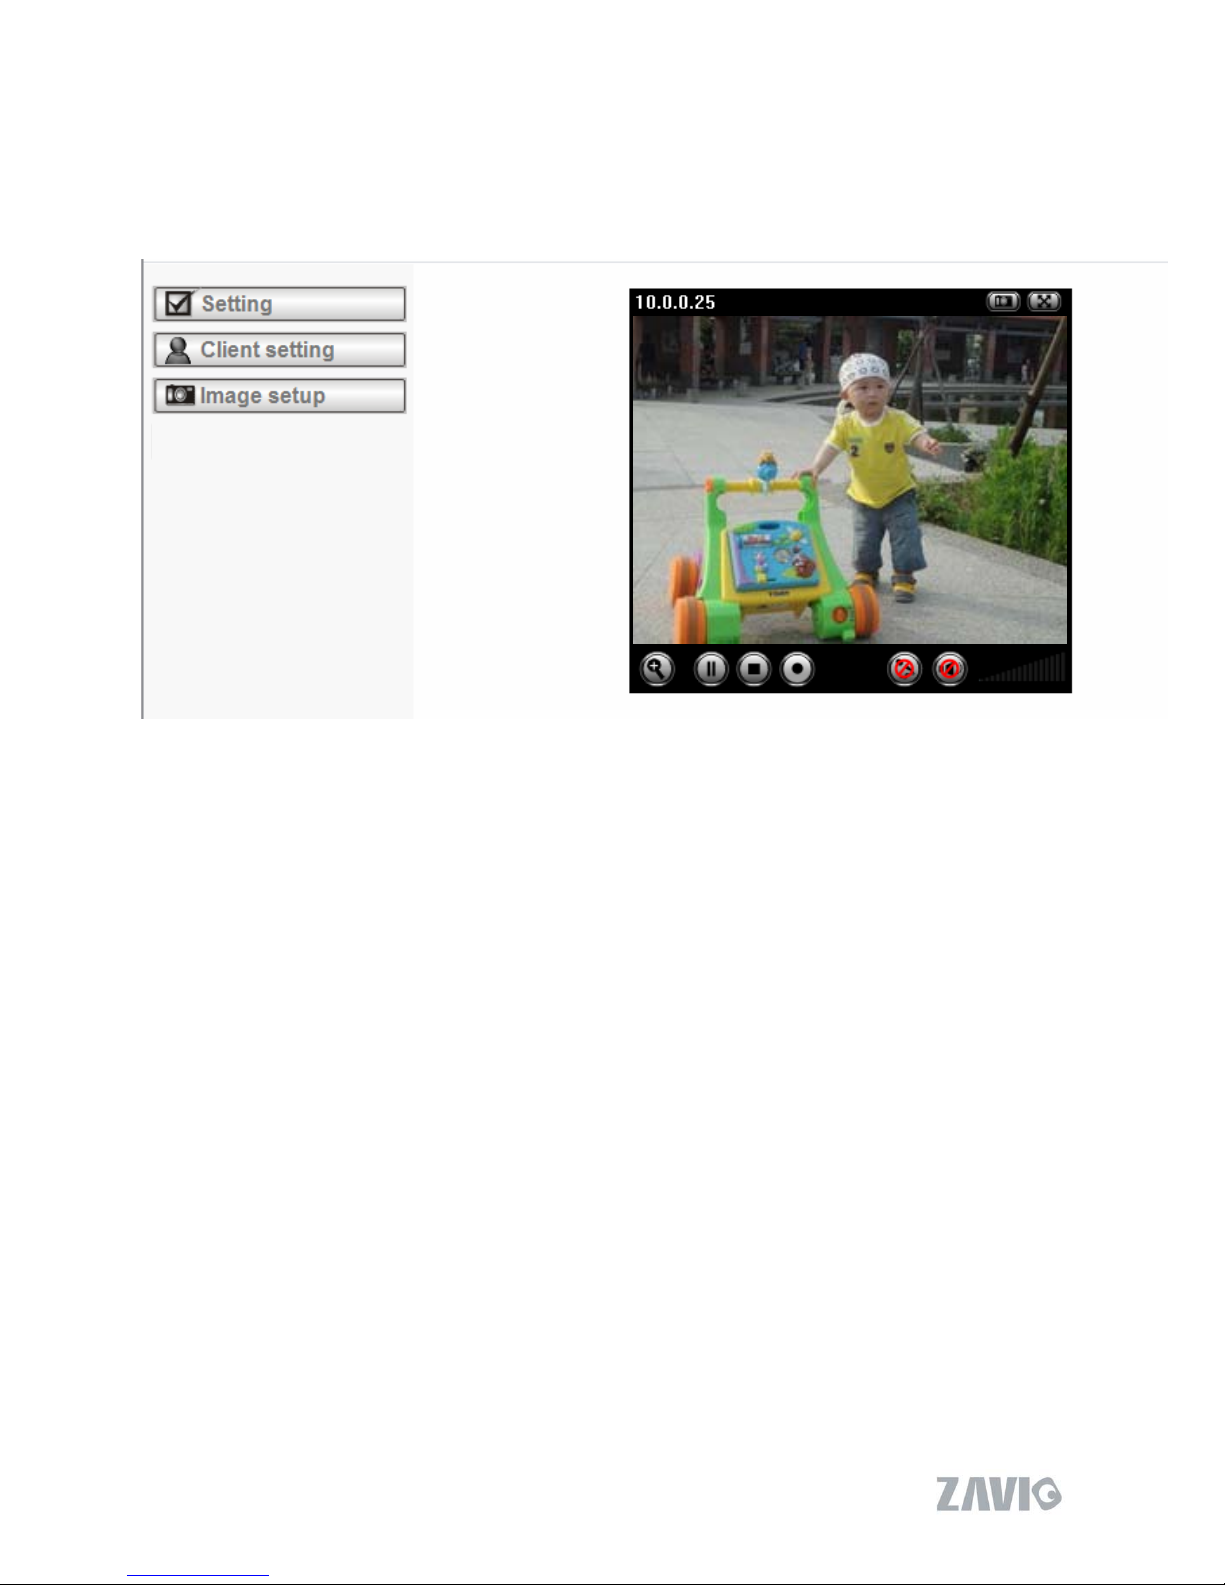
5.1 LIVE VIEW ............................................................................................................................................................. 16
5.2 SETTING ................................................................................................................................................................. 18
5.3 CLIENT SETTING ................................................................................................................................................... 19
5.4 IMAGE SETUP......................................................................................................................................................... 20
CHAPTER 6. SETTING-BASIC................................................................................................................................... 21
6.1 SYSTEM .................................................................................................................................................................. 22
6.2 CAMERA................................................................................................................................................................. 27
6.3 NETWORK .............................................................................................................................................................. 33
6.4 SECURITY............................................................................................................................................................... 47
CHAPTER 7. SETTING-ADVANCE ........................................................................................................................... 50
7.1 FTP CLIENT........................................................................................................................................................... 51
7.2 SMTP .................................................................................................................................................................... 59
7.3 HTTP EVENT ......................................................................................................................................................... 69
7.4 ALARM OUTPUT .................................................................................................................................................... 76
7.5 SCHEDULE.............................................................................................................................................................. 80
7.6 ALARM INPUT ........................................................................................................................................................ 82
7.7 ALARM BUFFER...................................................................................................................................................... 83
7.8 MOTION DETECTION............................................................................................................................................. 84
7.9 SYSTEM LOG.......................................................................................................................................................... 86
CHAPTER 8. APPENDIX ............................................................................................................................................. 87

N6031 User Manual
2
Firmware User Manual
Chapter 1. Minimum System Requirement
We strongly recommend your computers follow our minimum requirements in order to use this
IP-Camera normally. If computer level is lower than this, it might cause some problems.
Item Requirements
CPU Pentium 4 1600MHz (or equivalent AMD)
Graphic Card 64 MB RAM graphic cards(or equivalent on-board graphic cards)
RAM 512 MB
Operating System Windows 98, Windows ME (Please see Note)
Windows2000, 2003, XP, Vista, Mac OS X Leopard
Web Browser Internet Explore 6 or later
Note:
1. If you are using Windows 98 or Windows ME, please install IP Installer before using WEB UI
to ensure the system runs normally.
2. If you can't view the record video file, please install Xvid codec while installing Intelligent IP
Installer. (For Windows 98, ME or 2000 server, the codec might not work properly. You’ll need to
download Xvid codec 1.0 from the internet.
3. Please always update the latest Windows component. (.Net Framework, Windows Media Player,
Enhance ActiveX Security)

Chapter 2. Using IP Camera via Web Browser
2.1Windows Web Browser
1. Start your web browser, and enter the IP address or host name of the IP camera in the
Location / Address field of your browser.
Note :
If you only want to view the video without setting page, enter “http://<IP>/index2.htm”
as your web URL.
2. Use the default account “admin” and default password “admin”.
Note :
The default user name “admin” and the password are set at the factory for the
administrator. You can change them in the Account Menu (Please check “Setting →
Basic →Security →Account”)
3

3. The monitor image will be displayed in your browser. In the far left side of main
configuration are Setting, Client Setting, and Image Setup. For more details, you can check
Chapter 5.2、Chapter 5.3 and Chapter 5.4.
4

2.2 Mac Web Browser
1. Click the Safari icon, and enter the IP address of the IP camera in the Location / Address
field of your browser.
Note :
If you only want to view the video without setting page, enter “http://<IP>/index2.htm”
as your web URL.
5

2. Use the default account “admin” and default password “admin”.
Note :
The default user name “admin” and the password are set at the factory for the
administrator. You can change them in the Account Menu (Please check “Setting →
Basic →Security →Account”)
6

3. The monitor image will be displayed in your browser. In the far left side of main
configuration are Setting, Client Setting, and Image Setup. For more details, you can check
Chapter 5.2、Chapter 5.3 and Chapter 5.4.
7

Chapter 3. Using IP Camera via Mobile Phone
3.1 Using IP Camera via iPhone
You can use Zavio Web User Interface via iPhone. Please follow the setting process below.
Then you can use Zavio web UI via iPhone.
1. Select Safari function 2. Enter IP address in your web link.
3. Type name and password.
Default value is admin / admin.
4. The Zavio User Interface and live
image will show up in the middle of
screen.
Then click Login In
Note: It will show continuous snapshots not
a real time video streaming. Therefore, the
recording feature is disabled.
8

9
3.2 Mobile Phone Viewing
To use IP cameras via mobile phones, please make sure your RTSP is set to “On” (Default is
“On”). To change the settings of IP cameras, Please check “Settings →Basic →Camera →
General.”
1. 3G Mobile Phone Streaming Viewing
For 3G mobile phone viewing, type “ rtsp://<IP>:<PORT>/video.3gp ” into your 3G
Streaming Link. <IP> is the Public IP address of your IP camera; <PORT> is the RTSP port
of your IP camera (Default value is 554.) Example: rtsp://100.10.10.1:554/video.3gp
Note: You can also use RTSP clients (RealPlayer, VLC, QuickTime Player…etc.) to
view RTSP streaming, just type in “rtsp://<IP>:<PORT>/video.3gp” as the Player URL
2. 2.5G Mobile Phone WAP Viewing
For 2.5G mobile phone viewing, type “ <IP>/mobile.wml ” into your 2.5G WAP Browser.
<IP> is the Public IP address of your IP camera.
3. 2.5G Mobile Phone Browser Viewing
For 2.5G mobile phone viewing, type “ <IP>/mobile.htm ” into your 2.5G Web Browser.
<IP> is the Public IP address of your IP camera.

Chapter 4. MSN Messenger
Please see the following steps to set up the Messenger function.
1. You can download MSN software freely and create a new MSN account (camera at home) to
use Microsoft Live Messenger.
2.Go to Setting→Basic→Network→Messenger , set the Messenger to “ON” . Then, login in new
account and password (Camera at home).
3. Choose “On” at the option of IP Notification. If this feature switches On, camera will send
IP notification to the users who are allowed.
4. Choose “On” at the option of Privacy. If you can choose “On” at the privacy option, you can set
an allow list.
5. Use your account to login in the Messenger software. Then, add the new MSN account (Camera
at home )
10

6. The Camera at home will show up with its Public IP and Private IP if the option of IP
Notification is “On”. ( You can enter “Ping” to show up with Public IP and Private IP. )
7. Click on the small camera icon . Then, choose “View a new contact's webcam”.
Camera at home says:
8. The IP Camera will accept your invitation; the live video will show up in the right screen after
few seconds.
11

9. Click Action button and choose Start control panel to use control panel.
12
10. The dialog box will show up with “This application is not part if Window Live Message…….”
Tick the box of “Don’t show me this again” and click OK

11. The IP Camera will accept your invitation to start Control Panel.
13
12. You can click Camera icon to snapshot then the picture will send to you immediately.
Sna
p
shot

13. You can click paint palette icon showing up with tool bar to set up image. Then, you
can use the tool bar to optimize video Brightness , Contrast , Saturation and Hue .
After the adjustment of all setting, you can still click to make the setting back to the
original setting.
Image Setup
14

Chapter 5. Configuration of Main Menu
In the far left side of main configuration are Setting, Client Setting, Image Setup. For more
details, you can check Chapter 5.2、Chapter 5.3、Chapter 5.4.
15
Full screen
Snapshot
Zoom in / Out
Video Play Audio button
In your right hand side, you can use Live View in your main Browser. There are Snapshot,
Zoom and Audio and Video Play four different function. You can see more details as follow.

5.1 Live View
A. Snapshot
B.You can capture a still image shot by the camera and save it in your computer.
16
B. Zoom in / out the image via the monitor window
Click to display the digital zoom in window.
Pull the to adjust the digital zoom range, and it will
be showed on the above window.
You can use the left click of your mouse to move the to any where on the window.
Symbols Meaning
a snapshot window will appear
Save to save the picture in your computer
Close to return to the view page
full Screen

C. Video play buttons
Symbols Meaning
Pause the current video
Play the video
Stop the current video
Record the current video
Note:
Concerning the recording storage requirement of your hard disk, please refer to
the CHAPTER 8. APPENDIX / B. Storage Requirement Table.
D. Audio buttons
Symbols Meaning Note
Speakers turned on mean the speakers of your computer are turned on
to transmit the sounds from the connected IP
camera(s)
Speakers turned off
Microphone turned on mean you can broadcast to the connected IP
camera(s) via the Ethernet using your microphone
Microphone turned off
Volume control bar
17

5.2 Setting
This function is only for the Administrator. Click this button to get into the Basic and
Advance settings menu.
Click Basic folder, there are four sub-folders including System, Camera, Network, and
Security. Fore more information, you can see Chapter 6.1、Chapter 6.2、Chapter 6.3 and
Chapter 6.4.
Click Advance folder, there are four sub-folders including FTP Client, SMTP, HTTP
event, Alarm output, Schedule, Alarm input, Motion Detection, and System Log. Fore
more information, you can see Chapter 7.1、Chapter 7.2、Chapter 7.3、Chapter 7.4、Chapter
7.5、Chapter 7.6、Chapter 7.7、Chapter 7.8、Chapter 7.9.
18

5.3 Client Setting
This function is only for the client.
Click this button to control Mode, View Size, Protocol, and Video Buffer.
5.3.1 Mode
Click the pull-down box to choose between MPEG4 and MJPEG video compression mode.
MJPEG streaming is unavailable if RTSP mode is “On.”
(Please check Setting →Basic →Camera →General)
Note:MJPEG streaming is unavailable if RTSP mode is On.
5.3.2 View Size
Select the desired display image resolution to 640X480 or 320X240.
5.3.3 Protocol
Select the transferring protocol from TCP, UDP, HTTP and Multicast.
5.3.4 Video Buffer
Turn the Video Buffer function ON / OFF. The Video Buffer function makes the streaming
more smoothly in unsteady network environment, but might cause a little delay in live
viewing.
19
This manual suits for next models
7
Table of contents
Other Zavio IP Camera manuals

Zavio
Zavio M511E User manual

Zavio
Zavio D510E Instructions for use

Zavio
Zavio P8220 User manual

Zavio
Zavio F731E 35M Instructions for use

Zavio
Zavio M511W Instructions for use

Zavio
Zavio B7210 User manual

Zavio
Zavio B7320 3MP WDR User manual

Zavio
Zavio D7110 User manual

Zavio
Zavio M511E Instructions for use

Zavio
Zavio P4520 User manual