3
ZigBee Network Setup
Z
Zi
ig
gB
Be
ee
e
D
De
ev
vi
ic
ce
e
G
Gu
ui
id
de
el
li
in
ne
e
ZigBee is a wireless communication protocol that is reliable and has low power consumption and
high transmission efficiency. Based on IEEE802.15.4 standard, ZigBee allows a large amount of
devices to be included in a network and coordinated for data exchange and signal transmission.
Due to the fundamental structure of ZigBee network, ZigBee device will actively seek and join
network after powering on. Since performing a task in connecting network may consume some
power, it is required to follow the instructions to avoid draining battery of a ZigBee device
- Ensure your ZigBee network router or coordinator is powered on before inserting battery into the
ZigBee device.
- Ensure the ZigBee network router or coordinator is powered on and within range while a ZigBee
device is in use.
- Do not remove a ZigBee device from the ZigBee network router or coordinator without removing
the battery from a ZigBee device.
J
Jo
oi
in
ni
in
ng
g
t
th
he
e
Z
Zi
ig
gB
Be
ee
e
N
Ne
et
tw
wo
or
rk
k
As a ZigBee device, the Siren needs to join a ZigBee network to send and receive alarm signal.
Please follow the steps bellow to join the Siren into the ZigBee network.
1. Insert the batteries. Use the battery switch to power on the Siren.
2. Press and hold the Function button for 10 seconds, the LED will flash to indicate.Then release
to join ZigBee network. Please make sure to enable the permit-join feature on the router or
coordinator of your ZigBee network
3. After joining the ZigBee network, the Siren will be registered in the security system in the
network automatically. Please check the security system control panel or CIE (Control and
Indicating Equipment) to confirm if joining and registration is successful.
4. After joining the ZigBee network, if the Siren loses connection with current ZigBee network, the
LED will flash every 20 minutes to indicate the situation. Please check your ZigBee network
condition and Siren signal transmission range to correct the problem.
R
Re
em
mo
ov
vi
in
ng
g
D
De
ev
vi
ic
ce
e
f
fr
ro
om
m
Z
Zi
ig
gB
Be
ee
e
N
Ne
et
tw
wo
or
rk
k
(
(F
Fa
ac
ct
to
or
ry
y
R
Re
es
se
et
t)
)
To remove the Siren from current ZigBee network, the device must be put to Factory Reset to
complete device removal. Factory Reset function will clear the Siren of its stored setting information
and prompt the device to search for new ZigBee network.
Before removing device, make sure the Siren is within current ZigBee network signal range
1. Press and hold the function button for 10 seconds, then release the button to reset Siren.
2. Upon reset, the Siren will clear current ZigBee network setting and transmit signal to ZigBee
coordinator to remove itself from current ZigBee network. It will then actively search for
available ZigBee network again and join the network automatically.
Installation
I
In
ns
st
ta
al
ll
la
at
ti
io
on
n
G
Gu
ui
id
de
el
li
in
ne
e
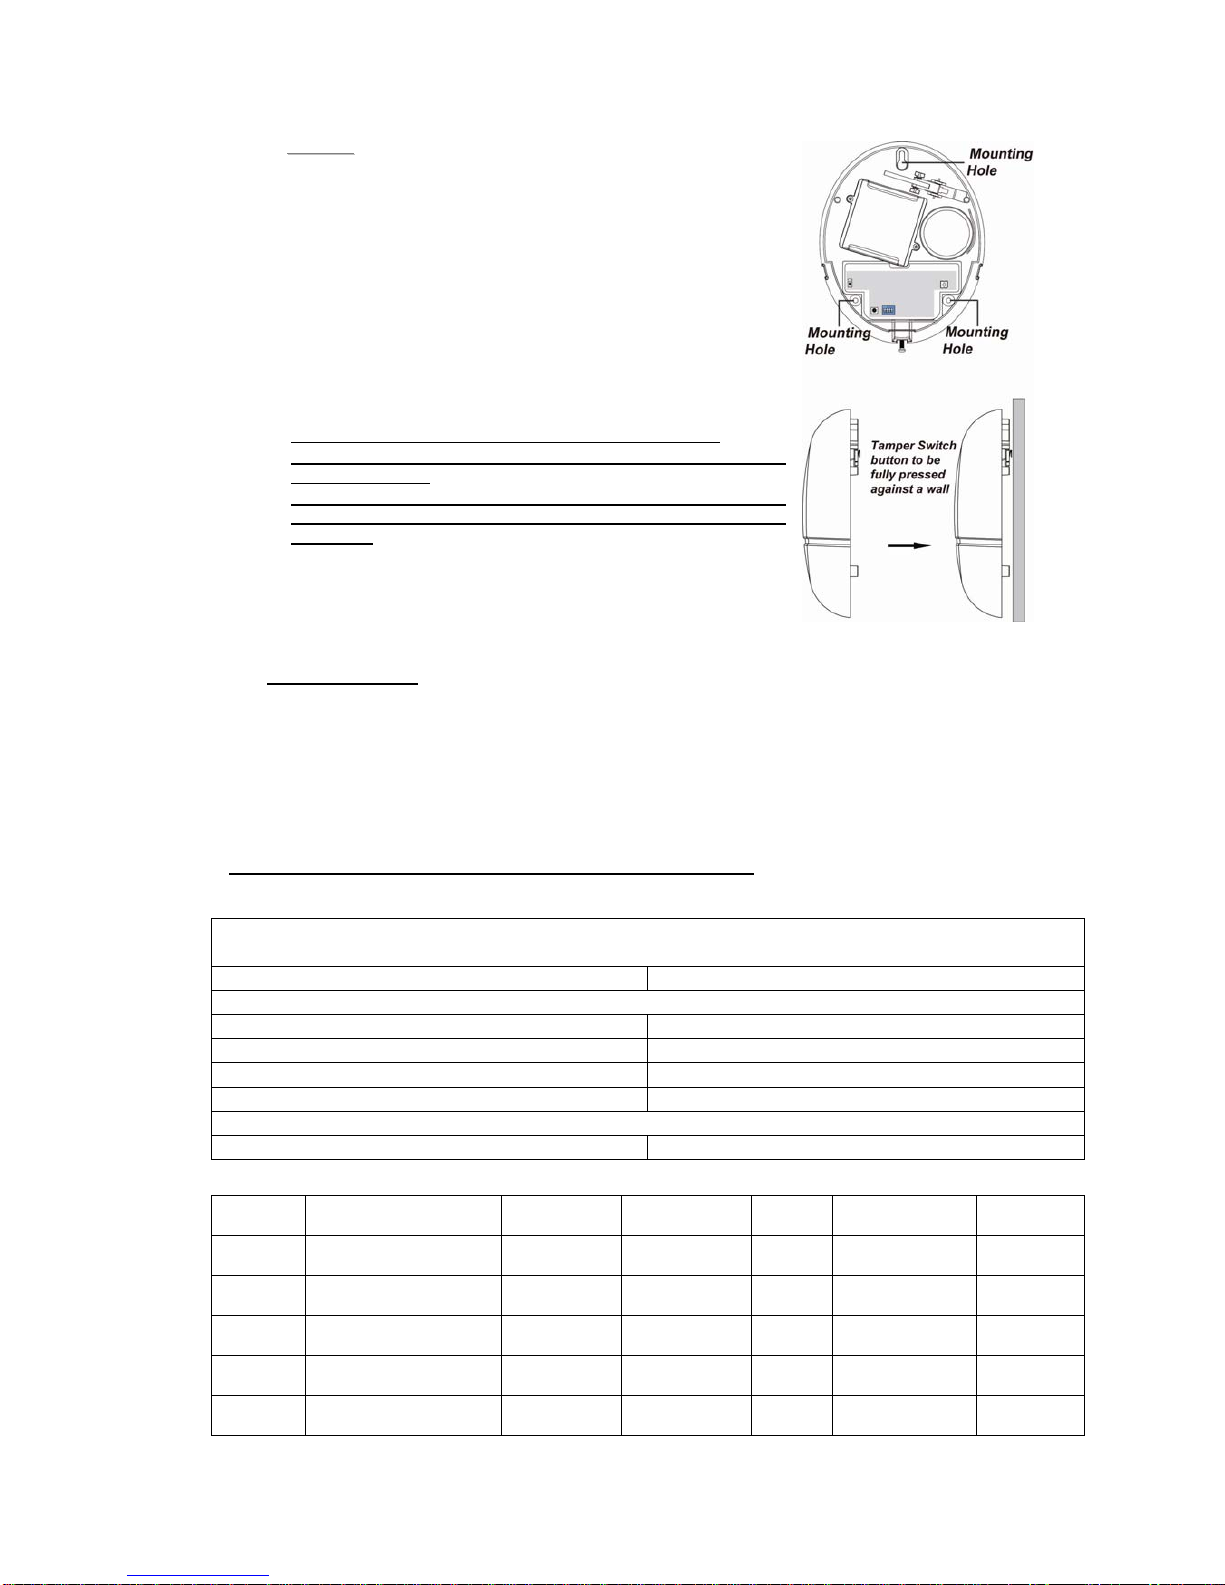
The Siren is designed to be mounted on a flat surface with fixing screws and plugs provided.
The base has 3 mounting holes for you to screw the Siren onto the wall.
M
Mo
ou
un
nt
ti
in
ng
g
t
th
he
e
S
Si
ir
re
en
n
1. Bypass the Siren using the Control Panel’s Edit Device function (refer to the Control Panel
instruction manual). The siren will sound a beep to indicate the tamper switch is now disabled.
2. Find the location where the Bellbox is to be mounted.
3. Remove the Top cover by releasing the bottom screw using a Philips screwdriver and pulling the
outer case out carefully.
4. Hold the Siren at the position where it will be mounted.
5. Check whether Siren has a strong enough signal with the Control Panel by putting the Control
Panel into Walk Test mode (please refer to Control Panel manual). Press the Function Button
check whether the signal is strong enough (please refer to Control Panel manual for signal
strength).
6. If you are satisfied with the signal strength, remove the Siren from mounting location.
7. Identify the 3 mounting holes, mount and fix the Siren on the wall using the large screws and
wall plugs provided. Secure the screws using a Philips screwdriver. Make sure the Tamper
Switch is fully depressed against the wall.