ZLOS ONT-PB10K-22W User manual

10000mAh Mini Power Bank
User Manual

1
*Note: After receiving the package, please confirm whether the
items inside are complete. If there is any missing, please contact
our after-sales department.
Mini Power Bank x 1
(ONT-PB10K-22W)
1. Package List
User Manual x 1 Warranty Card x 1

1.
2.
3.
4.
5.
6.
7.
8.
9.
10.
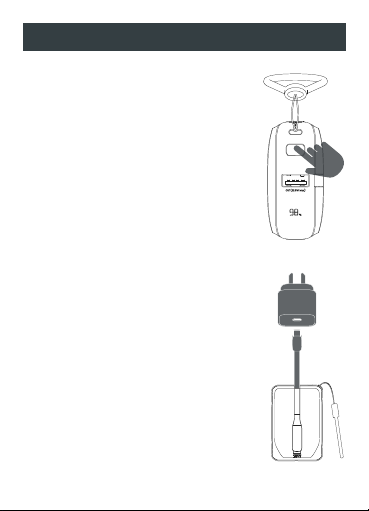
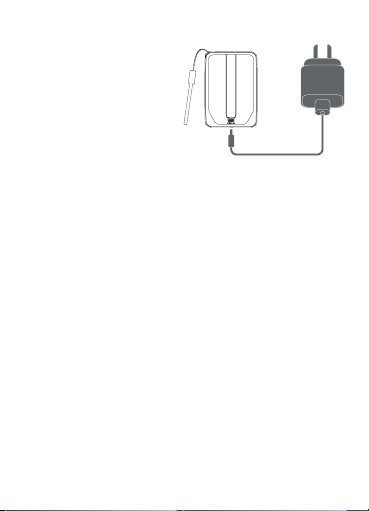
Fully charge the product in the first use.
The rated power, voltage, and current of this product and the
charged devices should be checked before charging.
Unapproved or incompatible chargers and power adapters
are strictly prohibited to prevent fire, explosions, and other
dangers.
Disconnect the charging cable immediately after the product
has been fully charged, or after the product has fully charged
other devices, to prevent damaging the product or other
devices.
Do not disassemble, repair, or modify the product to avoid
damaging the battery cells or creating a fire.
Do not expose the product to environments exceeding 60°C,
such as car seats exposed to direct sunlight, heaters,
microwave ovens, etc. Batteries may explode in high-
temperature environments.
Do not place the product on flammable materials (bed
sheets, carpets) while charging.
Do not use or store the product in a humid environment; do
not touch the battery in a humid environment.
Do not drop, crush, puncture, short-circuit the product, or put
it into water or fire to avoid fire or explosion.
Do not use this product in thunderstorms, to avoid product
failure or the risk of electric shock.
2. Safety Instructions
2

11.
12.
13.
Do not use this product if there are any abnormalities such as
battery expansion, liquid leakage, deformation, etc.
When storing the product for a long time, keep it at not less
than 70% power and in a dry place. To prolong the product's
life, it is recommended that it be fully charged and
discharged every three months.
Generally, this product can be taken on airplanes. Details can
be found in local laws and regulations.
3

General Specs
Name: 10000mAh Mini Power Bank
Model: ONT-PB10K-22W
Color: Anthracite Grey
Size: 84x58x28mm
Net Weight: Approximately 190g
Built-in Cables: USB-C x 1, Lightning x 1
Certification: CE, RCM, Rosh, GB/T35590
Battery
Cell Chemistry: Lithium-ion Cell 21700
Battery Capacity: 10000mAh / 36.9Wh
Rated Capacity: 6000mAh, 5V/2.4A
Input
USB-C Input Port: 5V⎓2A, 9V⎓2A, 12V⎓1.5A, 18W max
Built-In USB-C Cable: 5V⎓2.6A, 9V⎓2A, 12V⎓1.5A, 18W max
Output
USB-A Output Port: 5V⎓3A, 5V⎓4.5A, 4.5V⎓5A, 9V⎓2A, 12V⎓1.5A,
22.5W max
Built-In USB-C Cable: 5V⎓3A, 9V⎓2.22A, 12V⎓1.67A, 20Wmax
Built-In Lightning Cable: 5V⎓3A, 9V⎓2.22A, 12V⎓1.67A, 20W max
Total Output: 5V⎓3A
3. Specifications
4

Protocol Compatibility
USB-C Port: AFCP, FCP, SFCP
USB-A Port: QC2.0, QC3.0, AFCP, FCP, SFCP, SCP, BC1.2, MTK
Built-In USB-C Cable: PD2.0, PD3.0, PPS, AFCP, FCP, SFCP, BC1.2,
MTK
Built-In Lightning Cable: PD2.0, PD3.0, PPS, AFCP, FCP, SFCP, BC1.2,
MTK
Whether to support charging while discharging: Yes
Charge Temperature: 0°C~45°C
Discharge Temperature:-20°C~60°C
5

g
ef
acdb
4. Features
a.
b.
c.
d.
Handle Rope
Main Power Button
USB-A Output Port
Remaining Battery Percentage
e.
f.
g.
Built-In Lightning Cable
Built-In USB-C Cable
USB-C Input Port
6

1.
2.
Turn On/Off the Product
Press the Main Power Button or charge it
directly, the product turns on. After
powering on the product, you can check the
remaining power percentage to see if it
needs to be recharged. If the remaining
power percentage cannot be displayed,
charge it to see if it appears. Check to see if
the charging cable and external power
supply are intact if it still cannot display.
Please contact after-sales service if you still
cannot solve the problem. The product
automatically turns off after 30 seconds of
removing the cable.
Charging with the Built-In USB-C Cable
The USB-C cable is embedded on the back
side, so please gently pull out the cable and
connect the C end of the cable to the
external charging socket as shown in the
illustration. Make sure that the power,
voltage, and current of the external socket
(5V⎓2.6A, 9V⎓2A, 12V⎓1.5A, 18W max) are
compatible with this port before charging it.
5. Product Charging
7

3. Charging with the USB-C Port
As shown in the picture,
connect this product to the
external socket using the
USB-C charging cable
(cable not included).
The C end of the charging
cable connects to the
USB-C port of the product, while the USB end connects to the
external plug. Before charging, please check the voltage,
current, and power range of the input socket applicable to this
interface (5V⎓2A, 9V⎓2A, 12V⎓1.5A, 18W max).
8
!!! NOTICES:
1)
2)
3)
4)
Please fully charge this product before using it for the first
time.
The product supports charging and discharging
simultaneously, so you can use it to charge other devices
while charging Tiny10.
The product will enter fast charging mode if the external
power supply is compatible with the product's fast charging
protocol; if it isn't, the product will be charged at normal
speed.
After reaching 100%, the product automatically stops charging
and the display will always remain on. To prevent product
loss, unplug the charging cable as soon as possible.

1.
2.
Turn On/Off the Product
The Tiny10 turns on by short pressing the
Main Power Button or directly connecting
the charged device. Once the product has
been powered on, you can browse its
remaining power to see if it can charge
another device. Charge your Tiny10 first if
the power is less than 1%. In 30 seconds
after removing the load, the product will
automatically shut down.
Charging Other Devices with the Built-In
Lightning Cable
The Built-In Lightning Cable is embedded
on the front side. Pull out the cable gently
and connect the L end to the external
device as shown in the diagram. Make sure
the voltage, current, and power ranges of
the external device are appropriate for this
cable (5V⎓3A, 9V⎓2.22A, 12V⎓1.67A, 20W
max).
9
6. Product Use

4. Charging Other Devices with the USB-A
Output Port
Connect this product to an external device using a USB-A
charging cable (not provided). The A end of the charging
cable connects to the product's USB-A Output Port, and the
USB end connects to the external device interface. Make sure
the voltage, current, and power ranges of the external device
are compatible with this interface (5V⎓3A, 5V⎓4.5A, 4.5V⎓5A,
9V⎓2A, 12V⎓1.5A, 22.5W max) before charging.
3. Charging Other Devices with the Built-In
USB-C Cable
The Built-In USB-C Cable is embedded on
the backside. Pull out the cable gently and
connect the C end to the external device
as shown in the diagram. Make sure the
voltage, current, and power ranges of the
external device are appropriate for this
cable (5V⎓3A, 9V⎓2.22A, 12V⎓1.67A,
20W max).
10

11
!!! NOTICES:
1)
2)
3)
The product supports charging and discharging
simultaneously, so you can charge it during discharging.
The product will enter fast charging mode if the external
device is compatible with the fast charging protocol
supported by it, and the display will display a green lightning
symbol; if it is not compatible, it will charge at a normal rate.
The product can charge three devices simultaneously. It will
turn off the fast charging mode when charging two or more
devices at once to protect the battery.

1.
2.
The product will automatically activate the protection mode
when the input voltage is lower than 4.5V or higher than 12V,
or the output voltage is greater than 13.5V. To resume
operation, unplug the charging cable, disconnect the load,
reconnect the product to a voltage within its appropriate
range, and restart it.
The product will not discharge when its temperature is lower
or higher than its working temperature. To resume operation,
disconnect the load, wait for the temperature to return to the
working range, and then restart the product.
7. Troubleshooting
12

Warranty Card
www.z-los.com
You are entitled to a refund or replacement for a major failure.
You are also entitled to have the goods repaired should they fail
to be of acceptable quality (and the failure does not amount to
a major failure).
You must present your receipt of sale as proof of date of
purchase for warranty validation. Please retain this warranty
card for any warranty claim.
This product is for household use only. Use in a commercial
environment, the warranty period will be automatically reduced
to three months. With normal use the product will be free from
faulty parts, manufacture or workmanship.
The warranty does not apply where damage is caused by other
factors including but not limited to mishandling, abuse, accident
or failure to follow operating instructions.
How to make a warranty claim:
Contact the retailer/reseller/store that you bought the product
from for a replacement or refund if the product is faulty. Or you
can contact ZLOS directly via info@z-los.com.
The customer is responsible for all costs relating to all
packaging, freight and insurance for the transport of the product
to and from ZLOS.
Table of contents