Zodiac pH Perfect User manual

What Does pH Mean?
pH is the measure of how acid/alkaline the swimming pool water is. Its value ranges from
0 to 14: 0 is highly acidic, 7 is neutral and 14 is highly alkaline.The mineralogical quality of the water,
the climate, water intake and the numerous pool users all cause the pH to vary continuously.
For the comfort of the pool users, the pH of the water should be maintained between 7.2 and 7.4.
Below that value, the water is aggressive; and above it, larger doses of disinfectant are required to
keep the water healthy and prevent the formation of algae.
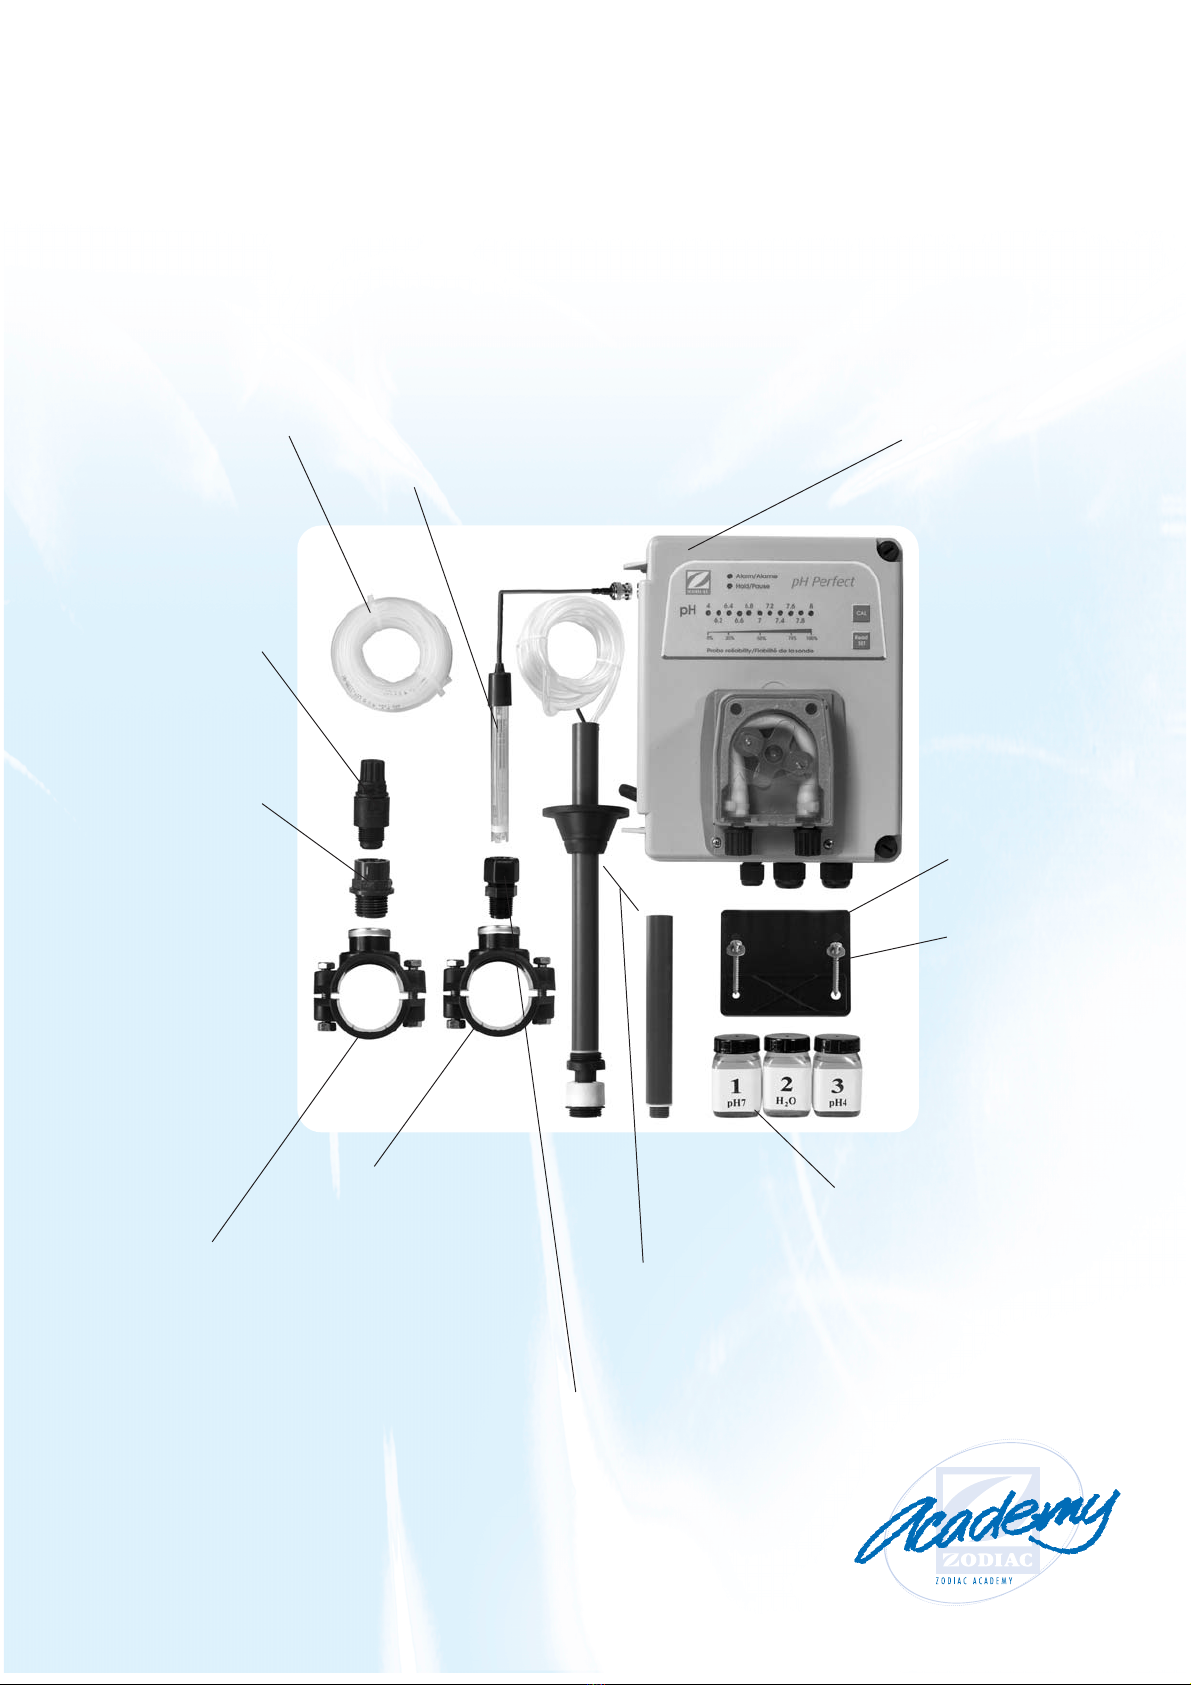
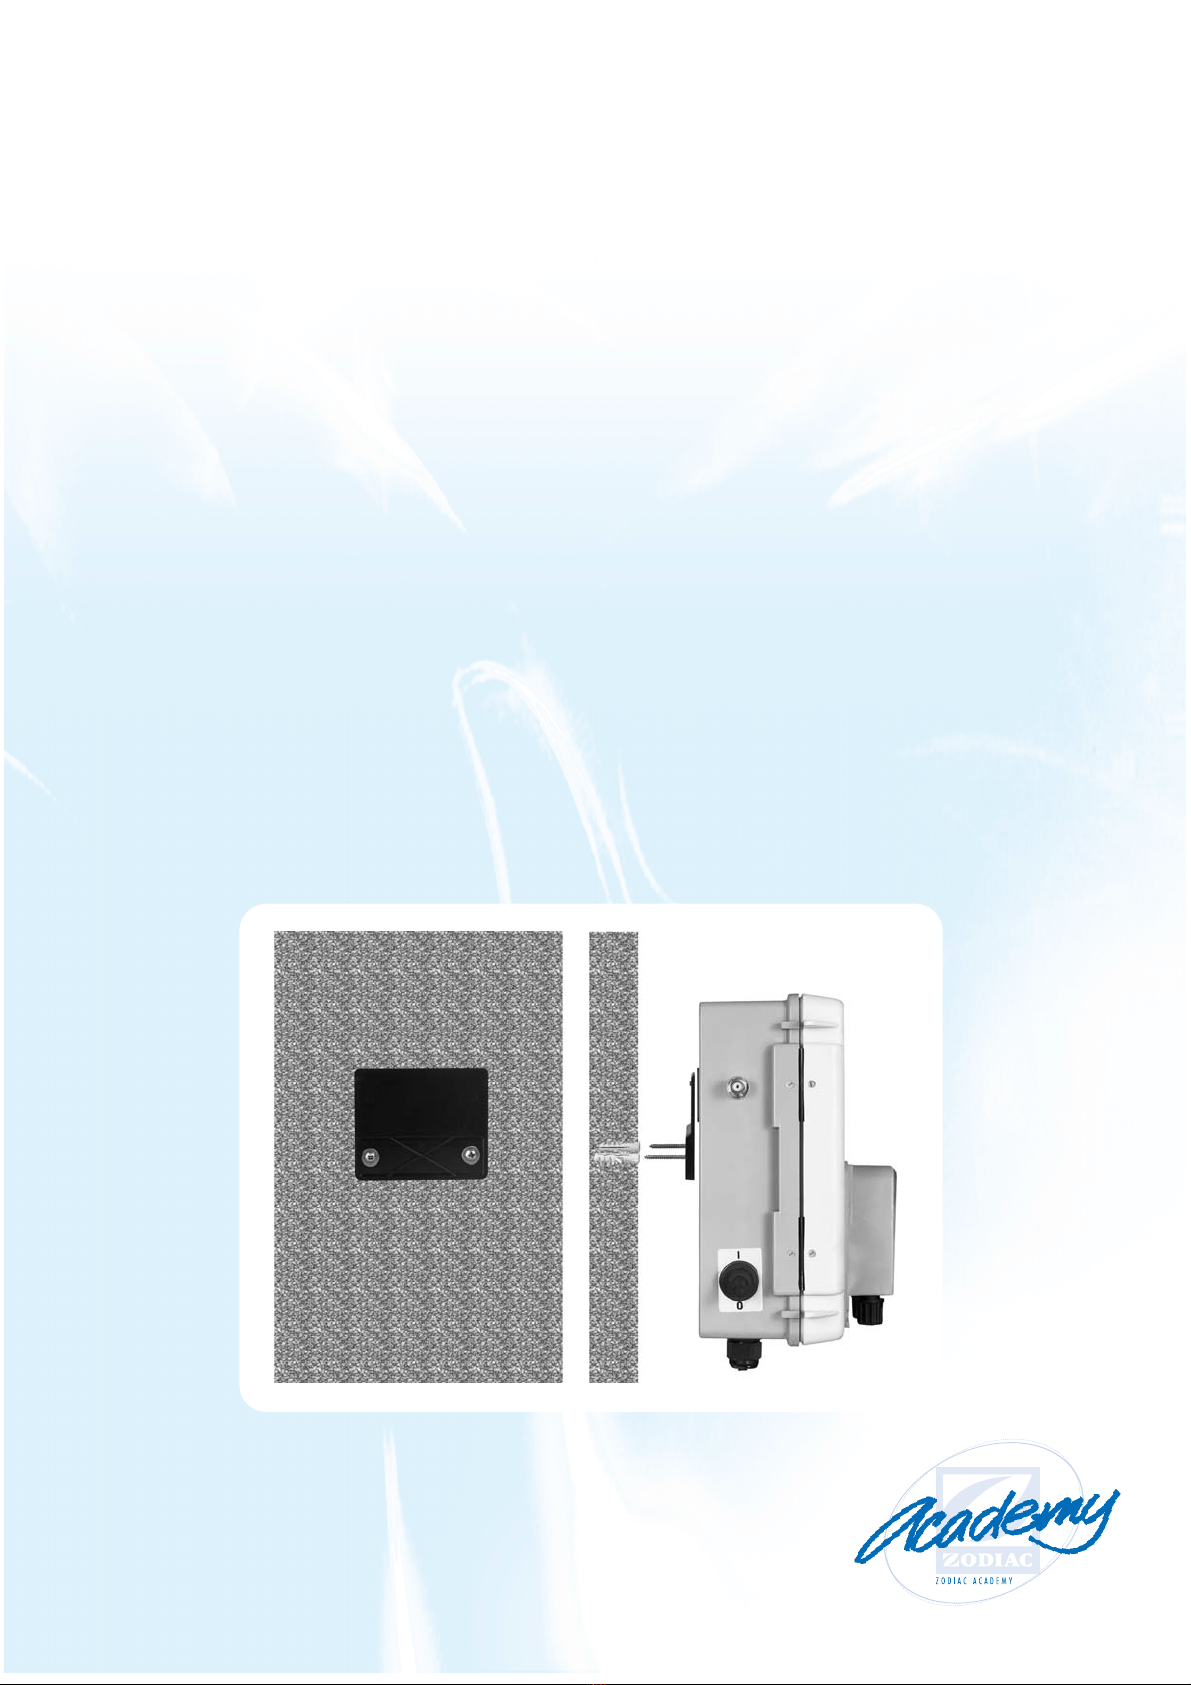
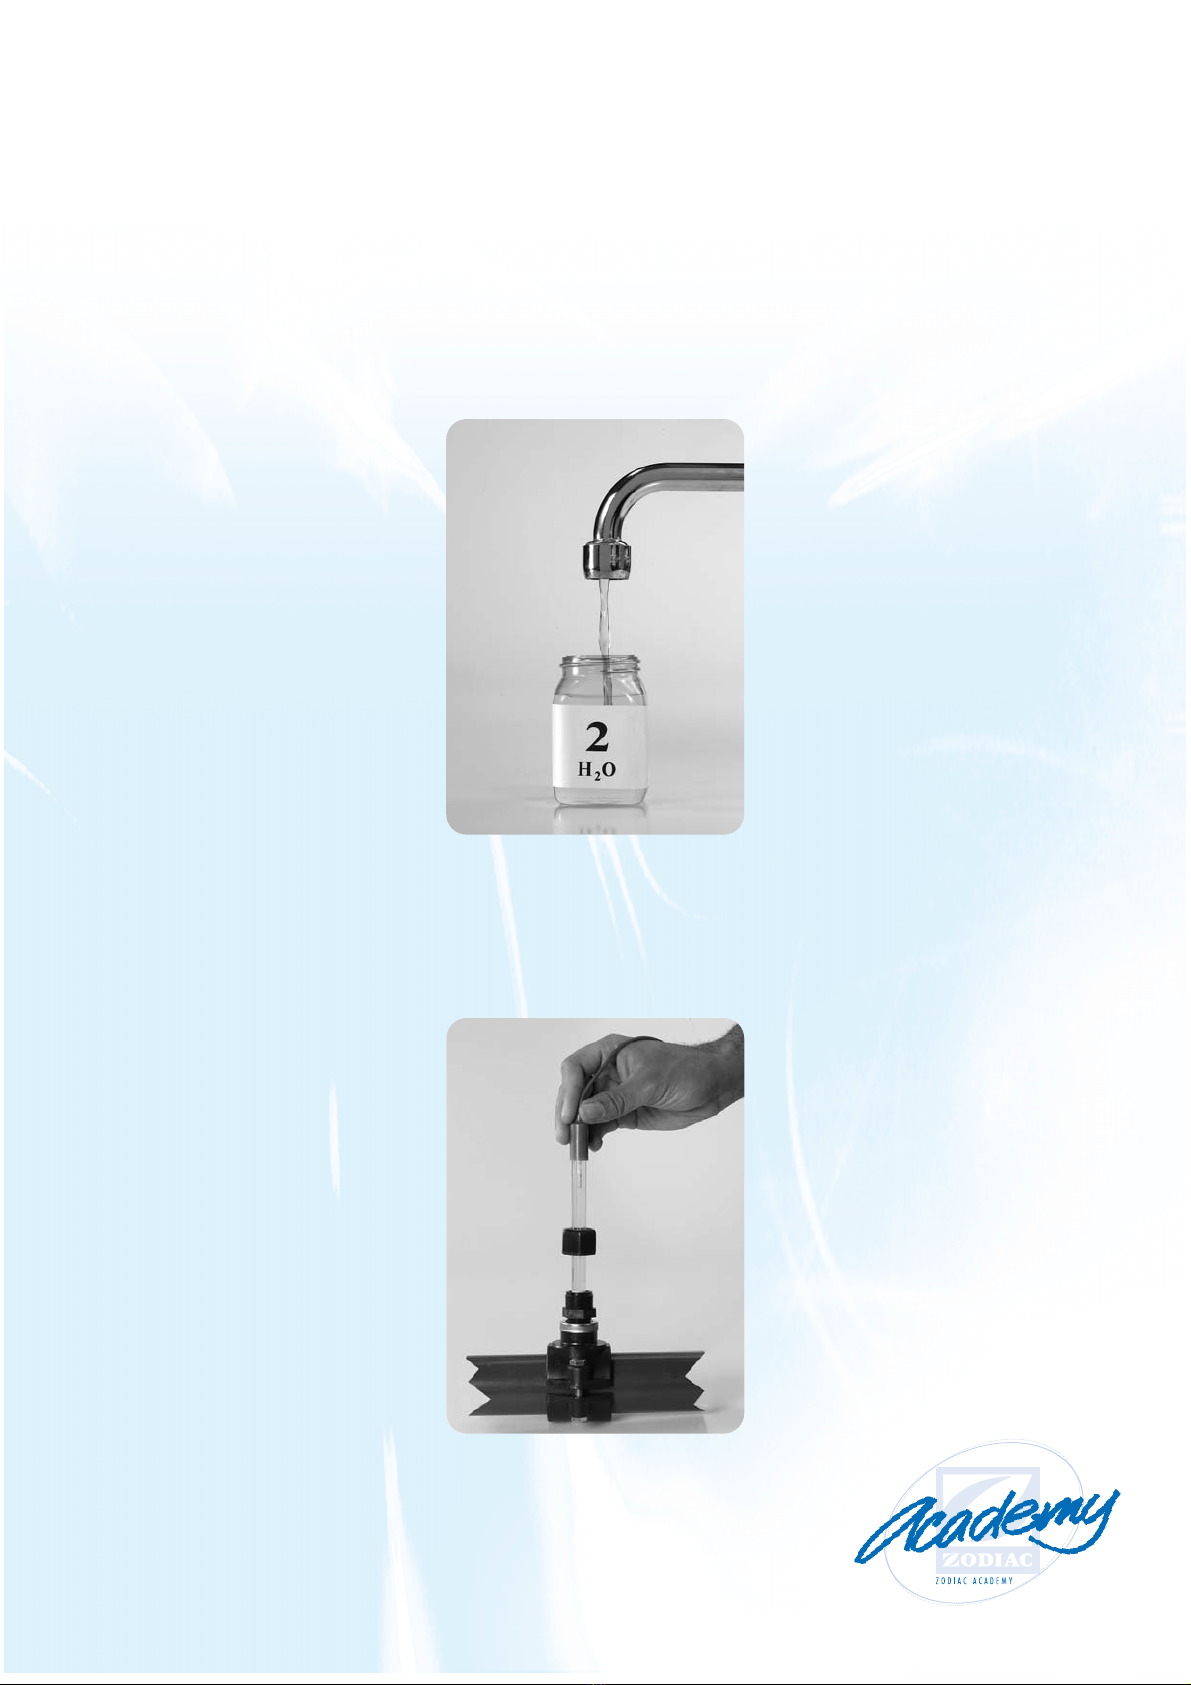
How Does it Work?
pH Perfect monitors the pH with a pH probe located in the filtration system, which constantly
measures the pH of the water in the pool. According to the value measured, pH Perfect adjusts the
pH of the water with its dosing pump by adding acid.This maintains the water balance at the correct
level without any intervention.
To prevent your pool from becoming a constant source of worry, ZODIAC supplies an automatic
water treatment system designed to free you from having to do this work yourself. So enjoy your
pool to the fullest, without the worry.
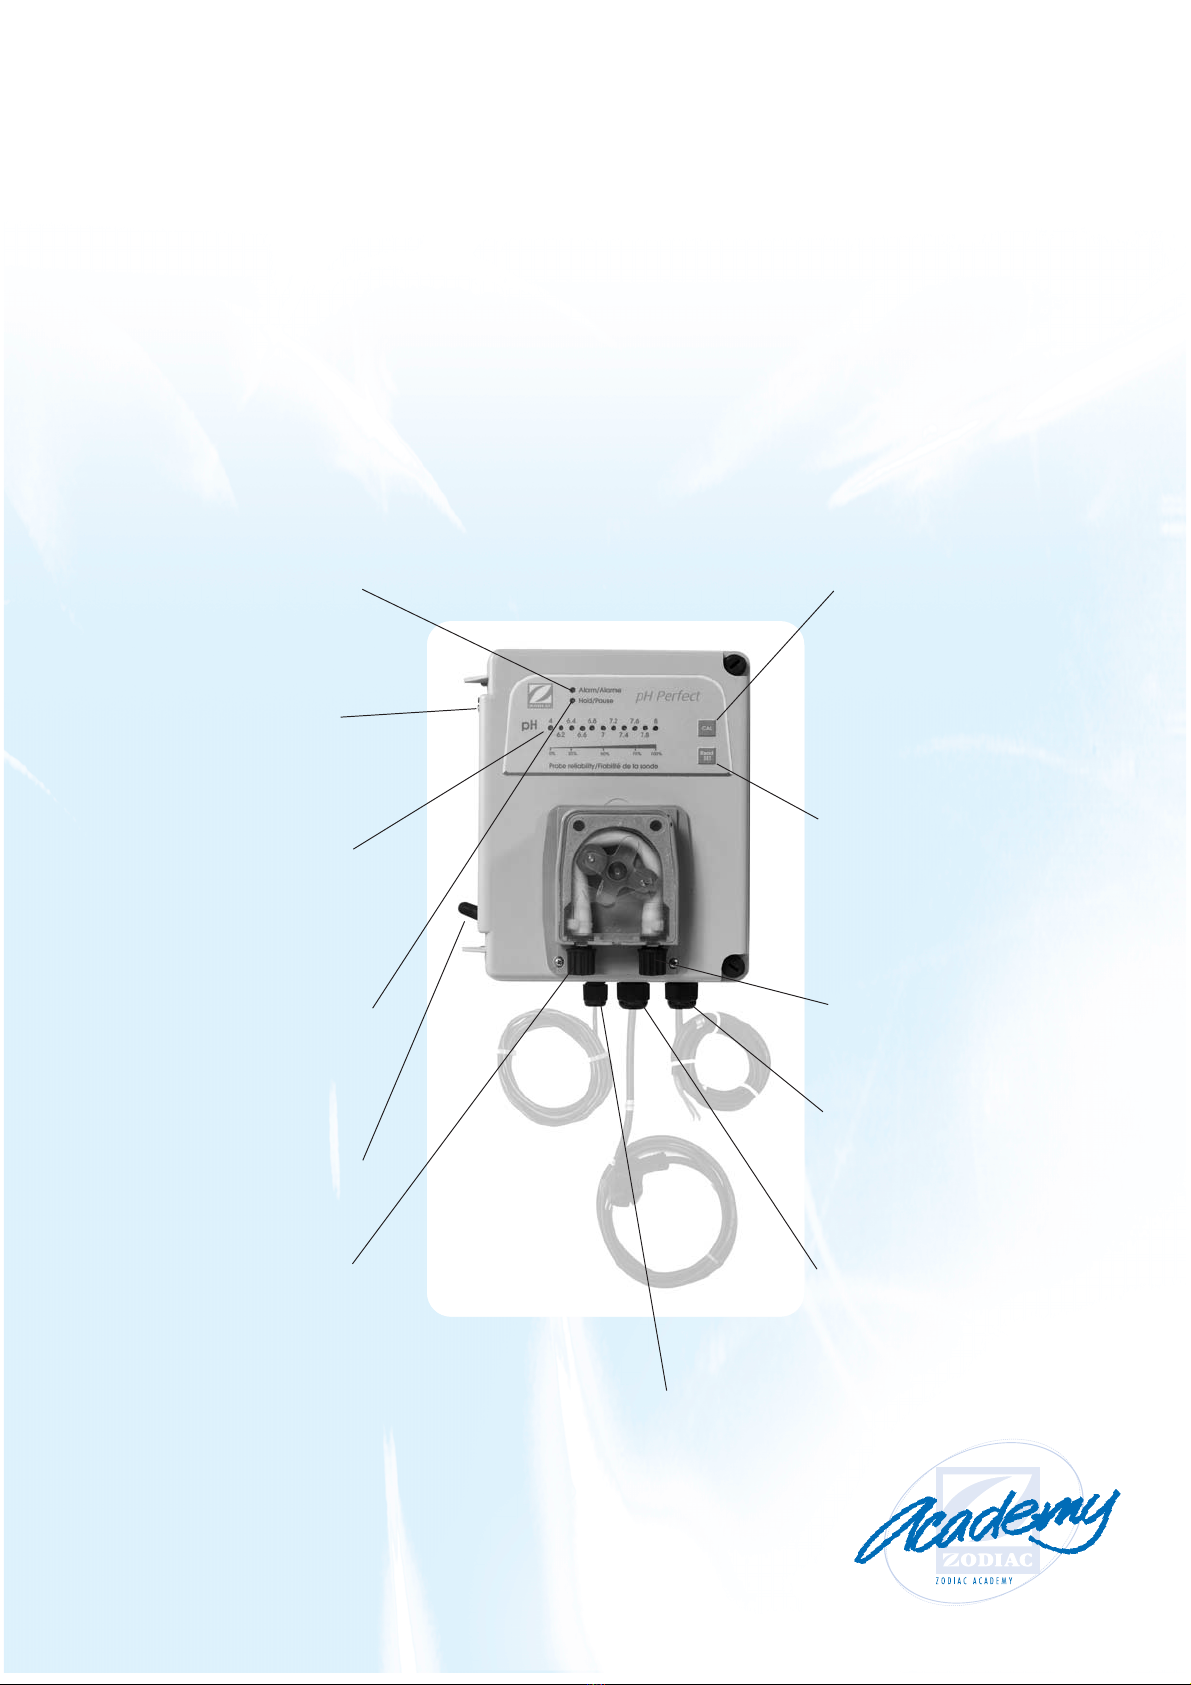
A Product the User Will Find Simpler and More Reliable:
With pH Perfect and as with all its products, ZODIAC has achieved yet another really simple pool
maintenance breakthrough: with its dual power supply system, ZODIACS’ pH Perfect controller keeps
the user constantly informed of the pH of the pool water, whether the pump's on or off.
A simple visual alarm on the control, will indicate when the corrective products runs out and you
can check instantly the probe reliability if you have any doubts about it. Lastly, the intake pipe with
gas emission stopper provides more safety by preventing any contact with the corrective acid.
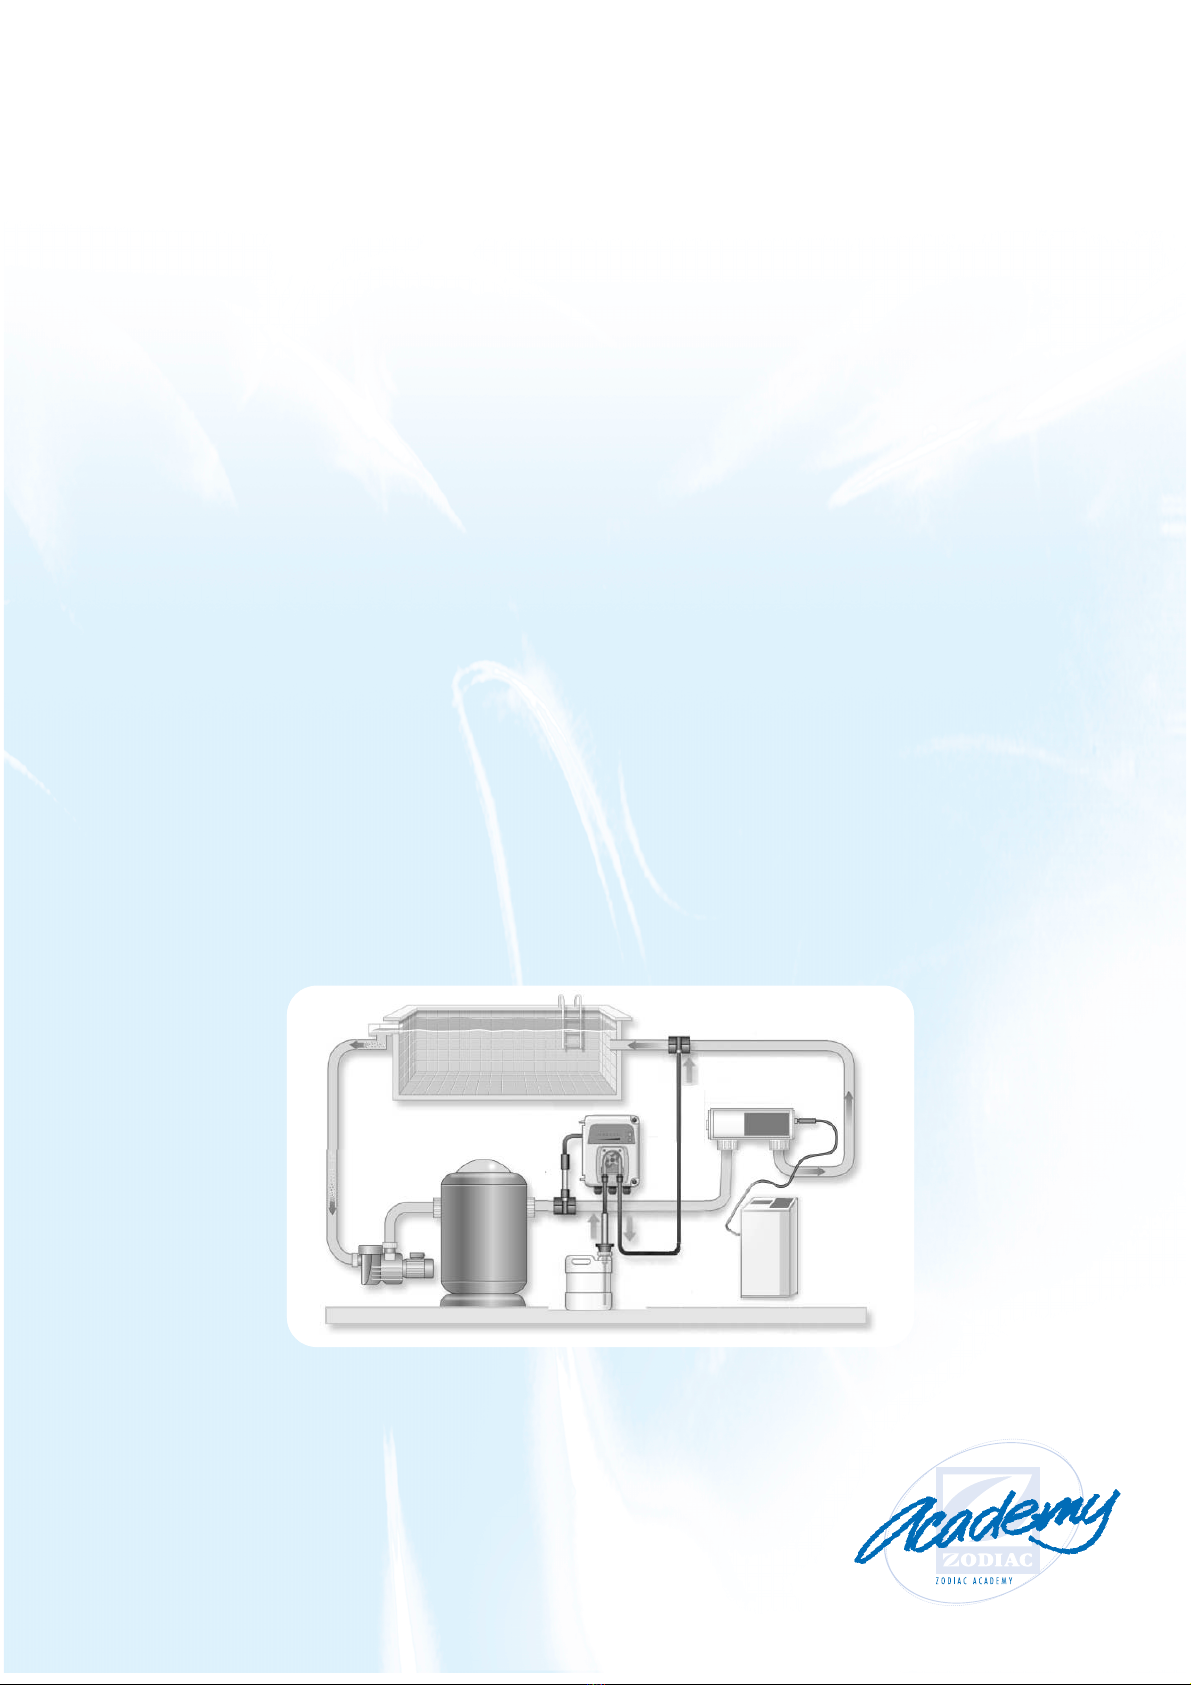
An Essential System for Water Management
The pH Perfect system combines with other equipment to free the pool owner from the usual water
treatment chores. Unless the pH is properly regulated, manual treatments are both risky and expensive,
and even the automatic process controls are under-used and less effective.
Used in conjunction with a ZODIAC Salt Water Chlorinator, pH Perfect extends the service life of
the Chlorinator and reduces maintenance on the cell, at the same time ensuring water
that is really clear and comfortable while optimising the effectiveness of
the chemicals.
So ZODIAC Pool Care, with its two perfectly compatible systems,
provides fully automated pool treatment.
pH PERFECT

Benefits of a pH Perfect
Comfort That Requires No Work
• Automatic water treatment.
• Fewer chemical products.
• Simplified pool maintenance.
4 Advantages for Your Comfort and Wellbeing
• Water that is permanently clear and soft.
• No irritation to the eyes.
• No dryness of the skin.
• No unpleasant taste.
Visual Display
• Permanent water pH display.
• Visual alarm when the acid runs out.
• Probe reliability checked instantly.
Extremely Adaptable
• The set value can be adjusted as required.
• The pH Perfect works in acid or alkaline dosage mode (i.e. plus or minus pH injection).
• The calibration can be locked so as to prevent any accidental loss of settings.
Rapid Installation
For maximum simplicity:
• the unit is pre-wired for connection to the pump and the electric power supply
• easily wall-mounted by means of a clamp.
pH Perfect is supplied complete with:
• A control unit, equipped with a peristaltic pump.
• A pH measurement probe.
• The required hoses (suction and injection).
• An intake pipe with gas emission stopper equipped with a sensor.
• Buffer solutions.

Easy To Use And Reliable
• Maintenance of the water balance is automated.
• To inject the corrective product, pH Perfect uses a peristaltic dosing pump.
• Calibration is simple and can be done in less than two minutes.
• The probe is calibrated by means of a buffer solution in order to make
measurement more accurate.
• The intake pipe has a gas emission stopper for greater safety.

Identification of Parts
The pack contains the items shown and required to install your pH Perfect
Polyethylene
inlet tube
(5 metres) Electrode
pH Model SPH - 1
pH electrode with
6 metre cable
FPM lipped
injection flap
valve (3/8”)
Injection
flap valve
reducer
Collar for fixing
PSS3 to DN
50mm pipe
Collar for fixing
the injection valve to
DN 50mm pipe
pH Perfect
controller
Intake pipe with 2 metre PVC tube
+ 3 metre cable + 15cm extension
(with connector) for 20 litre can
Wall bracket
2 fixing bolts
and screws
(ø = 6mm)
Model PSS3 (1/2”)
sensor holder
Buffer solution kit
pH 4, pH 7,
H2O (water)

Default Parameters
The pH setting of the pH Perfect is pre-calibrated in the factory with the following parameters:
a. Pump at maximum flow = 1.5l/h
b. pH set point = 7.4
c. Dosage = ACID
d. Calibration = possible (ENABLE)
e. Safety against over-dosage: deactivated
Indicator Lamps and Buttons
The “CAL” key:
permits changing
from operation
in pH measurement
mode to sensor
calibration mode.
The key must be
depressed for
5 seconds
The “Read SET” key:
exerting continuous
pressure on this key
will display the
value of the
pH set point on the
diode bar
Connector for the
semi-rigid
polyethylene
inlet pipe
Connector junction:
connection of the
cable for direct
230V AC control
on the pool pump
Connector junction:
connection of the
cable permanent
230V AC
mains supply
Connector junction:
for the cable linking
the housing to
the suction tube sensor
“Alarm/Alarme”
diode: informs the
user of an incorrect
measurement or an
equipment malfunction
pH sensor
connection point:
this is used to connect
the sensor cable to the
control box
11 diode bar:
displays the pH value,
the value of the
set point and the
measurement of
sensor reliability
The “Hold/Pause”
diode: informs the user
that the dosing pump
has stopped working
Main switch:
for switching
on power to the
controller
Connector
for the PVC
pipe suction
tube

Dimensions: 215 (L) x 173 (W) x 110mm (H) Maximum back pressure: 1.5 bar
Weight: 1.6kg (appliance, sensor, tube and pipes) pH scale: 6.2pH - 8.0pH
Power Supply: 50Hz, 230V AC pH check range: 0.0pH - 14.0pH
Consumption: 7W Appliance accuracy: +/- 0.1pH
Pump flow rate: 1.5l/h (or 25ml/min) Calibration of sensor:
Automatic
215mm
195mm
80mm
110mm
30mm
95mm
pH Perfect
158mm
195mm
173mm
215mm
43mm
47mm
90mm
Front
Side

Recommendations
• Warning, the pH Perfect must be installed by an experienced pool professional.
• Before doing any work inside the housing of the pH Perfect Controller, disconnect the appliance
from the power supply.
• Before installing the pH Perfect Controller, make sure that all the components requires are
present and the instruction manual has been carefully read.
• Failure to comply with the instructions contained in this manual may be harmful to persons,
or cause damage to the appliance.
• During installation of the pH Perfect regulator, check the following:
- the supply voltage is as indicated on the label attached to the side of the appliance.
- the pressure at the injection point is less than 1.5 bars.
- the protective housing on the pump is properly clipped into position.
- the suction tube is immersed with the intake pipe in the can of product to be injected
and is connected to the pump (mark on the lid), then retighten the nut on the connector.
- the inlet pipe will then be connected to both the pump (sign under the lid) and the inlet
pipe to the pool through the injection flap valve.
• The pH sensor, together with the glass elements of which it is composed, is to be handled
with care.
Installation Diagram
• Installation of the pH Perfect on the filtration circuit.
INSTALLATION

The linear distance between the sensor and the injection point should not be less than 60cm.
The injection point should be the last element on the intake before the pool.
The cable should not run in the same area as the power supply to large pumps or any electrical
cable, in order to prevent electrical interference.
The maximum pressure in the pipes should not exceed 1.5 bars.
To increase the life span of the peristaltic tube, pressure should not exceed 1 bar.
Installations having a Chlorinator, heater or any other treatment system should be situated after the
pH sensor and before the acid injection point.
Installing the Control Unit
Install the pH Perfect Controller on a rigid support (a vertical wall) in a place easily accessible to
the operator. Attach the wall bracket using the screws supplied and attach the pH Perfect.
Before doing any work inside the appliance make sure that the main switch is in position 0. By
completely unscrewing the two screws on the right-hand side of the appliance, the pH Perfect can
be opened sideways.
Connect the central cable including a plug (“power feed” label) to a permanent 230V AC mains
socket. Connect the right-hand side direct control cable to the pool pump (single-phase 230V AC).

Installing the Sensor
Important: the length of pipe between the sensor and the injection point must not be less than 60cm.
The sensor must be vertical, or at 45° max and always above the pipe. In no circumstances should
it be positioned horizontally or below the pipe.
The sensor should be positioned in such a way as to analyze the pool water nearest to it and thus before
any treatment.
Installation Instructions
Correct Positions
Incorrect Positions

Calibration Procedure
Before starting the calibration procedure, stop the filtration and close the valves in order to isolate
the pH sensor from the water drains.
Step 1
Fill flask with clean water.
Step 2
Undo the sensor holder and remove the sensor from the pipe.
OPERATING ADVICE

Step 3
Rinse the sensor in flask 2 (water). Then shake gently to remove excess water.
• The sensor must be calibrated when your pH Perfect is first installed and each time your pool is
restarted at the beginning of the season (with new buffer solutions).
• The procedure is to be repeated if an abnormal amount of corrective solution is consumed
(pH minus or pH plus).
• The calibration procedure can only be carried out when filtration is stopped because of the
dual feed.
Step 4
Immerse the sensor in flask 1 (pH 7).

Step 5
Keep the “CAL”’ key depressed for more than 5 seconds until the “Hold/Pause” diode lights up and
the pH 7 diode flashes. Keep the sensor immersed in the buffer solution for 30 seconds.
Step 6
After 30 seconds the pH 7 diode will stop flashing indicating that the appliance has recognized the
buffer solution. Keep the sensor immersed for a further 30 seconds. The appliance indicates the
quality of the test*
*(e.g. 11 diodes lit = 100%, if <25%, See trouble shooting guide).

Step 7
If “Alarm/Alarme” diode lights up, see section “Indicator light illumination”.
Rinse the sensor in flask 2, then shake gently to remove excess water.
Step 8
Immerse the sensor in flask 3 (pH 4).
Press the “CAL” key. Keep the sensor immersed for 30 seconds.

Step 9
After 30 seconds the pH 4 diode will stop flashing, indicating that the appliance has recognized the
buffer solution. Keep the sensor immersed for a further 30 seconds. The appliance indicates the
quality of the test. If the “Alarm/Alarme” diode lights up, see section “Indicator light illumination”.
Step 10
Rinse the sensor in clean water then shake gently to remove excess water and replace it in its sensor
holder (it should not touch the other side of the pipe).

Step 11
To end calibration press the “CAL” key. The unit will return to measurement mode.
Normal operation will resume the next time pool filtration starts.

Indicator Light
When filtration has stopped the “Hold/Pause” diode is lit and the pH reading is done in the
normal way.
The “Alarm/Alarme” and “Hold/Pause” Diodes Flash.
Calibration error: the solution is not recognized. Press the “CAL” key to exit calibration and replace
the solution. If the problem persists, replace the sensor and recalibrate.
The “Alarm/Alarme” Diode Flashes and the “Hold/Pause” is Lit and the Pump has Stopped Dosing.
No flow in the circuit or the amount of corrective product is insufficient: to restore to normal
operation, restart filtration or change the bottle of product.
Please note: All alarm situations on the appliance are signalled by the red “Alarm/Alarme” diode flashing.
INDICATOR LIGHT ILLUMINATION

The “Alarm/Alarme” Diode is Lit.
In operating phase
• Outside range (more pH 8 – red indicator lamp “8” lit): the system picks up a pH value above
the pH reading range of the appliance.
• Outside range (less than pH 6.2 – red indicator lamp “6.2” lit): the system picks up a pH value
below the pH reading range of the appliance.
In calibration phase
The characteristics of the sensor are outside the calibration range, the pH 4 diode is lit and the
“Alarm/Alarme” diode is flashing.
The “Hold/Pause” Diode is Lit.
This indicator lamp indicates that the dosing pump is not going to start. It is either when you are
in calibration phase or when the pool filtration is paused.
Note: The unit includes an optional safety against over-dosage of corrective product, in order to avoid any
excessive injection in case the required pH is not reached after 3 cycles of dosage.
Operating Principle (if activated):
1st alarm: the “Alarm/Alarme” diode flashes after 3 cycles of dosage. The pH Perfect is still operating.
2nd alarm: the “Alarm/Alarme” diode flashes and the “Hold/Pause” diode is lit; the pH Perfect stops
dosing. This second alarm is activated after the 4th closing cycle. Just press the “Read SET” key to
come back to normal operation.

Changing the Pipe
Step 1
Unclip the hood by pulling the two tappets at the bottom of the plate towards you.
Step 2
Position the tablet holder at 20 past 10 by turning it clockwise.
Step 3
Free the left connector completely by holding it taut towards the outside, then turn the tablet holder
clockwise to release the pipe up to the right connector.

Step 4
Position the tablet holder at 20 past 10 by turning it clockwise.
Step 5
Insert the left connector in its housing, then pass the pipe under the tablet holder guide.
Turn the tablet holder clockwise at the same time as the pipe in the head of the pump up to the
right connector.
Step 6
Place the hood over the pump in the direction shown by the arrows (the up arrow is on the left
and the down arrow is on the right), then press the surface firmly to click fully into place.

NOTES
Other manuals for pH Perfect
4
Table of contents
Other Zodiac Controllers manuals