ZOSI C303 User manual

Smart Security
Camera
Day/Night
Please read the Quick Start Guide carefully before using the product and keep it properly.
V1.C.01.Z

Contents
Enlish
Español
1 - 11
12 - 22

1
Introduction
Important Notice
Warning
Important Safety Instructions
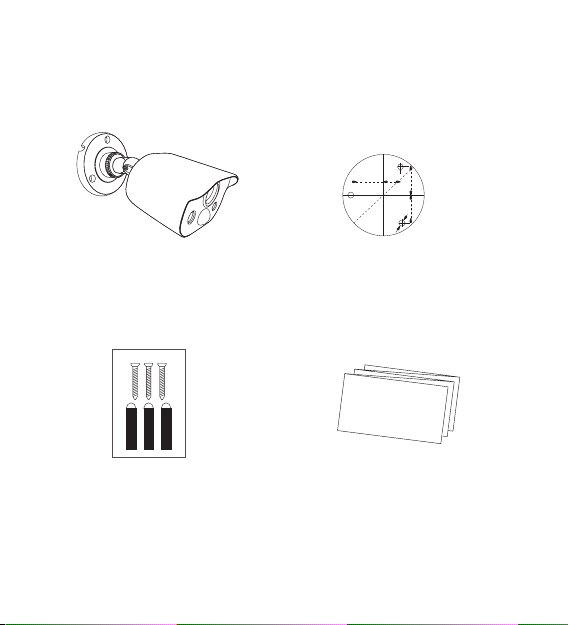
Thank you for purchasing this CCTV camera from ZOSI. This camera can operate in
almost all light conditions from bright daylight (provided it’s not irradiated directly
by the sun) to pitch darkness.
The camera is very sensitive to light and therefore can make use of even a tiny
little of light to create an image of what it captured. When it is in low light
conditions, this comes out as a black and white image.
In total darkness or near-total darkness environment, the camera uses built-
in infrared LEDs to illuminate the area in front of it. This light is invisible to the
human eye, although you might notice a faint red glow coming from the front of
the camera, which is normal phenomenon.
In day or well-lit environment, the IR Cut Filter feature of the camera can filter out
wavelengths of light that is useless to cameras in order to provide a clear colored
image.
All jurisdictions have specific laws and regulations relating to the use of cameras.
Before using any camera for any purpose, it is the buyer’s responsibility to be
aware of all applicable laws and regulations that prohibit or limit the use of
cameras. And also buyer must comply with the applicable laws and regulations.
Modification not approved by the party responsible for compliance could void
user’s authority to operate the equipment.
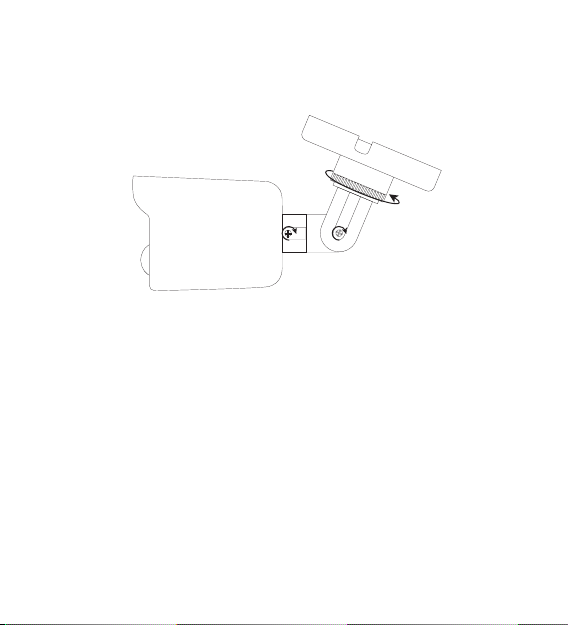
1) Make sure product is installed correctly and fastened stably.
2) Do not operate if wires and terminals are exposed.

2
What’s in the Box
1 x Camera
1 x Mounting Screw Bag 1 x Quick Start Guide
1 x Mounting Hole Template

3
Choosing a Location for this Camera
Notice
To get optimal effect from camera, where you install cameras is pivotal. You
should consider the distance between the camera and its subject to ensure
you obtain a good view of the areas in focus. Also, think about the appropriate
mounting places (e.g., under the eaves of a roof is a good choice) where it won’t
be either an easy target for vandals or affected by constant light reflections of
moving vehicles (which can cause falsely triggered motion detection). There are
numerous factors you should consider when choosing a location to mount your
camera, not merely involves where you want to monitor.
The camera can be mounted onto a flat, vertical surface using screws. The surface
must have sufficient strength to hold the camera. Materials such as hardwood,
brick or masonry are good options. You can mount the camera onto a metal
surface, but you’ll need to supply your own mounting hardware.
When setting the cable, try to avoid winding it on objects with sharp angles.
Don’t put your cable close to live electrical wiring. AC electricity will generate
radio “noise”, which can interfere with camera’s signal.
All wiring and connectors must be insulated in suitably. Meanwhile, they also
should be protected from moisture and sunlight because they are not weather
resistant.

4
Mount the Camera
1. Set the camera in a desired mounting position. Mark holes with the mounting
hole template.
2. Drill the holes, then feed the cable through the mounting surface or cable
notch.
NOTE: Insert the provided drywall anchors if install the camera in drywall.
3.Mount the camera on the surface using the provided screws. Make sure all
screws are fastened tightly.
4. Adjust camera’s position and angle.

5
Adjusting screw
Turn the adjustment ring to tighten / loosen the stand. Adjust the camera’s
horizontal position.
Loosen the lower screw with phillips screwdriver (not included) to adjust camera’s
vertical position.

6
Loosen the upper screw with phillips screwdriver (not included) to rotate camera
housing.
PIR Settings
The camera supports audio pickup on DVR or App. At the same time, when
someone passes by the camera, the camera will set off siren alarm. If you don't
need the siren alarm from the camera, you can also turning on/off of the camera
speaker through DVR.
Take ZOSI DVR as an example, the following is to introduce how to control the
camera speaker function. DVR of other manufacturers may not be able to control
the camera menu. If other brand’s DVR is not compatible with this camera, please
contact our sales or customer service center for help.

7
How to get the camera's menu
1. Right click the mouse to pop up the DVR interface menu, click PTZ and select
"Pelco-C", then jump to Figure 2.
Figure 1
Figure 2

8
2. Click the "+" icon on the right side of Menu ‘ ’ to call up the camera
menu, as shown in Figure 3.
3. Click the ‘ ’ button in the arrow key and select "PIR SETTING".
4. Click the "+" button on the right side of Menu ‘ ’ to call up the
camera PIR function menu.
Figure 3

9
PIR Function Introduction
PIR: ON/OFF
On: Turn on the PIR function.
Off: Turn off the PIR function. The camera's
PIR function will not work after turnoff.
WARNING: EXT/ ON /OFF
EXT: When PIR is triggered, the camera loudspeaker will not sound an alarm in
day mode (color), and the camera will sound an alarm in night vision mode (black
and white)
ON: When PIR is triggered, the camera loudspeaker will sound an alarm no matter
in day mode (color) or night vision mode (black and white)
OFF: When PIR is triggered, the camera loudspeaker will not sound an alarm no
matter in day mode (color) or night vision mode (black and white)
WARING LIGHT: ON/OFF
ON: Turn on the warm white LED of the camera. The warm light of the camera
is turned on no matter in the day mode (color) or night vision mode (black and
white).
OFF: Turn off the warm white LED of the camera. The warm light of the camera
will only turn on once the PIR is triggered in the night vision mode (black and
white).
BACK: Return to the previous step
EXIT: Exit the camera's menu
SAVE-EXIT: save and exit the camera's menu interface

10
Troubleshooting
Q: Video Loss appears in my monitor where should have displayed image?
A: 1. Check whether the extension cable (power and video) is securely connected
to the camera.
2.Check whether the video output from the camera is securely connected to the
video input channel on the DVR.
3. Check whether the camera is firmly connected to power supply.
Q: When I view at night will I only see a bright spot and no image?
A: A reflection may cause in night vision mode if the camera is seeing through a
window. Camera’s infrared LEDs work at night which can reflex bright surface (such
as glass, water, spider
webs, ceramics etc.) and effectively blind the camera. If you want to monitor the
outside, you shall mount the camera outside since it’s weather-resistant.
Q: The BNC extension cable is not applicable to my TV?
A: Many TV or monitors do not have the BNC connector but the RCA connector.
Connect the BNC to RCA converter in the end of the extension cable, and then
plug it into the RCA video input port on your TV or monitor.

11
ZOSI Communications warrants this product against defects in workmanship, and
all material will be warrantied for a period of one year from its original purchase
date. You must present your receipt as proof of purchase date for warranty
validation. Any unit which proves defective during the stated period will be
repaired without charge for components or labor. Replaced at the sole discretion
of ZOSI. The end user is responsible for all freight charges when it is necessary
to send the product to ZOSI’s repair center. The end user is responsible for all
shipping costs when shipping product from any country other than the origin
country.
The warranty does not cover any incidental, accidental or consequential damages
arising from the inability use of this product. End user should take responsibility
for any costs associated with the fitting or removal of this product caused by
tradesman or other person. This warranty applies to the original purchaser of the
product only, and it is forbidden to transfer product to any third party. It will make
all warranties voided if there are unauthorized end users or third party modify
any component or misuse evidence or abuse the device. By law some countries
do not allow limitations on certain exclusions in this warranty. Where applicable
by local laws, regulations and legal rights will take precedence.
All rights reserved
No part of this publication may be reproduced by any means without written
permission from ZOSI. The information in this publication is believed to be
accurate in all respects.
ZOSI cannot assume responsibility for any consequences resulting from the use
thereof. The information contained herein is subject to change without notice.
Revisions or new editions to this publication may be issued to incorporate such
changes.

12
Descripción
Importante
Advertencia
Atención
Gracias por elegir ZOSI. Esta cámara puede trabajar en cualquiera condición de luz
(siempre que no sea irradiado directamente por el sol). La cámara es muy sensible
a la luz y, por lo tanto, aunque esté en la peor condición de luz le dará imágenes
nítidas. Cuando tiene poca luz, sale una imagen en blanco y negro. En un entorno
oscuro, los LEDs IR de la cámara se encienden automáticamente. Es posible que
observe un tenue resplandor rojo proveniente
de la parte frontal de la cámara, que es un fenómeno normal. En el día o en un
entorno bien iluminado, el filtro IR-CUT de la cámara puede filtrar las longitudes
de onda de la luz que son inútiles para las cámaras a fin de proporcionar una
imagen clara en color.
Todas las jurisdicciones tienen leyes y regulaciones específicas relacionadas con
el uso de cámaras. Antes de utilizar cualquier cámara para cualquier propósito,
es responsabilidad del comprador conocer todas las leyes y normativas aplicables
que prohíben o limitan el uso de cámaras. El comprador debe cumplir con las
leyes y regulaciones aplicables.
Las modificaciones no aprobadas por la parte responsable del cumplimiento
pueden anular la autoridad del usuario para operar el equipo.
1) Asegúrese de que el producto esté instalado correctamente y sujeto de manera
estable.
2) No lo opere si los cables y terminales están expuestos.

13
Lista de empaque
1x Cámara
1x Bolsa de tornillos 1x Guía de operación rápida
1x Pegatina de instalación

14
Sitio de instalación
Antes de instalación
Para obtener un efecto ideal, el lugar donde instala la cámara es fundamental.
Debe considerar la distancia entre la cámara y su sujeto para asegurarse de
obtener una buena vista de las áreas en foco. También necesita pensar en un
lugar de montaje apropiado (por ejemplo, debajo del alero) donde no será
destruido fácilmente por vándalos o no se verá afectado por reflejos de luz
constantes de vehículos en movimiento (que pueden provocar unas alarmas de
detección de movimiento falsas). Hay numerosos factores debe considerar al
elegir una ubicación para montar la cámara.
La cámara se puede montar en la pared con tornillos. La superficie debe tener
la resistencia suficiente para sostener la cámara. Materiales como madera dura,
mampostería son buenas opciones. Puede montar la cámara también sobre una
superficie metálica, pero debe proporcionar su propio hardware de montaje.
1. Al colocar el cable de extensión de la cámara, intente evitar enrollarlo en
objetos con ángulos agudos.
2. No acerque el cable al cableado eléctrico vivo. La electricidad AC generará
"ruido" de radio, lo que puede interferir con la señal de la cámara.
3. Todo el cableado y los conectores deben estar aislados de manera adecuada.
Mientras tanto, también deben estar protegidos de la humedad y la luz solar
porque no son impermeables.

15
Instalar la cámara
1. Instale la cámara en la posición de instalación deseada y fije la posición del
orificio con la pegatina de instalación.
2. Taladre agujeros y luego pase el cable a través de la superficie de instalación o
la ranura del cable.
Nota: Si instala la cámara en una pared, inserte los tacos de goma provistas.
3. Use los tornillos provistos para instalar la cámara en la pared, asegurándose de
que todos los tornillos estén apretados.
4. Ajuste la posición y el ángulo de la cámara.
Pegatina de
instalación

16
Tornillo de ajuste
Gire el anillo de ajuste para apretar / aflojar la conexión del soporte. Ajuste la
posición horizontal de la cámara.
Use un destornillador Phillips (no suministrado) para aflojar el tornillo inferior y
ajustar la posición vertical de la cámara.

17
Use un destornillador Phillips (no suministrado) para aflojar el tornillo superior y
girar la carcasa de la cámara.
Función PIR
La cámara admite grabación de audio en DVR o APP. Al mismo tiempo, la cámara
puede emitir un tono de advertencia cuando alguien pasa la cámara. Si no
necesita el tono de advertencia, puede encender y apagar el altavoz de la cámara
a través del DVR.
A continuación explicamos cómo controlar el altavoz en el menú del DVR,
utilizando el ZOSI DVR como ejemplo. Sin embargo, es posible que los DVR de
otros fabricantes no puedan controlar esta cámara. Si su DVR no puede funcionar
con esta cámara, comuníquese con nuestro servicio al cliente.

18
¿Cómo acceder al menú de la cámara?
1. Haga clic derecho para abrir el menú del sistema. Haga clic en "PTZ" y
seleccione "Pelco-C". Muestra el menú como en la imagen 2.
imagen 1
imagen 2
Table of contents
Languages:
Other ZOSI Security Camera manuals