Zte AT&T Z221 User manual

User Manual
AT&T Z221

Legal Information
Devices purchased for use on AT&T’s system are designed for use exclusively on AT&T’s system. You agree that
you won’t make any modifications to the Equipment or programming to enable the Equipment to operate on any
other system. A voice plan is required on all voice-capable devices, unless specifically noted otherwise in the terms
governing your agreement. Some devices or plans may require you to subscribe to a data plan.
Your phone is designed to make it easy for you to access a wide variety of content. For your protection, we want
you to be aware that some applications that you enable may involve the location of your phone being shared.
For applications available through AT&T, we offer privacy controls that let you decide how an application may use
the location of your phone and other phones on your account. However, the AT&T privacy tools do not apply to
applications available outside of AT&T. Please review the terms and conditions and the associated privacy policy for
each location-based service to learn how location information will be used and protected. In addition, your AT&T
phone may be used to access the Internet and to download, and/or purchase goods, applications, and services
from AT&T or elsewhere from third parties.AT&T provides tools for you to control access to the Internet and certain
Internet content. These controls may not be available for certain devices which bypass AT&T controls.
AT&T may collect certain types of information from your device when you use AT&T services to provide customer
support and to improve its services. For more information on AT&T’s Privacy Policy, visit att.com/privacy.
Copyright © 2012 ZTE CORPORATION.
All rights reserved.
No part of this publication may be excerpted, reproduced, translated or utilized in any form or by any means, elec-
tronic or mechanical, including photocopying and microfilm, without the prior written permission of ZTE Corporation.
The manual is published by ZTE Corporation. We reserve the right to make modifications on print errors or update
specifications without prior notice.
The Bluetooth®word mark and logos are registered trademarks owned by Bluetooth SIG, Inc. and any use of such
marks by ZTE Corporation is under license.
Version No.: V1.0
Edition Time: October 2012
Manual No.: 081704100085
Getting Started ................................................ 3
Removing the Back Cover..................................... 3
Battery................................................................. 3
SIM Card.............................................................. 4
Charging Your Phone............................................ 4
Powering Phone On/Off........................................ 5
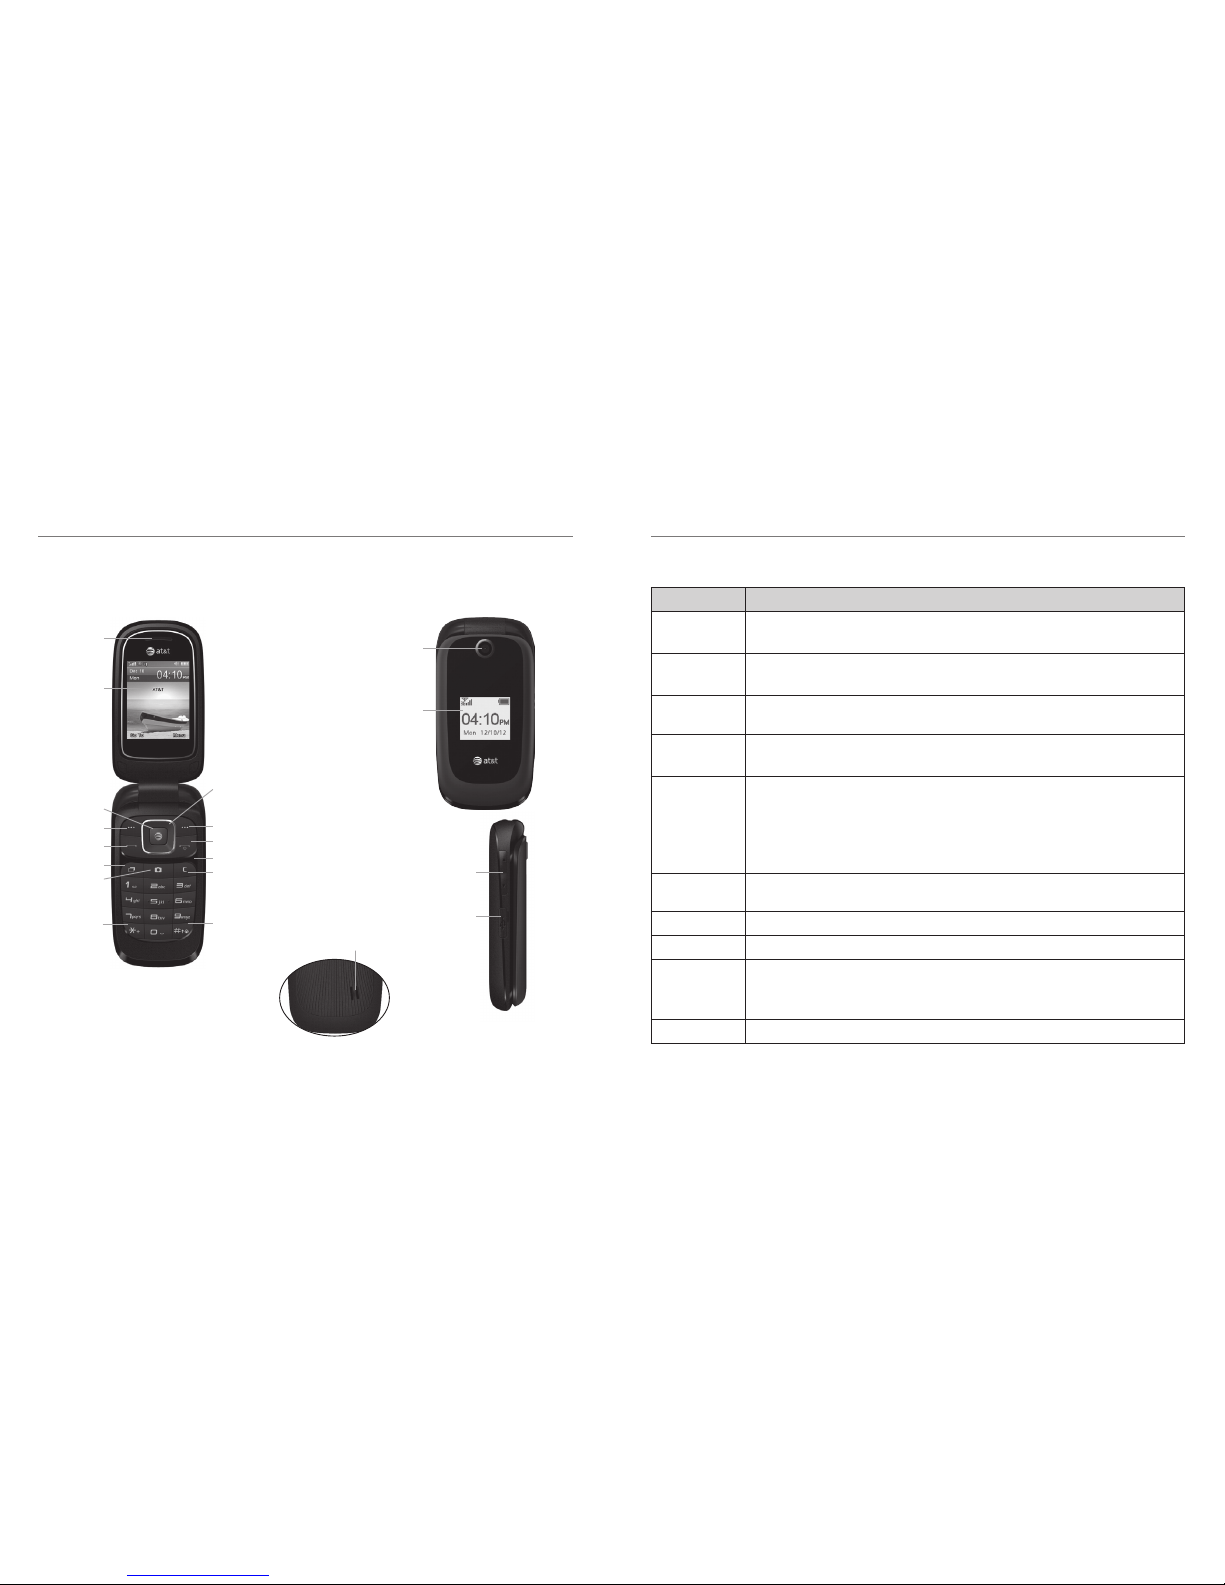
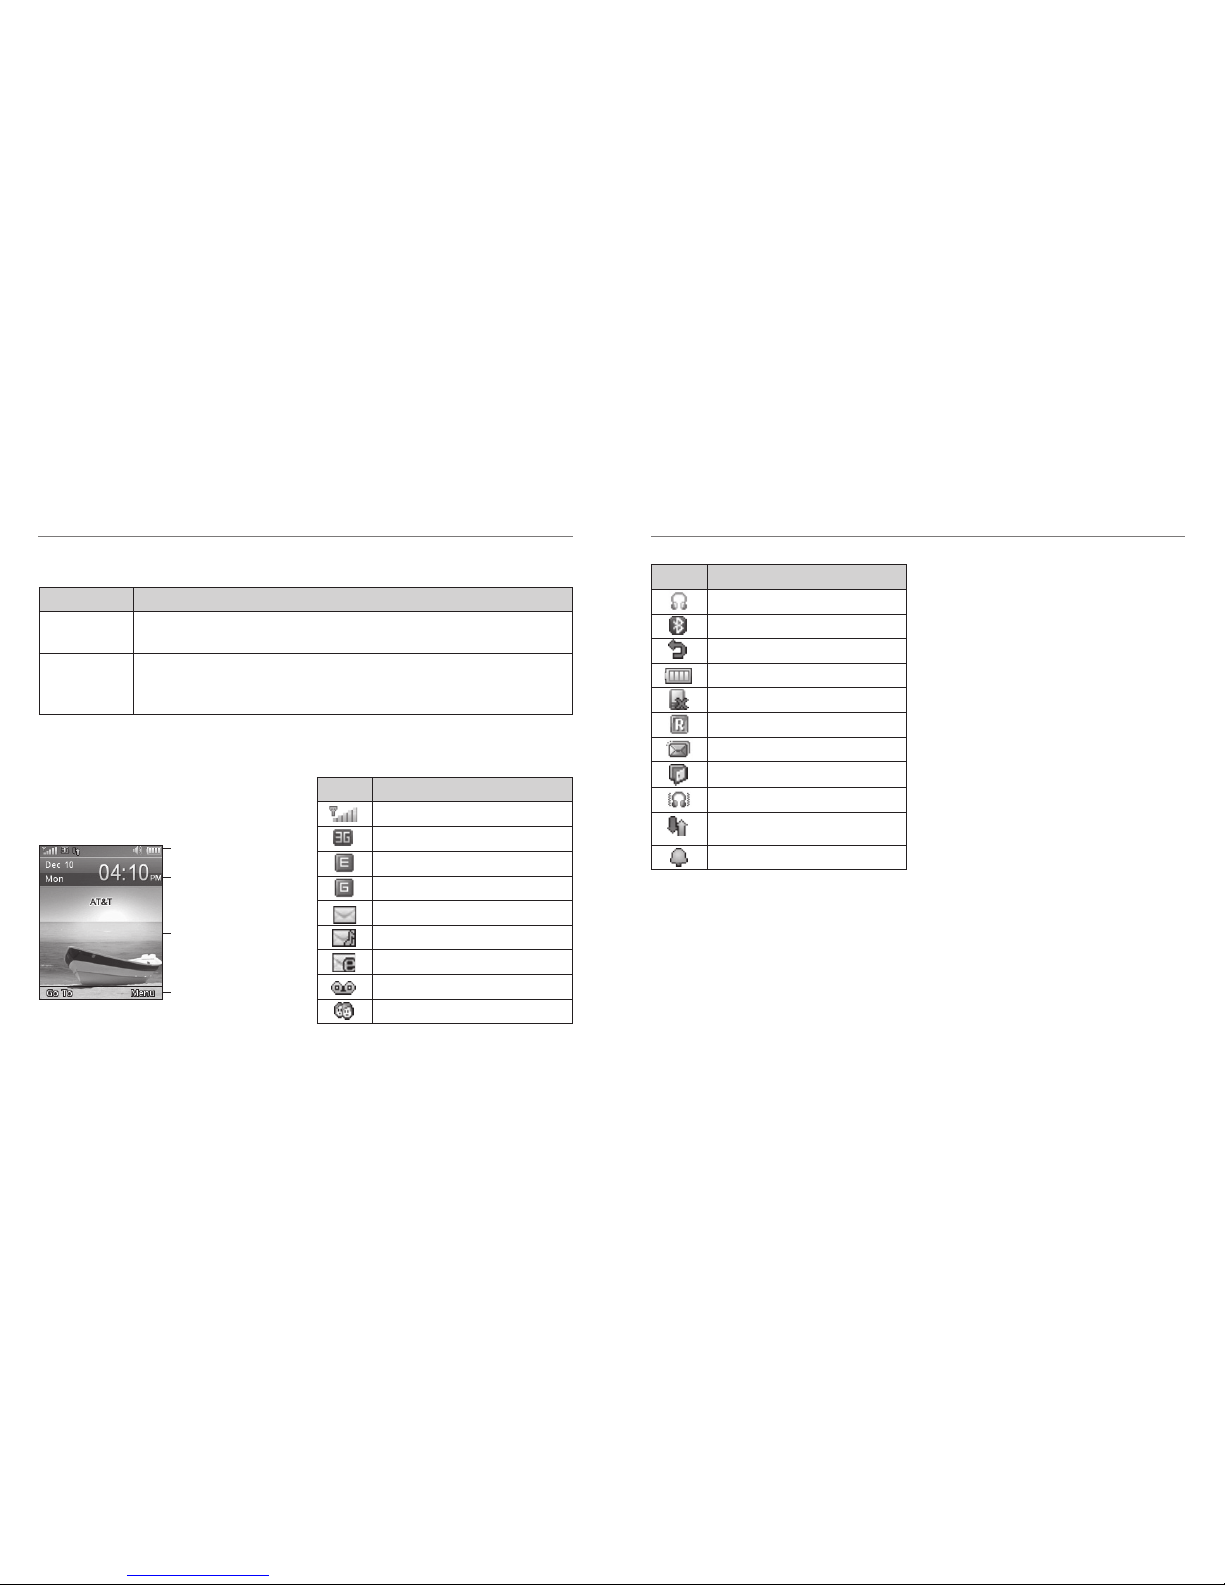
Getting to Know Your Phone ................................ 6
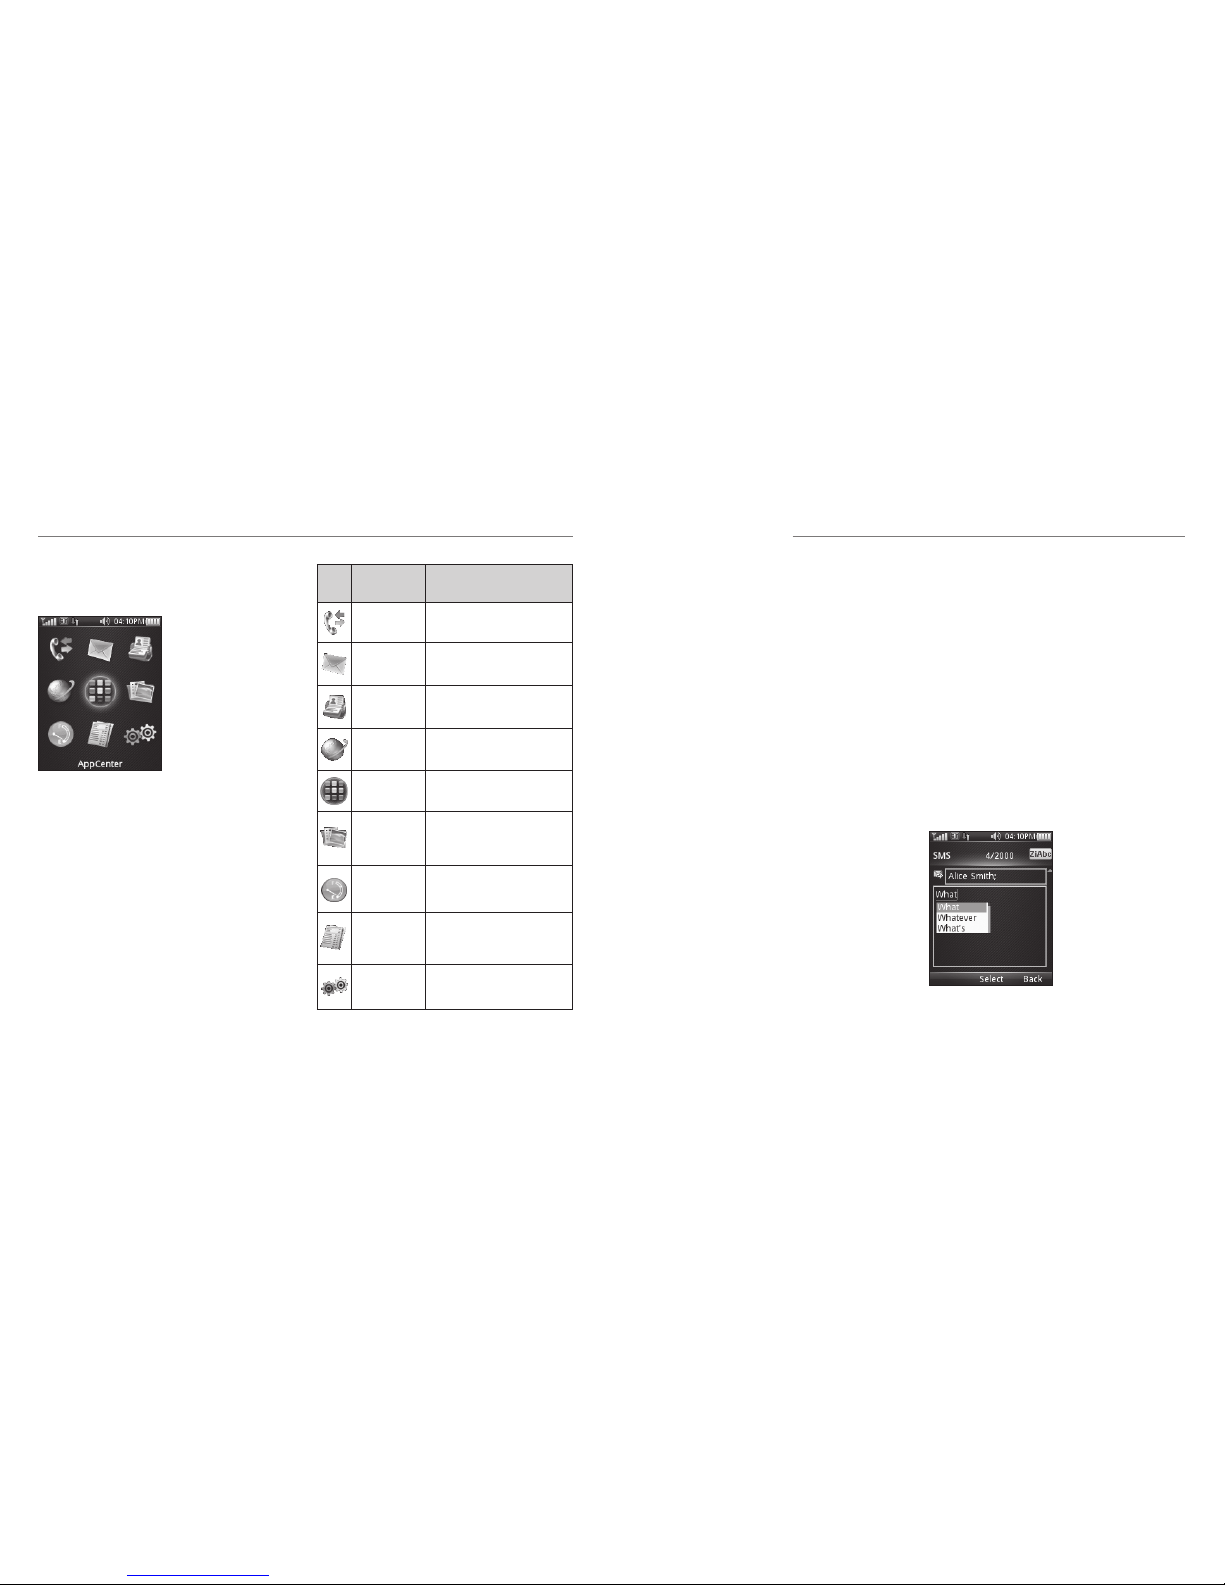
Entering Text................................................... 11
Changing Input Mode ........................................ 11
Calls ................................................................ 13
Making a Voice Call............................................ 13
Using the Address Book...................................... 13
Using Call Options ............................................. 13
Receiving Calls................................................... 13
Adjusting the Volume ......................................... 13
Using Call History............................................... 13
Messages......................................................... 14
Types of Messages ............................................. 14
SMS and MMS ................................................... 14
Voicemail........................................................... 15
Message Folders................................................. 15
Using Message Options...................................... 15
Message Settings ............................................... 16
Using Message Templates................................... 16
Mobile Email...................................................... 17
Address Book.................................................. 18
Adding a Contact............................................... 18
Searching for a Contact...................................... 18
Setting Speed Dial.............................................. 18
Making a Speed Dial .......................................... 18
Using Address Book Entry Options ...................... 19
Bluetooth®...................................................... 20
Enabling Bluetooth............................................. 20
My Devices......................................................... 20
Sending Data ..................................................... 21
Receiving Data................................................... 21
Mobile Web..................................................... 22
Using the att.net Homepage............................... 22
Visiting a Website............................................... 22
Tools ................................................................ 23
Alarm ................................................................ 23
Calendar............................................................ 23
Calculator .......................................................... 24
Tip Calculator..................................................... 24
Stopwatch.......................................................... 24
World Time......................................................... 25
Currency Conversion .......................................... 25
Recent Calls....................................................... 25
Table of Contents
1

Getting Started
3
Entertainment................................................. 26
Pictures.............................................................. 26
Video ................................................................ 26
Music ................................................................ 27
Voice Recorder ................................................... 27
Social Networking.......................................... 28
AT&T Social Net ................................................. 28
Settings ........................................................... 29
Sound Profiles Settings....................................... 29
Phone Settings................................................... 29
Display Settings.................................................. 30
Connections Settings.......................................... 30
Calls Settings ..................................................... 30
Security Settings................................................. 31
Accessibility.................................................... 33
TTY Mode .......................................................... 33
HAC (Hearing Aid Compatibility) Mode ............... 33
Care and Maintenance .................................. 34
General Care...................................................... 34
General Guidelines............................................. 35
CTIA Requirements............................................. 36
Aircraft Safety .................................................... 37
Hospital Safety................................................... 37
Road Safety........................................................ 37
Vehicles Equipped with Airbag(s) ........................ 37
Third-Party Equipment ........................................ 38
Declaration of Conformity................................... 38
Disposing of Your Phone..................................... 38
Emergency Service.............................................. 38
Privacy Information............................................. 39
Turn on the HAC Setting..................................... 39
Copyright Notice ................................................ 39
Troubleshooting and FAQs ............................ 40
Specifications ................................................. 43
FCC Compliance.............................................. 44
Radio Frequency (RF) Energy........................ 45
Warranty.......................................................... 46
Table of Contents
2
NOTE: In this User Manual, “press a key” means to
press the key and release it, while “hold a key” means
to press the key for at least two seconds and then
release it.
Removing the Back Cover
1. Hold the Power/End Key to turn off
the phone.
2. Lift the bottom of the back cover from the notch and
remove the back cover as shown below.
Battery
Installing the Battery
NOTES:
• The phone automatically turns off if the battery
power is too low.
• If you are not going to use the battery for a long
time, remove it from the phone and store it in a cool,
dry place.
1. Hold the Power/End Key to turn off the phone.
2. Remove the back cover of your phone.
3. Carefully insert the battery with the contacts located
against the metal springs.
4. Push down the battery until it clicks into place.
5. Replace the cover on the back of the phone.
CAUTION: Make sure the cover is lined up before
pressing it into place. Do not force it. Doing so will
damage the back cover.
Removing the Battery
1. Hold the Power/End Key to turn off the phone.
2. Remove the back cover of your phone.
3. Lift the end of the battery near the bottom of the
phone to remove it.

Getting Started
4
Getting Started
5
SIM Card
Inserting the SIM (Subscriber
Identification Module) Card
You can obtain a SIM card from your service provider
when you sign on as a subscriber.
CAUTION:
• Do not bend or scratch your SIM card. Keep the card
away from electricity and magnetism.
• Don’t touch the metal surface of the SIM card. Doing
so could cause information on the card to be lost or
destroyed.
• Disconnect the charger and other accessories from
your phone and remove the battery before inserting
and removing your SIM card.
1. Hold the Power/End Key to turn off
the phone.
2. Remove the back cover of your phone.
3. Hold the SIM card with the metal contacts facing
downward and the cut corner at the upper left.
Insert the card into the card holder and push it until
it clicks into position.
4. Insert the battery and replace the cover on the back
of your phone.
Removing the SIM Card
1. Hold the Power/End Key to turn off the phone.
2. Remove the back cover (and battery, if necessary) of
your phone.
3. Gently remove the SIM card from the card holder.
Charging Your Phone
Your phone uses a rechargeable battery.When you
first unpack the phone, the battery is not fully charged,
but there might be enough power to turn on the
phone.You can use the provided charger to charge
the phone battery.
1. Open the USB port cover.
2. Insert the charger’s USB adapter into the USB port.
3. Plug the charger into a standard AC wall outlet.
4. When the battery is fully charged, unplug the
charger and disconnect it from the phone.
NOTES:
• The phone automatically switches off if the battery
power is too low.
• Make sure the charger’s connector is inserted
correctly. Do not force the connector into the port.
• The battery will remain fully charged for 3 to
4 hours.
• Only use the charger provided by the original
provider. Using an unapproved charger might
be dangerous and violate the authorization and
warranty rules of the phone.
• If the phone is used too often when the battery is
low or not used for a long time, the screen may not
display the charge indicator until the battery has
been continuously charged for 10 to 40 minutes.
• To get the maximum performance out of your
battery, it is recommended that you completely
charge the battery before using the phone for the
first time.A new battery’s full performance is only
reached after three complete charge and discharge
cycles have been finished.
• Charging is only possible within a temperature range
of 32°F to 113°F.
Powering Phone On/O
NOTE: Do not turn your phone on in areas in which
wireless phone use is not permitted, or when it could
cause interference or danger.
Hold the Power/End Key to turn your phone on or off.
TIPS:
• When prompted, enter your PIN (Personal
Identification Number) code or handset code and
press the OK Key.
• The PIN code is the password provided by your
network service provider. You cannot use the SIM
card without it.
• When the PIN code or handset code is accepted, the
phone automatically searches for the network. After
a few seconds, your phone displays idle mode.

Getting Started
6
Getting Started
7
Getting to Know Your Phone
Earpiece
Left Soft Key
OK Key
Send Key
Task Key
Camera Key
Internal
Display
4-Way
Navigation Key
Right Soft Key
Power/End Key
Microphone
Clear & Back Key
# Key
* Key
(back)
Camera Lens
External
Display
Volume Up/
Down Keys
Charger/
Headset Port
Speaker
Key Description
OK Key From idle mode: Press to open att.net.
In lists and menus: Press to start an application/function.
4-Way
Navigation Key
From idle mode: Used to activate preset functions.
In lists, messages, and menus: Used to scroll up, down, left, and right.
Left Soft Key/
Right Soft Key
The bottom line of the display shows the options that can be selected using the Left and
Right Soft Keys.The options change depending on the application/function being used.
Send Key Press to answer calls or, after entering a phone number, press to dial.
From
idle
mode: Press to show a list of all calls.
Power/End Key Hold to turn the phone on/off.
Press to end a call.
Press to reject an incoming call.
Press to cancel dialing.
Press to return to idle mode.
Volume Up/
Down Keys
Adjust the volume of the phone.
Task Key
Press to perform multiple tasks and switch among various applications.
Camera Key Press to activate the camera.
Clear &
Back Key
Press to delete the character on the left of the cursor when entering text or numbers.
Hold to delete all characters during text entry.
Press to return to the previous page when navigating menus or browsing the Internet.
Number Keys
Press the number keys to enter a phone number.
Key Functions

Getting Started
8
Getting Started
9
Key Description
* Key
Press to enter *.
In an editing screen: Press to enter punctuation and symbols.
# Key Press to enter #.
In an editing screen: Press to change the input method.
From idle mode: Hold to activate meeting mode with vibration.
Key Functions (continued)
Idle Mode
After powering on the phone, when the name of the
network is displayed on the screen, the phone is in idle
mode and ready for use.The display has 4 areas:
Indicators and
Icons area
Date and
Time area
Text and
Graphics area
Soft key
function
indicators
Indicators and Icons
Indicator What it means
Signal strength
3G network
EDGE network
GSM network
New SMS
New MMS
New email
New voicemail
Vibrate mode
Indicator What it means
Headset mode
Bluetooth on
All calls divert
Battery status
Missed call
Roaming
The message memory is full
Vibrate and ringing
Headset and vibrate mode
GPRS in use (solid blue and green)
Alarm

Icon What it
means
Description
Recent Calls View missed and received
calls
Messaging Send and read SMS or MMS
messages
Address
Book Add and edit contacts
Mobile Web Access the web with att.net
AppCenter Online application store
My Stuff
Contains applications and
tools such as Alarm, Calendar,
and more
Data Balance Check data usage
AT&T Account
Balance
Check your phone’s account
balance
Settings Set up and personalize
your phone
Entering Text
11
Getting Started
10
Additional charges may apply. For more information on these services, please refer to the Quick Start Guide included in your box or visit
www.wireless.att.com.
Main Menu
From idle mode, press the Right Soft Key for Menu to
access the main menu.
Changing Input Mode
You can enter text into your phone using the following
input methods: ZiAbc, abc, Abc (default input method),
ABC, and number input. You can also switch the
language between English and Spanish.
Current Text Mode
When you are in a field that allows characters to be
entered, the text input mode indicator is shown in the
upper right corner of the display.
Changing Input Mode or Language
Press the # Key and select an input method or
language.
Using Predictive Text (ZiAbc)
The predictive text method is based on a built-in
dictionary and generates words from the combination
of letters pressed.
1. Press each key once that corresponds to the letter
you want to enter. The letters are shown on the
display as they are entered. The list of candidate
words changes as each key is pressed.
2. When the candidate words are displayed, use the
4-Way Navigation Key to highlight a candidate
word and then press the OK Key to Select.
3. Press the 0 Key to insert a space or press the * Key
to select symbols.
4. Press the Clear & Back Key to delete the letter to
the left of the cursor. Hold the Clear & Back Key to
delete all entered text to the left of the cursor.

Entering Letters (Abc/ABC/abc)
Press a number key (2through 9) multiple times until
the preferred letter is shown on the screen. Press once
to enter the first letter on the keypad; press twice
quickly to enter the second letter, and so on.
• Press the 0 Key to add a space.
NOTES:
• When using “Abc” mode, only the rst letter will be
capitalized.
• After entering the rst capital letter, the input mode
will be changed to “abc” mode automatically.
Entering Numbers
Press the # Key and select 123.The input method
icon ( ) is shown on the display. You can enter
numbers directly using the number keys.
• Press and hold the 0 Key to enter 0.
TIP: To enter a space when using number input, press
the # Key and select any of the ABC input methods.
Press the 0 Key to enter the space.
Entering Symbols
1. Press the * Key.
2. Use the 4-Way Navigation Key to select a symbol.
3. Press the OK Key.
12
Calls
13
12
Making a Voice Call
1. From idle mode, enter a phone number.
2. Press the Send Key to call the number.
Using the Address Book
1. From idle mode, select Menu > Address Book.
2. Highlight a contact and press the Send Key to call
the contact.
Using Call Options
During a call, you can press the Left Soft Key for more
options.The options vary depending on the functions
you are currently using.
• Hold/Unhold: Put the current call on hold or
retrieve the call.
• End call: End the current call.
• Record: Record the current call. Press the OK Key
to stop recording.
• DTMF off/on: Enable or disable the sending of
DTMF tones.
• Message: Switch to the Messaging menu during
a call.
• Contacts: Switch to the Address Book menu during
a call.
• Browser: Browse the Internet during a call.
Receiving Calls
When a voice call comes in, press the Send Key to
answer the call.
TIP: If you have connected a headset to the phone,
you can press the button on the headset to answer
the call.
Adjusting the Volume
During a call, press the Volume Keys to adjust the
volume on the speakerphone or on the earpiece.
Using Call History
From idle mode, press the Send Key to check your
recent call history.
Entering Text

14
Messages
15
Voicemail
Voicemail Settings
From idle mode, select Menu > Messaging >
Settings > Voicemail number to check the voicemail
number.
Your voicemail number is preset by your service
provider. You do not need to set it manually.
• To access your voicemail at any time from idle mode,
hold the 1 Key.
Receiving a Voicemail
When the system sends you a message notifying you
that there is a new voicemail, press the OK Key for
Listen to listen to a new message.
NOTE: Contact your service provider for more
information on using the voicemail service.
Message Folders
• The Inbox folder contains all of your received
messages. In this folder you can view your received
messages and reply to them or forward messages to
another recipient.
• The Outbox folder contains all messages that were
not sent during the last attempt. In this folder you
can edit or resend your messages.
• The Sent folder contains messages that were
sent successfully. From this folder you can forward
messages to another recipient.
• The Drafts folder contains drafts and unfinished
messages. In this folder you can complete or resend
your messages.
NOTES:
• You cannot receive new messages if the message
memory is full.
• The total amount of space available for saving
messages is determined by the space available on
the phone and SIM card.
Using Message Options
While viewing the contents of the Inbox, press the
Left Soft Key to access the following options, which
apply to the highlighted text message:
• Reply: Reply to the message.
• Call Sender: Call back the originator of the
message.
• Save number: Save the originator’s number to your
Address Book.
• Delete: Delete this message.
• Lock/Unlock: When the message is locked, you will
not be able to delete it.
• Forward: Forward this message.
• Sort: Sort the messages by time or read/unread.
Messages
Types of Messages
Your phone provides the following message types:
• Text Messages (SMS)
• Multimedia (Picture) Messages (MMS)
The Short Message Service (SMS) lets you send and
receive text messages to and from other mobile phones
and email addresses.To use this feature, you may need
to subscribe to your service provider’s message service.
The Multimedia Messaging Service (MMS) lets
you send and receive multimedia messages (such as
picture messages) to and from other mobile phones
and email addresses.To use this feature, you may need
to subscribe to your service provider’s multimedia
message service.
SMS and MMS
Sending a New SMS Message
1. Select Menu > Messaging > Create message.
2. Enter the recipient’s number or press the OK Key
for Contacts to choose the recipient(s) from your
address book.
3. Press down on the 4-Way Navigation Key to
move to the Text field.
4. Enter a message. Press the Left Soft Key >
Template or My words to insert preset messages
or my words.
5. Press the OK Key for Send to send the message.
Sending a New MMS Message
1. Select Menu > Messaging > Create message.
2. Enter the recipient’s number or press the OK Key
for Contacts to choose the recipient(s) from your
address book.
3. Press down on the 4-Way Navigation Key to
move to the Text field.
4. Enter a message. Press the Left Soft Key for
Options and select Insert to insert pictures, audio,
or videos from your My Stuff folder or choose to
take a picture and record audio or a video to insert.
5. Press the OK Key for Send to send your message.
NOTES:
• To save an unnished message, press the Left Soft
Key for Options and select Save to save it to the
Drafts folder.
• Messages in the Outbox and Drafts folders can be
edited and sent.
Viewing a Message
The or envelope icon will appear on the
information bar to indicate that you have received a
new message.
Press the OK Key to view the message.
Or from idle mode, select Menu > Messaging >
Inbox to check your messages.

17
Mobile Email
Carry your email inbox in your pocket! With Mobile
Email, you can access numerous providers, including
AT&T ,
®AOL ,
®Yahoo!,
®Gmail™, Windows Live™,
and others.
1. From idle mode, select Menu > Messaging >
Mobile Email.
2. Select the name of your email provider.The steps
that follow will vary depending on your provider.
3. When you select Other Providers, you may be
asked to accept terms of service and/or to select your
email domain. Follow the on-screen instructions.
4. Enter your email address and password.
5. Press the OK Key for Sign In.
Messages
16
Messages
Message Settings
From idle mode, select Menu > Messaging >
Settings to change the MMS/SMS/Template settings.
MMS Settings (Multi. msg. setting)
Retrieval Settings: You have two choices:
• Automatic: Retrieve the new multimedia message
automatically without selecting the notification
message and receiving.
• Manual: Retrieve the new multimedia message
manually.
Time per page: Set the play time of each page.
Anonymous Msg.: You can choose to accept or reject
anonymous messages.
Connections: Please consult the service operator for
detailed information.
PUSH Message: You can accept or reject PUSH
messages.
SMS Settings (Text msg. setting)
SMS center number: Service center number given to
you by your service provider.
Template Setting
The phone has 10 templates for SMS/MMS, and you
can edit them.
Using Message Templates
1. From idle mode, select Menu > Messaging >
Create message.
2. Move to the Text field and select
Options > Template.
3. Select a template and press the OK Key to insert
the template.
Please don’t text and drive.

19
Address Book
18
Using Address Book
Entry Options
1. From idle mode, select Menu > Address Book.
2. Scroll to the desired contact and press the Left Soft
Key for more options:
Add new contact: Create a new contact.
Call: Call the highlighted contact.
Send message: Send SMS or MMS messages to
this contact.
Edit contact: Edit this contact information.
Delete contact: Delete this contact.
Share contact info: Send this contact as a
business card via MMS message.
Add to group: Add this contact to a group: Family,
Friends, or Work.
Set as speed dial: Set speed dial for this contact.
Settings:
• SIM management: Copy contacts to or from
the SIM card, or delete contacts from the
SIM card.
• Delete multiple: Delete a batch of contacts.
• Speed dial: View and edit the speed dial list.
Adding a Contact
You can store contacts with a variety of phone and fax
numbers and additional address details.
The phone can store up to 500 items.The capacity
of the phone book on your SIM card depends on the
type of SIM card provided by your service provider. The
saved location is identified by the icon shown before
the contacts.
1. Select Menu > Address Book > Left Soft Key >
Add new contact.
2. Enter the information of the contact, such as name,
number, and so on.
3. Press the Left Soft Key for Save to save the
new contact.
Searching for a Contact
1. Select Menu > Address Book to view all the
contacts on your phone.
2. Enter a letter. The phone will show all the contacts
starting with that letter.
For example, to search “John,” press the 5 Key
once for “j.” All names starting with “J” or “j”
are displayed.
3. Refine the search by entering a subsequent letter
that can occur anywhere in the name.
For example, “Jn” will find “John” and “Julian,” but
not “James.”
Setting Speed Dial
1. From idle mode, press Menu > Address Book.
2. Use the 4-Way Navigation Key to select a
contact, press the Left Soft Key for Options and
select Set as speed dial.
3. Select an empty slot.
4. Press the OK Key for Assign to finish.
5. Press the Right Soft Key to return to the previous
menu or press the Power/End Key to return to the
idle screen.
Making a Speed Dial
NOTE: The 1 Key is reserved for the Voicemail
service.
1. From idle mode, hold the corresponding number key
(2to 9) in the speed-dial list to make the call.
2. Press the Power/End Key to end the call.
Address Book

Bluetooth®
2120
Sending Data
Before sending data, please confirm the following
two items:
• Bluetooth function is enabled.
• The paired device is visible, paired, and connected.
1. Select your desired file, press the Left Soft Key for
Options, and select Send > Via Bluetooth.
2. Select the recipient device from the device list, and
press the OK Key to send the file.
Receiving Data
1. Enable Bluetooth function.
2. If the paired device tries to send a file to your phone,
a pop-up dialogue will appear on your screen.
3. Press the Left Soft Key for Yes to accept the
incoming file, or press the Right Soft Key for No to
reject it.
Your phone includes support for Bluetooth, which can
be used to connect your phone to a wireless headset.
You can also use it to transfer files between your
phone and other Bluetooth devices, such as another
phone or a laptop. Not all applications or devices can
be supported because Bluetooth is an open forum and
different manufacturers have different standards and
implementation.
Enabling Bluetooth
By default, Bluetooth is disabled on your phone. If you
enable Bluetooth and turn off the phone, Bluetooth will
be disabled. When you turn the phone on, Bluetooth
will automatically be enabled.
1. From idle mode, select Menu > Settings >
Connections > Bluetooth.
2. Press the OK Key to set Bluetooth to On.
3. Go down to Discoverable and press the OK Key
to set it to On.
4. Go down to My Bluetooth Info and enter the
phone name.
5. Press the OK Key to save the settings.
NOTE: Set Discoverable to On to allow your phone
to be found by other compatible devices.
My Devices
1. From idle mode, select Menu > Settings >
Connections > Bluetooth > My devices.
2. Choose to either search for a new device or highlight
a device from the list and press the OK Key.
3. To connect to the device, enter the passkey
(typically 0000 – four zeros) when prompted
and press the Left Soft Key for Pair.
There are two options for Bluetooth connection:
• Automatic: Set another Bluetooth device that
is connecting to your phone as an authorized
device.
• Always Ask: Set another Bluetooth device that
is connecting to your phone as an unauthorized
device that must ask before connecting.
TIP: Some devices don’t connect to another Bluetooth
device automatically. You need to highlight the device
name in the My devices list and press the OK Key to
connect with it.
Bluetooth

Calendar
With this feature, you can use the calendar, set
appointments, and view events.
1. From idle mode, select Menu > My Stuff > Tools
> Calendar.
2. Press the Left Soft Key for Options to access the
following:
• New: Add meeting, memo, or anniversary.
• Week view: View the schedule of the current
week.
• Go to date: Enter a date and view the
scheduled events of that day.
• Delete entry: Delete entries for On this day,
Before date, or All entries.
• Settings: Set the Calendar alarm tone,
Default view, and Week starts on.
• Memory Info: See the current memory usage.
22
Mobile Web
23
Alarm
This feature allows you to set an alarm to ring at a
specific time.
1. From idle mode, select Menu > My Stuff > Tools
> Alarm.
2. Press the OK Key for Edit and configure the alarm
as required using the Alarm Setup Screen:
Alarm time Set as required
Alarm type Once, Repeat
Snooze Off, 5, 10, 15, 30 minutes
Ringtone On/Off
Ringtone type AT&T Firefly.mp3; select Edit to
change
Alarm remark Optional
TIPS:
• If the alarm time has passed it cannot be saved.
• Even if the phone is turned off, the alarm will
automatically turn the phone back on so that it
can ring.
Browse the web directly from your mobile phone. Check
the weather, visit your favorite websites, and enjoy
access to the Internet on the go. From idle mode, press
the OK Key or select Menu > Mobile Web.
Using the att.net Homepage
The att.net homepage features three tabs, which you
can access by scrolling left or right with the 4-Way
Navigation Key:
• Web: Enter a web address; search the Internet with
Yahoo!; use, add, or manage shortcuts; view social
networks; find movie information and buy tickets;
and access your account.
• Popular: Get the latest updates on news, finance,
sports, entertainment, and more; use email and
social networking.
• Local: Set your location, search locally, find movie
showtimes, get local information, check the weather,
and see local news updates.
Visiting a Website
1. From the att.net homepage, press down on the
4-Way Navigation Key to highlight the address
bar and press the OK Key.
2. Enter a web address and press the OK Key.
3. To access a link on a website, scroll to it using the
4-Way Navigation Key and press the OK Key.
Mobile Web options:
• Home: Return to the att.net homepage.
• Go to URL: Enter a new web address.
• Go to Search: Enter search terms.
• History: View your web browsing history.
• Go to Bookmarks: Access your list of favorite sites.
• Add to Bookmarks: Add a site to your list of
favorites.
• Reload: Reload the current page.
• Find in Page: Search the page for a term.
• Settings: Adjust browser settings.
• Help: Find help and answers to frequently asked
questions.
• Exit: Exit the web browser.
Tools

24
Tools
25
World Time
With this feature, you can check the current local time
and date for major cities around the world.
1. From idle mode, select Menu > My Stuff > Tools
> World time.
2. Press left or right on the 4-Way Navigation Key to
view the time of desired city.
3. Press the OK Key > Left Soft Key to save the
selected city time as the time setting on your phone.
Currency Conversion
This feature allows you to convert foreign currency to
domestic currency.
From idle mode, select Menu > My Stuff > Tools >
Currency conversion.
• Exchange rate: Enter a currency exchange rate.
• Foreign amount: Enter the amount of foreign
currency to be converted.
• Local amount: The conversion result displays.
TIP: Press the Left Soft Key to enter a decimal.
Recent Calls
With this feature, you can check the call log and
call duration.
From idle mode, select Menu > My Stuff > Tools >
Recent calls. For more information about recent calls,
press the Left Soft Key for Options to access the
following:
• Call: The phone will dial the highlighted number
for you.
• Save:Save as a New contact or Update
existing.
• Sendmessage:Send an SMS or MMS message.
• Delete:Choose to delete the Selected or
Multiple calls.
• Callduration:Check the Last call duration
and All calls duration. You can clear all the call
duration timers by pressing the OK Key for Clear.
To reset the timers you will need to enter the
phone’s lock code. The default lock code is 0000.
NOTE: All calls information can also be accessed by
pressing the Send Key while in idle mode.
Calculator
With this feature, you can use the phone as a calculator.
The calculator provides the basic arithmetic functions:
addition, subtraction, multiplication, and division.
1. From idle mode, select Menu > My Stuff > Tools
> Calculator.
2. Enter the first number using the number keys.
3. Enter the operation for your calculation by pressing
up, down, left, or right on the 4-Way Navigation
Key.
4. Enter the second number.
5. Press the OK Key for Equal to view the result.
TIPS:
• Press the Clear & Back Key to clear digits
and results.
• Press the * Key to toggle the number between
positive and negative.
• Press the # Key to enter a decimal point.
Tip Calculator
With this feature, it will be easy to calculate a tip
or determine how much each person should pay in
your group.
1. From idle mode, select Menu > My Stuff > Tools
> Tip calculator.
2. Enter the total bill by using the number keys. Press
right on the 4-Way Navigation Key to enter
the cents.
3. Type the tip amount (in percentage) you would like
to leave.
4. If the cost is shared by more than one person, enter
the number of people into the Split field.
5. The amount you need to pay will be displayed at the
bottom of the calculator.
Stopwatch
With this feature, you can measure time and take split
times or lap times, for example, in different sports.
1. From idle mode, select Menu > My Stuff > Tools
> Stopwatch.
2. Select Start to start timing.
3. Select Stop to stop the timing during the operation
and view the duration of time.
4. Select Contin. to continue timing.
5. Select Reset to reset the stopwatch.
Tools

26 27
Voice Recorder
This function allows you to record a voice memo.You
can also set the voice memo as a ringtone.
Recording
1. From idle mode, select Menu > My Stuff > Tools
> Voice recorder.
2. Select Start to start recording your voice memo.
3. Select Pause to pause the recording.
4. Select Contin. to resume recording.
5. Select Stop to stop recording.
6. Press the OK Key for Save.
Music
You can use the following method to play a sound file.
1. From idle mode, select Menu > My Stuff > Audio
> My Audio.
2. Highlight a sound file and press the OK Key to
play it.
Entertainment
Your phone allows you to use a camera, video camera,
and voice recorder to take photos, shoot video clips,
record voice memos, and more.
Pictures
Your phone includes a photo management function.
Photos in the phone’s memory can be browsed,
transmitted, set as wallpaper, moved, renamed, copied,
and deleted.
NOTE: The preloaded photos on the phone cannot be
transmitted or deleted.
Taking a Photo
Your phone has an integrated digital camera, which
allows you to capture images.
1. From idle mode, select Menu > My Stuff > Tools
> Camera.
Or from idle mode, press the Camera Key to start
the camera.
2. Aim the camera lens at a subject.
3. Press the OK Key to take the photo; press it again
to save.
Viewing Pictures
You can use the following method to view photos:
1. From idle mode, select Menu > My Stuff >
Pictures > My pictures.
2. Highlight a photo and press the OK Key for Open.
Video
Your phone allows you to record, store, and play
video files.
Recording a Video
You can use the video camera to record video clips.
1. From idle mode, select Menu > My Stuff > Tools
> Camera.
2. Press right on the 4-Way Navigation Key to
switch to video camera mode.
3. Press the OK Key to start recording.
4. Press the OK Key to pause.
5. Press the OK Key for Continue to resume
recording.
6. Press the Right Soft Key for Stop to stop
recording.
7. Press the OK Key for Save.
Playing Videos
You can use the following method to play a video.
1. From idle mode, select Menu >
My Stuff > Video > My Videos.
2. Highlight a video and press the OK Key to play it.
Entertainment

Sound Profiles Settings
You can set and edit an appropriate profile depending
on your current environment.
1. From idle mode, select Menu > Settings >
Sound Profiles.
2. Select a profile and press the Left Soft Key
for Edit.
• Select Voice call ringtone to set the voice
call ringtone.
• Select Ring volume to set the volume of the
ringtone.
• Select Ring type to set the ring type.
• Select Message tone to set the notification
ringtone for an incoming message.
• Select Keypad tone to enable or disable
keypad tone.
• Select Warning tone to turn the warning tone
on or off.
• Select Power on/off sound to turn on/off the
sound that plays while powering on/off
the phone.
• Select Earpiece volume to set the volume in
the earpiece.
Phone Settings
From idle mode, select Menu > Settings > Phone.
• Select Language to set the current display
language.
• Select Time and date to set the date, time, and
time style.
• Select Missed calls alert to enable or disable the
notification for missed calls. Choose for the alert to
repeat every 5 minutes, 10 minutes, 15 minutes, or
30 minutes.
• Select Shortcut keys to assign a navigation key as
a shortcut for a function, such as the calendar.
• Select Own phone number to display your phone
number in idle mode to remind you which SIM card
you are using.
• Select TTY setting to enable the TTY function.
Please refer to Accessibility > TTY Mode in this
user manual.
• Select T-coil setting to enable you to hear the
phone audio through a hearing aid with a telecoil.
Please refer to Accessibility > HAC Mode in this
user manual.
• Select Master Reset to reset the phone to the
default factory settings.
• Select Master Clear to clear all user data and reset
the phone to the default factory settings.
28
Social Networking
29
AT&T Social Net
Keep on top of your world with AT&T Social Net, which
allows you to access the latest news as well as popular
social networks—including Facebook,
®Twitter,®and
MySpace™—all in one place.
1. From the idle screen, select Menu > My Stuff >
Games & Apps > Applications > AT&T
Social Net.
2. To accept data charges if asked, select Continue.
To accept the End User License Agreement,
select Accept.
3. Select the social network of your choice from the
top row.
4. Enter your login and password. Select Sign in.
You are now able to access your social network.
Access Social Networks
and Information
Select , , or to quickly update your status.
Select for the latest news and information.
Select for a snapshot of all of your status updates.
Settings

30
Security Settings
Phone Password
A password can protect your phone and help avoid
illegal use. If your phone is password protected, you will
have to enter the correct password when the phone is
turned on.
• For a new phone, the protection function is not
activated by default, and the default password
is 0000.
• From idle mode, select Menu > Settings >
Security > Activate security codes > Phone
lock code to start or stop password protection.
• From idle mode, select Menu > Settings >
Security > Change security codes > Phone
lock code to change the phone’s password. It
is suggested that you change the password to
something you will easily remember.
NOTES:
• Please remember the password you set. Without it
your phone cannot be used normally and you will
need to contact your service provider to unlock it.
• Contact your service provider for more information.
PIN Codes
A PIN code is the personal identification code used
by the SIM card. Its purpose is to help you avoid
illegal use of your SIM card. The correct PIN code
should be entered when the new phone is first turned
on, otherwise the phone will only be able to make
emergency calls.
• For a new card, the default code is supplied by the
service provider.
• From idle mode, select Menu > Settings >
Security > Activate security codes > PIN code
to enable or disable the PIN code.
• From idle mode, select Menu > Settings >
Security > Change security codes > PIN code
to change the PIN code.
• If you enter the wrong PIN code three times in a
row, the phone will lock the SIM card and prompt
you to enter a PUK code to unlock it.
NOTES:
• If you change the PIN code, be sure to remember the
new number.
• PIN2 is needed for some settings. Use the same
procedure as for the PIN code.
31
Display Settings
From idle mode, select Menu > Settings > Display.
• Select Wallpaper and select a photo saved in
Pictures or Other files.This will be used as wallpaper,
which is shown in idle mode.
• Select Backlight duration to adjust the backlight
duration.
• Select Main menu view to set the main menu to
be displayed as List or Grid.
• Select Brightness to adjust the screen brightness.
• Select Keypad light to adjust how long the
backlight for the keypad remains on.
• Select Owner’s name to enter the owner name.
This is displayed in idle mode.
• Select Greeting to enter a text greeting to be
shown on the display when the phone is turned on.
Connections Settings
From idle mode, select Menu > Settings >
Connections.
• Select Bluetooth to set up your phone as a
Bluetooth device.
• Select Access point settings to add to, edit, or
view the access point list.
• Select Modem setting to choose the connection
method between your computer and the phone.
• Select Profile connect to create or edit the
connection data for a service provider.
Calls Settings
From idle mode, select Menu > Settings > Calls.
Call Forwarding
Call forwarding allows you to divert your incoming
calls to another phone number. Contact your service
provider for more information and availability.
Call Waiting
If a call comes in when you are already on a call, you
are notified with a call waiting tone. The phone shows
the number/name of the waiting call. Contact your
service provider for more information.
Send My Number
This function allows you to send or hide your phone
number when making calls.You can also select Set by
network. The network then chooses whether to
show/hide the phone number. This function requires
network support.
Answer Mode
Flip Open to Answer
This function allows you to answer an incoming call
by directly opening the flip, but without pressing the
Send Key or OK Key.
Any Key to Answer
This function allows you to answer an incoming call by
pressing any key on the keypad.
Settings Settings

33
Settings
32
TTY Mode
Your handset is a TTY-compatible device. Simply connect
the TTY equipment to the headset jack.
1. From idle mode, select Menu > Settings > Phone
> TTY setting.
2. Select one of the following options and press the
OK Key for Select.
• Full: Users who cannot talk or hear may use
this setting to send and receive text messages
through TTY equipment.
• Read & talk: Users who can talk, but cannot
hear, may use this setting to talk through the
phone and receive responses via text messages.
• Write & hear: Users who can hear, but cannot
talk, may use this setting to listen to the other
party and respond via text messages.
• Off: Users who can hear and speak may use this
setting to disable TTY support.
HAC (Hearing Aid
Compatibility) Mode
This phone supports HAC (Hearing Aid Compatibility)
function. When you turn on the Hearing Aid Mode and
use a hearing aid with a telecoil to answer the phone,
it will help you hear more clearly while speaking on the
phone. For more detailed information on HAC, please
refer to Care and Maintenance > Turn on the HAC
Setting in this user manual.
1. From idle mode, select Menu > Settings > Phone
> T-coil setting.
2. Select On or Off and press the OK Key for Select
to confirm.
Your Z221 has been tested for hearing aid device
compatibility and has an M3/T4 rating.
PUK Codes
A PUK code is the unlock code for the SIM card. When
the SIM card is locked, you have to enter the correct
PUK code and then enter the new PIN code.The SIM
card can then be used normally.
• A PUK code may be supplied with a new card.
Contact your service provider for more information.
• A PUK code can only be entered 10 times in a row. If
you enter the wrong PUK code more than 10 times,
the SIM card will be locked indefinitely.
NOTE: If a PUK code is supplied with the new card,
remember to store it safely.
Fixed Dial Numbers
If you enable fixed dial numbers, you cannot dial phone
numbers that are not in the FDN list.
FDN List
The FDN list allows you to create a list of fixed dial
numbers.
Accessibility

34
• Do not use a damaged or deformed battery.
• Do not solder a battery directly.
• Immediately remove an expired battery from the
phone.
• The earpiece may become warm during normal use.
Also, the handset itself may become warm while the
battery is being charged.
• When a handset is in vibration mode, the vibration
can sometimes cause the handset to move.
• Be careful not to place the handset near heat
sources (such as a heater) or too close to the edge of
a table.
• Use a damp or anti-static cloth to clean the handset.
Do not use an ordinary dry cloth or electrostatic
cloth. Do not use chemical or abrasive cleaners as
these could damage the casing.
• Third-party equipment: The use of third-party
equipment, cables, or accessories, not made or
authorized by the manufacturer, may invalidate the
warranty of your handset and also adversely affect
the phone’s safety/operation.
• Remember to make backup copies of all important
data on your handset.
• Remember to recycle: The cardboard packing
supplied with this handset is ideal for recycling.
CAUTION: An explosion may occur if the battery is
replaced by an incorrect type. Dispose of used batteries
according to the instructions.
General Guidelines
• In some countries national law prohibits private
copying of copyrighted material. Please check
the national legislation of the applicable country
concerning the use of such material.
• Many jurisdictions have laws and regulations
about taking pictures in public or private areas and
regarding the processing and further use of such
pictures.The manufacturer encourages its customers
to obey all laws and to respect the personal rights of
others.
• Please check roaming agreement availability with
your service provider.
• The use of mobile phones is not allowed in some
radiation sensitive areas, such as hospitals, research
centers, and airplanes. The user is responsible to
power off the device. If there is any uncertainty, you
should remove the battery from the handset.
• Observe any signs that require powering off
your handset, such as those near gas stations
or explosives, and power off the handset/device
immediately.
• If you have a heart condition, be careful with the
settings of call vibration or tone volume.
• Do not allow children to play with the handset,
charger, or batteries.
• Do not use the handset where blasting is in progress.
• Do not try to make a call or have a conversation
while the temperature of the charging battery is
above 122°F (50°C).
35
General Care
Your handset contains delicate electronic circuitry,
magnets, and battery systems. You should treat
it with care and give particular attention to the
following points:
• Do not allow the handset, battery, or accessories to
come into contact with liquids or moisture at any
time. Do not immerse the handset in any liquid.
• Do not place the handset alongside computer disks,
credit cards, travel cards, and other magnetic media.
The information contained on disks or cards may be
affected by the handset.
• Do not place anything in the folded handset.
• Do not paint the handset.
• Do not leave the handset or the battery in places
where the temperature could exceed 60 °C, e.g.,
on a car dashboard or a windowsill, behind glass in
direct sunlight, etc.
• Do not remove the handset’s battery while the
handset is switched on.
• Take care not to allow metal objects, such as
coins or key rings to contact or short-circuit the
battery terminals.
• Do not dispose of battery packs in a re. The
handset’s Li-ION batteries may be safely disposed
of at a Li-ION recycling point.
• Do not put the handset’s battery in your mouth,
as battery electrolytes may be toxic if swallowed.
• Do not attempt to dismantle the handset or any of
its accessories.
• This equipment is tted with an internal battery;
take it to a qualified service engineer when the
replacement of the battery is required.
• There is a risk of explosion if the battery is replaced
with an incorrect battery type. Dispose of the used
battery in accordance with the manufacturer’s
instructions.
• Do not put a battery into a microwave oven, clothes
dryer, or high-pressure container.
• Do not touch battery directly to an electric outlet or
cigarette lighter charger. Use only approved charger
units.
• Do not pierce battery with a sharp object such as
a needle.
• When the battery is thrown away, be sure it is
non-conducting by applying vinyl tape to the (+) and
(-) terminals.
• Do not disassemble or modify the battery.
• Do not drop, throw, or subject the handset to
rough treatment.
• Stop using the battery if abnormal heat, odor,
discoloration, deformation, or an abnormal condition
is detected during use, charge, or storage.
• In the unlikely event of a battery leak, keep the
battery discharge away from your eyes or skin. If
the leakage does come into contact with the eyes
or skin, please flush thoroughly in clean water and
consult with a doctor.
Care and Maintenance Care and Maintenance

Care and Maintenance
3736
Aircraft Safety
• Power off your phone before the airplane takes off.
In order to protect the airplane’s communication
system from interference, it is prohibited to use
mobile phone in flight. If you want to use the mobile
phones before the airplane takes off, you should get
aircrew’s permission according to safety regulations.
• If the mobile phone has the function of automatic
timing power on, please check your alarm setting
to ensure that your phone will not be automatically
powered on during the flight.
Hospital Safety
• Switch off your phone and remove the battery in
areas where the use of handsets is prohibited.
• Follow the instructions given by the respective
medical facility regarding the use of handsets on
their premises.
Road Safety
• You must exercise proper control of your vehicle at
all times. Give your full attention to driving.
• Observe all of the recommendations contained in
your local traffic safety documentation.
• Pull off the road and park before making or
answering a call, if driving conditions require so.
• Check if local laws and/or regulations restrict the
use of handsets while driving.
• You MUST NOT stop on the hard shoulder of a
motorway to answer or make a call, except in an
emergency.
• Switch off your handset at a refueling point, such
as a gas station, even if you are not refueling your
own car.
• Do not store or carry ammable or explosive
materials in the same compartment as the handset.
• Electronic vehicle systems, such as anti-lock brakes,
speed control, and fuel injection systems are not
normally affected by radio transmissions.The
manufacturer of such equipment can advise if it
is adequately shielded from radio transmissions.
If you suspect vehicle problems caused by radio
transmissions, consult your dealer and do not switch
on the handset until it has been checked by qualified
approved installers.
Vehicles Equipped
with Airbag(s)
An airbag inflates with great force. Do not place
objects, including either installed or portable wireless
equipment, in the area over the airbag or in the airbag
deployment area. If in-vehicle wireless equipment is
improperly installed and the airbag inflates, serious
injury could result.
• Take care not to put your handset in the back pocket
of your trousers or skirt and then sit on it. Also, do
not put your phone at the bottom of a bag where
it may be subject to excessive weight or pressure.
Doing so may damage the LCD and camera lens and
cause them to malfunction.
• The operation of some medical electronic devices,
such as hearing aids and pacemakers, may
be affected if a handset is used next to them.
Observe any caution signs and the manufacturer’s
recommendations.
• Do not leave the handset discharged or without a
battery for a long time, otherwise some data may be
erased.
• Your phone contains metal, which may induce an
itch, a rash, or eczema, depending on your physical
condition.
CTIA Requirements
• Do not disassemble or open, crush, bend, or deform,
puncture, or shred.
• Do not modify or remanufacture, attempt to insert
foreign objects into the battery, immerse or expose
to water or other liquids, expose to fire, explosion, or
other hazard.
• Only use the battery for the system for which it is
specified.
• Only use the battery with a charging system that has
been qualified with the system per this standard.
Use of an unqualified battery or charger may present
a risk of fire, explosion, leakage, or other hazard.
• Do not short circuit a battery or allow metallic
conductive objects to contact battery terminals.
• Replace the battery only with another battery that
has been qualified with the system per this standard,
IEEE-Std-1725-2006. Use of an unqualified battery
may present a risk of fire, explosion, leakage, or
other hazard.
• Promptly dispose of used batteries in accordance
with local regulations.
• Battery usage by children should be supervised.
• Avoid dropping the phone or battery. If the device or
battery is dropped, especially on a hard surface, and
the user suspects damage, take it to a service center
for inspection.
• Improper battery use may result in a re, explosion,
or other hazard.
For those host devices that utilize a USB port as a
charging source, the host device’s user manual shall
include a statement that the phone shall only be
connected to CTIA-certified adapters, products that bear
the USB-IF logo, or products that have completed the
USB-IF compliance program.
Care and Maintenance
Table of contents
Other Zte Cell Phone manuals