Zte ZFIVE 3LTE Owner's manual

1
Z559DL
PHONE & FEATURE GUIDE
Z079584509773

2
Setting Up Your Phone
Installing a microSDXC™ Card (Not Included)
The microSDXC card can be installed and removed while the
phone is turned on. Unmount the microSDXC card before
removing it.
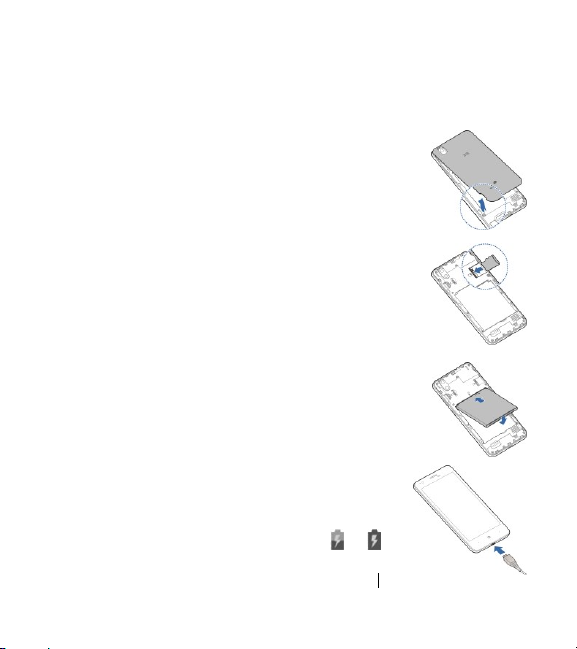
1. Place your finger in the slot at the lower left of the back cover
to lift and remove the cover.
2. Hold your microSDXC card with the metal contacts facing
down and slide it into the microSDXC card slot.
3. Insert the battery by aligning the metal contacts on the
battery with the metal contacts in the battery compartment.
Gently push down on the battery until it clicks into place.
4. Press the cover gently back into place until you hear a click.
Charging the Battery
Your phone’s battery should have enough power for the phone
to turn on, find a signal, and make a few calls. You should fully
charge the battery as soon as possible.
WARNING! Use only ZTE-approved chargers and USB cables.
The use of unapproved accessories could damage your phone
or cause the battery to explode.
1. Connect the adapter to the charging port. Ensure that the
adapter is inserted with the correct orientation. Do not
force the connector into the charging port.
2. Connect the charger to a standard AC wall outlet. If the
phone is on, you’ll see a charging icon, such as or ,
appear in the Status Bar.
3. Disconnect the charger when the battery is fully charged.

3
Getting to Know Your Phone
* Supports CTIA headsets only.
**Customizable. See Touch Screen and Navigation Keys panel.
Speaker
3.5mm
Headset
Jack*
Back
Camera
Flash
Back
Cover
Earpiece
Proximity &
Light Sensor
Volume Key
Back Key**
Home Key
Touch
Screen
Front Camera
Charging/
micro-USB Port
Recent Apps
Key**
Power/Lock
Key
Microphone
Indicator
Light

4
Notifications
The Status Bar at the top of the home screen provides phone and service status icons,
and notification icons.
Phone and Service Status Icons
2G connected
No signal
3G connected
Signal strength
4G LTE™ connected
Mobile data in use
Do not disturb mode on
Airplane mode
Data saver on
Bluetooth on
Vibration on
Connected to a Wi-Fi®network
Ringer off
Wi-Fi in use
Battery low / Battery full
Portable Wi-Fi hotspot on
Battery charging
Speaker on
Alarm set
Phone microphone off
Wired headset connected
GPS on

5
Notification Icons
New SMS / MMS
Song playing
New email
message(s)
New Wi-Fi network
detected
New Gmail
message(s)
USB tethering on
Missed call
Downloading /
sending data
Call in progress /
Call on hold
microSDXC card
mounted
QSG Z079584509773

6
Touch Screen and Navigation Keys
Power/Lock Key: Press and hold to power on,
restart the phone, turn on/off airplane mode, or
power off. Press to turn on/off the screen display.
Home Key: Press to return to the home
screen from any application or screen. Press and
hold to use Google Assistant.
Recent Apps Key: Press to view recently used
apps. Double-tap to switch to the most recent app.
Press and hold to activate split-screen mode.
Back Key: Press to go to the previous screen.
Volume Key: Press to turn the volume up or down
or to enable silent mode/vibration mode.
Opening Applications
1. Press if the current screen is not the home
screen.
2. Swipe up on the screen to view available apps.
3. Swipe up or down on the screen and tap an app
to open it.
Personalize
You can exchange the positions of the Back Key and
Recent Apps Key.
Swipe up on the home screen and tap >
Features> Navigation keys and select an option.

7
Internet
Connecting via Wi-Fi®
1. Swipe up on the home screen and tap >
Network & Internet > Wi-Fi.
2. Slide the on/off switch if Wi-Fi is off. Your phone
automatically searches for Wi-Fi networks in range
and displays their names and security settings. Your
phone also connects to previously linked networks
when they are in range.
3. Tap a network name to connect to it.
4. If the network is secured, enter a password or other
credentials (ask your network administrator for
details) and tap CONNECT.
Connecting via Mobile Network
1. Swipe up on the home screen and tap >
Network & Internet > Data usage.
2. Slide next to Mobile data to enable mobile
data.

8
Calling and Voicemail
Making a Call
1. From the home screen, tap > .
2. Enter the phone number with the on-screen keypad.
Tap to delete incorrect digits.
3. Tap to place the call.
NOTE: To call a contact, swipe up on the home screen, tap
, and tap .
Checking Voicemail
1. From the home screen, tap > .
2. Press and hold the 1 Key. If prompted, enter your
voicemail password.
3. Follow the voice prompts to listen to and manage your
voicemail messages.
NOTE: To set your voicemail service, tap > >
Settings > Voicemail and tap the voicemail settings you
want to change. For detailed information, please contact
the service provider.

9
Address Book
Creating a New Contact
1. Swipe up on the home screen and tap .
2. Tap .
3. Enter the contact name, phone numbers, email
addresses, and other information, as shown.
4. Tap SAVE to save the contact.
Importing Contacts in Batches
1. Swipe up on the home screen and tap .
2. Tap > Settings > Import > .vcf file or Import
SIM card.
3. Tap the vCard file or SIM card contacts you want to
import. If prompted, select an account in which to
save the contacts.

10
Text Messaging
1. From the home screen, tap > .
2. Enter the recipient(s) and message text.
If you want to send an MMS, tap to add
attachments.
3. Tap to send the message.
Please don’t text and drive.

11
Email
Setting Up Gmail™
1. From the home screen, tap > .
NOTE: If you have already entered a Google™
account (e.g., during initial phone setup), tap TAKE
ME TO GMAIL. If you’d like to add another Gmail
account, tap Add another email address and follow
instructions.
2. Tap Add an email address > Google.
3. Enter your existing Google email and tap NEXT, or
tap Create account.
4. Follow the instructions on the screen to set up the
account.
Setting Up Email
1. From the home screen, tap and select an email
server.
NOTE: If another email account is already set up,
swipe up on the home screen and tap >
Accounts > Add account. Then select the type of
account you need.
2. Enter the email address.
3. Enter the password, tap NEXT, and follow the
on-screen instructions.

12
Customizing Home Screens
You can customize your home screen by adding
shortcuts, folders, widgets, and more.
Adding Widgets
1. Press and hold an empty spot on a home screen.
2. Tap WIDGETS.
3. Press and hold a widget and drag it to the desired
home screen.
NOTE: To add a shortcut to a home screen, press
and hold the app from the App Tray and drag it to a
home screen.
Removing Widgets or Shortcuts
1. Press and hold a widget or shortcut on the home
screen.
2. Drag it to to remove it.
Organizing Shortcuts With
Folders
1. Press and hold a shortcut.
2. Drag it to at the top of the screen. A new folder
is created.
3. If needed, drag more shortcuts and drop them into
the folder.

13
Applying New Wallpapers
1. Press and hold an empty spot on a home screen.
2. Tap WALLPAPERS.
3. Tap a wallpaper thumbnail image, or select a source (My photos or a live wallpaper)
and then choose an image or animation.
4. Tap or SET WALLPAPER and follow the instructions on the screen.

14
Camera and Video
Taking a Photo
1. From the home screen, tap > PHOTO.
2. Aim the camera at the subject and make any necessary adjustments.
3. Tap .
Recording a Video
1. From the home screen, tap > VIDEO.
2. Aim the camera at the subject and make any necessary adjustments.
3. Tap to start and to stop recording.
TIP: While the recording is in progress, you can tap to pause or resume
recording, or tap to save the frame as a photo.

15
Change the
flash setting
Change the
camera settings
Change the
HDR setting
Switch to photo
camera mode
Apply a
special effect
Switch between
the front and
back cameras
Adjust the exposure
Switch to manual
camera mode
Select a scene
mode
View your photos
and videos
Capture a photo
Adjust the
focus point
Switch to video
camera mode

16
Playing Music
1. Swipe up on the home screen and tap .
2. Tap All songs.
3. Tap a song to play it.
Song and artist
information
Album artwork
(if available)
Drag the slider
to jump to any
part of the song
Toggle shuffle
mode
Access additional
options
Tap to see the current
playlist (queue)
Add the song to
your favorites
Toggle repeat
mode
Playback control:
Skip songs or pause
and resume playback
Return to the
library

17
Connectivity
Connecting With a Bluetooth®
Headset
Turn on the Bluetooth headset (or any other device you
want to pair with your phone) and switch it to pairing
mode. Refer to the headset’s user guide for more
information.
1. Swipe up on the home screen and tap >
Connected devices > Bluetooth.
2. Slide the on/off switch if Bluetooth is off. When
Bluetooth is on, the icon appears in the Status
Bar.
3. Tap Pair new device.
NOTE: Your phone automatically scans for and
displays the IDs of all available Bluetooth devices in
range.
4. Tap the ID of the headset. Enter a passcode if
prompted.
5. If necessary, tap the ID of the paired headset to
connect with it.
TIP: Tap the headset ID and then tap OK to end the
connection.

18
Google Play™
Google Play has tens of thousands of games and
applications for you to enjoy. Before you begin, make
sure that you are signed in to your Google account.
1. From the home screen, tap .
2. Find the apps you need either by category or by
typing in the search field.
3. Tap the app to see a more detailed description.
CAUTION: Once installed, some apps can access
many functions or a significant amount of your
personal data. To view permissions on the app’s
detail page, swipe to the bottom of the page and tap
Permission details. To view and adjust permissions
of an installed app, swipe up on the home screen
and tap > Apps & notifications > app name >
Permissions.
4. Tap INSTALL (free apps) or the price (paid apps).
NOTE: A payment method (such as Google Wallet™)
is required to purchase apps. For paid apps, follow
additional on-screen instructions for payment.
5. Wait for the app to be downloaded and installed
automatically. Payment needs to be authorized
before paid apps start downloading.
6. You can find the new app after swiping up on the
home screen.
NOTE: The content you can access in the Play Store
depends on your region and your service provider.

19
For Your Safety
Radio Frequency (RF) Energy
This phone is designed and manufactured not to exceed the
emission limits for exposure to radio frequency (RF) energy set by
the Federal Communications Commission of the United States.
During SAR testing, this device was set to transmit at its highest
certified power level in all tested frequency bands, and placed in
positions that simulate RF exposure in usage against the head
with no separation, and near the body with the separation of 15
mm Although the SAR is determined at the highest certified power
level, the actual SAR level of the device while operating can be
well below the maximum value. This is because the phone is
designed to operate at multiple power levels so as to use only the
power required to reach the network. In general, the closer you
are to a wireless base station antenna, the lower the power output.
The exposure standard for wireless devices employs a unit of
measurement known as the Specific Absorption Rate, or SAR.
The SAR limit set by the FCC is 1.6 W/kg.
This device complies with SAR for general population/uncontrolled
exposure limits in ANSI/IEEE C95.1-1992 and has been tested in
accordance with the measurement methods and procedures
specified in IEEE1528.
The FCC has granted an Equipment Authorization for this model
phone with all reported SAR levels evaluated as in compliance

20
with the FCC RF exposure guidelines. SAR information on this
model phone is on file with the FCC and can be found under the
Display Grant section of www.fcc.gov/oet/ea/fccid after
searching on FCC ID: SRQ-Z559DL.The FCC ID also can be
found on the device when you swipe up on the home screen and
touch Settings > System > About phone > Regulatory
information.
For this device, the highest reported SAR value for usage against
the head is 0.85 W/kg, for usage near the body is 0.93 W/kg.
While there may be differences between the SAR levels of various
phones and at various positions, they all meet the government
requirements.
SAR compliance for body-worn operation is based on a separation
distance of 15 mm between the unit and the human body. Carry
this device at least 15 mm away from your body to ensure RF
exposure level compliant or lower to the reported level. To support
body-worn operation, choose the belt clips or holsters, which do
not contain metallic components, to maintain a separation of 15
mm between this device and your body.
RF exposure compliance with any body-worn accessory, which
contains metal, was not tested and certified, and use such
body-worn accessory should be avoided.
FCC Regulations
This device complies with part 15 of the FCC Rules. Operation is
This manual suits for next models
1
Table of contents
Other Zte Cell Phone manuals