Zultys MXmeeting M200 Instruction Manual

Z u l t y s , I n c . 7 8 5 L u c e r n e S u n n y v a l e , C a l i f o r n i a , U S A 9 4 0 8 5 w w w . z u l t y s . c o m
Author: Zultys Technical Support Department
MXmeeting is a multi-function web collaboration system. MXmeeting features include:
Web conferencing –sales presentations, product demos, interactive collaboration.
Webcam server - up to 30 webcams can join in for live video interactive presentations.
Web seminar –Seminars for view only attendees with no client or agent to install. Totally platform
and browser independent.
Remote support: remotely access and troubleshoot anyone’s PC by emailing them a URL.
Remote Access: Remotely access your own PC from anywhere, without the worry of firewalls or
static IP addresses.
Remote print: issue a print command to instruct a local document to be printed at 1 or all of the
participants remotely.
Webinar Polling.
This document only describes Zultys supported features. Please note that if the MXmeeting warranty is not
current, the appliance cannot be upgraded and is not eligible for technical support. The MXmeeting appliance
will not be impaired by the failure, but it will be unable to access the latest features. In addition, in the event that
a problem should occur, support is not available for an out-of-warranty system. Furthermore, depending on the
product model you buy, some of the meeting types may not be available to you.
May
16
MXmeeting™ M200/M500 and
M800/M1000 Release v6.0
Administration Manual
Z

MXmeeting Release v6.0 M200/M500 & M800/M1000
Admin Guide (0000000202)/ Revision 7 5/9/2016
© 2016 Zultys, Inc. No reproduction of distribution without permission
Page 2 of 42
Technical Publications
1Contents
1INSTALLATION.................................................................................................... 3
1.1 ACCESSING YOUR M200/M500 WEB CONFERENCING APPLIANCE ..................................... 4
1.2 PLUG-AND-PLAY................................................................................................. 4
1.3 LOCAL ACCESS .................................................................................................... 5
1.4 CROSSOVER-CABLE .............................................................................................. 6
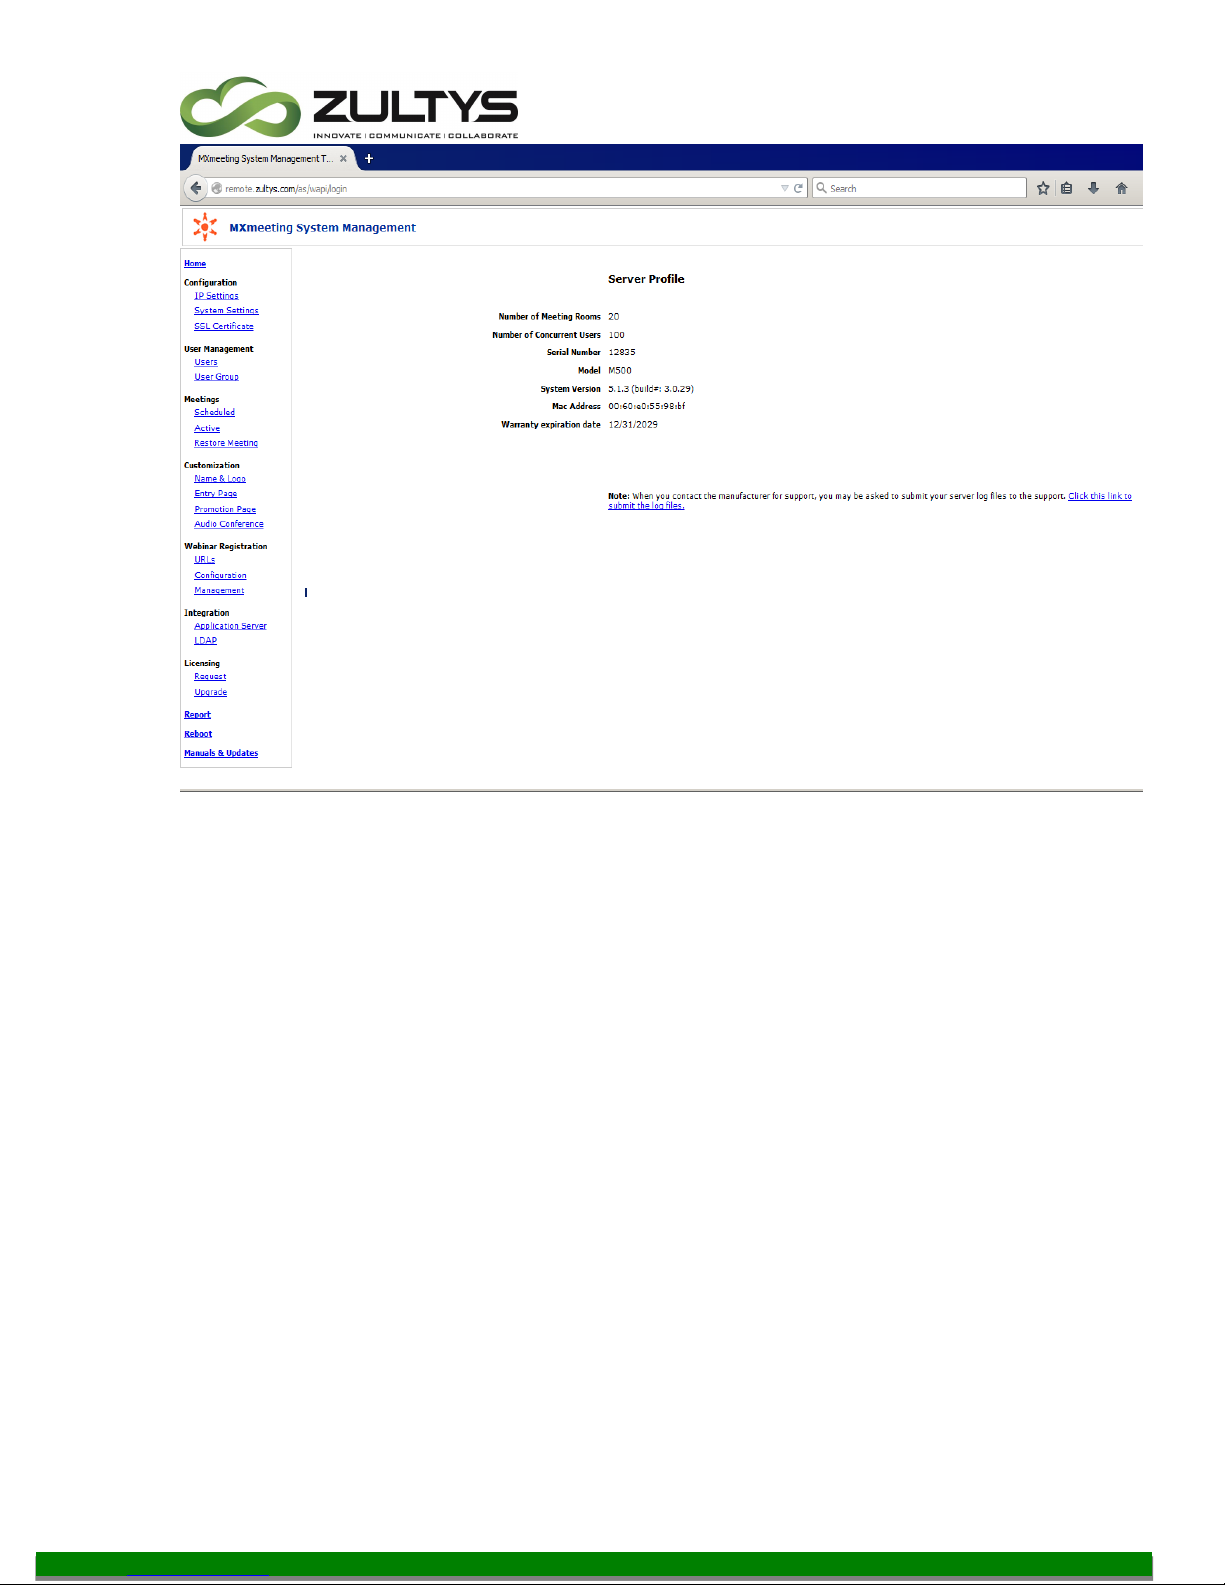
2CONFIGURING THE MXMEETING WEB CONFERENCING APPLIANCE........................... 6
2.1. CONFIGURE SERVER IP SETTINGS ............................................................................. 9
2.2. SYSTEM SETTINGS ..............................................................................................11
2.3. MANAGING YOUR SSL CERTIFICATE ........................................................................15
2.4. SCHEDULED MEETINGS AND ACTIVE MEETINGS ...........................................................18
2.5. RESTORE (OR TRANSFER)AN EXISTING,EXPIRED OR DELETED MEETINGS ............................19
2.6. CUSTOMIZING THE MEETING START AND PROMOTION PAGES .........................................20
2.7. WEBINAR REGISTRATION ......................................................................................23
2.8. INTEGRATION....................................................................................................26
2.9. INTEGRATION WITH LDAP FOR USER AUTHENTICATION ................................................26
2.10. LICENSING......................................................................................................28
3CONFIGURING THE FIREWALL..............................................................................29
3.1. BEHIND FIREWALL AND ACCESSIBLE BY USERS OUTSIDE FIREWALL.....................................29
3.2. OUTSIDE THE FIREWALL .......................................................................................31
3.3. BEHIND FIREWALL AND NOT ACCESSIBLE BY USERS OUTSIDE FIREWALL ..............................32
4MANAGE USERS..................................................................................................33
4.1. USER GROUPS ...................................................................................................34
5START MEETINGS ...............................................................................................37
6REPORTING........................................................................................................40
7RESET APPLIANCE...............................................................................................40
8SUPPORT CONTACT ...........................................................................................41

MXmeeting Release v6.0 M200/M500 & M800/M1000
Admin Guide (0000000202)/ Revision 7 5/9/2016
© 2016 Zultys, Inc. No reproduction of distribution without permission
Page 3 of 42
Technical Publications
1Installation
The Web conferencing server package includes:
M200/M500 or M800/M1000 appliance (or server)
Analog console cable
Ethernet crossover-cable
The MXmeeting M800/M1000 web conferencing appliance
The MXmeeting M200/M500 web conferencing appliance

MXmeeting Release v6.0 M200/M500 & M800/M1000
Admin Guide (0000000202)/ Revision 7 5/9/2016
© 2016 Zultys, Inc. No reproduction of distribution without permission
Page 4 of 42
Technical Publications
Power cord. Power brick (for M200/M500 only)
Brackets (for M800/M1000)
1.1 Accessing your M200/M500 Web Conferencing Appliance
There are two ways to access the M200/M500 appliance: by using plug-and-play or by using an
Ethernet crossover-cable. To access the M800/M1000 appliance use plug-and-play. In all
cases, an Internet browser needs to be used to access and configure the server.
1.2 Plug-and-Play
This method requires that you have:
A DHCP server on your network
A computer with Microsoft Windows (98, 2000, XP or Vista)
It is important to follow the instructions below to start the server for initial setup:
1. Connect the server with an Ethernet cable (not the crossover-cable in the package) to
your network
2. Plug in the power cord to automatically power on the server
3. Wait for the ready light to turn green. This usually takes about 30 seconds.
Open a browser on your computer and type “http://myonlinemeeting”. The following page
should appear:

MXmeeting Release v6.0 M200/M500 & M800/M1000
Admin Guide (0000000202)/ Revision 7 5/9/2016
© 2016 Zultys, Inc. No reproduction of distribution without permission
Page 5 of 42
Technical Publications
Figure 1.1 Home Page
If the page does not display and you are familiar with your router, check the IP address your
router has assigned to the MXmeeting appliance, which is named “myonlinemeeting”. Then
input the IP address in your browser and you can access the MXmeeting appliance.
If the page does not display and you are not familiar with your router, go to the next initial
startup method as detailed below.
1.3 Local Access
For the M800/M1000 appliance only, if you fail to access the appliance by the above method,
do the following:
Plug in your keyboard, mouse and monitor to the appliance
Power on the appliance

MXmeeting Release v6.0 M200/M500 & M800/M1000
Admin Guide (0000000202)/ Revision 7 5/9/2016
© 2016 Zultys, Inc. No reproduction of distribution without permission
Page 6 of 42
Technical Publications
Wait for 1 minute
Type “turbomeeting” as the Username and “password” as the Password
Wait for up to a couple of minutes and you will be connected to the Fedora 4 desktop.
Open a browser by clicking the browser icon on the top banner
This will take you to the MXmeeting web login page (Figure 1.2)
Follow the sections below to configure the appliance using the browser.
1.4 Crossover-cable
The crossover-cable is only used for the M200/M500 appliance. Before you use the crossover-
cable method, configure your computer (in any operating system) with the following IP setting:
IP Address: 192.168.1.100
Subnet Mask: 255.255.255.0
Next, do the following:
Disconnect your computer from any network including the wireless
Power on the M200/M500 (as described above)
Wait for the ready light to turn green. This usually takes about 90 seconds
Connect the M200/M500 to your computer using the included crossover-cable or any
Internet cable
Open a browser on your computer and type http://192.168.1.192. The home page
(Figure 1.1) should display.
Once you have accessed the meeting server, you are ready to configure the server. Do not
disconnect your computer from the meeting server before you complete the configuration
described in the next section. After the configuration, connect the M200/M500 to your network
using a regular Ethernet cable (which is not included).
Note that after you change the system IP settings, the web page will hang. You will need to use
the new IP address to access the appliance.
2Configuring the MXmeeting Web Conferencing Appliance

MXmeeting Release v6.0 M200/M500 & M800/M1000
Admin Guide (0000000202)/ Revision 7 5/9/2016
© 2016 Zultys, Inc. No reproduction of distribution without permission
Page 7 of 42
Technical Publications
After you access the meeting server home page (Figure 1.1), click the “Web Conferencing Server
Management” link and you will see the login page shown in Figure 2.1. Type
admin for the Email field
password for the Password field
To change the default administrator account, you use “Manage Users” (see Section 4) to change
the default email and password to your choice.
Figure 2.1 Login Page
After login, the Server Management home page is displayed. The Server Management Navigation
frame is shown in Figure 2.2:

MXmeeting Release v6.0 M200/M500 & M800/M1000
Admin Guide (0000000202)/ Revision 7 5/9/2016
© 2016 Zultys, Inc. No reproduction of distribution without permission
Page 8 of 42
Technical Publications
Figure 2.2 Management Home Frame

MXmeeting Release v6.0 M200/M500 & M800/M1000
Admin Guide (0000000202)/ Revision 7 5/9/2016
© 2016 Zultys, Inc. No reproduction of distribution without permission
Page 9 of 42
Technical Publications
2.1. Configure Server IP Settings
In the left frame of the System Management page, under Configuration click the IP Settings link.
Figure 2.3 is displayed:
Figure 2.3 Configure Server IP Settings
Note that if you change the IP settings and submit the changes, your browser may hang
because the IP is changed. You should use the updated IP to access the appliance.

MXmeeting Release v6.0 M200/M500 & M800/M1000
Admin Guide (0000000202)/ Revision 7 5/9/2016
© 2016 Zultys, Inc. No reproduction of distribution without permission
Page 10 of 42
Technical Publications
The following describes the fields in Figure 2.3.
Public IP Address
In order for users outside your LAN to host or join meetings, you have to assign a public
IP address. If you don’t have a fixed public IP address, you can go to
http://www.dyndns.com to set up a domain name and copy the domain information and
your DynDNS user account information to the meeting server configuration page. After
that, you can always access your MXmeeting appliance by the domain name you set at
DynDNS.
Note that MXmeeting offers the DynDNS client as a convenience to our customers.
MXmeeting is in no way affiliated with DynDNS or responsible for their service. Any fees
that you may incur with DynDNS are between you and DynDNS and have nothing to do
with MXmeeting.
Authorized Public IP’s to Join Internal Meetings
If you have branch offices outside your LAN and you don’t have a VPN, use this setting
to allow employees from those branch offices to join an internal secured meeting hosted
in your LAN.
Current IP Settings
These are the IP addresses that the meeting server has currently.
Permanent IP Settings

MXmeeting Release v6.0 M200/M500 & M800/M1000
Admin Guide (0000000202)/ Revision 7 5/9/2016
© 2016 Zultys, Inc. No reproduction of distribution without permission
Page 11 of 42
Technical Publications
The Permanent IP Settings refer to the desired IP settings you want your meeting server
to have. The permanent IP address can be the same as “Public IP Address” or different
from “Public IP Address“. If the permanent IP is a local IP address, it will be different
from the public IP address. In such a case, you will need to do port forwarding on your
firewallrouter to forward TCP traffic from the ports (80, 443 and 8889) at the public IP
address to the corresponding ports at the permanent IP address. See the next section
for details.
Carefully check that the DNS setting is correct. A wrong DNS setting will stop the
meeting server from connecting to the Zultys communications release servers for
automatic updates.
Note that after you change the permanent IP settings, the web page will hang because
the server IP address has been changed. You will need to use the new IP address to
access the appliance.
If you make a mistake in configuration, you need to reset the appliance. See Section 6 for
details.
2.2. System Settings
In the left frame of the Server Management page, under Configuration click the System Settings
link. Figure 2.4 is displayed.

MXmeeting Release v6.0 M200/M500 & M800/M1000
Admin Guide (0000000202)/ Revision 7 5/9/2016
© 2016 Zultys, Inc. No reproduction of distribution without permission
Page 12 of 42
Technical Publications
Figure 2.4 System Settings
The following describes the fields in Figure 2.4.
Language
The language for the MXmeeting Server Management UI can be changed to English,
Chinese (Simplified), Chinese (Traditional), Japanese or Spanish.
Time Zone and Time & Date & Date Format
Set the correct time zone, time and date, and desired date format for the MXmeeting
appliance.
Max number of participants shown on the meeting control panel at all time
Set the maximum number of participants that are shown in the “short list” in the
meeting control panel. The presenter can open a window that shows a “long list” of all
the meeting participants. Attendees that require attention (such as if they raise their

MXmeeting Release v6.0 M200/M500 & M800/M1000
Admin Guide (0000000202)/ Revision 7 5/9/2016
© 2016 Zultys, Inc. No reproduction of distribution without permission
Page 13 of 42
Technical Publications
hand) move to the top of each of these lists. The “long list” can be sorted by participant
name.
Default audio mode
Set the default audio mode for attendees who have not already chosen their audio
mode. The possible settings are “Use Telephone” and “Use Mic & Speakers”. The host of
the meeting can override this setting in MXMeeting’s Tools | Preferences dialog.
Integration Code
Use this to specify your own Integration Code which you can specify when using the integration
features shown on our web site including the URL to schedule a meeting.
Allow attendees to record
This setting determines whether any attendees are allowed to record during a meeting
Access this server only via SSL
By default, screen images during a meeting are transmitted with MXmeeting proprietary
encryption for efficiency. However, you can use SSL for encryption by enabling the
Access this server only via SSL option. See the section Manage Your SSL Certificate
about how to upload your own SSL Certificate.
Use SSL to manage the server web pages
This setting determines if SSL is always used when displaying the MXmeeting System
Management web pages. It is recommended that you use your own SSL certificate with
this setting so that web browsers do not complain about a domain name mismatch. See
the section Manage Your SSL Certificate about how to upload your own SSL Certificate.
Enable auto update of system
The MXmeeting appliance retrieves software updates automatically if this is enabled. This is
done at 3 AM for the time set on the appliance.

MXmeeting Release v6.0 M200/M500 & M800/M1000
Admin Guide (0000000202)/ Revision 7 5/9/2016
© 2016 Zultys, Inc. No reproduction of distribution without permission
Page 14 of 42
Technical Publications
Video Conferencing Optimization preference
This setting lets your attendees “Have the best image quality” of the webcams at the expense of
higher CPU usage or “Use the least client CPU” at the expense of using more bandwidth. Each
user can override this setting in their client’s Tools | Preferences “Video” tab.
Max cameras in one session
This setting is a limit for the maximum number of webcams that can be started in an HD Video
Conference. The downside of setting a high number, like the maximum of 30, is that the
Windows and Mac client software will use more memory the higher this value is.
Max camera resolution
This setting specifies the maximum resolution for any one webcam in an HD Video Conference.
The choices are:
o1080P (1920x1080 pixels)
o720P (1280x720 pixels)
o540P (960x540 pixels, recommended)
o360P (640x360 pixels)
540P is a good trade-off between webcam clarity and bandwidth usage. 1080P and to some
extent 720P could produce problems on slower computers, but our algorithms adjust for slower
computers to automatically reduce CPU usage.
Max bandwidth per camera
This setting specifies the maximum resolution for any one webcam in an HD Video Conference.
The choices are:
o128 Kbps
o256 Kbps
o384 Kbps
o512 Kbps (recommended)
o768 Kbps
o1 Mbps
o2 Mbps
512 Kbps is a good trade-off between webcam clarity and bandwidth usage. A higher number
could affect bandwidth usage at your company depending on the size of the meetings. This
setting typically only affects the webcams that the viewer sees as larger. Our algorithms reduce
bandwidth by only sending the webcam size that is required by the viewer. Thus, if the viewer

MXmeeting Release v6.0 M200/M500 & M800/M1000
Admin Guide (0000000202)/ Revision 7 5/9/2016
© 2016 Zultys, Inc. No reproduction of distribution without permission
Page 15 of 42
Technical Publications
sees one full-screen webcam, the download bandwidth usage in this case will be similar to that of
four webcams that fill up the same screen.
Enable HD video conferencing
Turning off this setting will remove the ability for hosts to start HD Video Conferences and take
away the ability for presenters to switch to HD Video Conference mode.
Enable Telepresence
Turning off this setting will remove the ability for each participant to use telepresence feature,
which is the ability to use up to 8 monitors connected to one computer to see screen sharing on
one monitor and webcams on the remaining monitors
Update System Now
This feature retrieves updated MXmeeting appliance software from the MXmeeting web
site.
NOTE: The prompt is parentheses is not true, and will be removed in future iterations.
The Update Now feature works if the “enable auto-update box” is checked or
unchecked.
2.3. Managing Your SSL Certificate
In the left frame of the Server Management page, under Configuration click the SSL Certificate
link. Step 1 of setting up an SSL certificate is displayed as in Figure 2.5.

MXmeeting Release v6.0 M200/M500 & M800/M1000
Admin Guide (0000000202)/ Revision 7 5/9/2016
© 2016 Zultys, Inc. No reproduction of distribution without permission
Page 16 of 42
Technical Publications
Figure 2.5 Setting up an SSL Certificate, step 1
The following describes the fields in Figure 2.5.
Common Name
This is the domain name for your MXmeeting appliance. This must match the domain
name you specify in your SSL certificate.
Organization Name
This is the Organization Name you specify in your SSL certificate.
State, City and Country
This is the State, City, and Country that you specify in your SSL certificate.
Next, obtain an SSL certificate as shown in Step 2 (Figure 2.6). For the SSL certificate, specify
the same Common Name, Organization, State, City and Country that you specified in Step 1.

MXmeeting Release v6.0 M200/M500 & M800/M1000
Admin Guide (0000000202)/ Revision 7 5/9/2016
© 2016 Zultys, Inc. No reproduction of distribution without permission
Page 17 of 42
Technical Publications
Figure 2.6 Setting up an SSL Certificate, step 2
Locate your SSL Certificate file and your CA Root Certificate file. Using Microsoft WordPad, copy
and paste the contents of these files into the files shown in step 3 (Figure 2.7).
Figure 2.7 Setting up an SSL Certificate, step 3
Test your SSL Certificate as described in step 4 (Figure 2.8).

MXmeeting Release v6.0 M200/M500 & M800/M1000
Admin Guide (0000000202)/ Revision 7 5/9/2016
© 2016 Zultys, Inc. No reproduction of distribution without permission
Page 18 of 42
Technical Publications
Figure 2.8 Setting up an SSL Certificate, step 4
2.4. Scheduled Meetings and Active Meetings
In the left frame of the Server Management page, under Meetings click the Scheduled link. This
feature shows you the list of scheduled meetings for your MXmeeting appliance. The provided
URLs show all of the public meetings and provide a link for how to join the meeting.
Figure 2.9 List of scheduled meetings
In the left frame of the Server Management page, under Meetings click the Active link. This
feature shows you the list of active meetings for your MXmeeting appliance. As the
administrator, you can stop an Active meeting by clicking the Stop link as shown in Figure 2.10.

MXmeeting Release v6.0 M200/M500 & M800/M1000
Admin Guide (0000000202)/ Revision 7 5/9/2016
© 2016 Zultys, Inc. No reproduction of distribution without permission
Page 19 of 42
Technical Publications
Figure 2.10 List of active meetings
2.5. Restore (or transfer) an Existing, Expired or Deleted Meetings
In the left frame of the System Management page, under Meetings click the Restore Meeting
link. This feature allows you to restore a meeting that has expired or was deleted; and it allows
you to transfer a meeting to another user, which is helpful if the original host of the meeting is
unavailable.
To restore a meeting to its original owner, enter the meeting ID and select Restore to “Current
owner”; click “Submit”. To transfer a meeting to a new owner, enter the meeting ID, select
Restore to “New owner whose email/username is” and specify the email id or user name; click
“Submit”.
Figure 2.11 List of scheduled meetings

MXmeeting Release v6.0 M200/M500 & M800/M1000
Admin Guide (0000000202)/ Revision 7 5/9/2016
© 2016 Zultys, Inc. No reproduction of distribution without permission
Page 20 of 42
Technical Publications
2.6. Customizing the Meeting Start and Promotion Pages
In the left frame of the Server Management page, under Customization click the Name & Logo
link. This feature allows the Administrator to use show your company’s name and logo on the
standard meeting home page.
Figure 2.11 Change the name and logo on standard meeting home page
In the left frame of the Server Management page, under Customization click the Entry Page link.
This feature allows the Administrator to use a different home page as the standard meeting
home page.
Figure 2.12 Use a new page for the meeting home page
This manual suits for next models
3
Table of contents