100FIT 130T User manual

PLEASE READ ALL INSTRUCTION IN THE OWNER'S MANUALCAREFULLY
BEFORE ASSEMBLY AND USE THE TREADMILL.
AND KEEP IT FOR FUTURE REFERENCE.
MOTORIZED TREADMILL
INSTRUCTION MANUAL-130T
WWW.HUNDREDFIT.COM

² QUALITY GUARANTEE COMMIITMENT ------------------------------------ 1
² SAFETY INSTRUCTION ------------------------------------------------- 2
² S P EC I C A L SA F E T Y IN S T R U C T I O N --------------------------------------------- 3
² DESCRIPTION OF ASSEMBLY -------------------------------------------------- 3
² CONFIGURATION LIST ------------------------------------------------------- 4
² EXP LOS I ON DIAG R AM ----------------------------------------------------- 5
² PARTS LIST OF EXPLOSION DIAGRAM ---------------------------------------- 6-7
² STEPS OF ASSEMBLY ----------------------------------------------------------------- 8-10
² STRUCTURE OF FINISHED PRODUCT ------------------------------------------- 11
² OPERATING INSTRUCTION ---------------------------------------------- 12-14
² CONSOLE OPERATING INSTRUCTION ------------------------------------ 15-20
² DAILY MAINTENANCE ---------------------------------------------------------------- 21-23
² IMPORTANT MATTER ------------------------------------------------------------ 24-25
CONTENTS

Quality Guarantee Commitment
- 1 -
Thank you for purchasing this product. It will improve your health.
I. Quality Guarantee Commitment
We ensure that this product is made from high-quality materials.
We will repair the product if it has problems in normal use.
Warranty period is 1 year (from the date of purchase). If the product you purchase has quality
problems, please contact with our customer service personnel in 12 months. Please don’t deal with
the problems without permission. We are responsible for repair of the following accessories: frame,
wires, foam on armrest, motor, moving wheels, etc. The following cases are beyond the scope of
warranty:
•
Damage for external reason.
•
Use non-original accessories.
•
Handle incorrectly by yourself.
•
Fail to operate as instructed.
Quick-wear parts will not be repaired or replaced if normally worn, such as running belt, etc.
This quality guarantee commitment is only valid for private use of family and inapplicable to
gymnasium and other situations of professional training.
Please contact with our customer service personnel to buy accessories beyond scope of warranty
and provide the information below when ordering:
•
Instruction.
•
Model of treadmill.
•
Serial number of accessory.
•
Proof of date of purchase.
Please don’t send the product to our company before our customer service personnel confirm. We
refuse to bear any expenses if you send back the product without permission.

Quality Guarantee Commitment
- 2 -
II. Safety Instruction
Many safety problems are considered in design and manufacturing of the product, but please still
operate according to the instruction below just in case. We are not responsible for any consequences
caused by abnormal operation.
In order to ensure your safety and prevent accidents, please carefully read the operating
instruction before use.
1.
Please consider your physical condition when training with the product, and train in an
appropriate and regular way to ensure that you have enough physical strength. Wrong or
excess training will be harmful to your health.
2.
This product is unsuitable for children. Those that feel unwell or are mentally defective and
lack common sense of use shall not use the product unless under guardianship or guidance of
people responsible for their safety. Children shall be prevented from fiddling with the
equipment.
3.
This product is suitable for home use instead of professional training and test or medical
treatment.
4.
Heart rate display of this product does not provide data for clinical medicine.
5.
The damaged power line must be replaced by manufacturer or professional maintenance
personnel to prevent danger.
6.
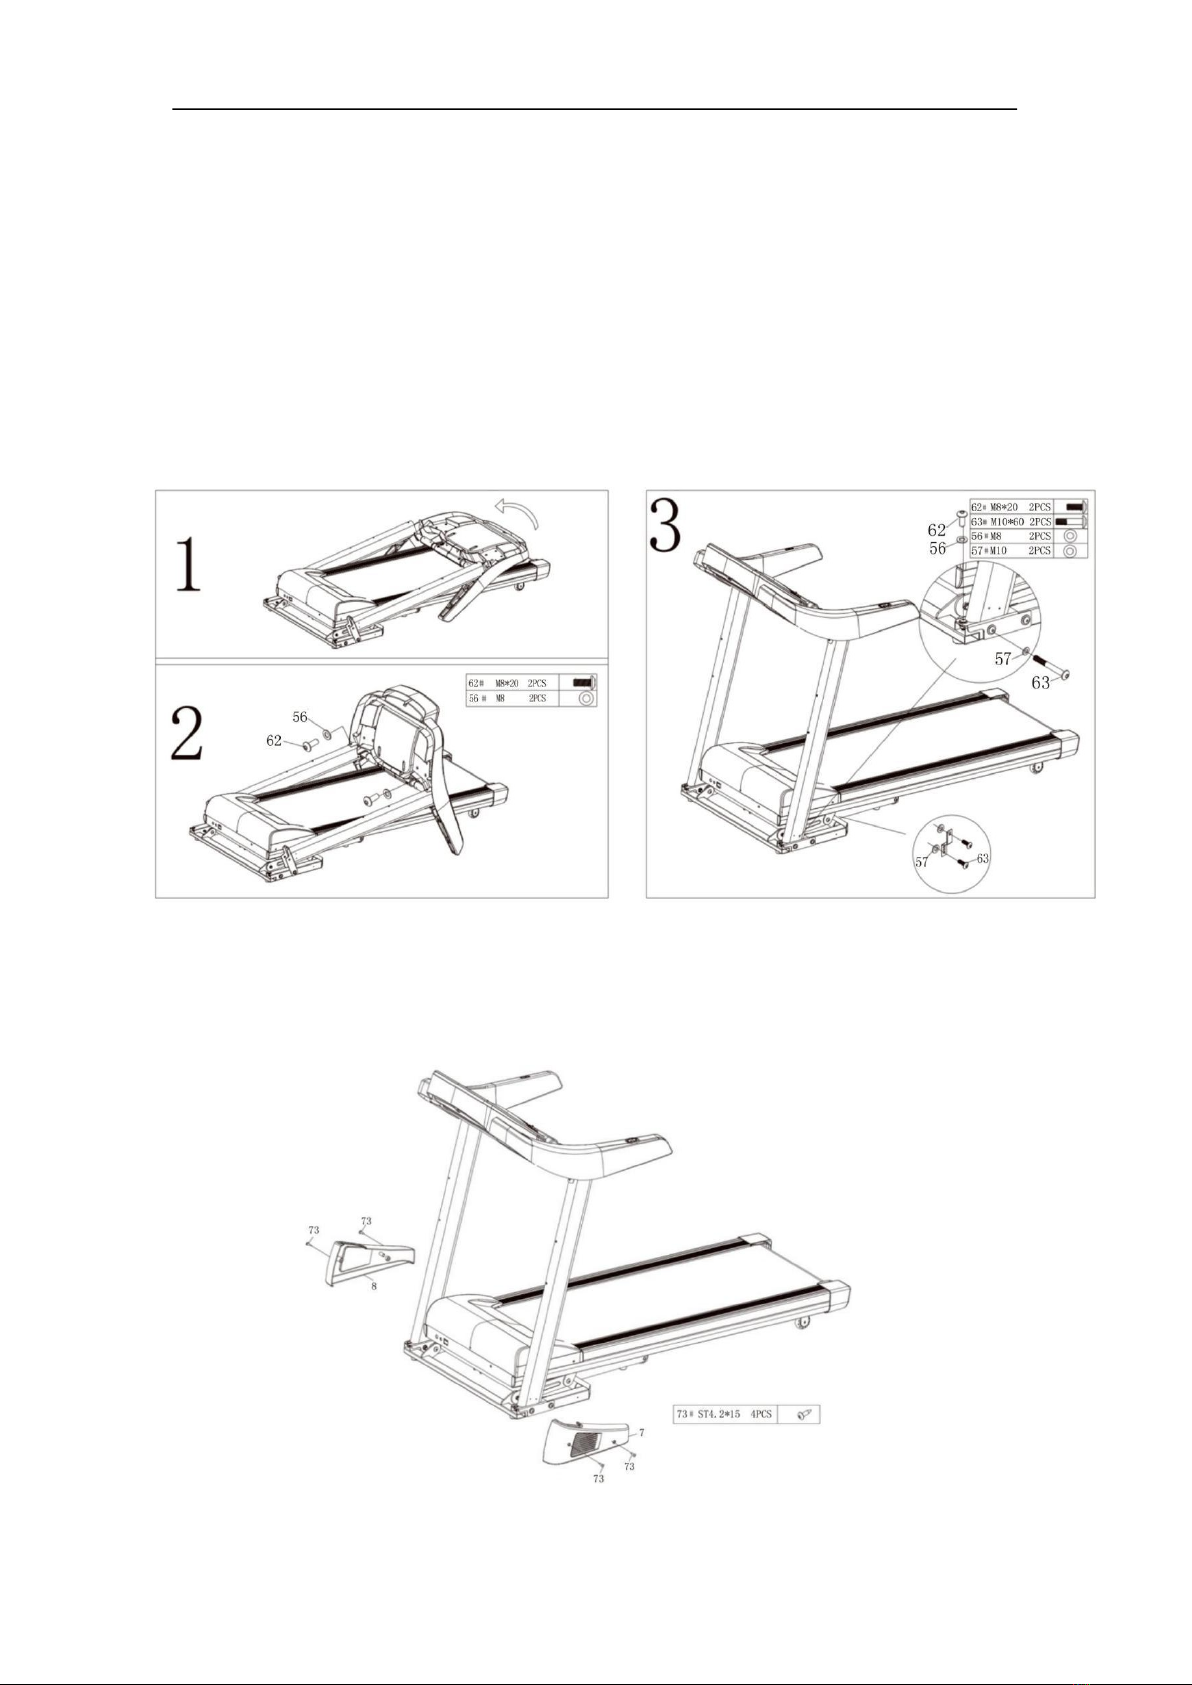
Please inspect all components and ensure that screws and nuts are tightened before use.
7.
Please wear comfortable tight clothes when using the product to prevent the clothes from
being hooked by the machine. Don’t let kids or pets play nearby to avoid accidents.
8.
Please place the product on smooth, clean and flat ground, ensure that there is nothing sharp
nearby and don’t use it near source of water and heat.
9.
Don’t touch any moving parts with hands or place hands or feet in gap beneath the running
belt.
10.
This product can only be used by one person when running.
11.
Ensure that screws and bolts are tightened after assembly of the product.
12.
Please use accessories provided by the factory and don’t replace them without permission.
13.
This product is HC product. The weight of user is not more than 120kg.

Quality Guarantee Commitment
- 3 -
III. Special Safety Instruction
Power source
•
Place the treadmill where the plug can reach the socket.
•
Directly insert the power line into socket and keep it firm.
•
Please use qualified socket to avoid consequential danger. If the plug and socket are
incompatible, ask the electrician to deal with it instead of moving the plug.
•
220V—240VAC power source is used.
•
Please keep power line away from roller, and don’t place power source on running belt or use
damaged plug.
•
Please pull the plug out from the socket before cleaning and maintenance.
Warning: failing to pull out the plug may cause personal injury and damage to equipment.
•
Please inspect each component before use.
•
Please don’t use the product outdoors, at high humidity and in the sunshine.
•
Please turn off the machine and pull out the plug when leaving.
IV. Description of Assembly
•
Please carefully read steps of assembly before assembly.
·
Take out all wrap pages and place them on clean ground, which is convenient for you to check
and install.
•
Carefully check whether components are complete according to packing list.
•
Please pay attention to safety when using tools or handling. Please don’t install forcibly as you
like in assembly.
•
Please confirm whether the tools and packing materials left are dangerous. Plastics and foam
are harmful to kids.
•
Assemble the product according to the instruction. Please carefully read steps and description
of assembly.
•
The product must be carefully installed by adults, and by professionals if necessary.
Warning: carefully install the product without damaging it.

Quality Guarantee Commitment
- 4 -
V. Configuration List
Configuration List
Multi-function
Single-function
Complete machine
Bag of
instruction
Safety switch
MP3
Connecting
line
Silicone oil
instruction
Multi-
function accessory
7# support of
massager
8# supine
support
18# massage
head
52# dumbbell
58# sponge
sheath
59# body
twister
43#&44# left & right side
covers

Quality Guarantee Commitment
- 5 -
VI. Explosion Diagram
All accessories are here and displayed in the list below.

Quality Guarantee Commitment
- 6 -
VII. List of Explosion Diagram
Part no.
Name
Q'ty
Part no.
Name
Q'ty
1
Pedestal
1
46
Speaker
2
2
Upright post (L)
1
47
Plastic edgestrip
2
3
Upright post (R)
1
48
R-type wire clamp
3
4
Computer
1
49
End Cap(L+R)
2
5
Main frame
1
50
Plastic spacer
4
6
Round cushion
1
51
Edgestrip buckle
8
7
Side cover (L)
1
52
Adjust foot pad
4
8
Side cover (R)
1
53
Rubber square washer
2
9
Package stator
1
54
Round inner tube plug
6
10
Running board
1
55
M4 Flat gasket
6
11
Running belt
1
56
M8 Flat gasket
20
12
Front roller
1
57
M10 Flat gasket
6
13
Rear roller
1
58
M8 Spring washer
2
14
Motor belt
1
59
M8 Lock nut
12
15
Gas spring
1
60
M10 Lock nut
6
16
DC motor
1
61
Half-round head hexagon screw M8*15
2
17
Assemble plastic
1
62
Half-round head hexagon screw M8*20
8
18
Front Moving roller
2
63
Half-round head hexagon screw M10*60
4
19
Computer PCB
1
64
Half-round head hexagon screw M10*25
4
20
Lower controller
1
65
Half-round head hexagon screw M8*30
1
21
Motor support
1
66
Half-round head hexagon screw M8*40
2
22
Back Moving roller
2
67
Half-round head hexagon screw M8*45
1
23
MP3 connecting line
1
68
Half-round head hexagon screw M8*50
4
24
Safety lock
1
69
Cylinder head hexagon screw M8*12
2
25
Upper line of Computer PCB
1
70
Cylinder head hexagon screw M8*60
4
26
Bottom line of Computer PCB
1
71
Countersunk head hexagon screw M8*25
8
27
Single line 150MM
2
72
Cross recessed pan head screw ST3.0*10
10
28
Single line 300MM
2
73
Cross recessed pan head screw ST4.0*16
39
29
Ground line 300MM
1
74
Cross head with flat self - tapping & self -
drilling screws ST4.2*16
24
30
Overload protector
1
75
Cross head with flat self - tapping & self -
drilling screws ST4.2*25
6
31
Power switch
1
76
Half-round head hexagon socket screw
M10*40
1
32
Power line buckle
1
77
Half-round head hexagon socket screw
M10*55
1

Quality Guarantee Commitment
- 7 -
33
Power line
1
78
M5 L-wrench
1
34
Magnetic ring
1
79
M6 L-wrench
1
35
Computer panel
1
80
Cross open-end wrench
1
36
Computer cover
1
81
User's Instruction
1
37
Computer back decoration
cover (L+R)
2
82
Silicone oil
1
38
Computer bottom decoration
cover
1
83
Massager support
2
39
Handle bar top cover
2
84
Supine support
1
40
Handle bar top cover
2
85
Massager head
1
41
Handle keybutton
2
86
Sponge sheath
4
42
PU foam(L+R)
2
87
Body twister
1
43
Special pipe plug(L+R)
2
88
Dumbell
6
44
Motor top cover
1
89
Incline motor
1
45
Motor bottom cover
1
90
Incline frame
1
The above parts list is list of the highest configuration of this series of products.

Quality Guarantee Commitment
- 8 -
VIII. Steps of Assembly
Step 1: Installation of complete machine
1.
Hold the electronic meter and slowly lift it to fixed screw hole.
2.
Fix electronic meter onto column with 62# screw and 56# flat gasket.
3.
Fix column onto pedestal with 57# screw and 63# flat gasket.
Then remove package stator (red) fixing frame and pedestal, and prevent the frame from hurting
people when bouncing off.
Step 2: Assembly of left and right side covers.
1. Fix the left and right side covers on both sides of pedestal with 73# screw and lock them.
(The single function treadmill item has been finished assemble.)

Quality Guarantee Commitment
- 9 -
Step 3: Assembly of multi-functional supports
(Multi function treadmill need to assemble the multi function parts)
1.
Take out the Massager support, pay attention to (R) indication of (L) gasket, and fix the Massager
support onto left and right Upright post with 62# screw and 56# flat gasket.
2.
Take out supine support, and fix it onto the Massager support with 67# screw and 56# flat gasket.
3.
Fix the Massager onto stator on the top of supine support with hex screw, flat gasket and spring
washer.
Step 4: Assembly of other parts
1.
Install dumbbell onto groove on supine support in the figure;
2.
The body twister can be placed at any stable position by the user;
3.
Safety lock is placed at yellow position on electronic meter;
4.
Massage belt is hung in grooves on both sides of massager.
Finally, please ensure that all screws are tightened after all accessories are assembled.

Quality Guarantee Commitment
- 10 -

Quality Guarantee Commitment
- 11 -
IX. Structure of Finished Product
Multi-function treadmill
Single function treadmill

Quality Guarantee Commitment
- 12 -
X. Operating Instruction
Operating instruction of treadmill:
Power socket with ground line must be used for your safety when you use the treadmill.
1.
Insert power plug into socket and turn on power switch a (light turns red). You will hear “beep”
and window on instrument panel displays;
2.
Place safety lock at yellow position of instrument panel, when the treadmill can be normally used.
Please clamp the safety lock onto your clothes when using the machine to avoid accidents. You can
open the safety lock at any time to immediately stop the motor to avoid falling over. Please place
the safety lock back and start starting program to use the machine again.
Instructions of massager and other functions:
Power socket with ground line must be used for your safety when you use the massager.
1. Please don’t fold main frame A when using the massager to avoid tilting forward during massage.
2.You can lie on the main frame A to do sit-ups according to personal requirements.

Quality Guarantee Commitment
- 13 -
Description of movement of treadmill:
1.
Fix one side of pedestal with a foot, and pull the armrest backward with hands to make the
treadmill tilt backward after folding it.
2.
Move the machine.
Please move the machine to a place inaccessible to kids to prevent them from touching the gas
spring casing to make the running platform fall to cause unnecessary accidents.

Quality Guarantee Commitment
- 14 -
Description of folding:
•
Fold the treadmill:
Folding the treadmill can save space.
Turn off the power switch and pull out the
power plug before folding.
Lift the running platform with hands until it
is stuck by gas spring casing.
•
Lower the running platform:
Gently tread the gas spring casing as shown in the
figure, the running platform will slowly fall to the
ground.
Note: keep kids away when operating this step to
prevent injury.

Quality Guarantee Commitment
- 20 -
XI. Operating Instruction of Instrument
1. BUTTON FUNCTION:
“PROG.”button:Press this button to choose program from manual mode—P1--P12--U1--U3--
FAT;
“MODE” button: When machine in standby state, press this button to choose the mode: mode-
time count down, mode-distance count down, mode-calories count down;
“START” button: Press this button to start the machine, the machine will run at the lowest speed
or at the speed of default program after 3 seconds time count down;
“STOP” button: Press this button to stop the machine, the machine will stop smoothly;
“SPEED
+
” ,“ SPEED
-
” : Adjust the speed. Press the button to adjust the speed when
running, and adjust the data when stop;
SPEED (3,6,9,12): Adjust the speed quickly.
“INCLINE+” ,“ INCLINE-” : Adjust the incline. Press the button to adjust the incline when
running, and adjust the data when stop;
INCLINE(3,6,9, 12): Adjust the incline quickly. Notice: When incline low to 0,then you could fold
treadmill.
2. MAIN FUNCTION

Quality Guarantee Commitment
- 21 -
Ⅱ
.Precautions
◎ To ensure the normal use of the device, please do not download or upd
ate any APP to the system.
◎ Please cleanup operation on the device periodically.
◎ Please try not to use third-party apps. When exiting a third-party app, please use the return key first.
◎ WIFI restrictions, this product can not link WIFI that requires WIFI webpage verification.
◆ Operation during exercise:
◎ Treadmill will decelerate to stop running after press the “stop”button during exercise.
◎ Treadmill will display heart pulse data in about 5 seconds after the athlete holds the handle pulse with
both hands.
◎ The key of exercise to athletes is to do relaxation exercise before running and slow stop after the exerc
ise.
◎ Usually, the athlete walks slowly for 5 minutes and then fast walk or running, and finally runs slowly for
5 minutes before stop.
Explanation: When start to running, set the speed slowly and walk for 5 minutes. This is rou
ghly equivalent to the state of walking, and then gradually increase the speed of the treadmil
l. When the speed increases to "5" or "6", you are walking or jogging. Based on this state, th
e body has been basically adapted, you can maintain or increase the speed and slope accor
ding to your own needs, then officially run for about 20 minutes, and finally set to a slower s
peed, slow down for 5 minutes as a relaxation, let The body gradually adapts during exercis
e. This takes about 30 minutes at a time.
Usually about 30 minutes of exercise has a better exercise effect, for ordinary exercisers, each run time s
hould not exceed 60 minutes,too long exercise time may cause excessive fatigue.
◎ Incline operation during running
If you need to set the incline, set it to "0" when you start running. After 5 minutes of slow walking, after the
body adapts, gradually increase the slope as needed, which can consume more calories, but the larger s
lope, not suitable for long running.
Heart rate monitoring while running
Please don't get down from the treadmill immediately after running. When running, the body's blood is ma
inly concentrated in the lower limbs. The rhythmic contraction of the muscles can help the blood of the lo
wer limbs to return to the heart. However, if you stop immediately after running, the effect of this squeeze
suddenly disappears, and the speed of blood returning to the heart slows down, which may cause in-suffi
cient blood supply o the brain. In serious situation,it may also cause shock symptoms.

Quality Guarantee Commitment
- 22 -
Treadmill has a heart rate monitoring function:
You can assess whether to stop running by measuring the heart rate.
Hold the hand pulse with both hands and display the heart pulse data in about 5 seconds. The treadmill w
ill automatically calculate the heart pulse of your exercise. Generally, the heart pulse rate drops below 12
0, and it is basically OK.
Boot screen
Quick start
1.Turn on the power switch and put the safety lock to the safety lock position on the panel.
2.After start, the screen displays the main interface.
3.Press the "start" button on the panel, the treadmill start running at the lowest speed and the lo
west slope, and you need to press the incline button or speed button to change the slope and sp
eed.
Operation during exercise:
◎
When the treadmill is running, press the stop button and the treadmill will decelerate to sto
p running.
◎
When the athlete holds the heartbeat handle with both hands, the heartbeat data is displaye
d in about 5 seconds.
◎
The key to the movement of the treadmill is the relaxation in the early stage and the slow st
op after the exercise;
◎
Usually walk slowly for 5 minutes and then go fast or run, and finally walk 5 minutes to finis
h running.
Explanation: When running, set a slower speed and walk for 5 minutes. This is roughly equivalent to the
state of walking, and then gradually increase the speed of the treadmill. When the speed increases to "5
" or "6", you are fast walking or The state of jogging, the body has basically adapted at this time, you can
maintain or increase the speed and slope according to your own needs, then officially run for about 20
minutes, and finally set to a slower speed, slow down for 5 minutes as a release Loosen the body and le
t the body gradually adapt to the movement. This takes about 30 minutes at a time.
Usually 30 minutes of exercise has a good exercise effect, for every runner who runs
The time should not exceed 60 minutes. Excessive exercise time may cause excessive fatigue.
◎ During the exercise, the lift setting
(Some models do not have a lift function, this function is for reference only, subject to the actual prod
uct)
If you need to set the lift (slope), set it to “0” when you start running. After 5 minutes of slow walking,
after the body adapts, gradually increase the slope as needed, which can also consume more cal
ories, but larger The slope is not suitable for long running.
◎ Heart rate monitoring during running
Please don't get down from the treadmill immediately after running. The blood of the body is mainly c

Quality Guarantee Commitment
- 23 -
oncentrated in the lower limbs when running. The rhythmic contraction of the muscles can help the bl
ood of the lower limbs to return to the heart. However, if you stop immediately after running, the effec
t of this squeeze suddenly disappears, and the speed of blood returning to the heart slows down, whi
ch may cause insufficient blood supply to the brain. In severe cases, there may be shock symptoms.
The treadmill comes with heart rate monitoring, which allows you to assess your heart rate by measu
ring your heart rate at the end of your run. Hold the heartbeat handle with both hands and display the
heartbeat data for about 5 seconds. The treadmill will automatically calculate the number of real-tim
e heartbeats for your exercise. Generally, the heart rate drops below 120, which is basically enough.
Start up Screen
Quick Start
:
1. Turn on the power switch and properly attach the magnetic safety lock to the safety lock position below th
e panel;
2. Press the "Start" button on the panel to start the system;
3. After startup, the screen displays the main interface;
4. Press the “Start” button on the panel at this time, the treadmill starts to start at the lowest speed and the l
owest slope; press the “incline+ -” or “speed + -” button to change the slope and speed as needed.
Main interface
The main interface is divided into eight functional modules: local audio and video, Internet, program motion, re
al-life motion, speed-shifting motion, user center, and system settings.
Gesture operation
:
Swipe left an
d right
Single finger press and hold and slide left and right on the screen;
This operation can switch between the eight function modules on the main interf
ace.
Slide up and
down
Single finger press and hold, and slide up and down on the screen;
When the interface has a list menu, this action can be swiped up and down to vi
ew the content.
Table of contents
Other 100FIT Treadmill manuals
Popular Treadmill manuals by other brands

NordicTrack
NordicTrack 831.298810 user manual

Kettler
Kettler Atmos Pro instruction manual

Reebok
Reebok Competitor Rt 6.0 Treadmill MANUEL DE L’UTILlSATEUR

Mobility Research
Mobility Research GaitKeeper GK2000T owner's manual

Universal
Universal 915 Threadmill owner's manual

Domyos
Domyos TC290 Operating instruction