3M PN 64384 User manual

RANDOM ORBITAL SANDER
MANUAL
EN : English
ES : Spanish
DE : German
FR : French
IT : Italian
NL : Dutch
SE : Swedish
DK : Danish
NO : Norwegian
PT : Portugese
GR : Greek
RU : Russian
PL : Polish
CZ : Czech
HU : Hungarian
SK : Slovak
EN
ES
DE
FR
IT
NL
SE
DK
NO
PT
GR
RU
PL
CZ
HU
SK
75-078_ROSander.indd 175-078_ROSander.indd 1 12.03.2010 12:45:5512.03.2010 12:45:55

75-078_ROSander.indd 275-078_ROSander.indd 2 12.03.2010 12:45:5612.03.2010 12:45:56

EN
ORIGINAL RANDOM ORBITAL SANDER INSTRUCTION MANUAL
5000 to 10000 RPM 150mm (6”)
Important Safety Information
Intended Use
Explanation of Signal Word Consequences
Summary of device labels containing safety information
WARNING:
CAUTION:
Please read, understand and follow all safety information contained in these instructions prior to the use of this tool. Retain these instructions for future reference.
GENERAL WARNINGS: Before operating the product read also the GENERAL SAFETY INSTRUCTIONS which are supplied on an extra sheet with this tool!
The tool must be connected to a suitable dust extraction system (not supplied).
This electric tool is intended for use in industrial locations, and used only by skilled, trained professionals in accordance with the instructions in this manual.
The tool is designed for sanding wood, plastic, composite materials, paint/varnish, filling material and similar materials. Materials with an asbestos content must
not be processed with these tools. The machine must not be operated in humid environments or in the presence of flammable gas or liquids. This product is not
designed for sanding materials that can generate sparks. Make sure the work piece is suciently secured. In the event of improper use, the user is fully liable
for any damages or accidents.
Read the
Material Safety Data Sheets (MSDS)
before using any materials Exposure to DUST generated from workpiece
and/or abrasive materials can result in lung
damage and/or other physical injury.
Use dust capture or local exhaust as stated
in the MSDS. Wear government-approved
respiratory protection and eye and skin
protection.
Failure to follow this warning can result in
serious lung damage and/or physical injury.
Contact the suppliers of the workpiece
materials and abrasive materials for
copies of the MSDS if one is
not readily available.
Indicates a potentially hazardous situation, which, if not avoided, could result in death or serious injury
and/or property damage.
Indicates a potentially hazardous situation, which, if not avoided, may result in minor or moderate
injury and/or property damage.
WARNING
13M Instruction Manual
WARNING: “For safe operation see instruction manual”
Symbol indicates direction of tool rotation
Symbol indicates “Class II” construction
Please recycle. Do not dispose in household waste
75-078_ROSander.indd 375-078_ROSander.indd 3 12.03.2010 12:45:5612.03.2010 12:45:56

WARNING
CAUTION
The safety and accident prevention instructions are reported in the “GENERAL SAFETY INSTRUCTION” booklet which forms an integral part of these
documents; the operating instructions indicate the additional information required specifically for use of the tool.
To reduce the risk associated with impact from abrasive paper disc, breakup, sharp edges and rupture:
- The electric tool must be connected to a suitable dust extraction unit (not supplied): Use regulation safety devices for personal protection and
observe safety norms valid for the processed work material.
- Refer to the appropriate MSDS before use
- Do not operate tool in water or in an excessively damp application
- Never operate this tool without all safety features in place and in proper working order.
- Any operations carried out on the tool must be eected with the power supply disconnected.
- Before starting the tool, ensure that it is held tightly and in contact with the work surface.
- Wear clothing suited to the work you are about to perform.
- Due to risks that may arise during sanding, we recommend the use of appropriate P.P.E. (personal protective equipment) including hand, hearing, eye
and respiratory protection according to laws in force to prevent or reduce accident probability.
- Be aware that the appliance continues to work for a few seconds after it has been switched o.
To reduce the risks associated with vibration:
- If any physical hand/wrist discomfort is experienced, work should be stopped promptly. Hand, wrist and arm injury may result from repetitive work,
motion and over exposure to vibration. If this is suspected then seek medical attention.
To reduce the risks associated with loud noise:
- Always wear hearing protection while operating this tool. Follow your employer’s safety policy or local/national standards for personal protective
equipment requirements.
To reduce the risks associated with skin abrasion, burns, cuts, or entrapment:
- Use care in attaching the abrasive paper disc; following instructions to ensure that it is securely attached to the tool before use.
- Never over-tighten accessory fasteners.
- To reduce the risk of skin abrasion, do not touch the moving parts during operation for any reason
- Do not use paper disc pads that have a Max RPM less than the tool Max RPM rating
- Only accessories specifically recommended by 3M should be used with this tool. Use in any other manner or with other accessories could lead to unsafe
operating conditions.
- At the end of its useful life, the product, pursuant to European Directive 2002/96/CE (RAEE) + 2003/108/CE and its implementation in national law,
must not be released into the environment or thrown away as domestic waste, it must be disposed of at an authorised recycling centre (contact the
relevant local authorities for a list of places where the product may be disposed of according to the law). Disposing of the product correctly contributes
to protecting human health and safeguarding the environment. Any illegal disposal of the product will be punishable by law.
23M Instruction Manual
TECHNICAL DATA
TYPE PN 64384 & PN 64385 PN 64380 & PN 64381 PN 64386 PN 64382
PROTECTION CLASS II II II II
OPERATING VOLTAGE 230 V ~ 50 Hz 230 V ~ 50 Hz 110 V ~ 50 Hz 110 V ~ 50 Hz
ABSORBED CURRENT 2 A 2 A 4 A 4 A
ABSORBED POWER 450 W 450 W 450 W 450 W
ELECTRONIC SPEED
CONTROL
YES YES YES YES
ROTATION SPEED 5000 to 10000 RPM 5000 to 10000 RPM 5000 to 10000 RPM 5000 to 10000 RPM
ORBITAL DIAMETER 3mm 5mm 3mm 5mm
PAD DIAMETER 150 mm 150 mm 150 mm 150 mm
PAD TYPE Hookit™ pad Hookit™ pad Hookit™ pad Hookit™ pad
EXTRACTION SYSTEM INTEGRAL INTEGRAL INTEGRAL INTEGRAL
WEIGHT 2,1 Kg 2,1 Kg 2,1 Kg 2,1 Kg
75-078_ROSander.indd 475-078_ROSander.indd 4 12.03.2010 12:45:5612.03.2010 12:45:56

Before starting-up the tool, ensure that:
- the packaging is complete and does not show signs of having been damaged during storage or transport;
- the tool is complete; check that the number and type of components comply with that reported in this instruction booklet;
- the power supply and socket outlet can support the load reported in the table and that indicated on the tool identification plate reproduced and
explained on page 5.
Fit the dust bag (9) if required.
MOUNTING THE BACK-UP PAD
1. Place the back-up pad (5) with the screw in the centre (6) (fig. 1);
2. Slightly turn the back-up pad (5) until it is fixed to the screw as in (fig 2);
3. Tighten the screw using the supplied allen key (7) (fig. 3). Do not tighten the back-up pad screw if it is in the wrong position (fig. 4);
4. To remove, follow the same procedure in reverse order.
FITTING ABRASIVE PAPER DISCS
Press the abrasive paper disc onto the pad ensuring that the holes in the paper coincide with extraction holes in the pad.
Ensure that:
- the power supply conforms with the characteristics of the tool;
- the power supply cable and plug are in perfect condition;
- the ON/OFF switch works properly, test with the power supply disconnected;
- all the parts of the tool have been assembled in the proper manner and that there are no signs of damage;
- the ventilation slots are not obstructed (8);
- the tool must be connected to a suitable and ecient dust extraction system (4);
- the dust bag (9) is empty and not damaged.
- Starting: push the slide switch (2) forward; if the tool is to be locked in the ON position, apply pressure to the front part of the slide switch at the same time.
- Stopping: release the slide or, if locked in position, apply pressure to the back part of the switch and allow it to return to the stop position.
EN
3M Instruction Manual 3
PARTS OF THE TOOL
INITIAL TOOL RECEIPT CHECKS
ASSEMBLING THE TOOL
BEFORE STARTING THE TOOL
STARTING AND STOPPING
1 - Identification plate
2 - ON/OFF switch
3 - Speed control
4 - 29 mm Ø suction port
5 - Hookit™ pad
6 - Disc pad fixing screws
7 - Back-up pad Allen key
8 - Motor ventilation slots
9 - Filter bag and adaptor
75-078_ROSander.indd 575-078_ROSander.indd 5 12.03.2010 12:45:5612.03.2010 12:45:56

OPERATING
MAINTENANCE
SAFETY AND ELECTROMAGNETIC COMPATIBILITY
NOISE AND VIBRATION
43M Instruction Manual
- All maintenance operations are carried out with the power supply disconnected.
- Empty the dust collections bag (9) frequently.
- At the end of each work session, or when required, remove any dust from the body of the tool using a vacuum system, paying particular attention to the
motor ventilation slots.
- To replace the power cord refer to the data sheet enclosed with this manual.
No other maintenance operations must be undertaken by the user.
Maintenance and cleaning of the inner parts, like brushes, ball bearings, gears etc. or others, must be carried out only by an authorised customer-service workshop.
ELECTRIC SAFETY - LOW VOLTAGE
The tests have been carried out in accordance with the standard:
EN 60745-1 Safety of hand-held electric motor operated tools
EN 60745-2-4 Particular requirements for sanders.
RADIO SUPPRESSION
The tools are suppressed in accordance for the prevention and elimination of radio disturbances measured in accordance with standard:
EN55014-1+EN55014-2; EN61000-3-2+EN61000-3-3.
TEST RUN
Start the tool with the abrasive in contact with a suitable work piece and check there is no unusual vibration.
Warning: If there is a problem switch-o the tool immediately and eliminate the cause.
SPEED REGULATION
The speed can be adjusted by rotating the wheel (3) located on the top of the tool. The choice of speed depends on the characteristics of the abrasive paper
disc and the material to be worked.
REPLACING THE ABRASIVE PAPER DISCS
- Used discs can be removed by simply tearing them o;
- New Hookit™ discs are mounted by simply pressing them onto the pad, making sure that the holes cut in the paper disc coincide with those in the pad.
USABLE DISCS
Ø 150 mm Hookit™ abrasive paper discs with dust extraction holes.
NOISE LEVEL
The noise level was measured according to regulation EN ISO 3744+ UNI EN ISO 11203.
Idle Surface Sound Pressure Level LpA = 72,8 dB (A) KpA = 3 dB (A)
Sound Power Level LwA= 83,8 dB (A) KwA = 3 dB (A)
With load Surface Sound Pressure Level LpA = 78,3 dB (A) KpA = 3 dB (A)
Sound Power Level LwA= 89,3 dB (A) KwA = 3 dB (A)
Notice: The values of the uncertainty Kpa, KpC, peak and KWA are obtained from the corresponding basic standards ISO 11203 and ISO 3744.
Warning:Wear suitable hearing protection! (see warnings).
MEAN ACCELERATION VALUE
The mean quadratic acceleration value is less than 2,5 m/sec2measured in accordance with standard UNI EN 28662 + UNI EN ISO 5349.
Motor A =2,65 m/sec20,05 K=1,5 m/sec2
Handle A=2,95 m/sec20,05 K=1,5 m/sec2
75-078_ROSander.indd 675-078_ROSander.indd 6 12.03.2010 12:45:5612.03.2010 12:45:56

WARRANTY AND LIMITED REMEDY
EN
3M Instruction Manual 5
Unless stated otherwise in 3M’s product literature, packaging inserts or product packaging for individual products, 3M warrants that each 3M product meets the
applicable specifications at the time 3M ships the product. Individual products may have additional or dierent warranties as stated on product literature, package
inserts or product packages. 3M MAKES NO OTHER WARRANTIES, EXPRESS OR IMPLIED, INCLUDING, BUT NOT LIMITED TO, ANY IMPLIED WARRANTY OF
MERCHANTABILITY OR FITNESS FOR A PARTICULAR PURPOSE OR ANY IMPLIED WARRANTY ARISING OUT OF A COURSE OF DEALING, CUSTOM OR USAGE
OF TRADE. User is responsible for determining whether the 3M product is fit for a particular purpose and suitable for user’s application. If the 3M product is
defective within the warranty period, your exclusive remedy and 3M’s and seller’s sole obligation will be, at 3M’s option, to repair or replace the product or
refund the purchase price.
LIMITATION OF LIABILITY
Except where prohibited by law, 3M and seller will not be liable for any loss or damage arising from the 3M product, whether direct, indirect, special, incidental
or consequential, regardless of the legal theory asserted, including warranty, contract, negligence or strict liability.
SUBMITTING A WARRANTY CLAIM
Contact your dealer when submitting a warranty claim in accordance with the restrictions listed above. Please note that all warranty claims are subject to
manufacturer’s approval. Be sure to keep your sales receipt and Product Inspection Certificate in a safe place. These must be submitted when filing a
warranty claim.
PRODUCT REPAIR AFTER WARRANTY HAS EXPIRED
3M has established local corporations with authorised repair and service centres. Please contact your distributor who will be able to arrange repair and servicing to
oer you the best service.
TOOL IDENTIFICATION PLATE
POSITION AND MEANING OF INFORMATION
1. Type of tool.
2. Nominal working voltage in Volts (V).
3. Working frequency in Hertz (Hz).
4. Absorbed current in Amperes (A). Ensure that the power supply to which
the tool is connected can easily tolerate the indicated current as a minimum.
5. Absorbed power expressed in Watts (W).
6. Tool code or serial number.
7. Technical data of the tool.
8. Maximum rpm
9. The double square indicates that the tool is doubly insulated and therefore
does not require earthing through the power supply cable.
10. Read all these instructions before operating this product and save these instructions.
11. Personal Protective Equipment.
12. Please recycle. Do not dispose in household waste (see also under Cautions)
75-078_ROSander.indd 775-078_ROSander.indd 7 12.03.2010 12:45:5612.03.2010 12:45:56

EC DECLARATION OF CONFORMITY
63M Instruction Manual
75-078_ROSander.indd 875-078_ROSander.indd 8 12.03.2010 12:45:5612.03.2010 12:45:56

ES
3M - Manual de instrucciones 1
MANUAL DE INSTRUCCIONES DE LIJADORA ROTO-ORBITAL
5000 - 10000 RPM 150 mm (6”)
Información importante de seguridad
Uso previsto
Lea, comprenda y siga toda la información de seguridad contenida en estas instrucciones antes de utilizar esta herramienta.
Conserve las instrucciones como referencia futura.
ADVERTENCIAS GENERALES: Antes de utilizar el producto, lea también las INSTRUCCIONES GENERALES DE SEGURIDAD, que se suministran con
esta herramienta en una hoja suplementaria. La herramienta debe conectarse a un sistema adecuado de extracción de polvo (no suministrado).
Esta herramienta eléctrica ha sido diseñada para el uso en establecimientos industriales y sólo debe ser utilizada por profesionales cualificados y formados, de
acuerdo con las instrucciones de este manual. La herramienta permite lijar madera, plástico, materiales compuestos, pintura, barniz, materiales de relleno y simi-
lares. Los materiales con contenido de amianto no deben utilizarse con estas herramientas. La máquina no debe ser utilizada en entornos húmedos ni en presencia
de gases o líquidos inflamables. Este producto no ha sido diseñado para lijar materiales que puedan generar chispas. Compruebe que la pieza de trabajo esté bien
sujetada. En caso de un uso inadecuado, el usuario es totalmente responsable de cualquier daño o accidente.
Explicación de las consecuencias de las leyendas impresas
Resumen de las etiquetas que contienen la información de seguridad
ADVERTENCIA:
ATENCIÓN:
Indica una situación potencialmente peligrosa que, si no se evita, puede provocar la muerte,
lesiones graves y/o daños materiales.
Indica una situación potencialmente peligrosa que, si no se evita, puede provocar lesiones
menores o moderadas y/o daños materiales.
Antes de usar cualquier material,
lea las “Hojas de datos de seguri-
dad de los materiales” (MSDS) La exposición al POLVO originado por la
pieza de trabajo y/o los materiales abrasivos
puede afectar los pulmones o producir otras
lesiones físicas.
Utilice un sistema adecuado de ventilación
local o extracción de polvo según las indi-
caciones de las MSDS. Use los elementos de
protección aprobados para proteger las vías
respiratorias, los ojos y la piel.
Si no se respeta esta advertencia, pueden
producirse graves daños pulmonares y/o
lesiones físicas.
Si no tiene copias disponibles de las
MSDS y necesita obtenerlas, póngase
en contacto con los proveedores de los
materiales de la pieza de trabajo y los
materiales abrasivos.
ADVERTENCIA
ADVERTENCIA: “Para un manejo seguro, consulte el manual de instrucciones”
Este símbolo indica el sentido de rotación de la herramienta
Este símbolo indica que se trata de una construcción de “Clase II”
Por favor, recicle. Este producto no se debe eliminar con los residuos domésticos.
75-078_ROSander.indd 975-078_ROSander.indd 9 12.03.2010 12:45:5712.03.2010 12:45:57

23M - Manual de instrucciones
ADVERTENCIA
ATENCIÓN
Las instrucciones de seguridad y prevención de accidentes aparecen indicadas en el folleto “INSTRUCCIONES GENERALES DE SEGURIDAD”, que forma
parte de estos documentos; las instrucciones de operación contienen la información adicional, requerida específicamente para el uso de la herramienta.
Para reducir los riesgos relacionados con el impacto del disco de papel abrasivo, la rotura de la herramienta, los bordes agudos o la fractura:
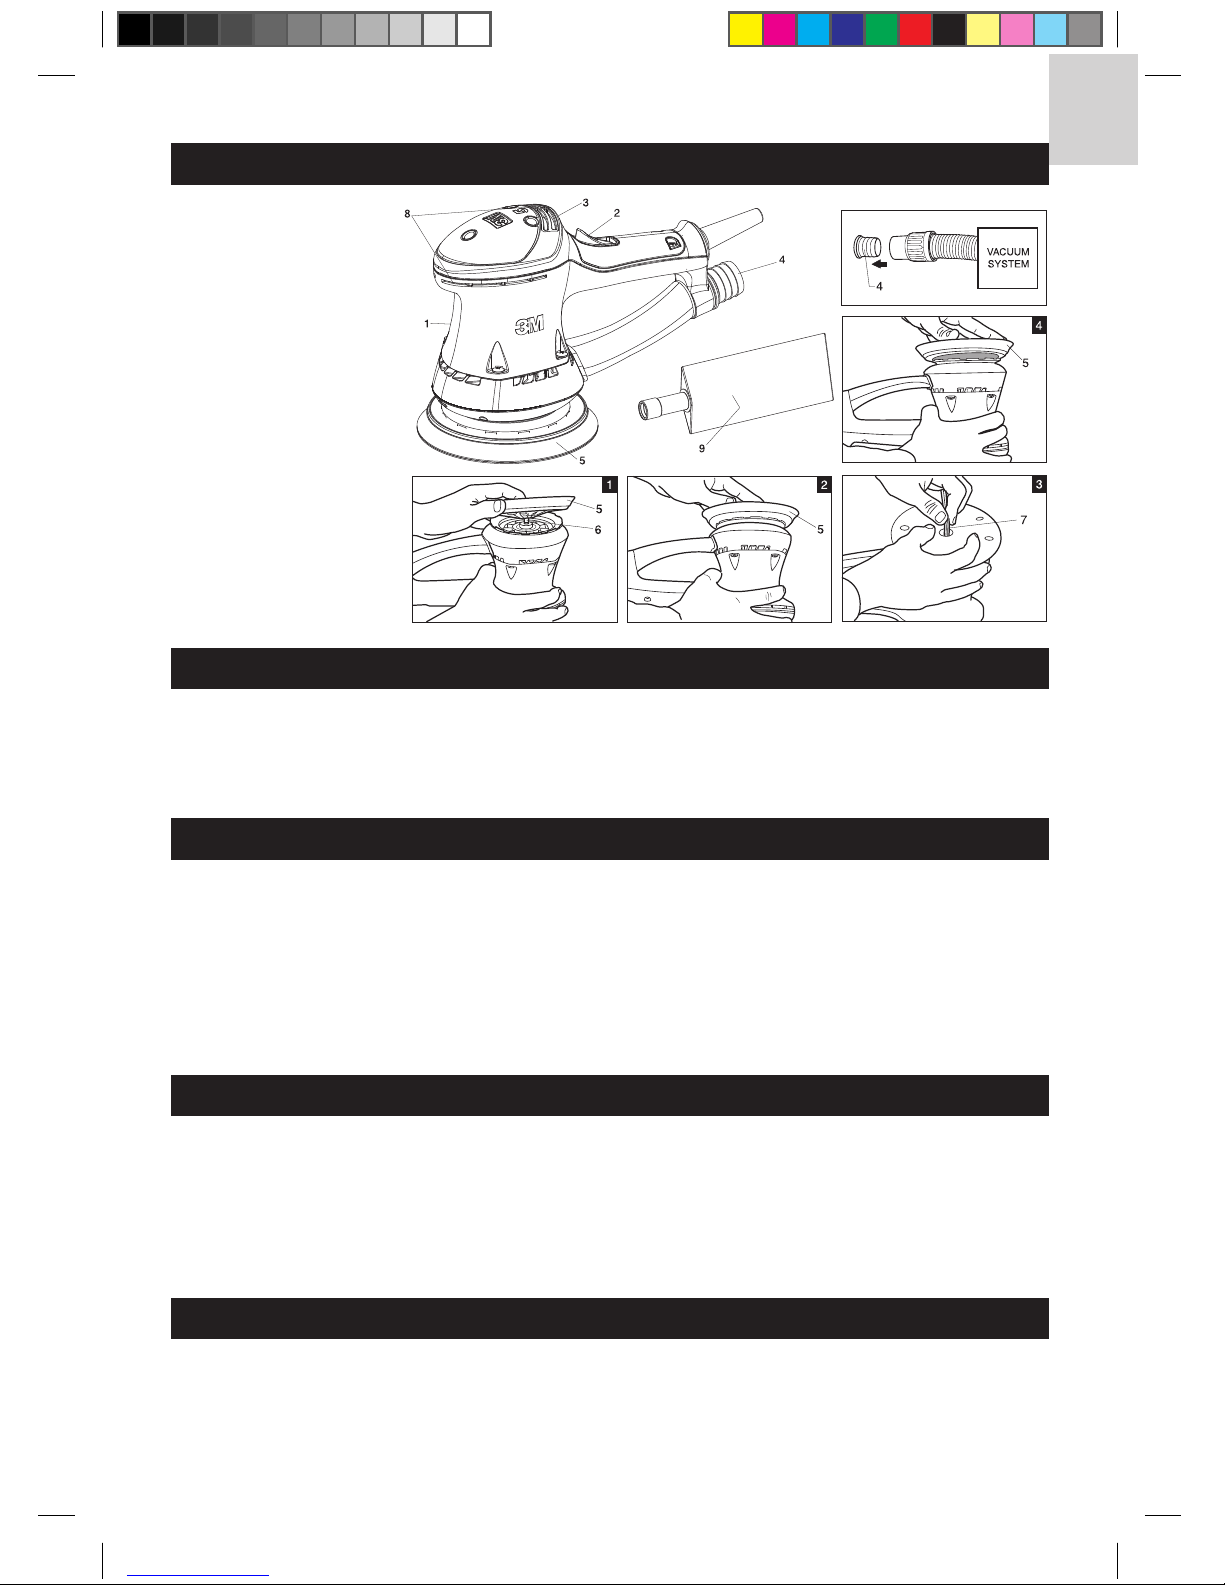
- La herramienta eléctrica debe conectarse a una unidad adecuada de extracción de polvo (no suministrada): Utilice dispositivos adecuados de protección
personal y cumpla las normas de seguridad aplicables al material de trabajo procesado.
- Antes del uso, consulte las “Hojas de datos de seguridad de los materiales” (MSDS).
- No haga funcionar la herramienta en el agua o en aplicaciones extremadamente húmedas.
- La herramienta debe ser utilizada con todos los dispositivos de seguridad colocados y en buen estado.
- Antes de llevar a cabo cualquier operación en la herramienta, desconéctela de la red eléctrica.
- Antes de poner en marcha la herramienta, compruebe que esté bien sujeta y que esté en contacto con la superficie de trabajo.
- Utilice ropa adecuada para el trabajo que debe realizar.
- Debido a los riesgos que pueden producirse durante el lijado, se recomienda usar un equipo de protección personal (EPP) adecuado de acuerdo con las
normas legales vigentes, proporcionando protección para manos, oídos, ojos y vías respiratorias a fin de prevenir o reducir la probabilidad de accidentes.
- Tenga en cuenta que el dispositivo continuara funcionando durante algunos segundos después de ser apagado..
Para reducir los riesgos relacionados con la vibración:
- Si experimenta algún malestar físico en la mano o la muñeca, suspenda inmediatamente el trabajo. Pueden producirse lesiones en la mano, la muñeca
y el brazo a causa de trabajos y movimientos repetitivos y de la exposición excesiva a la vibración. En caso de duda, consulte a un médico.
Para reducir los riesgos relacionados con ruidos fuertes:
- Al utilizar esta herramienta, use siempre accesorios protectores para los oídos. Siga la política de seguridad de su empresa o las normas
locales/nacionales en materia de equipos de protección personal.
Para reducir los riesgos relacionados con abrasión de la piel, quemaduras, cortes o atrapamientos:
- Proceda con cuidado al colocar el disco de papel abrasivo; antes del uso, siga las instrucciones para comprobar que esté bien sujeto a la herramienta.
- Los elementos de fijación de accesorios nunca deben ajustarse excesivamente.
- Para reducir el riesgo de abrasión de la piel, no toque las partes móviles durante la operación bajo ninguna circunstancia.
- No utilice almohadillas para discos de papel cuyas RPM máximas son inferiores al rango correspondiente de la herramienta.
- Con esta herramienta, sólo deben utilizarse los accesorios recomendados específicamente por 3M. Si se realiza un uso diferente al previsto o con
otros accesorios, pueden generarse condiciones de funcionamiento inseguras.
- Al final de su vida útil, de acuerdo con la Directiva Europea 2002/96/CE (RAEE) + 2003/108/CE y las respectivas leyes nacionales, el producto no
debe arrojarse al medio ambiente ni desecharse como residuo doméstico. Debe eliminarse en un centro de reciclaje autorizado (para obtener una lista de
los lugares donde el producto puede ser eliminado de forma adecuada, póngase en contacto con las autoridades locales pertinentes). La eliminación cor-
recta del producto contribuye a proteger la salud y el medio ambiente. La eliminación inadecuada del producto constituye un acto legalmente punible.
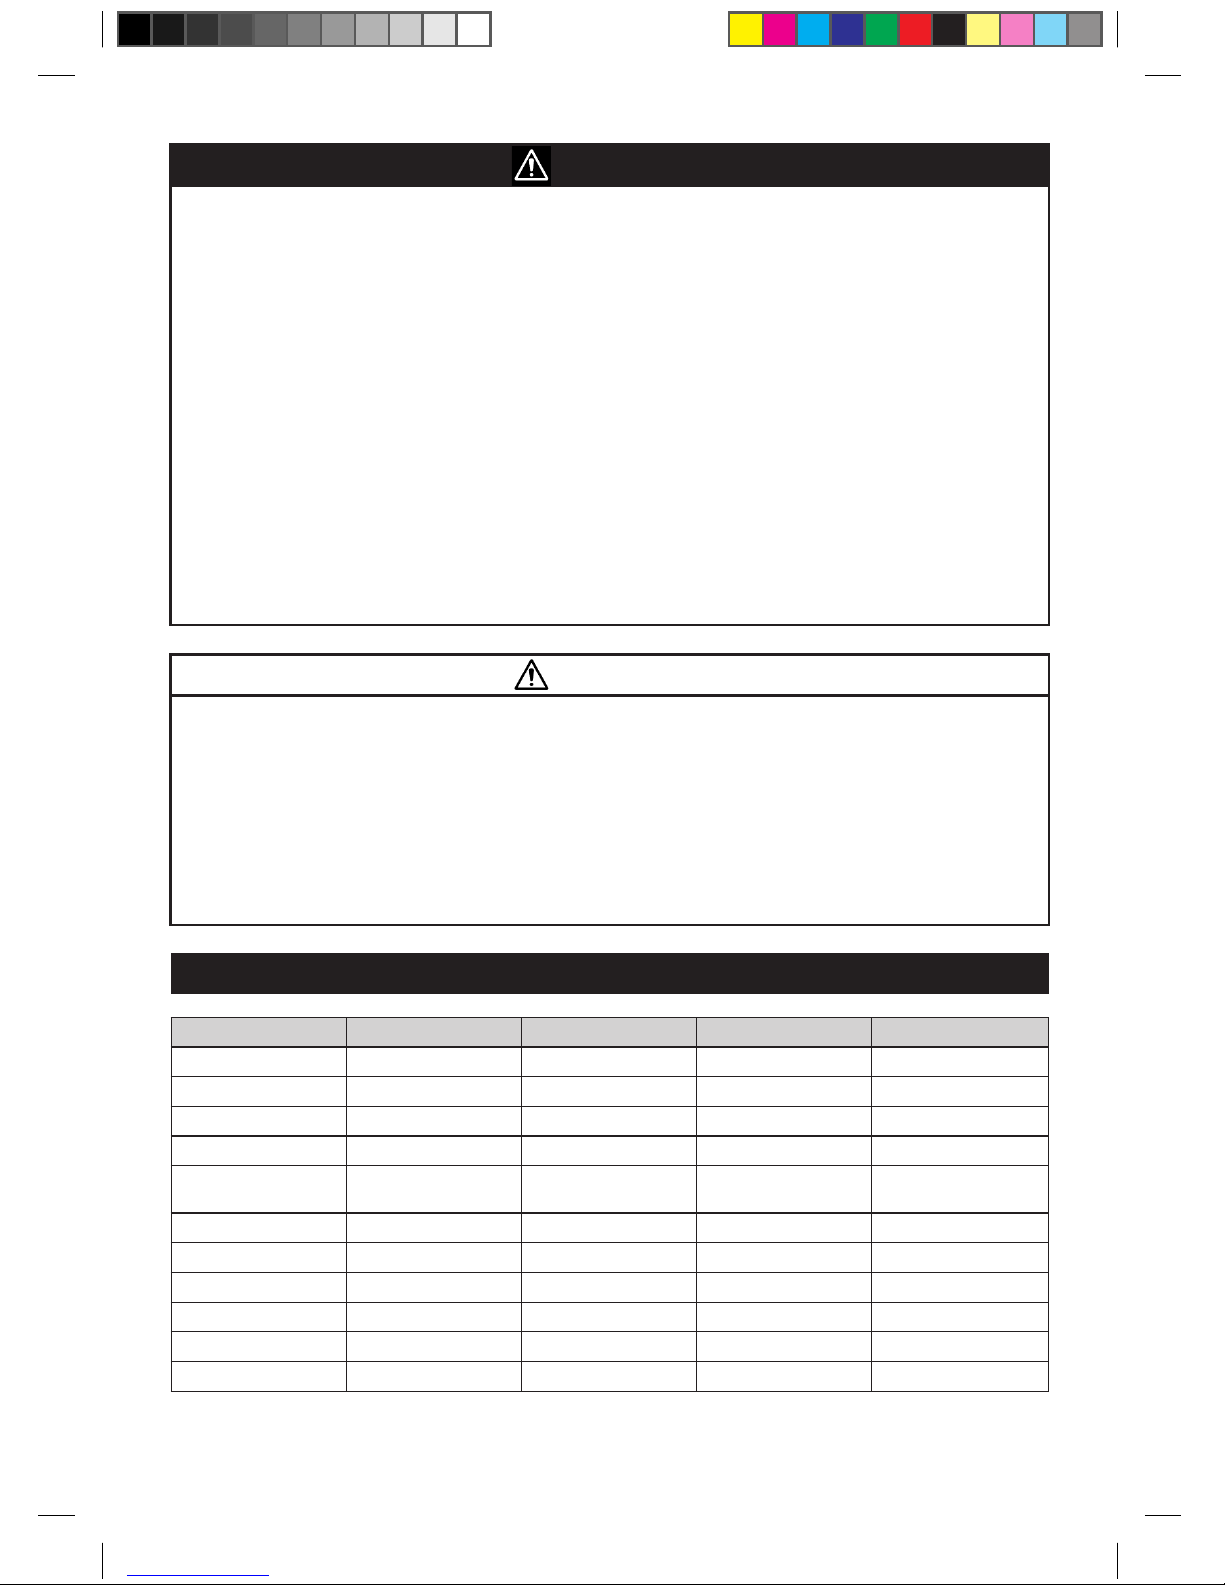
DATOS TÉCNICOS
MODELO PN 64384 y PN 64385 PN 64380 y PN 64381 PN 64386 PN 64382
CLASE DE PROTECCIÓN II II II II
TENSIÓN DE FUNC. 230 V ~ 50 Hz 230 V ~ 50 Hz 110 V ~ 50 Hz 110 V ~ 50 Hz
CORRIENTE ABSORBIDA 2 A 2 A 4 A 4 A
POTENCIA ABSORBIDA 450 W 450 W 450 W 450 W
CONTROL ELECTRÓNICO DE
VELOCIDAD
SÍ SÍ SÍ SÍ
VELOCIDAD DE ROTACIÓN 5000 - 10000 RPM 5000 - 10000 RPM 5000 - 10000 RPM 5000 - 10000 RPM
DIÁM. ORBITAL 3 mm 5 mm 3 mm 5 mm
DIÁM. DE ALMOHADILLA 150 mm 150 mm 150 mm 150 mm
TIPO DE ALMOHADILLA Almohadilla Hookit™ Almohadilla Hookit™ Almohadilla Hookit™ Almohadilla Hookit™
SISTEMA DE EXTRACCIÓN INTEGRAL INTEGRAL INTEGRAL INTEGRAL
PESO 2,1 Kg 2,1 Kg 2,1 Kg 2,1 Kg
75-078_ROSander.indd 1075-078_ROSander.indd 10 12.03.2010 12:45:5712.03.2010 12:45:57

3M - Manual de instrucciones 3
Antes de poner en marcha la herramienta, asegúrese de que:
- el embalaje esté completo y no muestre signos de daños producidos durante el transporte o el almacenamiento.
- la herramienta esté completa; compruebe que la cantidad y el tipo de componentes coincidan con los datos indicados en el folleto de instrucciones.
- el suministro eléctrico y la toma de corriente puedan soportar la carga indicada en la tabla y en la placa de identificación de la herramienta, con los
datos reproducidos y explicados en la página 5.
Coloque la bolsa para el polvo (9) en caso necesario.
MONTAJE DE LA ALMOHADILLA DE RESPALDO
1. Coloque la almohadilla de respaldo (5) con el tornillo en el centro (6) (Fig. 1).
2. Gire ligeramente la almohadilla de respaldo (5) hasta que quede fija en el tornillo (Fig. 2).
3. Apriete el tornillo con la llave Allen suministrada (7) (Fig. 3). No apriete el tornillo de la almohadilla de respaldo si la posición es incorrecta (Fig. 4).
4. Para retirar el elemento, siga el mismo procedimiento en orden inverso.
COLOCACIÓN DE DISCOS DE PAPEL ABRASIVO
Coloque el disco de papel abrasivo firmemente sobre la almohadilla, verificando que los orificios del papel coincidan con los orificios de
extracción situados en la almohadilla.
Asegúrese de que:
- el suministro eléctrico se ajuste a las características de la herramienta.
- el cable y la conexión de alimentación estén en perfectas condiciones.
- el interruptor de encendido/apagado funcione correctamente (prueba con la herramienta desconectada).
- todas las partes de la herramienta hayan sido montadas de manera adecuada y no haya signos de daños.
- las ranuras de ventilación no estén obstruidas (8).
- la herramienta esté conectada a un sistema adecuado y eficaz de extracción de polvo (4).
- la bolsa para el polvo (9) esté vacía y no presente daños.
- Puesta en marcha: Mueva el interruptor deslizable (2) hacia delante; si la herramienta debe bloquearse en la posición de encendido, presione al
mismo tiempo sobre la parte frontal del interruptor.
- Detención: Suelte el interruptor deslizable o, si está bloqueado en su posición, presione sobre la parte trasera del interruptor para que vuelva a la
posición de detención.
PARTES DE LA HERRAMIENTA
CONTROLES INICIALES AL RECIBIR LA HERRAMIENTA
MONTAJE DE LA HERRAMIENTA
ANTES DE PONER EN MARCHA LA HERRAMIENTA
PUESTA EN MARCHA Y DETENCIÓN
1 - Placa de identificación
2 - Interruptor de
encendido/apagado
3 - Control de velocidad
4 -
Toma de aspiración, 29 mm de Ø
5 - Almohadilla Hookit™
6 - Tornillos de fijación de
almohadilla de disco
7 - Llave Allen para almohadilla
de respaldo
8 -
Ranuras de ventilación del motor
9 - Bolsa de filtro y adaptador
ES
75-078_ROSander.indd 1175-078_ROSander.indd 11 12.03.2010 12:45:5712.03.2010 12:45:57

FUNCIONAMIENTO
MANTENIMIENTO
SEGURIDAD Y COMPATIBILIDAD ELECTROMAGNÉTICA
RUIDO Y VIBRACIÓN
Todas las operaciones de mantenimiento deben realizarse con la herramienta desconectada.
Vacíe con frecuencia la bolsa colectora de polvo (9).
Al final de cada sesión de trabajo o cuando sea necesario, elimine el polvo del cuerpo de la herramienta con
un sistema de aspiración, prestando especial atención a las ranuras de ventilación del motor.
Para reemplazar el cable de alimentación, consulte la hoja de datos suministrada con este manual.
Ninguna otra operación de mantenimiento debe ser realizada por el usuario.
El mantenimiento y la limpieza de las partes internas (cepillos, rodamientos de bolas, engranajes, etc.) deben ser llevados a cabo por
un servicio autorizado de atención al cliente.
SEGURIDAD ELÉCTRICA, BAJA TENSIÓN
Las pruebas han sido realizadas de acuerdo con las normas:
EN 60745-1 Herramientas manuales eléctricas accionadas por motor eléctrico - Seguridad
EN 60745-2-4 Requisitos particulares para lijadoras
SUPRESIÓN DE RADIOINTERFERENCIAS
Las herramientas se ajustan al sistema de supresión para la prevención y eliminación de radiointerferencias,
medidas de acuerdo con las normas: EN 55014-1 + EN 55014-2; EN 61000-3-2 + EN 61000-3-3.
PRUEBA DE FUNCIONAMIENTO
Ponga en marcha la herramienta y verifique que no haya vibraciones anormales ni contacto con el disco de papel abrasivo.
Advertencia: Si hay algún problema, apague la herramienta inmediatamente y elimine la causa.
REGULACIÓN DE VELOCIDAD
La velocidad puede ajustarse mediante el giro de la rueda (3) situada en la parte superior de la herramienta. La selección de la velocidad depende de las
características que exhiben el disco de papel abrasivo y el material a trabajar.
REEMPLAZO DE DISCOS DE PAPEL ABRASIVO
- Para retirar los discos usados, sólo hay que arrancarlos.
- Para montar los discos Hookit™ nuevos, sólo hay que colocarlos firmemente sobre la almohadilla, verificando que los orificios del disco de
papel coincidan con los de la almohadilla.
DISCOS UTILIZABLES
Discos de papel abrasivo Hookit™ de 150 mm de Ø con orificios de extracción de polvo.
43M - Manual de instrucciones
NIVEL DE RUIDO
El nivel de ruido producido fue medido de acuerdo con las normas EN ISO 3744 + UNE-EN ISO 11203.
En vacío Nivel de presión acústica de superficie LpA = 72,8 dB (A) KpA = 3 dB (A)
Nivel de potencia acústica LwA = 83,8 dB (A) KwA = 3 dB (A)
Con carga Nivel de presión acústica de superficie LpA = 78,3 dB (A) KpA = 3 dB (A)
Nivel de potencia acústica LwA = 89,3 dB (A) KwA = 3 dB (A)
Aviso: Los valores de las variables Kpa, KpC, pico y KWA se obtienen a partir de las normas ISO 11203 e ISO 3744.
Advertencia: Use una protección adecuada para los oídos (ver advertencias).
VALOR DE ACELERACIÓN MEDIA
El valor de aceleración cuadrática media es inferior a 2,5 m/seg2, medido de acuerdo con las normas UNE-EN 28662 + UNE-EN ISO 5349.
Motor A = 2,65 m/sec20,05 K = 1,5 m/sec2
Empuñadura A = 2,95 m/sec20,05 K = 1,5 m/sec2
75-078_ROSander.indd 1275-078_ROSander.indd 12 12.03.2010 12:45:5712.03.2010 12:45:57

GARANTÍA Y RESPONSABILIDAD LIMITADA
A menos que se afirme lo contrario en los documentos referentes al producto, las indicaciones incluidas en el embalaje o el propio embalaje de los productos
individuales, 3M garantiza que cada producto 3M cumple las especificaciones vigentes en el momento del envío. Los productos individuales pueden tener
garantías adicionales o diferentes a las mencionadas en los documentos referentes al producto, las indicaciones incluidas en el embalaje o el propio embalaje.
3M NO OTORGA OTRAS GARANTÍAS EXPRESAS NI IMPLÍCITAS, INCLUIDAS PERO NO LIMITADAS A LAS GARANTÍAS IMPLÍCITAS DE COMERCIALIZACIÓN
O APTITUD PARA UN PROPÓSITO PARTICULAR O A LAS GARANTÍAS IMPLÍCITAS DERIVADAS DE UN PROCESO DE NEGOCIO, UNA COSTUMBRE O UNA
PRÁCTICA COMERCIAL. El usuario es responsable de determinar si el producto 3M se ajusta a un propósito particular y es adecuado para la aplicación del
usuario. Si el producto 3M presenta un defecto dentro del período de garantía, la solución exclusiva y la única obligación de 3M y del vendedor será, a criterio
de 3M, reparar o reemplazar el producto o devolver el valor del precio de compra.
LIMITACIÓN DE RESPONSABILIDAD
Excepto cuando lo prohíbe la ley, 3M y el vendedor no serán responsables de ninguna pérdida o daño derivado del producto 3M, ya sea de tipo directo, indirecto,
especial, incidental o consecuente, independientemente de la teoría legal esgrimida, incluyendo contrato, negligencia, garantía o responsabilidad estricta.
PRESENTACIÓN DE RECLAMACIÓN DE GARANTÍA
Para presentar una reclamación de garantía de acuerdo con las restricciones mencionadas, póngase en contacto con su distribuidor. Tenga en cuenta que
todas las reclamaciones de garantía están sujetas a la aprobación del fabricante. Asegúrese de conservar su comprobante de compra y el certificado de
control del producto en un lugar seguro. Estos documentos deben ser enviados junto con la reclamación de garantía.
REPARACIÓN DEL PRODUCTO DESPUÉS DEL VENCIMIENTO DE LA GARANTÍA
3M ha establecido agentes locales con centros autorizados de reparación y servicio. Póngase en contacto con su distribuidor, que podrá ofrecerle la
mejor opción de servicio y reparación.
PLACA DE IDENTIFICACIÓN DE LA HERRAMIENTA
POSICIÓN Y SIGNIFICADO DE LA INFORMACIÓN
1. Tipo de herramienta.
2. Tensión nominal de funcionamiento en V.
3. Frecuencia de funcionamiento en Hz.
4. Corriente absorbida en A. Asegúrese de que el sistema de suministro eléctrico
al que está conectada la herramienta pueda soportar fácilmente la corriente
indicada como un mínimo.
5. Potencia absorbida, expresada en W.
6. Número de serie o código de la herramienta.
7. Datos técnicos de la herramienta.
8. RPM máximas.
9. El símbolo de doble cuadrado indica que la herramienta tiene doble aislamiento
y, por lo tanto, no requiere una puesta a tierra a través del cable de alimentación.
10. Lea todas las instrucciones antes de utilizar el producto. Conserve las instrucciones.
11. Equipo de protección personal.
12. Por favor, recicle. Este producto no se debe eliminar con los residuos domésticos (ver advertencias)
3M - Manual de instrucciones 5
ES
75-078_ROSander.indd 1375-078_ROSander.indd 13 12.03.2010 12:45:5812.03.2010 12:45:58

EC DECLARATION OF CONFORMITY
63M - Manual de instrucciones
75-078_ROSander.indd 1475-078_ROSander.indd 14 12.03.2010 12:45:5812.03.2010 12:45:58

13M Bedienungsanleitung
BEDIENUNGSANLEITUNG EXZENTERSCHLEIFER
5000 bis 10000 U/min 150mm (6”)
Wichtige Sicherheitsinformationen
Verwendungszweck
Erklärung der Signalwörter
Zusammenfassung der auf dem Gerät angebrachten Etiketten mit Sicherheitsinformationen
WARNUNG:
VORSICHT:
Bitte lesen, verstehen und befolgen Sie alle Sicherheitsanweisungen in diesem Handbuch, bevor Sie das Gerät einsetzen.
Bitte bewahren Sie diese Anweisungen für den Fall, dass Sie sie später noch einmal lesen möchten.
ALLGEMEINE WARNUNGEN: Bitte lesen Sie vor der Verwendung des Geräts auch die dem Gerät auf einem eigenen Blatt beigelegten
ALLGEMEINEN SICHERHEITSANWEISUNGEN! Das Werkzeug muss an ein adäquates Staubsaugsystem (nicht mitgeliefert) angeschlossen werden.
Dieses Elektrowerkzeug wurde für die Verwendung in der Industrie und ausschließlich für den Einsatz durch geschulte Fachleute gemäß den Anweisungen dieses Hand-
buches entwickelt. Dieses Elektrowerkzeug wurde für das Schleifen von Holz, Plastik,Verbundmaterialien, Farbe/Lack, Füllmaterial und ähnlichen Materialien entwickelt.
Asbest-haltige Materialien dürfen nicht mit vorliegendem Werkzeug behandelt werden. Das Gerät darf nicht in trockener Umgebung oder in der Nähe von entzündbaren
Gasen oder Flüssigkeiten verwendet werden. Das Produkt wurde nicht für das Schleifen von Materialien, die Funken erzeugen können, entwickelt. Es ist stets zu
gewährleisten, dass das Werkstück ausreichend gesichert ist. Bei nicht ordnungsgemäßer Verwendung haftet der Benutzer vollständig für etwaige Schäden oder Unfälle.
Deutet auf eine potentielle Gefahrensituation hin, die bei Missachtung zum Tod oder zu schwerwiegen-
den Verletzungen und/oder Sachschäden führen kann.
Deutet auf eine potentielle Gefahrensituation hin, die bei Missachtung zu kleineren bis mittelschweren
Verletzungen und/oder Sachschäden führen kann.
Lesen Sie die Sicherheitsdaten-
blätter (MSDS), bevor Sie irgend-
welche Materialien verwenden. Einatmen von STAUB von Werkstücken
und/oder Schleifmitteln können zu Lungen-
schäden und/oder anderen Körperverletzun-
gen führen.
Verwenden Sie Staubfilter oder lokale Ent-
lüftung laut Sicherheitsdatenblatt. Tragen
Sie staatlich geprüften Atemschutz und
Augen- sowie Hautschutz.
Wenn diese Richtlinien nicht eingehalten
werden, können schwere Lungenschäden
und/oder andere Körperverletzungen
auftreten.
Fordern Sie bei den Lieferanten der
Werkstücke und Schleifmittel Kopien
der Sicherheitsdatenblätter an,
wenn diese noch nicht verfügbar
sein sollten.
ACHTUNG
WARNUNG: „Anweisungen zum sicheren Gebrauch finden sich im Handbuch“
Symbol zeigt die Drehrichtung des Werkzeugs an
Symbol zeigt ein „Klasse II“-Gerät an
Bitte recyclen – Nicht im Hausmüll entsorgen
DE
75-078_ROSander.indd 1575-078_ROSander.indd 15 12.03.2010 12:45:5812.03.2010 12:45:58

23M Bedienungsanleitung
WARNUNG
VORSICHT
Die Sicherheits- und Unfallverhütungs-Vorschriften befinden sich in der Broschüre „ALLGEMEINE SICHERHEITSANWEISUNGEN“, die einen festen Bestandteil
dieser Dokumente darstellt. Die Bedienungsanleitung gibt zusätzliche Informationen, die für die Verwendung dieses Gerätes erforderlich sind.
Um Risiken bei der Verwendung dieses Gerätes zu reduzieren:
- Das Werkzeug muss an ein adäquates Staubabsaugsystem (nicht mitgeliefert) angeschlossen werden. Zum persönlichen Schutz sind
Sicherheitsvorrichtungen für die Regulierung zu verwenden und die für das verarbeitete Material gültigen Sicherheitsnormen zu beachten.
- Beachten Sie vor dem Einsatz das entsprechende Sicherheitsdatenblatt.
- Gerät nicht im Wasser oder unter übermäßig feuchten Bedingungen verwenden.
- Das Gerät darf nie verwendet werden, ohne dass alle Sicherheitsvorrichtungen montiert wurden und richtig funktionieren.
- Werden am Gerät selbst Arbeiten vorgenommen, so muss es dabei stets vom Netzanschluss getrennt sein.
- Bevor das Gerät angeschaltet wird, muss sichergestellt werden, dass es sicher gehalten wird und Kontakt mit der Arbeitsoberfläche hat.
- Es muss der zu verrichtenden Arbeit entsprechende Kleidung getragen werden.
- Auf Grund von Gefahren im Zusammenhang mit dem Schleifvorgang empfehlen wir die Verwendung von angemessener PSA (persönlicher Schutzaus-
rüstung), die Schutz für Hände, Gehör, Augen und die Atmung gemäß der entsprechenden Gesetze zur Unfallverhütung bzw. Gefahrreduzierung beinhaltet.
- Der Benutzer sollte sich stets bewusst sein, dass das Gerät nach dem Abschalten noch für einige Sekunden weiterläuft.
Verringerung der Gefahren in Zusammenhang mit der Vibration des Geräts:
- Falls leichte Schmerzen an der Hand oder am Handgelenk auftreten, sollte die Arbeit unverzüglich unterbrochen werden. Bei sich wiederholenden
Arbeiten und Bewegungen oder wenn der Arbeiter der Vibration zu lange ausgesetzt wird, können Hand-, Handgelenks- oder Armverletzungen
auftreten. Falls ein entsprechender Verdacht besteht, so ist ein Arzt aufzusuchen.
Verringerung der Gefahren in Zusammenhang mit Lärm:
- Bei der Arbeit mit dem Gerät ist stets ein Gehörschutz zu tragen. Den Sicherheitsanweisungen des Arbeitgebers oder den lokalen/nationalen Richtlinien
zur persönlichen Schutzausrüstung ist Folge zu leisten.
Verringerung der Risiken im Zusammenhang mit Abschürfungen, Verbrennungen, Schnitten oder Einklemmen der Haut:
- Schleifscheibe sorgfältig anbringen; bitte Anweisungen beachten, um zu gewährleisten, dass sie auch sicher an dem Werkzeug angebracht ist.
- Zubehör-Halterungen nie überspannen.
- Zur Verringerung des Risikos von Hautabschürfungen dürfen die sich bewegenden Teile des Geräts im Betrieb unter keinen Umständen berührt werden.
- Keine Schleifscheiben und -Teller mit einer maximalen Drehzahl unter der maximalen Drehzahl des Geräts verwenden.
- Mit dem Werkzeug dürfen nur von 3M spezifisch empfohlene Zubehörteile verwendet werden.Andere Verwendung oder andere Zubehörteile können zu
unsicheren Arbeitsbedingungen führen.
- Am Ende seiner Lebensdauer darf das Produkt laut der Europäischen Richtlinie 2002/96/CE (RAEE) + 2003/108/CE und ihrer Umsetzung in den
nationalen Gesetzen nicht in die Umwelt gelangen oder mit dem Hausmüll entsorgt werden, sondern muss an einem autorisierten Recycling-Zentrum
entsorgt werden (bitte kontaktieren Sie die örtlichen Behörden, um eine Liste der gesetzlich zugelassenen Entsorgungseinrichtungen zu erhalten). Die
ordnungsgemäße Entsorgung des Produkts trägt zum Schutz der menschlichen Gesundheit und der Umwelt bei. Jegliche Art der unzulässigen Entsorgung
ist gesetzlich strafbar.
TECHNISCHE DATEN
TYP PN 64384 & PN 64385 PN 64380 & PN 64381 PN 64386 PN 64382
SCHUTZKLASSE II II II II
BETRIEBSSPANNUNG 230 V ~ 50 Hz 230 V ~ 50 Hz 110 V ~ 50 Hz 110 V ~ 50 Hz
ABSORBIERTE STROMSTÄRKE 2 A 2 A 4 A 4 A
ABSORBIERTE STROMLEISTUNG 450 W 450 W 450 W 450 W
ELEKTRONISCHE DREHZAHL-
STEUERUNG
JA JA JA JA
DREHZAHL 5000 bis 10000 U/min 5000 bis 10000 U/min 5000 bis 10000 U/min 5000 bis 10000 U/min
ROTATIONS-DURCHMESSER 3 mm 5 mm 3 mm 5 mm
DURCHMESSER DES PADS 150 mm 150 mm 150 mm 150 mm
TYP DES PADS Hookit™-Pad Hookit™-Pad Hookit™-Pad Hookit™-Pad
EXTRAKTIONS-SYSTEM EINGEBAUT EINGEBAUT EINGEBAUT EINGEBAUT
GEWICHT 2,1 kg 2,1 kg 2,1 kg 2,1 kg
75-078_ROSander.indd 1675-078_ROSander.indd 16 12.03.2010 12:45:5812.03.2010 12:45:58

3M Bedienungsanleitung 3
Vergewissern Sie sich vor Inbetriebnahme des Werkzeuges, dass:
- die Packung vollständig ist und keine Anzeichen von Transport- oder Lagerschäden aufweist;
- das Gerät vollständig ist; Anzahl und Art der Teile müssen der Beschreibung in dieser Anleitung entsprechen;
- Netzanschluss und Steckdose die in der Tabelle und auf dem auf Seite 5 dargestellten und erklärten Maschinenschild angegebene Belastbarkeit haben.
Ggf. Staubbeutel (9) anbringen.
MONTAGE DES STÜTZPADS
1. Stützteller (5) mit der Schraube (6) in der Mitte platzieren (Abb.1);
2. Das Stützteller (5) leicht drehen, bis es wie in (Abb. 2) an der Schraube festsitzt;
3. Schraube mit dem mitgelieferten Inbusschlüssel (7) festziehen (Abb. 3). Die Stützteller-Schraube nicht in falscher Position (Abb. 4) festziehen;
4. Zur Entfernung den Vorgang in umgekehrter Reihenfolge durchführen.
Anbringen der Schleifscheibe
Schleifscheibe auf den Stützteller drücken, wobei die Löcher der Scheibe auf den Extraktionslöchern des Stütztellers liegen müssen.
Vergewissern Sie sich, dass:
- der Netzanschluss den Geräteeigenschaften entspricht;
- Netzanschluss und Stecker in perfektem Zustand sind;
- der AN/AUS-Schalter richtig funktioniert – vom Netzanschluss getrennt prüfen;
- alle Teile des Werkzeugs richtig montiert wurden und es keine Anzeichen für Schäden gibt;
- die Belüftungsschlitze nicht blockiert sind (8);
- das Werkzeug mit einem passenden und ezienten Staubsaugsystem (4) verbunden ist;
- der Staubbeutel (9) leer und unbeschädigt ist.
- Einschalten: Schalter (2) nach vorne drücken; ist das Gerät in der AN-Position gesperrt, gleichzeitig Druck auf den vorderen Teil des Schalters ausüben.
- Anhalten: Schalter lösen oder, falls dieser in seiner Position festgestellt wurde, Druck auf den hinteren Teil des Schalters ausüben und ihn so
in die Stop-Position zurückkehren lassen.
MASCHINENTEILE IN DER ÜBERSICHT
ERHALT DER MASCHINE
MONTAGE DES GERÄTS
VOR EINSCHALTEN DES GERÄTS
EINSCHALTEN UND ANHALTEN
1 - Maschinenschild
2 - AN/AUS-Schalter
3 - Drehzahlsteuerung
4 - 29 mm Ø Saugmund
5 - Hookit™-Stützteller
6 -
Fixierschrauben für Stützteller
7 - Stützpad Inbus-Schlüssel
8 - Belüftungsschlitze für den Motor
9 - Filterbeutel und Adapter
DE
75-078_ROSander.indd 1775-078_ROSander.indd 17 12.03.2010 12:45:5912.03.2010 12:45:59

BETRIEB
WARTUNG
SICHERHEIT UND ELEKTROMAGNETISCHE KOMPATIBILITÄT
LÄRM UND VIBRATION
- Alle Wartungsarbeiten werden von der Stromversorgung getrennt durchgeführt.
- Der Staubbeutel (9) muss häufig geleert werden.
- Nach Ende jeder durchgeführten Arbeit – oder im Bedarfsfall – Staub mit Hilfe eines Vakuumsystems/Staubsaugsystems vom Werkzeugkörper entfernen,
wobei besonders auf die Motorbelüftungsschlitze geachtet werden muss.
- Informationen zum Austausch des Netzkabels finden sich auf dem diesem Handbuch beigelegten Datenblatt.
Der Benutzer darf keine anderen Wartungsarbeiten durchführen.
Wartung und Reinigung der Innenteile wie Bürsten, Kugellager, Getriebe etc. oder andere dürfen nur von einer autorisierten Kunden-Werkstatt durchgeführt werden.
ELEKTRISCHE SICHERHEIT - NIEDRIGSPANNUNG
Die Prüfungen wurden gemäß folgender Normen durchgeführt:
EN 60745-1 Sicherheit handgeführter Elektromotor-betriebener Werkzeuge
EN 60745-2-4 Spezielle Anforderungen an Schleifer.
ENTSTÖRUNG
Die Geräte werden zur Verhütung und Beseitigung von gemäß den folgenden Normen gemessenen Funkstörungen entstört:
EN55014-1+EN55014-2; EN61000-3-2+EN61000-3-3.
LÄRMPEGEL
Der Lärmpegel wurde gemäß EN ISO 3744 + UNI EN ISO 11203 gemessen.
Nicht in Betrieb Geräuschpegel LpA = 72,8dB (A) KpA = 3dB (A)
Geräuschdruckpegel LwA = 83,8dB (A) KwA = 3dB (A)
Unter Belastung Geräuschpegel LpA = 78,3dB (A) KpA = 3dB (A)
Geräuschdruckpegel LwA = 89,3dB (A) KwA = 3dB (A)
Hinweis: Die Werte zu Kpa, KpC, peak und KWA wurden den Normen ISO 11203 und ISO 3744 entnommen.
Warnung:Angemessenen Hörschutz tragen! (siehe Warnungen).
MITTLERER BESCHLEUNIGUNGSWERT
Der mittlere quadratische Beschleunigungswert wurde nach den Normen UNI EN 28662 + UNI EN ISO 5349 ermittelt.
Motor A = 2,65 m/sec² 0,05 K = 1,5 m/sec²
Handgri A = 2,95 m/sec² 0,05 K = 1,5 m/sec²
TESTLAUF
Schalten Sie das Gerät ein und kontrollieren Sie, ob ungewöhnliche Vibrationen auftreten. Beobachten Sie die Maschine auch während des Schleifprozesses
(Arbeiten auf dem eingesetzten Material) und prüfen Sie das Vibrationsverhalten des Gerätes.
Warnung:Wenn es ein Problem gibt, muss das Gerät sofort ausgeschaltet werden und dessen Ursache behoben werden.
DREHZAHLSTEUERUNG
Die Drehzahl kann durch Drehen des Rades (3) oben auf dem Gerät eingestellt werden. Die Wahl der Drehzahl hängt dabei von den Eigenschaften der
Schleifscheibe und des Arbeitsmaterials ab.
AUSTAUSCHEN DER SchleifscheibeN
- Gebrauchte Schleifscheiben können durch einfaches Herausreißen entfernt werden;
- Neue Hookit™-Scheiben werden montiert, indem sie einfach auf den Stützteller gedrückt werden, wobei die Löcher der Schleifscheibe über den Löchern des
Stütztellers liegen müssen.
VERWENDBARE SCHEIBEN
Ø 150 mm Hookit™-Schleifscheiben
43M Bedienungsanleitung
75-078_ROSander.indd 1875-078_ROSander.indd 18 12.03.2010 12:45:5912.03.2010 12:45:59

GARANTIE UND EINSCHRÄNKUNG DER RECHTSMITTEL
Sofern in der entsprechenden Produktliteratur, Verkaufsbeilage oder auf der Verpackung von 3M nicht anderweitig vermerkt, garantiert 3M für jedes
3M-Produkt, dass es zu dem Zeitpunkt, an dem es von 3M versandt wird, die jeweils entsprechenden Angaben erfüllt. Für einzelne Produkte können zusätz-
liche oder andere Garantieleistungen als in der Produktliteratur, Verkaufsbeilage oder auf der Verpackung angegeben gewährt werden. 3M GEWÄHRT KEINE
ANDEREN GARANTIEN – AUSDRÜCKLICHE ODER IMPLIZIERTE -, DARUNTER AUCH KEINE - ABER NICHT AUSSCHLIESSLICH - IMPLIZIERTE GARANTIE FÜR
ALLGEMEINE GEBRAUCHSTAUGLICHKEIT ODER TAUGLICHKEIT FÜR EINEN SPEZIELLEN ZWECK ODER JEGLICHE ANDERE IMPLIZIERTE GARANTIE, DIE AUS
DEN HANDELSSITTEN ERWÄCHST. Der Benutzer ist dafür verantwortlich zu bestimmen, ob das Produkt von 3M für einen bestimmten Zweck und die Benutzer-
anwendung geeignet ist. Falls das Produkt innerhalb der Garantiezeit defekt wird, ist das einzige Rechtsmittel sowie die einzige Verpflichtung von Verkäufer
und 3M die Reparatur oder das Ersetzen des Produktes oder die Erstattung des Kaufpreises, wobei die Wahl 3M obliegt.
EINSCHRÄNKUNG DER HAFTUNG
Außer dort, wo dies von Gesetzes wegen so nicht gestattet ist, übernehmen 3M und der Verkäufer keine Haftung für jegliche Verluste oder Schäden durch das
Produkt von 3M, seien diese direkter, indirekter, besonderer, zufälliger oder logisch folgender Natur, unabhängig von der gesetzlichen Grundlage, einschließlich
Garantie/Gewährleistung, Vertrag, Fahrlässigkeit oder verschuldensunabhängiger Haftung.
EINREICHUNG EINES GARANTIE-ANSPRUCHS
Kontaktieren Sie Ihren Händler, wenn Sie einen Garantie-Anspruch gemäß der oben aufgelisteten Einschränkungen einreichen möchten. Bitte beachten Sie, dass
alle Garantie-Ansprüche der Zustimmung des Herstellers unterliegen. Bitte bewahren Sie unbedingt Ihren Kaufbeleg und das Produktinspektions-Zertifikat an
einem sicheren Ort auf. Beide müssen mit eingereicht werden, wenn ein Garantie-Anspruch geltend gemacht wird.
PRODUKTREPARATUR NACH ABLAUF DER GARANTIEZEIT
3M arbeitet vor Ort mit autorisierten Reparatur- und Service-Zentren zusammen. Bitte kontaktieren Sie gegebenenfalls Ihren Vertriebspartner.
Er wird Ihnen Reparatur und Service vermitteln können, um Ihnen den bestmöglichen Service zu bieten.
MASCHINENSCHILD
POSITION UND BEDEUTUNG DER INFORMATION
1. Gerätetyp.
2. Nennbetriebsspannung in Volt (V)
3. Betriebsfrequenz in Hertz (Hz)
4. Absorbierte Stromstärke in Ampere (A). Es muss gewährleistet sein, dass
der Netzanschluss, an den das Gerät angeschlossen ist, mit mindestens der
angegebenen Stromstärke belastbar ist.
5. Absorbierte Leistung in Watt (W).
6. Gerätecode oder Seriennummer
7. Technische Daten des Geräts.
8. Maximale Drehzahl (U/min)
9. Das doppelte Quadrat zeigt an, dass das Gerät doppelt isoliert ist und daher
keine Erdung durch das Stromversorgungskabel notwendig ist.
10. Lesen Sie alle Anweisungen vor Benutzung dieses Geräts und bewahren Sie die Anweisungen gut auf.
11. Persönliche Schutzausrüstung.
12. Bitte recyclen. Nicht im Hausmüll entsorgen (siehe auch unter VORSICHT).
3M Bedienungsanleitung 5
DE
75-078_ROSander.indd 1975-078_ROSander.indd 19 12.03.2010 12:45:5912.03.2010 12:45:59

EC DECLARATION OF CONFORMITY
63M Bedienungsanleitung
75-078_ROSander.indd 2075-078_ROSander.indd 20 12.03.2010 12:45:5912.03.2010 12:45:59
This manual suits for next models
5
Table of contents
Languages:
Other 3M Sander manuals
Popular Sander manuals by other brands

Rupes
Rupes RE21ACM Translation of original operating instructions

Worx
Worx WX856.9 Safety and operating manual

Bosch
Bosch PBS 7 AE operating instructions

Bosch
Bosch GSS 230 A PROFESSIONAL Original instructions

Ingersoll-Rand
Ingersoll-Rand 88S Series Product information

Festool
Festool RS 200 EQ Original operating manual

Porter-Cable
Porter-Cable 444 instruction manual

stayer
stayer DS 125 operating instructions

Black & Decker
Black & Decker KA88 Original instructions

Atlas Copco
Atlas Copco G2438-6.5N Original product instructions

Meec tools
Meec tools ST2502R operating instructions

Clarke
Clarke ALTO C2K Series Operator's manual