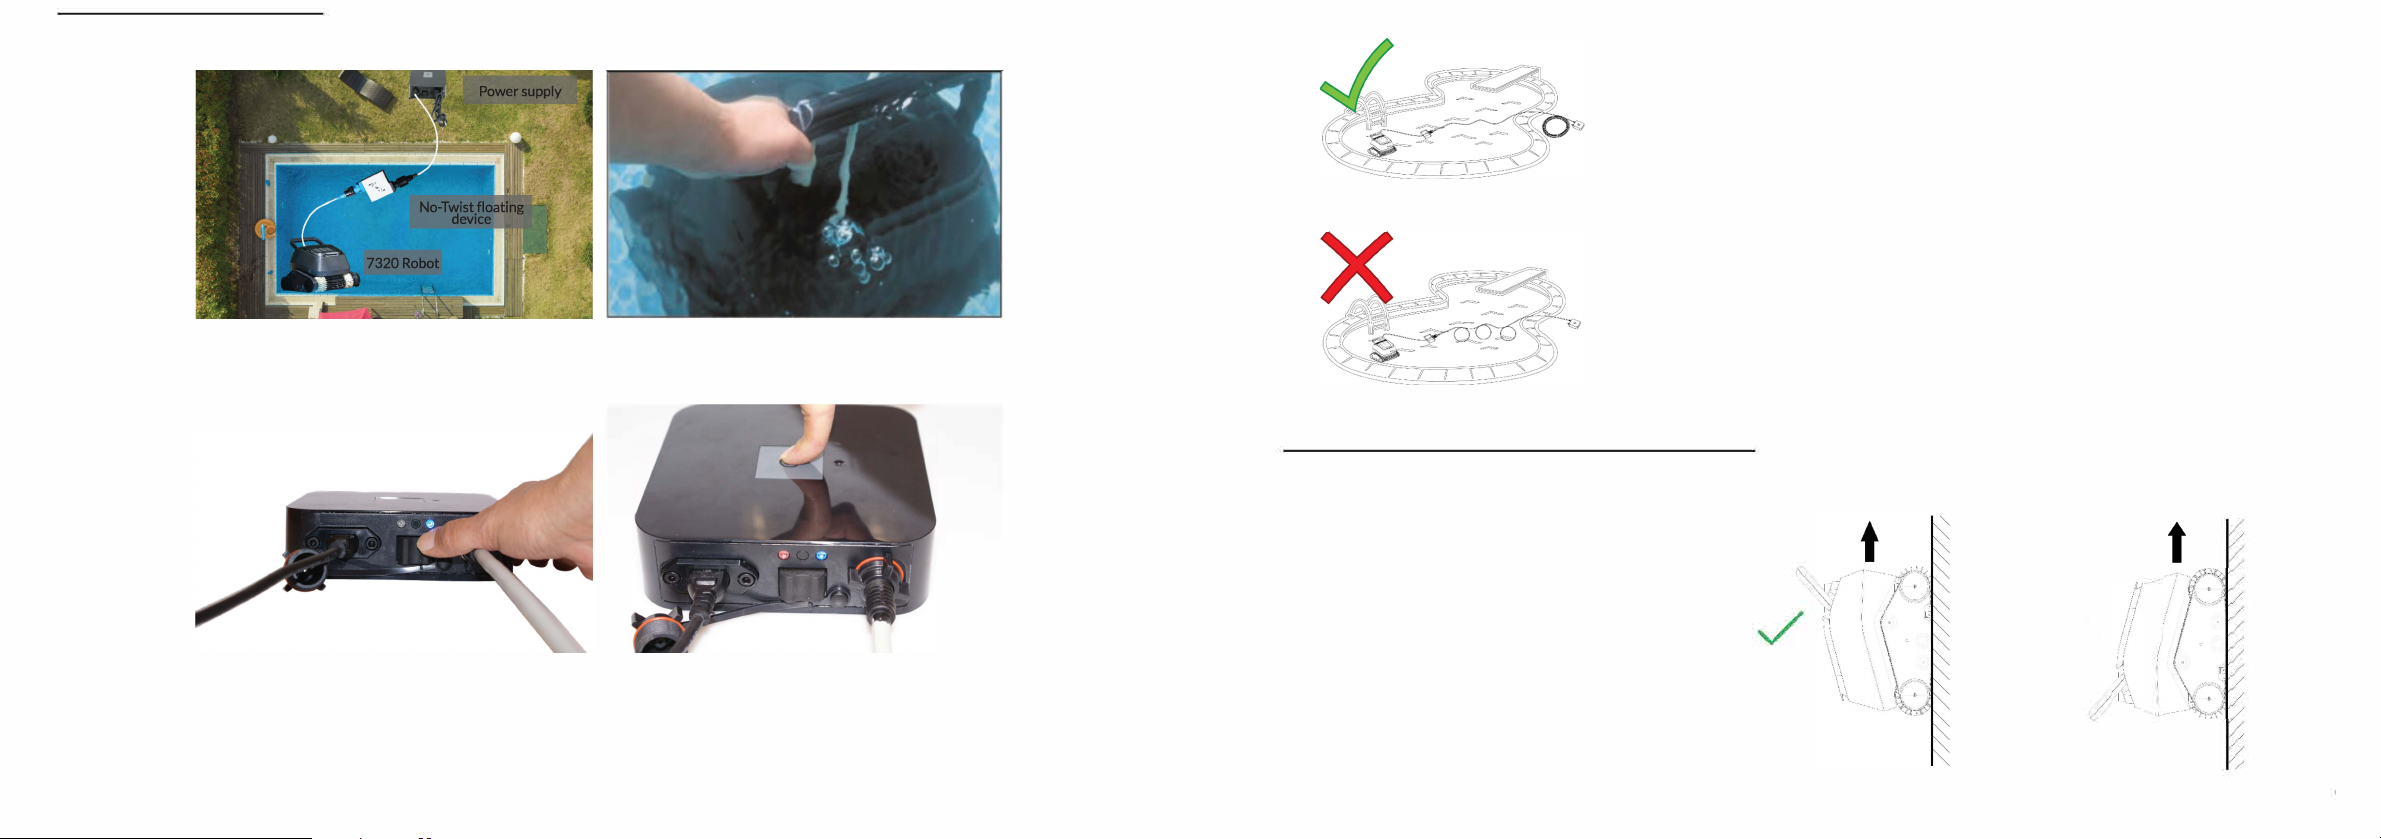
8 STREME Black Pearl User manual

Autonomous Swimming
Pool Cleaner

Page2
This Manual covers multiple models
PRODUCT COLORS MAY VARY
Congratulations on the purchase of your new 8streme Autonomous Pool Cleaner. It is a powerful autonomous robot delivered ready to use.
Ideal for pools of all sizes and in all forms. This robot comes with an
easily accessible debris basket along with floating rotary coupling
which limits cable entanglement.
Please check the package to make sure that all parts are ready to be installed.
We recommend that you check the connections of the cables from the cleaner to
the floating rotary coupling plug (chapter 5). If any parts
are missing or damaged, please contact 8STREME directly on www.8streme.com
Table of contents
01 Product features .............................................................. P03
02 Warnings and Safety Informations ....................................................... P03
03 Package content .............................................................. P04
04 Installation of side brushes .............................................................. P05
05 Start-up ............................................................... P06
06 Climbing walls ............................................................... P08
07 Cleaning the filter basket ............................................................... P09
............................................................... P10
................................................................ P11
................................................................ P12
................................................................ P15
08 Cleaning the impeller
09 Indicator Lights / LED
10 Troubleshooting
11 Spare parts list
12 Spare parts drawing ................................................................ P16
8STREME
8STREME

01 Product features
Maximum Depth: 8ft
Maximum size of the pool: 36ft x 18ft
Input current: 100-130VAC/200-230VAC
Output current: <24VDC
02 !! Warnings and Safety informations !!
2.1 Please refer to the rules of your
state/country regarding
swimming pool safety.
2.2 Place the power transformer at
least 11ft from the pool.
2.3 lf the cables delivered are
damaged, they must be replaced
by the manufacturer, a service
centre approved by the
manufacturer or a qualified
person to avoid any risk.
2.4 Please make sure that your
electrical system is well
protected by a 30mA ground
fault circuit interrupter (GFCI)
2.5 Do not use extension cord.
2.6 This unit must only be used with
the supplied transformer.
2.7 Keep the power transformer
away from moisture
Page 3
2.8 This appliance can
be
used by
children aged from 8 years and
above and persons with reduced
physical, sensory or mental
capabilities or lack of experience
and knowledge if they have been
given supervision or instruction
concerning use of the appliance in
a safe way and understand the
hazards involved.
Children shall not play with the
appliance.
Cleaning and user maintenance
shall not be made by children
without supervision.
2.9 Do not use the robot out of the
water
2.10 Make sure that the transformer is
disconnected before performing
maintenance on the robot
2.11 Don't use any damaged power cable
or cord.
2.12 Do not use the robot if people are in
the pool.
2.13 Do not use the swimming pool when
the cleaner is in the pool.
2.14 Remove the robotic cleaner from the
swimming pool when not in use
2.15 The use of the robot should be in a
pool whose temperature is between
40 and 95° F.
2.16 Make sure to maintain a pH close to
7.2 for optimal performance,
especially on the ability to climb
walls.
2.17 Do not use the robot if you have a
counter-current swimming device
working.
2.18 If the ambient air temperature
exceeds 95° F, place the power
transformer under the shade.
03 Pack
age
content
1. Robotic Pool Cleaner
2. Power transformer control box
3. Long floating cord
4. No-Twist floating device with rotary
swivel
5. (TRY ME) Sample of fine filter
6. Side brushes (4 units) + screws
- Our robots are designed to facilitate the
maintenance of your pool.
However, they are
not intended to clean a pool full of algae and
leaves (ex: end of winter period).
In
this case you must: use the leaf
skimmer, dean the filter and put back on the
filter and the pump.
- A tile coating leads to faster wear of the
brushes and belts. Please check these
regularly.
Side brushes and screws are inside
the debris basket
QUICKFACTS
-To
remove the cleaner from your pool, lift
the cable slowly and gently until you can
grab it by the handle. Use the handle to
fully pull out the cleaner
-In
order to access the filter basket, place
hands as
shown in picture. Push with
thumbs to unlock lid.
Page 4

04 Installation of side brushes
1.
3.
Insert the 2 screws.
Page 5
2.
4.
Insert the side
brushes.
Secure the side brushes
with the screws, using a
screwdriver. Do not over-
tighten!
05 Start-up
5.1 Unscrew the cap next to the switch.
5.4 Slide the cap to contact the plug of the
floating swivel union.
5.2 Insert the end of the floating cable into the
socket. Be careful with the direction of
the plug.
5.5 Tighten the black nut on the floating rotary
coupling by hand.
5.3 Insert the end of the floating cable from
the transformer into the black
"POWER" socket. Be careful with the
direction of the plug.
5.6 Repeat the operation on the blue side
marked "POOL ROBOT" with the cable
from the robot.
Page 6
Locate the holes for the
brushes. Align the pegs
on the bushes with the
holes.

05 Start-up
Page 7
5.7 Place your power box to a midpoint between
the two ends of your pool and at least 11ft
from the edge of the pool.
5.9 Screw the nut of the floating cable firmly. Press the
switch on the side of the transformer to turn it on.
A blue light appears. To select the 1 Hour cleaning
cycle, press on the left side of the switch lying under
the blue light of the transformer. To select the 3 Hours
cleaning cycle, press on the left side of the switch.
5.8 Place the robot in your pool and wait until it is
completely submerged. If necessary, help it to
sink manually.
5.10 Press the on/ off button located at the top of
the case to activate your robot.
Blue+ orange lights = 1 H cleaning cycle enabled
Blue+ red lights = 3 H cleaning cycle enabled
5.11 For optimal performance, place your robot
in the pool at the furthest possible location
from the power source.
This is the appropriate length of the cable
so that the robot can reach all of your pool.
Limit the length of cable in the pool to the
bare minimum, and place the surplus
outside the pool.
06 Climbing Walls
In order to be efficient while
cleaning the waterline, the
robot is designed to climb up
the waterline with the
orientation that offers the most
effective brushing.
It is therefore normal to see it
climb to the waterline only by
the side with the handle.
5.12 To turn off your robot, press the power
button and hold for 3 seconds.
Alternatively, you can also press the
switch located on the side of the box,
under blue light.
5.13 Do not remove your robot out of water
immediately after the end of its
cleaning cycle so as not to cause a
temperature shock.
5.14 When the cleaner is no longer used for an
extended period, screw on the
protective cap on the power supply and
store your robot indoors.
X
Page 8

07 Cleaning the
filter basket
7.1 In
order to access the filter basket, place
hands as shown in picture. Push upward
with thumbs to unlock cover.
7.4 Empty the debris inside the basket. Use a
jet
of
water to rinse the faces inside and outside
the basket filter panels. Also inspect and clean
the inside and outside of the robot.
Page 9
7.2 Use both hands to lift the basket with the
handles on the sides of the basket.
'
7.3 Open the lid of the basket by pulling the tab
on the front of the basket and empty content.
7.5 Once cleaned, replace the basket in the robot.
If the basket is not properly aligned, it is
not possible to close the cover of the
cleaner.
7.6 Press down the handles to lock your basket.
08 Cleaning the impeller
Some debris can clog or be
wrapped around the
impeller of the pump. By
force, these debris can
hinder the proper
functioning of the robot or
even damage the engine.
Regular visual inspection is
part of the normal
maintenance of the robot.
8.1. Use a flat screwdriver to remove the protective grill.
Page 10
7.7 (Optional) Fine filtration for silt or algae. There are 2 options: 7.7.2 Fine mesh debris basket
Replace the standard regular mesh basket with
fine mesh basket (optional) . Fine mesh basket
can catch silt or algae.
7.7.1 Use a fine filtration kit (item#7117)
A "TRY ME" pad is included. Place the fine filtration
pad inside the standard regular mesh basket.
It will catch fine debris.
(Item# 7119)
Fine filtration can catch silt or algae but could clog the filter
easier. Regular cleaning is required in order to keep the pool
cleaner robot running properly

09 Indicator lights / LED
INDICATOR MEANING / DIAGNOSIS
LIGHT/LED
A
When the power supply is plugged into wall outlet and
toggle switch is pressed towards "ON", this blue light must
remain on to indicate that the power supply is operating
normally. Otherwise check if the wall outlet has power or
replace the transformer.
B
C
It is a
timer indicator. This red or orange light will light up
during the cleaning cycles (orange for 1 hour cycle - red for
3 hour cycle).
CThis blue light turns on when the floating cord between
the transformer and the No-Twist float with swivel union is
properly connected and you have turned on the robot. It
indicates that the current is reaching the float. If the light
does not come on, check the connections.
DThis green light only lights up when the robot pump is
running. This green light does not light up when the pool
robot has completed its cleaning cycle or during certain
phases of the device's operation (e. g. after climbing walls,
when pump stops and the robot sinks).
E
E
When the "No-Twist" float with rotating swivel is connected
to the transformer and you have started the robot, this small
red light indicates that the current is coming out of the
float. You must have both this red light and the blue light (C)
on the float. If you have the blue light on the float but not
the red light, then it is likely that you will need to replace
the float.
Page 11
10 TROUBLESHOOTING
PROBLEM
The robot floats on the surface.
The robot does not clean all areas of the pool.
The robot does not recover debris during operation.
Fine particles (dust or dirt, pollen ... ) are ejected by
the impeller.
CAUSE(S)
-Immersion of the robot in the pool.
-Use of the fine filter.
-Water level in the pool.
-Not enough/ too much cable floating in the pool.
-The robot does not receive enough power.
-Basket clogged/ full.
-
-
An object is
stuck in the impeller or the grid
located above the impeller.
Debris are too fine, the robot is made to pick up the
particles more than 50 microns (with the fine filter
inside the basket).
SOLUTION(S)
- When you put the robot in the pool, let it sink and
reach the floor before you turn it on.
-
-
If you use an optional fine filter, remove the filter
from its plastic wrap, immerse the filter in the water
so that it is already wet before you put it in the robot
and let the robot settle on the floor before you turn
it on.
If your pool water level is too high, the robot might
turn around and take in the air if it touches the fop
seats, in this case to adjust the level of the pool.
-Make sure the length of floating cable introduced in
the pool is just the required length.
-Remove any excess cable length from the pool and
leave this excess length outsidethe pool next to the
power supply box.
-Insert the robot at the center point of the pool.
If your pool is oval or rectangular, this point is the
middle of the length.
-Check the connection of the cables.
-Clean the basket and filter panels. Clean the fine
filter if you use this accessory.
-Check if the basket is properly inserted. (See
chapter Cleaning of the filter basket).
-
-
Check that there are no foreign objects in the
impeller or blocked in the grid above the impeller
Check the attachment of the basket, press itif
necessary to lock it.
-Use a fine filter (check item number on the parts
drawing 29, sku 7117) on the
other hand do not forget that it is the filtration of
your swimming pool which ensures the cleaning
of the particles of less than 50 microns.
Page 12

PROBLEM
The robot moves in
one direction.
I
The
robot does
not
move and
the filtration pump
does not work either. The robot doesn't work any
longer.
I
The pump runs but the robot does not
move. Therobot turns on but stays in one
spot.
Robot does not climb walls.
The robot goes round in circles.
I
Page 13
CAUSE(S)
-An object blocks the rollers, the wheels of the robot
or interfering with the movement of the robot.
- The robot is not connected to a
power source.
-Power is off.
-No/not enough power is transmitted to the robot.
-An object blocks the rollers, the belts, the wheels
ofthe robot or the path.
-Possibility of motor problem.
-The robot is too heavy.
-The flow is not enough.
-The walls are too slippery.
-The handle of the robot is correctly directed.
-pHlevel is too high. Keep the pH level close to
7.2 to avoid slippery walls
- A belt is damaged.
-One of the 4 side wheels is damaged or unscrewed.
SOLUTION(S)
-impeller located above the motor.
- Check that there is no
foreign object blocking the
hydraulic circuit or the brushes and belts under
the robot and sides.
-Check that the power source is active by
plugging
another device into the power outlet.
-Check that the power supply is turned on.
-Check all connections of the robot to the power
source.
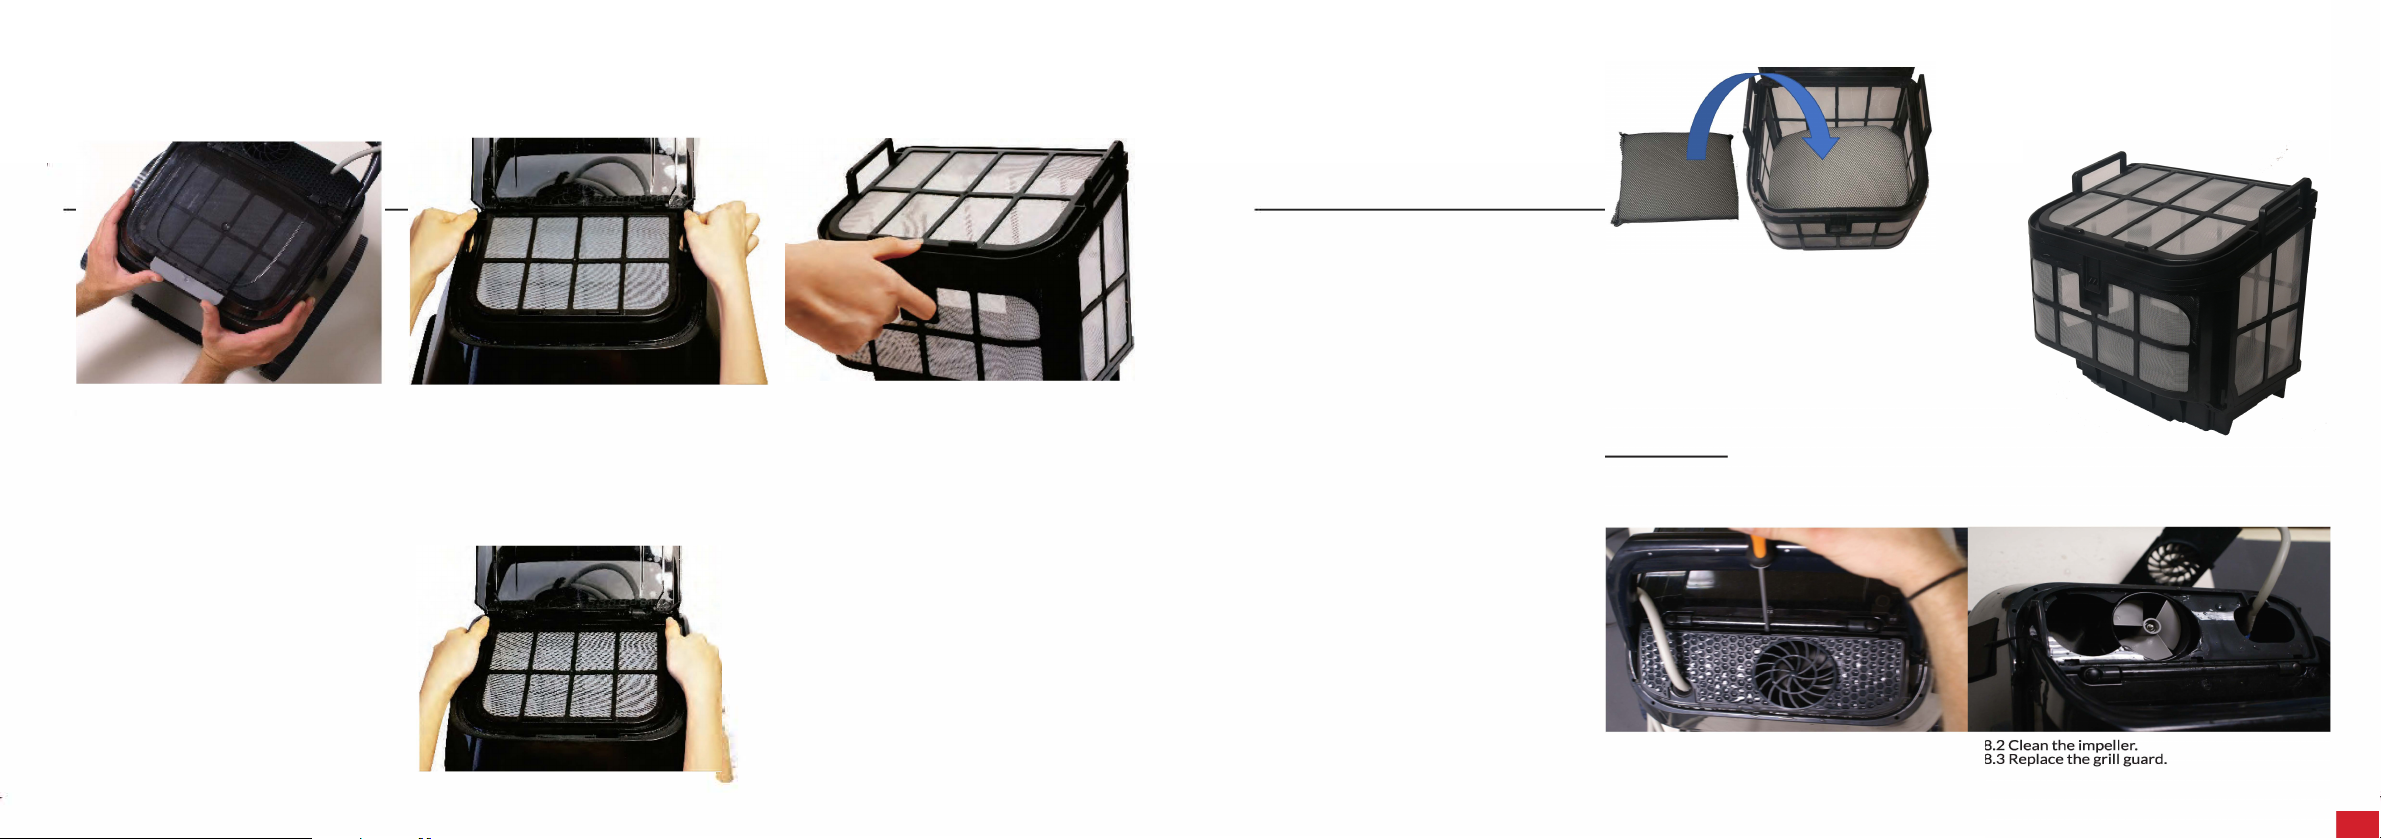
-Unplug the power and
take out the
robot in the
water. Open the cover of the basket and remove the
basket.
-Check that there are no foreign objects in the
impeller located above the motor.
-Check that there is no
foreign object blocking the
hydraulic circuit or the brushes andbelts under the
robot and sides.
-Contact the After-sales Service
-Check that the collection of debris basket isn't full
-Check and clean if needed the impeller of the pump
or the grill at the top of the impeller (propeller on top
of the robot toward the handle)
-Presence of algae or fatty deposits on the walls.
Remove algae using the chemical treatment of water
and manually brush to remove these fatty deposits.
-Check that the handle of the robot is directed to the
rear. The cable should be above the handle.
-Check the condition of the drive belts.
If necessary, replace any faulty belt.
-Check the wheels bolted to the ends of the rollers.
These wheels fit onto the roller
and then screwed
on. (See Chapter 4)
PROBLEM
The robot stops after a few minutes.
The robot moves slower than before.
No LED lit on the transformer.
The blue LED on the "No-Twist" floating device
does not light up ( light C of Chapter 9).
The blue light on
the transformer is on
but the red
or orange do
not light up
(timer light B of Chapter 9).
The blue light on the No-Twist Floating device is on
but the cleaner does not work ( light C of Chapter 9 ).
The robot leaves traces on
the floor or on
the walls.
CAUSE(S)
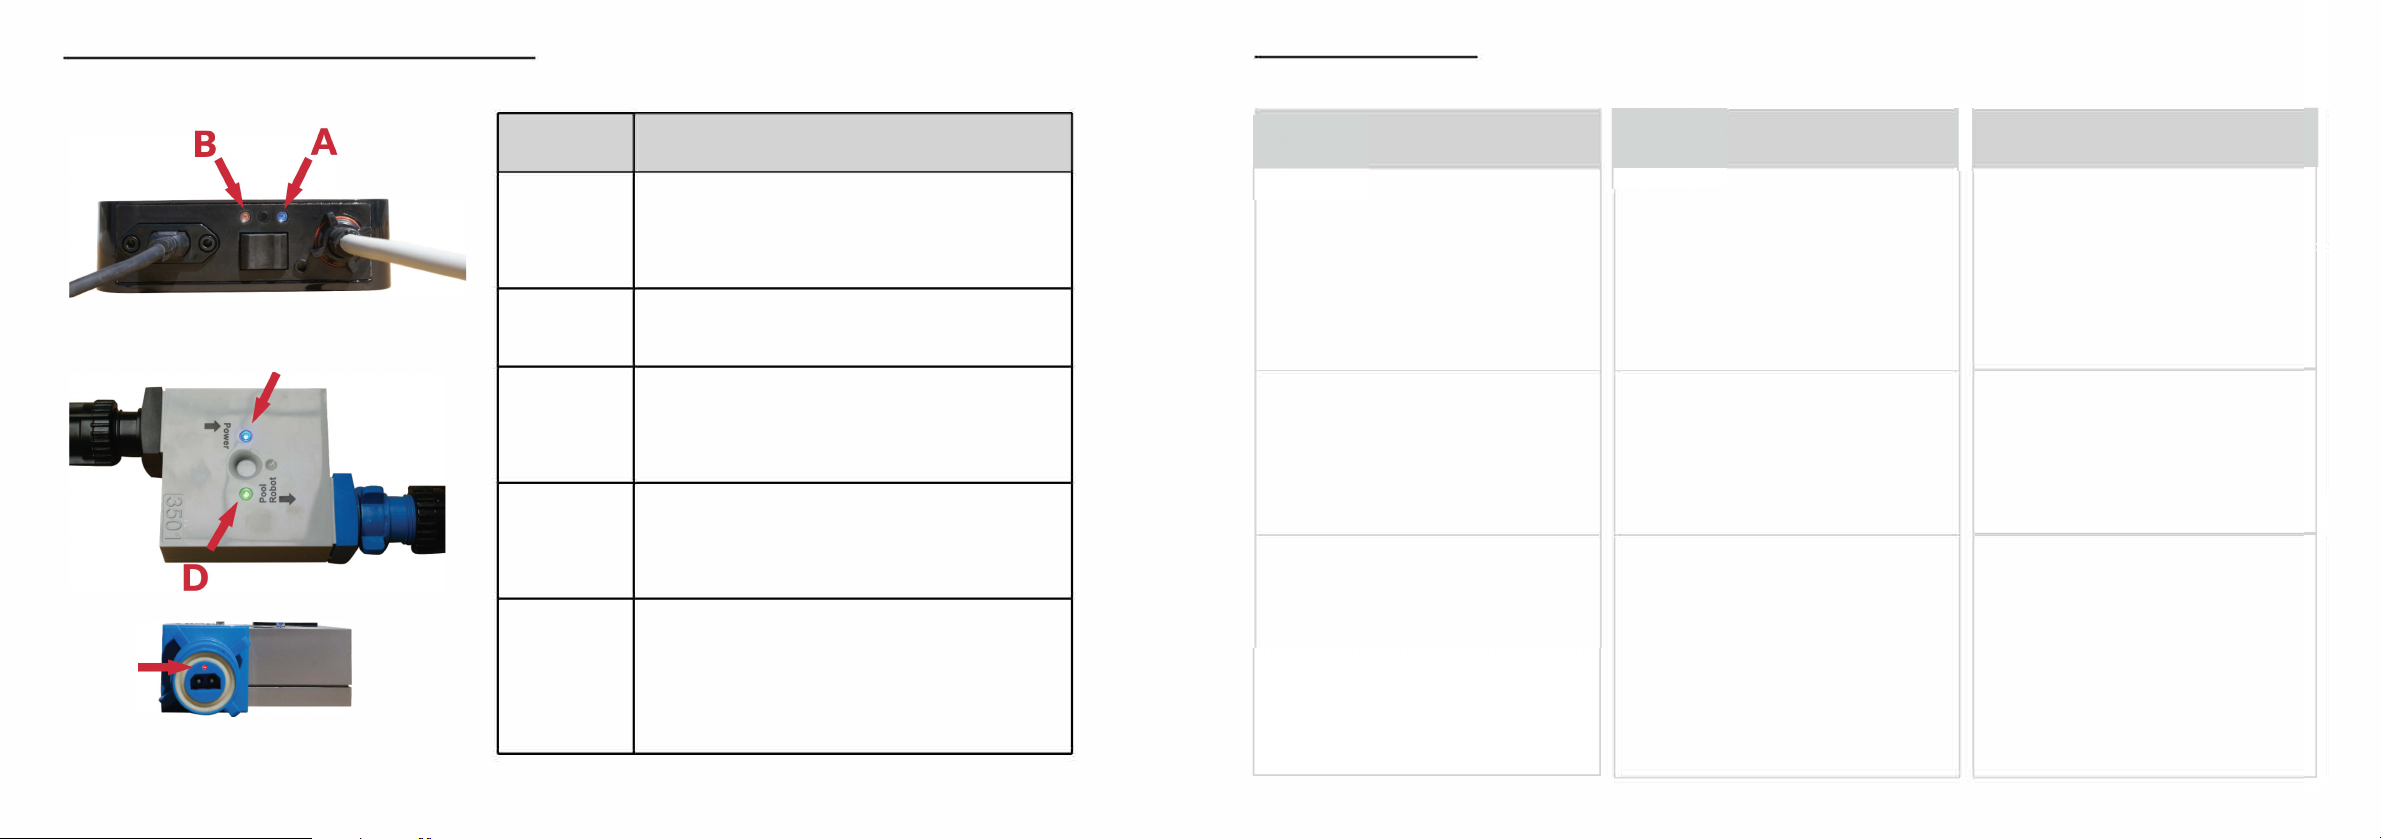
-Connection of the floating cable.
Check that there are no
foreign objects in the - Possibility of fault of the floating cable.
-Possibility of motor leakage.
-The robot is too heavy.
-The water flow is not sufficient.
-Cables connections loose/disconnected.
-The current is not reaching the transformer.
-Bad connection between the transformer and
the No-Twist floating device.
-Possibility of No-Twist floating device problem
-You did not press the on/off button located
above the transformer.
-Cleaner not activated
-Bad
cable connections.
-Possibility of ransformer problems
-Bad
connection between the No-Twist floating
device and the cleaner
-Possibility of No-Twist floating device problem
-Possibility of motor problem.
-State of the brushes and/or transmission belts.
SOLUTION(S)
-Check the connections of the floating cable.
Disconnect and reconnect as needed.
-Check the status of the connectors at the ends of
your cables (damaged, rusted, etc.)
-Check that the dirt collecting basket is not full.
-Check and clean if necessary the pump impeller or
the grill above the impeller (propeller at the top of
the robot towards the handle).
-Check all the cable connections (see chapter 5).
-Check your electrical outlet.
-Check the cable connections.
-Contact our Customer Service.
-Turn ON the cleaner by pressing the ON/ OFF
button located on
top of the transformer.
-Check all the connections of the cables between
the transformer and the No-Twist floating device.
-Contact the After-sales Service
-Turn ON the cleaner by pressing the ON/ OFF
button located on top of the transformer.
-Check your electrical outlet.
-Do not use extension cord
-Contact our Customer Service.
-Check if the connection at the
"No-twist" float
outlet, blue outlet "Pool Cleaner",is correct and
waterproof.
-If the blue light C is on, you should also have a red
light on
at the float outlet (light E in Chapter 8). If
this is not the case, it is likely that the float is
defective.
-If both blue and red lights are on
but the robot does
not work, please contact your dealer or our after-
sales service at service@8streme.com
-These brushes and belts are wear-and-tear parts.
Please check them and change them if necessary.
Please contact www.8streme.com if you have any other questions.
Page 14

11 Spare parts list
Page 15 Page 16
12 Spare parts Drawing
Table of contents
Other 8 STREME Swimming Pool Vacuum manuals

8 STREME
8 STREME 7310 User manual

8 STREME
8 STREME 5200-J2X User manual

8 STREME
8 STREME 7310 User manual

8 STREME
8 STREME 5200-J2X User manual

8 STREME
8 STREME 5210-J200 User manual

8 STREME
8 STREME 5310 User manual

8 STREME
8 STREME 7310 User manual

8 STREME
8 STREME 5220 User manual

8 STREME
8 STREME 7320 User manual

8 STREME
8 STREME 5222 Series User manual