ABB Navigator ADS551 User manual

—
ABB MEASUREMENT & ANALYTICS | INSTRUCTION | INS/ANAINST/025-EN REV. B
Navigator ADS551
Low level dissolved oxygen
Replacement / Upgrade procedures
– wet section spares,
kit references:
• flowcell
• tundish
• flowmeter
• drain valve
• Modbus cable
Measurement made easy
1 Introduction
This publication details replacement / upgrade
procedures for the following Navigator ADS551 wet
section spares:
Before carrying out any procedures, read Section 3 –
Health & Safety. These procedures must be carried
out by a suitably-trained technician.
Tools required
• Pozidrive screwdriver
• Slot-head terminal screwdriver
• Anti-static strap
• Spanners (adjustable)
2 For more information
Further information is available from:
www.abb.com/analytical
or by scanning these codes:
Sales Service
Navigator ADS551
wet section

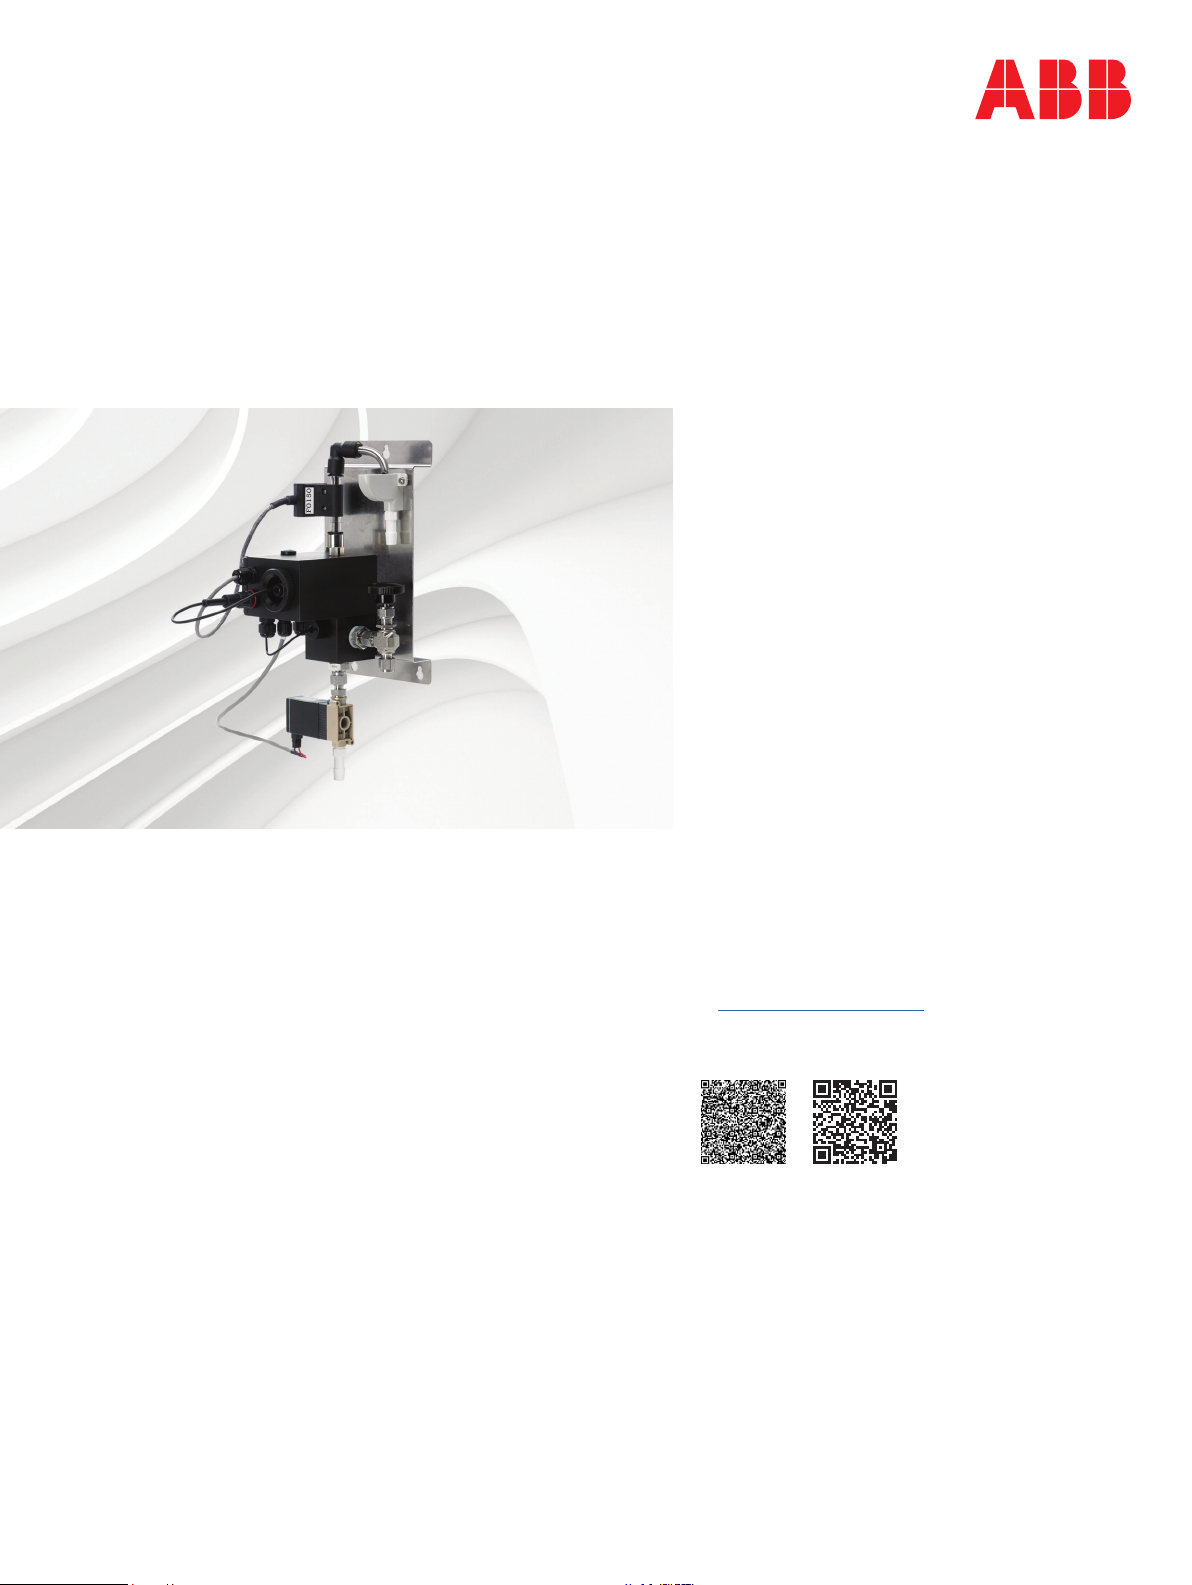
2 INS/ANAINST/025-EN Rev. B | Navigator ADS551 | Low level dissolved oxygen | Replacement / Upgrade procedures – wet section spares
3 Health & Safety 4 Overview
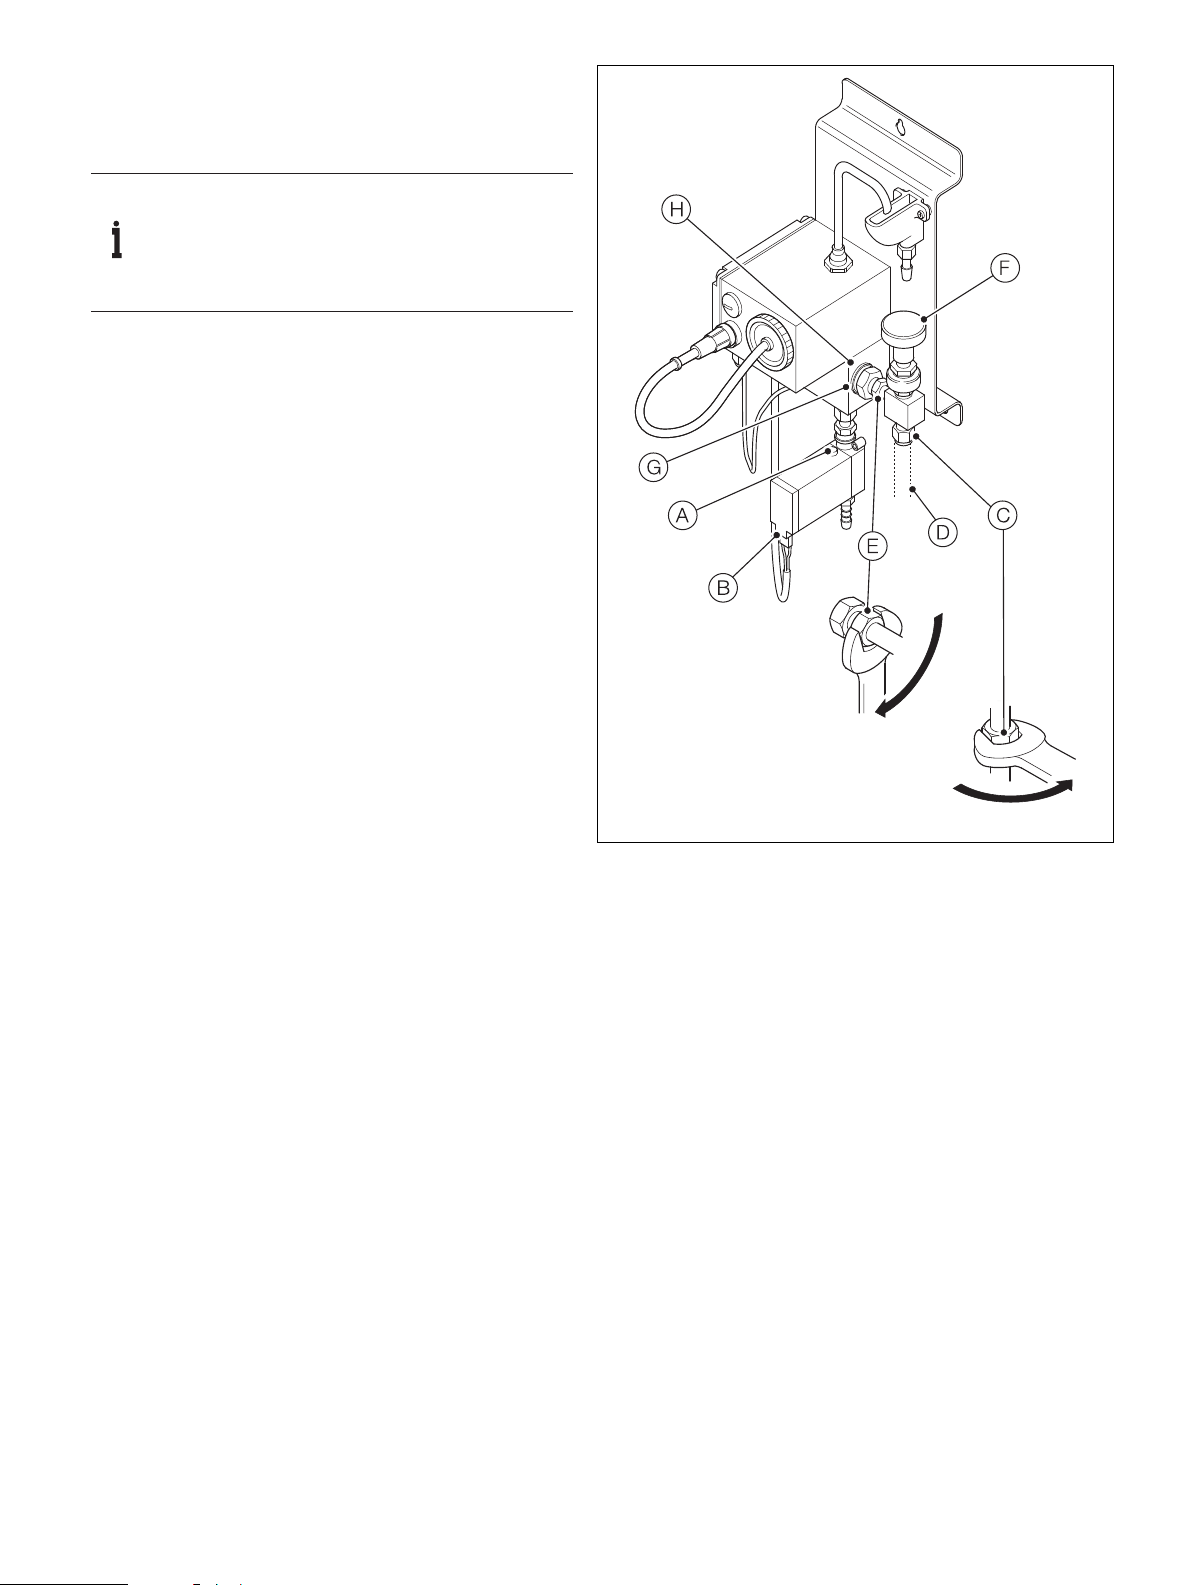
Flowcell PCB assembly, PCB housing cover, PCB housing gasket
(replacement – page 4):
— AW502 228 flowcell PCB housing gasket
— AW502 227 flowcell PCB housing cover
— AW502 225 PCB assembly
Tundish assembly (replacement – page 5):
— AW502 065 tundish assembly
Flowmeter assembly (replacement – page 5 / upgrade – page 9):
— AW502 250 flowmeter assembly (upgrade kit)
— AW502 060 flowmeter assembly (replacement kit)
Drain valve assembly (replacement – page 6 / upgrade – page 10):
— AW502 240 drain valve assembly (upgrade kit)
— AW502 056 drain valve assembly (replacement kit)
Temperature sensor assembly (replacement – page 6):
— AW502 220 temperature sensor assembly
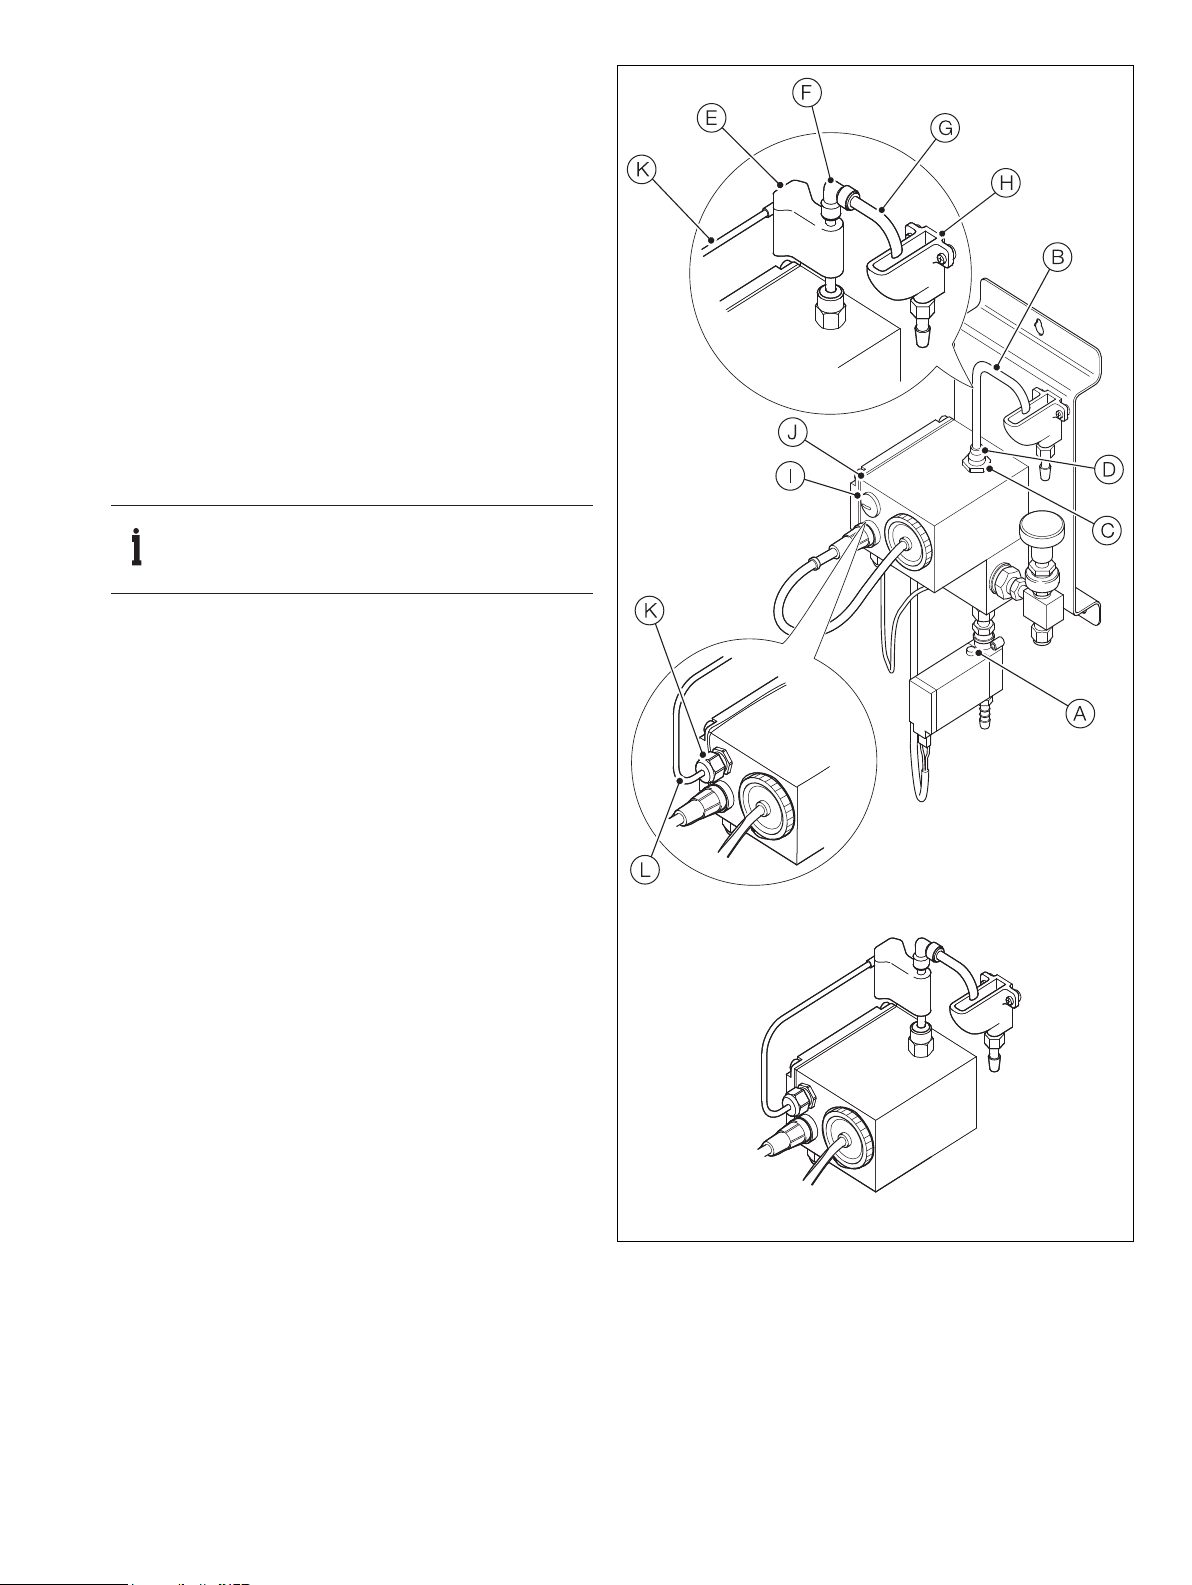
Modbus cable assembly (replacement – page 7):
— AW502 090 1.5 m (4.9 ft. cable)
— AW502 091 5 m (16.4 ft. cable)
— AW502 092 10 m (32.8 ft. cable)
Flow control valve (replacement – page 8 / upgrade – page 11):
— AW502 270 flow control valve assembly
(upgrade kit – imperial)
— AW502 275 flow control valve assembly
(upgrade kit – metric)
— AW502 068 flow control valve assembly
(replacement kit – imperial)
— AW502 069 flow control valve assembly
(replacement kit – metric)
WARNING – Bodily injury
These procedures must be carried out by a trained
technician.
Chemical
– Ensure personal protective equipment (PPE) such
as gloves and eye protection are worn during any
maintenance.
– Observe all health and safety procedures for
handling chemicals.
– To familiarize yourself with handling precautions,
dangers and emergency procedures, always review
the Material Safety Data Sheets prior to handling
containers, reservoirs and delivery systems that
contain chemical reagents and standards.
– Take care if cleaning any spillages and observe all
relevant safety instructions. Wipe up any spillages
using clean water.
Electrical
– Isolate all high voltage supplies to the transmitter
before performing replacement procedures.
– The wet-section is vulnerable to electrostatic
damage. Wear an anti-static strap or dismantle the
wet-section on an anti-static workbench.
– Ensure all electrical connections are kept dry at all
times.
General
– Shut off the external sample supply to the
wet-section and drain the flowcell - refer to the
wet-section Operating instructions (OI/ADS550-EN)
for flowcell drainage options.
– When a procedure is complete, restore power to
the transmitter and sample to the wet-section at the
correct flow rate. If necessary, calibrate the
wet-section – refer to the wet-section Operating
Instructions (OI/ADS550-EN) for calibration
instructions.
– Perform general cleaning of the wet section using a
damp cloth only – mild detergent can be used as a
cleaning aid. Do not use Acetone or any organic
solvents.

Navigator ADS551 | Low level dissolved oxygen | Replacement / Upgrade procedures – wet section spares | INS/ANAINST/025-EN Rev. B 3
5 Overview
Fig. 5.1 ADS551 Wet section spares – item locations
Tundish assembly –
Section 6.2, page 5
(replacement)
Flowcell PCB assembly –
Section 6.1, page 4
(replacement)
Drain valve assembly –
Section 6.4, page 6 (replacement)
Section 7.2, page 10 (upgrade)
Modbus cable assembly –
Section 6.6, page 7
(replacement)
Flowmeter assembly –
Section 6.3, page 5 (replacement)
Section 7.1, page 9 (upgrade)
Flow control valve assembly –
Section 6.7, page 8 (replacement)
Section 7.3, page 11 (upgrade)
Temperature sensor assembly –
Section 6.5, page 6
(replacement)

4 INS/ANAINST/025-EN Rev. B | Navigator ADS551 | Low level dissolved oxygen | Replacement / Upgrade procedures – wet section spares
6 Replacement procedures
6.1 Replacing the flowcell PCB housing gasket,
PCB housing cover and PCB
Part numbers:
— AW502 228 flowcell PCB housing gasket
— AW502 227 flowcell PCB housing cover
— AW502 225 PCB assembly
Referring to Fig. 6.1:
1. Remove and retain 4 flowcell PCB cover fixing screws and
washers Aand remove PCB cover B.
2. Remove flowcell PCB housing gasket C. If replacing the
gasket, discard.
3. If replacing PCB assembly D, disconnect all cables
from the terminal block on the PCB assembly, loosen all
cable glands then remove cables.
It is necessary to partially remove the glands, blanking
plugs and the LLDO connector to remove PCB assembly
D.
4. Remove and retain 2 PCB fixing screws and fibre washers
Eand remove PCB assembly D. Take care not to lose
2 spacers Ffitted on the screw threads behind the PCB
assembly.
5. Carefully offer PCB assembly Dup into the flowcell PCB
housing and tighten 2 PCB fixing screws.
6. Remake cable connections (disconnected at step 3) – refer
to Fig. 6.2 and Table 6.1 for terminal connections.
7. Tighten the cable glands, plugs and LLDO connector into
the flowcell PCB housing to ensure a watertight seal.
8. Refit, or for new items, fit flowcell PCB housing gasket C
and cover Busing 4 PCB cover fixing screws and
washers A. (Ensure flowcell PCB gasket Cis located
correctly.)
IMPORTANT (NOTE)
To secure the new PCB into the flowcell PCB
housing, pass 2 PCB fixing screws and fibre
washers Ethrough the PCB mounting holes, fit
the spacers Fonto the screw threads.
Fig. 6.1 Replacing the flowcell PCB housing gasket, PCB housing and PCB
Fig. 6.2 Cable connections to transmitter – ADS551
Cable Color Terminal
block ID Description
Serial White
TB1
Data –ve
Green Data +ve
Screen Screen
Black 0 V
Red 24 V
Drain valve Red TB3 +ve
Black –ve
Temp sensor White TB5 Pt1000
Screen Pt1000
LLDO sensor Red TB4 +ve LLDO sensor
Blue –ve LLDO sensor
Flowmeter Red
TB2
+ve
Brown GND
Black –ve
Table 6.1 Cable connections to transmitter – ADS551
BC
A
D
E
F
TB1 TB3 TB5 TB4 TB2
White
Serial (Tx)
cable
Drain valve
cable
Temp sensor
cable
LLDO
cable
Flow-
meter
cable
Green
Screen Red
Black Red
Black
White
Screen
Red
Blue Red Brown Black

Navigator ADS551 | Low level dissolved oxygen | Replacement / Upgrade procedures – wet section spares | INS/ANAINST/025-EN Rev. B 5
6.2 Replacing the tundish assembly
Part number:
— AW502 065 tundish assembly
Referring to Fig. 6.3:
1. Rotate sample outlet tube Auntil the open end is free of
tundish assembly B.
2. Disconnect drain tube Cfrom tundish assembly B.
3. Unscrew and remove 2 tundish retaining screws Dtaking
care to retain spacers Elocated between the rear of the
tundish assembly and the main case.
4. Remove old tundish assembly B.
5. Fit the new tundish assembly by reversing the removal
procedure.
6.3 Replacing the flowmeter assembly
Part number:
— AW502 060
Referring to Fig. 6.4:
1. Depress manual override button Aon the drain valve
assembly to drain the flowcell.
2. Remove the flowcell PCB cover as detailed in step 1 of
Section 6.1, page 4.
3. Loosen cable gland Bat the flowcell PCB housing C.
4. Disconnect flowmeter cable Dfrom wet-section PCB
terminals TB2 – see Fig. 6.7, page 7 and remove cable.
5. Depress the QD coupling collar Eon QD coupling Fand
lift the top QD coupling Fcomplete with sample outlet
tube Gaway from the flowmeter H.
6. Depress the QD coupling collar Kon QD coupling Land
lift the flowmeter away.
7. Fit the replacement flowmeter into the QD coupling Land
refit QD coupling Fto the flowmeter outlet.
8. Pass the flowmeter cable through the cable gland Bat
the flowcell PCB housing Cand terminal connections to
PCB terminals TB2 – Fig. 6.7, page 7.
9. Tighten cable gland Band refit the PCB cover as detailed
in step 1 of Section 6.1, page 4.
10. Ensure the sample outlet tube Gis located correctly in the
tundish assembly J.
Fig. 6.3 Replacing the tundish assembly
IMPORTANT (NOTE)
Ensure orientation of the flow arrow on the
flowmeter is upwards.
Fig. 6.4 Replacing the flowmeter assembly

6 INS/ANAINST/025-EN Rev. B | Navigator ADS551 | Low level dissolved oxygen | Replacement / Upgrade procedures – wet section spares
6.4 Replacing the drain valve assembly and drain valve
cable assembly
Part number:
— AW502 056
Referring to Fig. 6.5:
1. Depress manual override button Aon drain valve Bto
drain the wet-section.
2. Disconnect clip-on cable connector Cfrom the end of the
drain valve coil housing by depressing clip D.
3. Disconnect the drain tube from barbed outlet connector
Eon the bottom of drain valve B.
4. Lock hex coupling Gand rotate nut Hclockwise to
release couplings. Remove the valve assembly, complete
with coupling G. Remove coupling Gfrom the valve
assembly and fit to new valve, complete with new bonded
seal I.
5. If fitting a new drain valve cable assembly, remove the
wet-section cover as detailed in step 1 of Section 6.1, page
4, loosen the drain valve cable gland in the wet-section
PCB housing and proceed with steps 6, 7and 8 (below).
If using the existing cable, re-connect the clip-on cable
connector Cto the end of the drain valve coil housing.
6. Disconnect the drain valve cable from the terminal block –
see Fig. 6.7, page 7 and discard the cable.
7. Feed the replacement drain valve cable through the cable
gland and make connections to PCB wet-section terminals
TB3 (see Fig. 6.3, page 5) and at the transmitter (see
Operating instruction OI/ADS550-EN).
8. Connect the drain valve clip-on cable connector Cto the
end of the drain valve coil housing.
9. Reconnect the drain tube to barbed outlet connector E
on bottom of drain valve B.
6.5 Replacing the temperature sensor assembly
Part number:
— AW502 220
Referring to Fig. 6.5:
1. Depress manual override button Aon drain valve Bto
drain the wet-section.
Referring to Fig. 6.6, page 7:
2. Remove and retain 4 flowcell PCB cover fixing screws and
washers Cand remove PCB cover D.
3. Remove flowcell PCB housing gasket E.
4. Loosen cable gland F.
5. Loosen terminal screws Gand disconnect temperature
sensor cables Hfrom TB5.
6. Withdraw sensor cables Hfrom flowcell PCB housing I
through cable gland F.
7. Unscrew the knurled nut on temperature sensor assembly
Jand carefully withdraw the temperature sensor from
flowcell housing K.
8. Ensure a new O-ring Lis securely located on the new
temperature sensor, insert the sensor into flowcell housing
Kand tighten the knurled nut on temperature sensor
assembly Jfinger-tight.
9. Feed cables from the new temperature sensor through
cable gland F, make connections correctly at TB5 and
tighten screws G.
10. Tighten cable gland F.
11. Refit flowcell PCB housing gasket Eensuring it is located
correctly.
12. Refit PCB flowcell cover Dand secure with 4 flowcell
PCB cover fixing screws and washers C.
Fig. 6.5 Replacing the drain valve assembly and drain valve cable assembly
A
B
C
D
E
F
G
H
I
IMPORTANT (NOTE)
Check existing small O-ring Lfitted on the end
of the temperature sensor is withdrawn along
with temperature sensor assembly J.

Navigator ADS551 | Low level dissolved oxygen | Replacement / Upgrade procedures – wet section spares | INS/ANAINST/025-EN Rev. B 7
6.6 Replacing the Modbus cable assembly
Part numbers:
— AW502 090 / 1.5 m (4.9 ft.)
— AW502 091 / 5 m (16.4 ft.)
— AW502 092 / 10 m (32.8 ft.)
— AW502 093 / 20 m (65.6 ft.)
Referring to Fig. 6.1, page 4:
1. Remove the PCB cover.
Referring to Fig. 6.7:
2. Loosen cable gland Aat the wet-section PCB housing
Band disconnect the Modbus cable Cfrom terminal
block connections D(TB1) marked white, green, screen,
black and red.
3. Withdraw Modbus cable Cfrom the PCB housing and
flowcell case assembly and discard.
4. Feed the replacement Modbus cable through cable gland
Aand remake connections to the (TB1) white, green,
screen, red and black terminal connections at the wet
section PCB and at the transmitter.
5. Refit the PCB cover by reversing the removal procedure.
Fig. 6.6 Replacing the temperature sensor assembly
E
TB1 TB3 TB5 TB4 TB2
White
Green
Screen Red
Black Red
Black
White
Screen
Red
Blue Red Brown Black
F
Fig. 6.7 Replacing the Modbus cable assembly
TB1 TB3 TB5 TB4 TB2
White
Green
Screen Red
Black Red
Black
White
Screen
Red
Blue Red Brown Black

8 INS/ANAINST/025-EN Rev. B | Navigator ADS551 | Low level dissolved oxygen | Replacement / Upgrade procedures – wet section spares
6.7 Replacing the flow control valve assembly
Part number:
— AW502 068 (imperial, for 1/4in. pipe)
— AW502 069 (metric, for 6 mm pipe)
Referring to Fig. 6.8:
1. Depress manual override button Aon drain valve Bto
drain the wet-section.
2. Unscrew coupling nut Cat the flow control valve inlet and
remove sample feed pipe D.
3. Unscrew coupling nut Eand remove old flow control
valve F.
4. Offer up replacement flow control valve Fto inlet stub
Gon flowcell assembly Hand with the flow control
valve in the vertical position, lightly nip up coupling nut E
– do not tighten at this stage.
5. Push sample feed pipe Dinto the base of replacement
flow control valve Fand lightly nip up coupling nut C–
do not tighten at this stage.
6. Check that sample feed pipe Dand flow control valve F
are in the correct orientation.
7. Tighten coupling nut E(on the valve outlet side) and
coupling nut C(on the sample inlet pipe) finger-tight, then
turn another 1 to 11/4turns using a spanner.
8. Turn the flow control valve Fto the shut position;
reintroduce the sample upstream at a low flow rate initially
and check for leakage. If any leaks are detected, slowly
tighten coupling nuts Eand Cuntil no further leakage
is detected.
9. Open the feed line upstream to the required volume flow
rate and check for leaks. If no leaks are detected, open
flow control valve Funtil the required flow rate is present.
IMPORTANT (NOTE)
– Ensure the correct kit has been ordered
(6 mm pipe or ¼ in. pipe).
– Before proceeding, shut off flow to the
flowcell assembly.
Fig. 6.8 Replacing the flow control valve assembly
1 to 11/4turns
1 to 11/4turns

Navigator ADS551 | Low level dissolved oxygen | Replacement / Upgrade procedures – wet section spares | INS/ANAINST/025-EN Rev. B 9
7 Upgrade procedures
7.1 Upgrading the flowmeter
Part number:
— AW502 250
Referring to Fig. 7.1:
1. Depress manual override button Aon the drain valve
assembly to drain the flowcell.
2. Remove outlet tube Bfrom QD coupling Cby
depressing collar Don QD coupling Cand pulling tube
Bup.
3. Unscrew and remove QD coupling Cand wipe up any
water spillage.
4. Screw new QD coupling Cin and fit:
— flowmeter E
— (upper) QD coupling F
— sample outlet tube G
5. Remove the flowcell PCB cover as detailed in step 1 of
Section 6.1, page 4.
6. Remove blanking plug Ifrom front of flowcell PCB
housing Jand replace with supplied cable gland (and
O-ring) K.
7. Pass flowmeter cable Lthrough cable gland Kat
flowcell PCB housing Jand make connections to PCB
terminal block TB2 – refer to Fig. 6.7, page 7.
8. Tighten cable gland Kto form a watertight seal.
9. Check sample outlet tube Gis located correctly over
tundish assembly Hand restart sample flow.
Referring to Operating instruction OI/ADS550-EN:
10. Configure the transmitter to read the output from the
flowmeter by selecting Sensor Setup, scrolling to
Flowmeter and selecting Enabled.
(This enables auto calibrations to be configured.)
IMPORTANT (NOTE)
Ensure sample outlet tube Gis located
correctly over tundish assembly H.
Fig. 7.1 Upgrading the flowmeter assembly
Upgraded flowmeter fitted and connected

10 INS/ANAINST/025-EN Rev. B | Navigator ADS551 | Low level dissolved oxygen | Replacement / Upgrade procedures – wet section spares
7.2 Upgrading the drain valve assembly
Upgrade kit part number:
— AW502 240
Referring to Fig. 7.2:
1. Unscrew and remove blanking plug A(with O-ring)
at base of flowcell assembly B.
2. Fit sealing washer Cto male adaptor coupling D, screw
this assembly into flowcell base Band tighten.
3. Fit Boded seal Eonto thread of male stud coupling F,
screw into the upstream port of the drain solenoid valve
Gand tighten – note arrow position on valve body.
4. Wrap PTFE tape around the thread of barbed connector
Hand screw into the outlet port of the drain solenoid
valve G.
5. Offer drain solenoid valve assembly Gup to male adaptor
coupling Dand push onto spigot; orientate the valve (as
shown in Fig. 7.2) and tighten couplings Dand F
together – ensure couplings are fully tightened.
6. Fit the supplied length of drain tube Ionto the barbed
connector Jon drain valve Gand route as short and
straight as possible to a suitable drain.
7. Remove blanking plug Kfrom the underside of flowcell
PCB housing Land replace with supplied cable gland
and O-ring M.
8. Feed cable Nfrom drain solenoid valve assembly G
through the cable gland Mand make connections to
PCB terminal block TB3 – refer to Fig. 6.7, page 7.
9. Tighten cable gland Mto form a watertight seal.
Referring to Fig. 7.1, page 9:
10. Check sample outlet tube Gis located correctly over
tundish assembly Hand restart sample flow.
Referring to Operating instruction OI/ADS550-EN:
11. Configure the transmitter by selecting Sensor Setup,
scrolling to Calibration Valve and selecting Enabled.
(This enables auto calibrations to be configured.)
IMPORTANT (NOTE)
There will be sample left in the flowcell so it is
advisable to have a beaker or similar receptacle
to catch the sample.
Fig. 7.2 Upgrading the drain valve assembly
A
B
C
D
E
F
G
H
I
J
K
M
L
Correct drain
valve orientation
Upgraded drain valve
fitted and connected

Navigator ADS551 | Low level dissolved oxygen | Replacement / Upgrade procedures – wet section spares | INS/ANAINST/025-EN Rev. B 11
7.3 Upgrading the flow control valve assembly
Part number:
— AW502 270 (imperial, for 1/4in. pipe)
— AW502 275 (metric, for 6 mm pipe)
Referring to Fig. 7.3:
1. Depress manual override button Aon drain valve B
to drain the wet-section.
2. Unscrew coupling nut Con sample inlet coupling D
and remove sample feed pipe E.
3. Unscrew the remainder of coupling Dfrom the side
of flowcell assembly Fand remove along with nylon
washer G.
4. Fit new 3/8in. BSP x 6 mm or 1/4in. coupling (D) and new
nylon washer Ginto flowcell inlet port block Hand
tighten.
5. Offer up flow control valve Ito the inlet stub Jof
coupling D(above), and with the valve in the vertical
position, lightly nip up coupling nut K– do not tighten at
this stage.
6. Push the sample feed pipe into the base of flow control
valve Iand lightly nip up coupling nut L– it may be
necessary to cut or bend the pipe to arrange it into the
correct orientation for mating with the flow control valve.
7. Check that sample feed pipe Eand flow control valve I
are in the correct orientation.
8. Tighten coupling nuts K(on the valve outlet side) and L
(on the sample inlet pipe) finger-tight and then turn another
1 to 11/4turns using a spanner.
9. Turn flow control valve Ito the shut position; reintroduce
the sample upstream at a low flow rate initially and check
for leakage. If any leaks are detected, slowly tighten
coupling nuts Land Kuntil no further leakage is
detected.
10. Open the feed line upstream to the required volume flow
rate and check for leaks. If no leaks are detected, open
flow control valve Iuntil the required flow rate is present.
IMPORTANT (NOTE)
– Ensure the correct kit has been ordered
(6 mm pipe or ¼ in. pipe).
– Before proceeding, shut off flow to the
flowcell assembly.
IMPORTANT (NOTE)
Take care not to overtighten as this may strip the
thread in the inlet port block H.
Fig. 7.3 Upgrading the flow control valve assembly
1 to 11/4turns
1 to 11/4turns

INS/ANAINST/025-EN Rev. B 12.2018
—
We reserve the right to make technical changes or modify the contents of this document
without prior notice. With regard to purchase orders, the agreed particulars shall prevail.
ABB does not accept any responsibility whatsoever for potential errors or possible lack of
information in this document.
We reserve all rights in this document and in the subject matter and illustrations contained
therein. Any reproduction, disclosure to third parties or utilization of its contents – in
whole or in parts – is forbidden without prior written consent of ABB.
© ABB 2018 3KXA494540R2001
—
ABB Limited
Measurement & Analytics
Howard Road, St. Neots
Cambridgeshire, PE19 8EU
UK
Tel: +44 (0)0870 600 6122
Fax: +44 (0)1480 213 339
Email: instrumen[email protected]om
ABB Inc.
Measurement & Analytics
125 E. County Line Road
Warminster
PA 18974
USA
Tel: +1 215 674 6000
Fax: +1 215 674 7183
abb.com/measurement
Table of contents
Other ABB Analytical Instrument manuals