EnglishDeutsch
 logo
Brands
  1. Home
  2. •
  3. Brands
  4. •
  5. ABB
  6. •
  7. Industrial Equipment
  8. •
  9. ABB 2LINE 2CSV4005PK User manual

ABB 2LINE 2CSV4005PK User manual

Other ABB Industrial Equipment manuals

ABB HT573334 User manual

ABB

ABB HT573334 User manual

ABB HT563220 User manual

ABB

ABB HT563220 User manual

ABB HT593906 User manual

ABB

ABB HT593906 User manual

ABB HT607940 User manual

ABB

ABB HT607940 User manual

ABB TZIDC-200 User manual

ABB

ABB TZIDC-200 User manual

ABB HT610347 User manual

ABB

ABB HT610347 User manual

ABB HT603622 User manual

ABB

ABB HT603622 User manual

ABB HT566657 User manual

ABB

ABB HT566657 User manual

ABB Arc Guard System TVOC-2 Product manual

ABB

ABB Arc Guard System TVOC-2 Product manual

ABB HT604913 User manual

ABB

ABB HT604913 User manual

ABB HT610963 User manual

ABB

ABB HT610963 User manual

ABB HT579541 User manual

ABB

ABB HT579541 User manual

ABB HT600038 User manual

ABB

ABB HT600038 User manual

ABB HT566551 User manual

ABB

ABB HT566551 User manual

ABB Power2 850-M16 User manual

ABB

ABB Power2 850-M16 User manual

ABB HT575644 User manual

ABB

ABB HT575644 User manual

ABB HT612544 User manual

ABB

ABB HT612544 User manual

ABB HT613031 User manual

ABB

ABB HT613031 User manual

ABB HT611542 User manual

ABB

ABB HT611542 User manual

ABB SafeLink User manual

ABB

ABB SafeLink User manual

ABB HT598341 User manual

ABB

ABB HT598341 User manual

ABB HT610827 User manual

ABB

ABB HT610827 User manual

ABB HT608017 User manual

ABB

ABB HT608017 User manual

ABB HT600348 User manual

ABB

ABB HT600348 User manual

Popular Industrial Equipment manuals by other brands

Mark 7 Evolution user manual

Mark 7

Mark 7 Evolution user manual

Husky HyPET Original instructions

Husky

Husky HyPET Original instructions

bora PM-1800 user manual

bora

bora PM-1800 user manual

Grizzly T32428 owner's manual

Grizzly

Grizzly T32428 owner's manual

Siemens 8MF1 Series operating instructions

Siemens

Siemens 8MF1 Series operating instructions

Phoenix PHX-150 user guide

Phoenix

Phoenix PHX-150 user guide

Hermetica 10 Series user manual

Hermetica

Hermetica 10 Series user manual

HORNER OEE Solution manual

HORNER

HORNER OEE Solution manual

Hammerhead HG375 parts manual

Hammerhead

Hammerhead HG375 parts manual

SCHUNK VERO-S NSE-A3 138 Assembly and operating manual

SCHUNK

SCHUNK VERO-S NSE-A3 138 Assembly and operating manual

Webasto GSE CAN installation guide

Webasto

Webasto GSE CAN installation guide

BAC BCP2D Installation, Operating, Maintenance

BAC

BAC BCP2D Installation, Operating, Maintenance

M&C SP Series instruction manual

M&C

M&C SP Series instruction manual

Raven DCS 700 Installation and service manual

Raven

Raven DCS 700 Installation and service manual

Maxcess FIFE D-MAXE 3 Quick reference guide

Maxcess

Maxcess FIFE D-MAXE 3 Quick reference guide

MachineryHouse SW4000 instruction manual

MachineryHouse

MachineryHouse SW4000 instruction manual

Dover Triton 9610 installation guide

Dover

Dover Triton 9610 installation guide

turck DI80-N quick start guide

turck

turck DI80-N quick start guide

https://manuals.online logo
https://manuals.online logoBrands
  • About & Mission
  • Contact us
  • Privacy Policy
  • Terms and Conditions

Copyright 2026 Manuals.Online. All Rights Reserved.

1Annotare sulle etichette i dati relativi al
codice di chiamata (1) e al nome
dell'abitazione (2).
Note the information concerning the call
code (1) and the house or flat name (2)
directly on the cards.
2CSV4005PK POSTO ESTERNO CON ELENCO CITOFONICO
Placca esterna che alloggia una scheda informativa, dimensioni 7 mm x 276 mm.
Utile negli impianti con posto esterno con tastiera numerica, per informare il visitatore sui codici di chiamata delle abitazioni.
Per agevolare l'annotazione di queste informazioni vengono forniti fogli con etichette in bianco e prestampate da posizionare
in ciascun porta-etichette.
Il posto citofonico è dotato di illuminazione ausiliare per situazioni di scarsa illuminazione esterna. Questo sistema di
illuminazione si può alimentare con tensione alternata (12 Vca) o continua (15 Vcc).
USO DELLE ETICHETTE - USING THE CARD
2CSV4005PK ENTRANCE PANEL WITH DIRECTORY
Outside panel which accommodates one informative cardholder (1), 7 mm x 276 mm.
Can be used in installations whose entrance panel has a numeric keypad to inform the visitor of the call codes of the houses
or flats. To make it easy to record this information, a series of sheets of blank and pre-printed cards is provided to be placed
in each of the cardholders.
Auxiliary lighting is build into the panel for situations where outside light is insufficient. The auxiliary lighting can be fed
with either alternating current (12Vac) or direct current (15Vdc).
Etichette in bi nco - Blank ca d
Etichette prest mp te - P e-p inted ca ds
Queste etichette vengono fornite con le caselle prestampate, in modo da annotare i codici di chiamata e il nome delle abitazioni. Queste etichette
vanno utilizzate quando non si usa il modello della nostra pagina Web.
These cards are provided with preprinted spaces to enable you to record the call codes and house or flat name directly. Use these cards when
you do not intend to use the template from our web page.
Cod. 26 5790 - Rev. 01
CARATTERISTICHE TECNICHE - TECHNICAL CHARACTERISTICS MODULI COMPLETI
COMPLETE MODULES
Temperatura d'esercizio - Operating temperature -10 ... +55 oC
1
1
9 mm
128 mm
14 mm
2CSV4005PK
1
2
1Scaricare il modello che si trova nella
pagina web di ABB:
http://bol.it.abb.com, nella sezione
Assistenza tecnica.
Completare i dati relativi al codice di
chiamata e al nome dell'abitazione.
Download the template from the
Technical Support section of the ABB
web page at http://bol.it.abb.com. Fill
in the information concerning the call
code and house or flat number.
12 V
Alimentazione CC
DC Power supply
MORSETTI
TERMINALS
CARATTERISTICHE
CHARACTERISTICS
15
V
Alimentazione CA
AC Power supply
,
,
Specifiche soggette a variazioni senza preavviso.
Specifications subject to modifications without prior notice
ABB SACE
una divisione di ABB s.p.a.
Viale dellIndustria, 18
20010 Vittuone (MI) - Italy
Tel.: 02.90 4.1 - Telefax: 02.90 4.7609
2Stampare il file sul foglio di etichette in
bianco (1) fornito in dotazione.
Print the file on the blank cards sheet
(1) provided
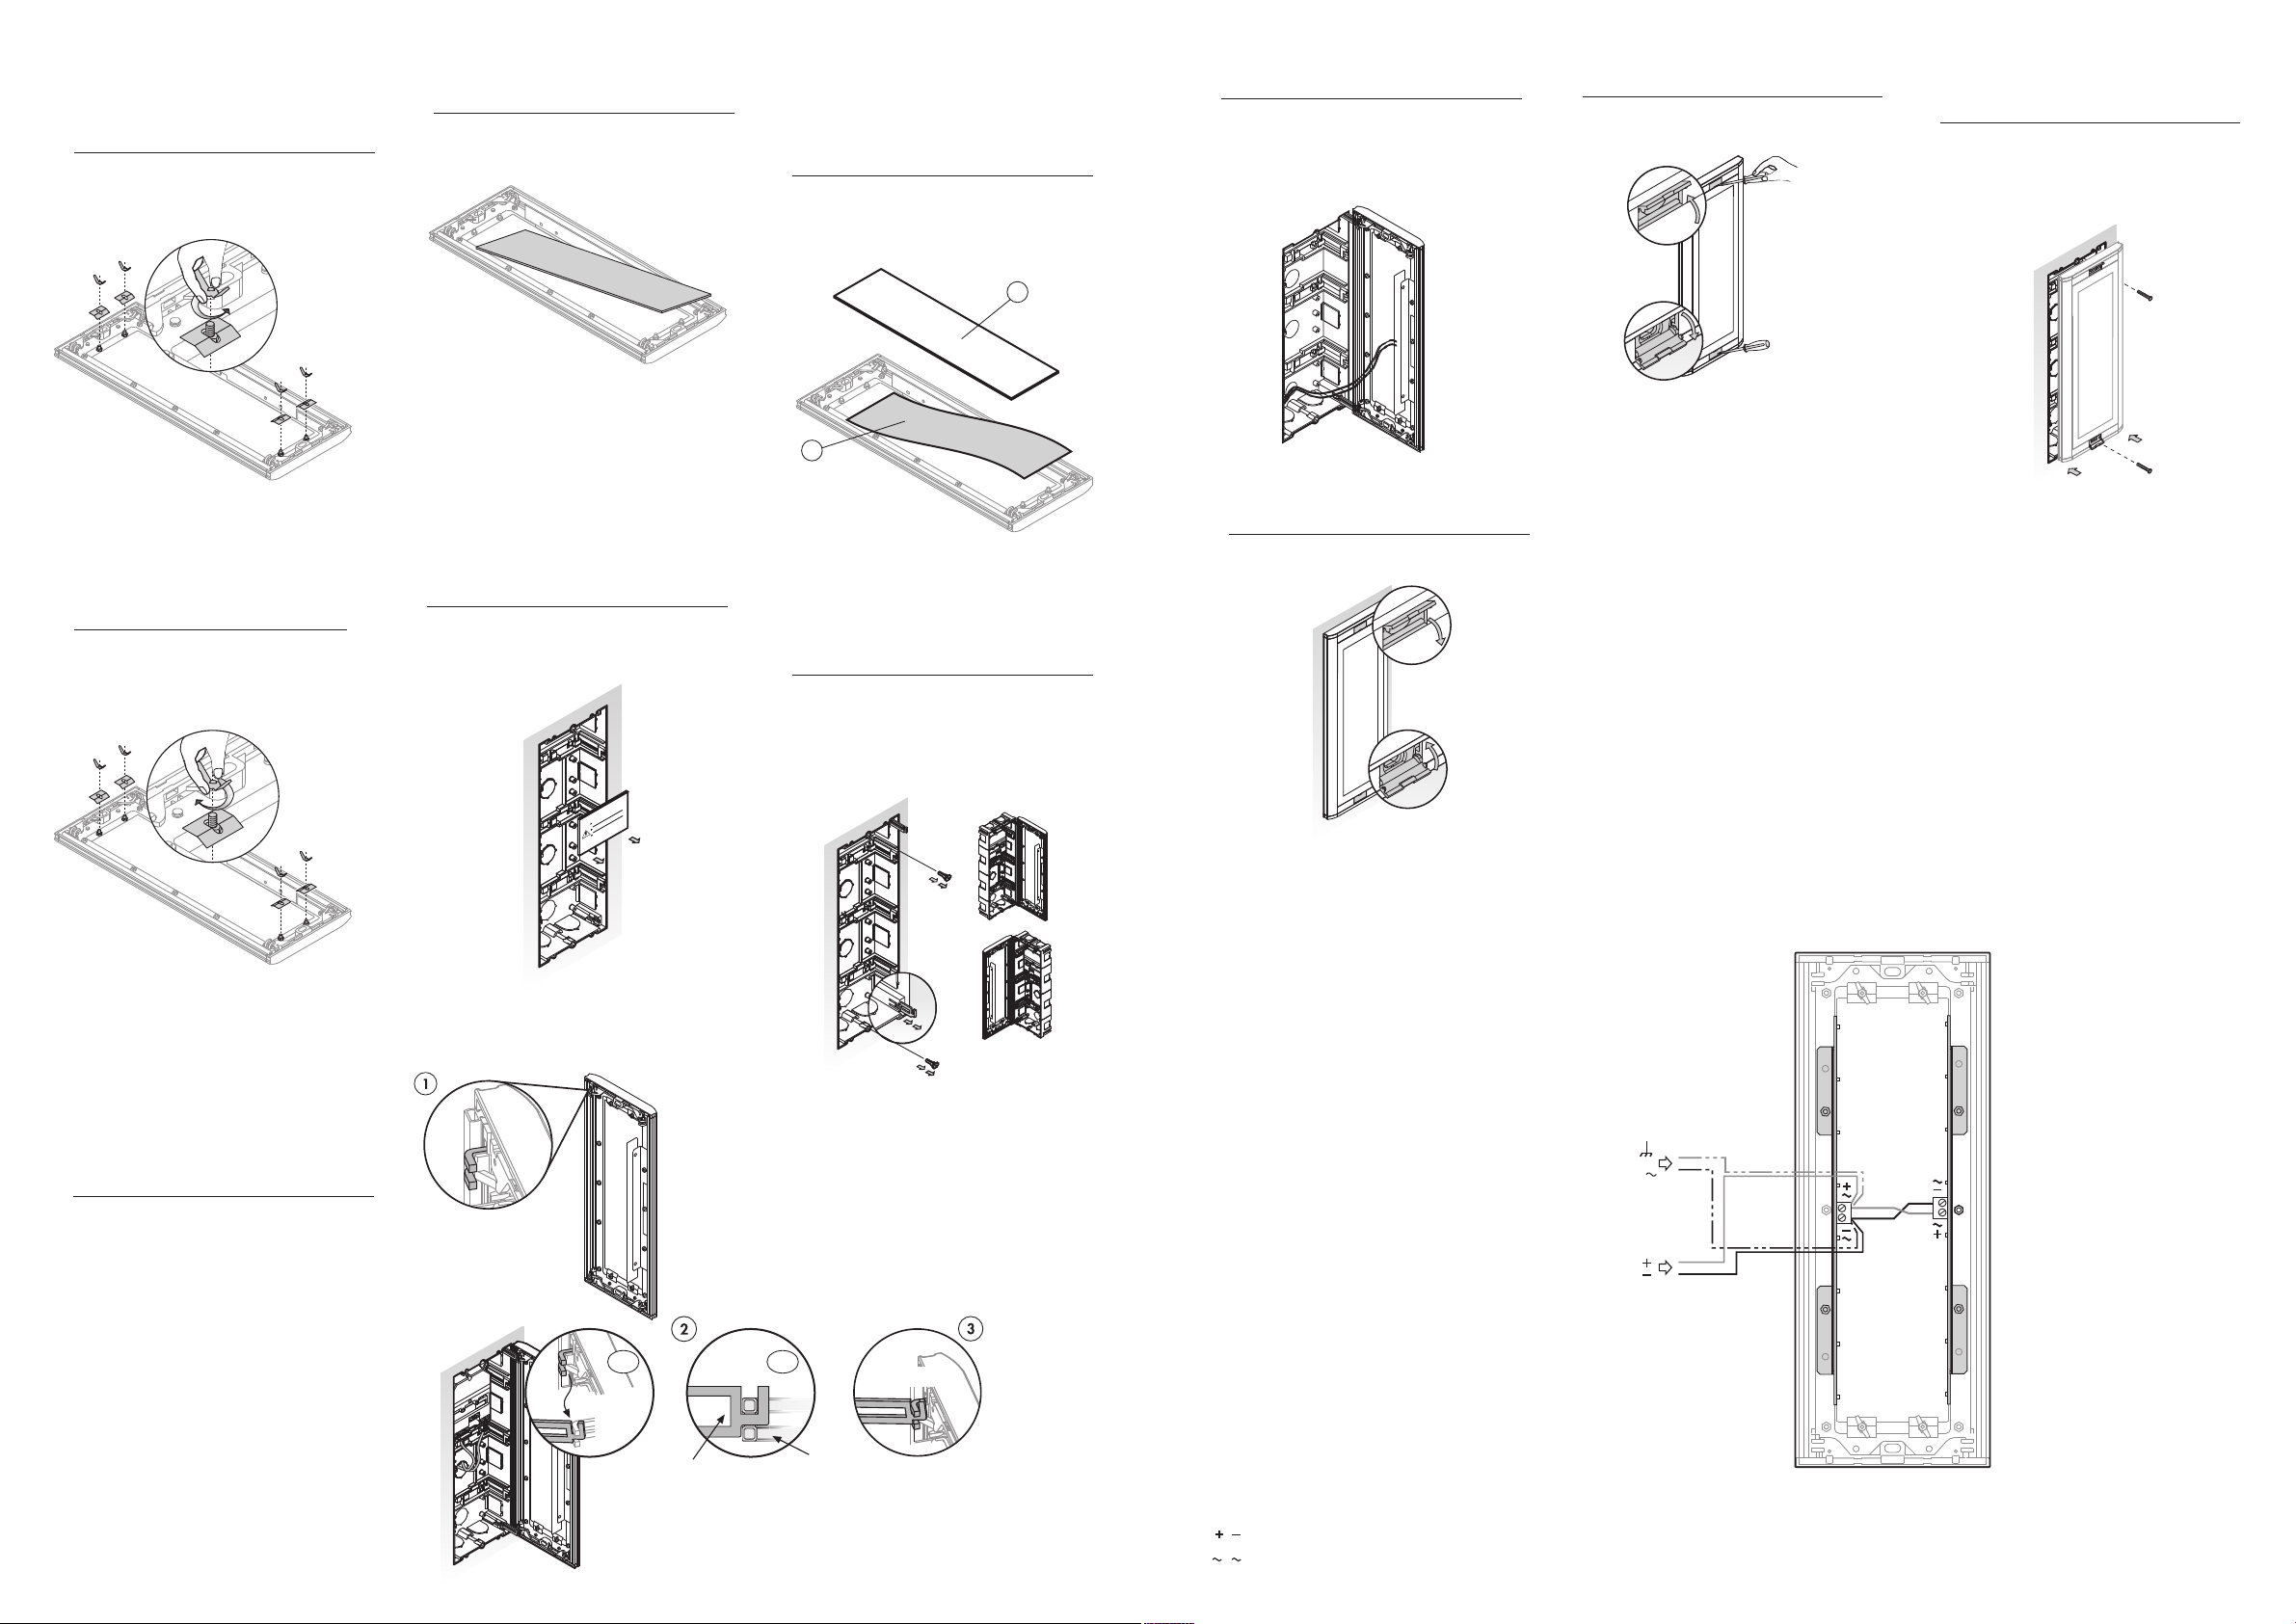
Chiudere il posto, premere lo stesso contro
la scatola ad incasso e fissare con le viti
di fissaggio.
Close the panel; press it against the flush-
mounted box and attach it using the fixing
screws.
10
Cerniere
Pin Elemento per il fissaggio
Pivot point
ISTRUZIONI PER IL MONTAGGIO - ASSEMBLY INSTRUCTIONS
ISTRUZIONI PER IL COLLEGAMENTO - CONNECTION INSTRUCTIONS
MORSETTI - TERMINALS
Alimentazione CC - DC Power supply
Alimentazione CA - AC Power supply
Chiudere i coperchi anteriori superiore e
inferiore.
Close the top and bottom front covers.
11
2
,
,
Alimentatore
(CA o CC)
Power supply
(AC or DC)
1
2
Togliere il rinforzo dalla scatola ad incasso.
5
Remove the reinforcement of the flush-
mounted box.
Retirar en el momento de
instalar la placa de calle
Remove when installing the
entrance panel
Retirer lors de l'installation
de la plaque de rue
6Togliere i tappi e le cerniere dalla scatola
ad incasso. Estrarre le due cerniere
necessarie, a seconda che si desideri aprire
il posto verso destra o verso sinistra.
Remove the caps and the fixing pins from
the flush-mounted box. Choose the two
fixing pins you want to hinge the panel on
to, so that it opens either to the right or to
the left.
The entrance panel is equipped with pivot
points to hold the fixing axle in place on
each of its sides (1). Attach the fixing axles
you have removed to the corresponding
pivot points (2) and ( ). The unused pins
should be placed in their slots.
7
Elemento per il fissaggio
Pivot point
CLICK!
2.1 2.2
Il posto esterno dispone di un elemento per
il fissaggio della cerniera ad ogni vertice
(1). Inserire le cerniere estratte nei relativi
elementi di fissaggio (2) e ( ). Introdurre
completamente le cerniere non utilizzate
nelle fessure.
Aprire i coperchi anteriori superiore e
inferiore.
Open the top and bottom front covers.
9
Smontare le 4 giunzioni metalliche
allentando i supporti di fissaggio sul retro
della placca.
1Una volta inserita la scheda informativa
(1) all'interno della placca, riposizionare
il pannello trasparente (2) in posizione
originaria.
3
Riposizionare le giunzioni metalliche
e serrare i supporti di fissaggio.
4
Estrarre il pannello trasparente.
2
Extract the transparent panel.
After inserting the informative label (1),
put the transparent panel back in position
(2).
Reassemble the metal holding clips and
tighten the wing nuts.
Disassemble the 4 metal holding clips by
loosening the wing nuts at the back of the
panel.
Eseguire i collegamenti elettrici. Vedere le
istruzioni di collegamento.
Make the electrical connections. See
connection instructions.
8
V
AC
DC