logo
Brands
  1. Home
  2. •
  3. Brands
  4. •
  5. ABB
  6. •
  7. Industrial Equipment
  8. •
  9. ABB CRB 15000 Specification sheet

ABB CRB 15000 Specification sheet

Other manuals for CRB 15000

5

Other ABB Industrial Equipment manuals

ABB HT576939 User manual

ABB

ABB HT576939 User manual

ABB HT570858 User manual

ABB

ABB HT570858 User manual

ABB HT593489 User manual

ABB

ABB HT593489 User manual

ABB RELION 650 SERIES User manual

ABB

ABB RELION 650 SERIES User manual

ABB HT580519 User manual

ABB

ABB HT580519 User manual

ABB HT610288 User manual

ABB

ABB HT610288 User manual

ABB HT565298 User manual

ABB

ABB HT565298 User manual

ABB HT585153 User manual

ABB

ABB HT585153 User manual

ABB HT613072 User manual

ABB

ABB HT613072 User manual

ABB HT607781 User manual

ABB

ABB HT607781 User manual

ABB HT553703 User manual

ABB

ABB HT553703 User manual

ABB UniGear ZS2 UniSafe 36 User manual

ABB

ABB UniGear ZS2 UniSafe 36 User manual

ABB HT582260 User manual

ABB

ABB HT582260 User manual

ABB VD4 Series User manual

ABB

ABB VD4 Series User manual

ABB HT842672 User manual

ABB

ABB HT842672 User manual

ABB HT608849 User manual

ABB

ABB HT608849 User manual

ABB HT613041 User manual

ABB

ABB HT613041 User manual

ABB HT610062 User manual

ABB

ABB HT610062 User manual

ABB HT581466 User manual

ABB

ABB HT581466 User manual

ABB HT563047 User manual

ABB

ABB HT563047 User manual

ABB HT845016 User manual

ABB

ABB HT845016 User manual

ABB HT565468 User manual

ABB

ABB HT565468 User manual

ABB HT567729 User manual

ABB

ABB HT567729 User manual

ABB HT845240 User manual

ABB

ABB HT845240 User manual

Popular Industrial Equipment manuals by other brands

Mark 7 Evolution user manual

Mark 7

Mark 7 Evolution user manual

Husky HyPET Original instructions

Husky

Husky HyPET Original instructions

bora PM-1800 user manual

bora

bora PM-1800 user manual

Grizzly T32428 owner's manual

Grizzly

Grizzly T32428 owner's manual

Siemens 8MF1 Series operating instructions

Siemens

Siemens 8MF1 Series operating instructions

Phoenix PHX-150 user guide

Phoenix

Phoenix PHX-150 user guide

Hermetica 10 Series user manual

Hermetica

Hermetica 10 Series user manual

HORNER OEE Solution manual

HORNER

HORNER OEE Solution manual

Hammerhead HG375 parts manual

Hammerhead

Hammerhead HG375 parts manual

SCHUNK VERO-S NSE-A3 138 Assembly and operating manual

SCHUNK

SCHUNK VERO-S NSE-A3 138 Assembly and operating manual

Webasto GSE CAN installation guide

Webasto

Webasto GSE CAN installation guide

BAC BCP2D Installation, Operating, Maintenance

BAC

BAC BCP2D Installation, Operating, Maintenance

M&C SP Series instruction manual

M&C

M&C SP Series instruction manual

Raven DCS 700 Installation and service manual

Raven

Raven DCS 700 Installation and service manual

Maxcess FIFE D-MAXE 3 Quick reference guide

Maxcess

Maxcess FIFE D-MAXE 3 Quick reference guide

MachineryHouse SW4000 instruction manual

MachineryHouse

MachineryHouse SW4000 instruction manual

Dover Triton 9610 installation guide

Dover

Dover Triton 9610 installation guide

turck DI80-N quick start guide

turck

turck DI80-N quick start guide

https://manuals.online logo
https://manuals.online logoBrands
  • About & Mission
  • Contact us
  • Privacy Policy
  • Terms and Conditions

Copyright 2026 Manuals.Online. All Rights Reserved.

GoFa CRB 15000
—
Unboxing the cobot- Get Started Guide
Version 1 0
TM
Before you start
—
01
—
ABB Service
Get support for your region via chat, email or phone.
http ://to.abb/KgwLVwp9
—
Free online video tutorials
For a detailed video guide on how to get started, access our
online tutorial here: http ://to.abb/K-TEQmUN
—
Product manual
You can also access product manuals for further
information. Please contact your local ABB sales team to set
up your account. http ://to.abb/BLGHcyT-
Preparation
—
—
Things to know before getting started
IMPORTANT- The weight of the CRB 15000 robot is 27 kg.
We recommend, for safe installation, two trained persons
with knowledge of mechanical and electrical
installation/maintenance/repair work, assemble this
cobot
You also need
A wrench or a he key fit for M10 screws; A 0.4mm (or
smaller) slot screw driver; A table with holes for secure
M10 screws and locating pins.
02 Step 1 | Preparation
Two holes for pins (size: mm)

What’s inside the boxes?
—
—
01 GoFa™ C B 15000 Manipulator
Brake release tool
—
03 Accessories, incl. screws, cables etc.
—
02 OmniCore™ C30 cobot controlle
FlexPendan
—
04 Documents and labels
Keep the printed documents and labels for further service.
+ +
03Step 1 | Preparation
04 Step 2 | Hardware set up
Mounting the cobot
—
Example: Table mounting
—
01 Lift the manipulator
IMPORTANT- When lifting
the cobot from the
packaging, grasp the cobot
at the foot and elbow, as
shown in the image.
—
02 Transport the manipulator
Make sure the intended
mouting platform or
foundation is stable and
flat.
—
02 Tighten the screws
You can ind our screws
and two pins in the
controller packaging box
Use the pins to ix the cobot
position
Insert the our screws at the
cobot base. Tighten each
screw.
—
03 Place the controller
Li t the controller rom C30
box and place it on an
appropriate table.
Ensure the height, weight
and stability o the table
Mount the covers i they are
available. In this case, you
also need to plug in the
Ethernet, FlexPendant cable
and power cable which are
mounted on the covers
Insert the cable pins to a
connector and attach it to
X15 port. Connect the
FlexPendant cable to X4
port.
05Step 2 | Hardware set up
Connect cables
—
—
02 Manipulator
Connect the cable to the
manipulator and rotate the
socket to lock the cable
Cable article number:
3HAC0 3212-00
(connected to X1)
06 Step 2 | Hardware set up
—
01 Controller
Connect corresponding
cables to ports X0 and X1,
and attach the connector to
the port X14
Connect the FlexPendant
power cable to the X4 port.
Cable article number
X0: 3HAC066153-00
X1: 3HAC0 3212-002
You can also connect X4 port from the front if covers are
mounted.
Safety
—
—
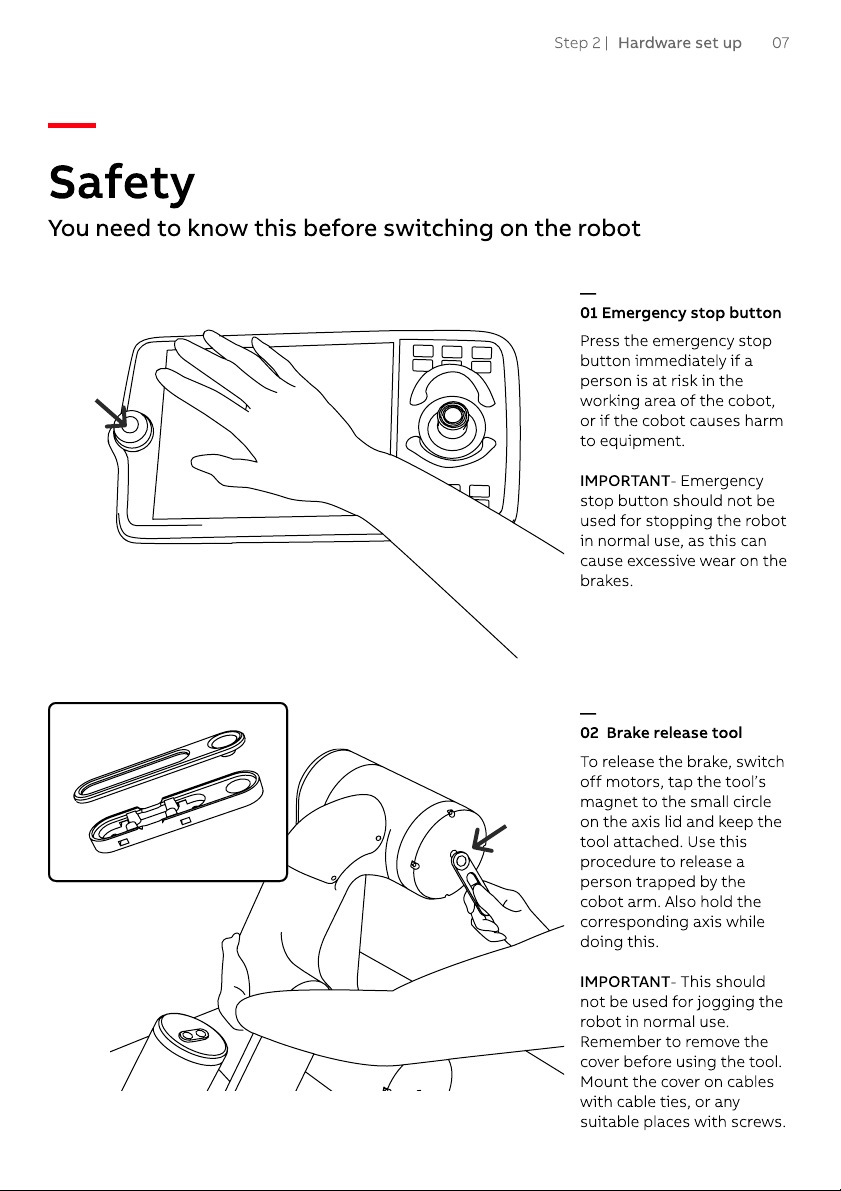
01 Emergency stop button
Press the emergency stop
button immediately if a
person is at risk in the
working area of the cobot,
or if the cobot causes harm
to equipment.
I PORTANT- Emergency
stop button should not be
used for stopping the robot
in normal use, as this can
cause excessive wear on the
brakes.
—
02 Brake release tool
To release the brake, switch
off motors, tap the tool’s
magnet to the small circle
on the axis lid and keep the
tool attached. Use this
procedure to release a
person trapped by the
cobot arm. Also hold the
corresponding axis while
doing this
I PORTANT- This should
not be used for jogging the
robot in normal use.
Remember to remove the
cover before using the tool.
Mount the cover on cables
with cable ties, or any
suitable places with screws.
07Step 2 | Hardware set up
You need to know this before switching on the robot
Switch on the robot
—
—
01 Press the button
—
02 FlexPendant
Follow the instruction on
the FlexPendant screens,
and press the enabling
device to switch on the
FlexPendant
08 Step 2 | Hardware set up
Move the robot
—
—
01 Enable Lead-through
Use FlexPendant, click on
the quick setting menu on
the top right and open the
jog interface

Toggle the Lead-through
button to enable it
—
02 Move the cobot
Grab the arm and move the
robot to a suitable position
for mounting grippers and
tools. 
You may need to press and
hold the enabling device at
the same time depending on
your safety configuration
IMPORTANT: Switch off
Lead-through after finishing
moving the cobot
09Step 2 | Hardware set up