Abestorm Water Damage Series User manual

User’s Manual
Note: as we keep upgrading our product,we reserve the right to modify the product
without natice in advance.
Abestorm Solutions INC
Water Damage Series
Add:Berlin
Tel: +44 (20) 81243974
Email: www.abestorm.com
DualPro Dehumidifier

Specifications
Operation Notes Guidelines
Howitworks
Operation
Troubleshooting
Maintenance
Warranty
Important Notes
Overview
Features
10
9
8
5
4
3
3
2
2
2
Warning: Pleasereadandunderstandthesewarningsandinstructionsbeforeusingthe
machine.Donotoperatethisdevicewiththecaseopenedorcanceled.
Donotadjustorcorrectthemachineinanyway.OnlyuseandreplacepartsWarning:
authorizedbyALORAIRproducts.Modifyoruseapprovedparts . Itmaycausedangeror
damagethemachine,andthewarrantywillbecomeinvalid.Youshouldcontactyourdealerfor
assistanceinthisregard.
1. Make sure to unplug the power plug before servicing.
Before opening the machine cover, make sure to unplug the power cord.
Make sure the power cord is properly grounded.
Check that the power cord is not damaged. If the plug is damaged, do not use the machine.
2.Risk of electric shock
3.Be careful that moving parts can injure your hands. Make sure the power plug has been
unplugged before servicing.
4.The surface of the device may be hot. Allow the equipment to cool before performing
maintenance procedures.
Important Notes
1

Overview
Daul pro has an extremely high water-repellent capacity, which makes the
machine an authorized machine to meet recovery needs. The flexible installation
makes it ideal for almost all applications. It is the best choice for all urgent
post-water injection repair tasks (elimination of moisture and early prevention of
mold growth). Its wide range of applications include flooding and restoration,
carpet cleaning, laundry, merchants, garages, etc... or anywhere you need to
extract moisture at a professional level.
New generation surface scratch resistance polyethylene shell 25% than the
previous generation. The self-developed rotating shell design is easy to
maintain and beyond imagination. Telescopic handles and rubber tires are
stacked together for easy transportation. Under the condition of unchanged
performance, the volume of the whole machine is 40% smaller. Simplified user
controls include a large LCD display and APP control. It can control the
dehumidifier at home anytime and anywhere, plus the built-in pump to pump
water through the dehumidifier more intelligently.
Features
Smart Wi-Fi & APP control
Easy clean – shellcanbe opened to access all components
Easy to store wires and hoses
Built-in Condensate Pump
Environmental R410A Refrigerant
Sturdy handle-Large Diameter Wheels
MicrochannelColdaHeatExchanger
Rotational Molded Body
Superior Stacking
Rotary Compressor
Ducting Options
Water-Full Protection
Automatic Humidistat Control
Quick Connection to Cable/Hose
Memory Starting
MERV-8 Filter
Low Temperature
Specifications
Power: 110-120 V/60Hz, 4.3A, 220-240 /60Hz, 2.5A
Size For: Up to 1,300 sq.ft
Filter: MERV - 8 Filter
Airflow: 210 CFM, 350 CMH
Sound Pressure Level: < 58 dBA
Refrigerant: R290A
Wheel: 2 Wheels
Draining: Condensate Pump
Functioning Temperature Range: 35.6~100.4℉
Functioning Humidity Range: 25~80%
Water Removal (AHAM): 50 PPD@80 ℉-60%
Weight: 70.5 lbs
Unit Dim (L×W H): 14.9” X14.6”X 23.1”
Operation Notes Guidelines
The unit should be operated stored and transported on stable surfaces.For
efficiency purposes, the windows and the doors should be closed avoid placing
the unit in a place where the air outlet and inlet are blocked.
Drain Hose Notes
It comes with a drain line connection that is easily plugged in the unit .
The drain line may be directed into the drain or the sink .
For proper drainage, uncoil the hose before you deploy it to use.
The end of the hose should never be placed at the height of 15 feet.
Always ensure that the drain hose is not blocked before you embark on using it.
Transportation Notes
During transportation, you must secure the dehumidifier using elastic bands
If the unit is transported vertically, let it stand in a normal position for not less
than 30 minutes before using it.
23

Howitworks
The dehumidifier uses an integral humidistat in monitoring the conditioned
space. As soon as the conditions get beyond the desired level, the air is
energized. The compressor will then push it across the evaporator coils. The
coil is cooler than the dew point. So the water vapor will be forced to
condensate into liquid. The cool air will then be reheated before it is
distributed into the room.
Operation
Press the POWER button to turn the dehumidifier ON and OFF.
Press the PURGE button to purge the machine.
Press the MENU button to advance to the next screen or to enter a value.
Press the SET button to scroll through available values.
-6-
Press the MENU button to advance to the next screen or to e
nter a value.
Press the SET button to scroll through available values.
OPERATION NOTES GUIDELINES
1. When the unit is plugged in you will see
the AlorAir LOGO.
2. The display will inform the machine is in
shutdown mode, press the “Power button”
to turn on.
In: Temperature, Humidity, GPP of the current inlet. GPP=
Grains per pound (GR/LB)
Out: Temperature, Humidity, GPP of the current outlet. GPP=
Grains per pound (GR/LB)
3. When the machine is in dehumidification
mode, the display will show:
UNIT OFF
Press to start
70 60 93
90 50 70
40
Set
020 JOB HRS 050 LIFE HRS
!
Easy Filter Access
Dual-Voltage
Air outlet
Sturdy handle
Large Diameter Wheels
Easy access to all
components
Water pipe power cord
storage
-6-
45

76
67

89

10 11
Symptom Cause Solution
A blank Display Inappropriate Connection Check and ensure that the two ends of the
power code are properly plugged in
Power Outage Try to have the power reset
The air is not flowing
A dirty Filter The filter should be cleaned
A blocked air outlet and
inlet Remove the blockage
Error Code: E1
Communication or humidity
sensor error
Ensure the sensor wire is properly connected at
the two ends. If no issue is visible, it shows that
the sensor is faulty.
Error Code: E4 Problem with Pump
Verify that the pump is properly
Installed and functioning. If so,
unplug the unit for two minutes,
Then restart.
Error Code: LO
It comes forth when the
temperature in the room
falls below 33° F
The temperature in the room must be increased
and should be above 33°F. If an error is
displayed, you may need to check the sensor.
Error Code: HI
It occurs when the room
temperature is above
105°F
Reduce the temperature to below 105°F. But
if the error is still being displayed, check the
sensor.
E5 Error Code Leaking of the Refrigerant Get help from installation assistant.
Troubleshooting
Wi-Fi connection successful.
Connection to server failed.
Hotspot direct successful icon.
!
Maintenance
1. Remove the two screws on the mold cover.
2. Rotating shell
3. Tilt the machine at a certain angle to remove the casing from the
machine
4. Clean the inside of the machine.Soap insolvents should not be
used.

Procedure for filter maintenance
The dust and obstacles on the filter should be removed regularly. You
may need to clean and replace the filter.
Use a soft, damp cloth to clean the exterior parts of the unit. Do not
use any soap or solvents.
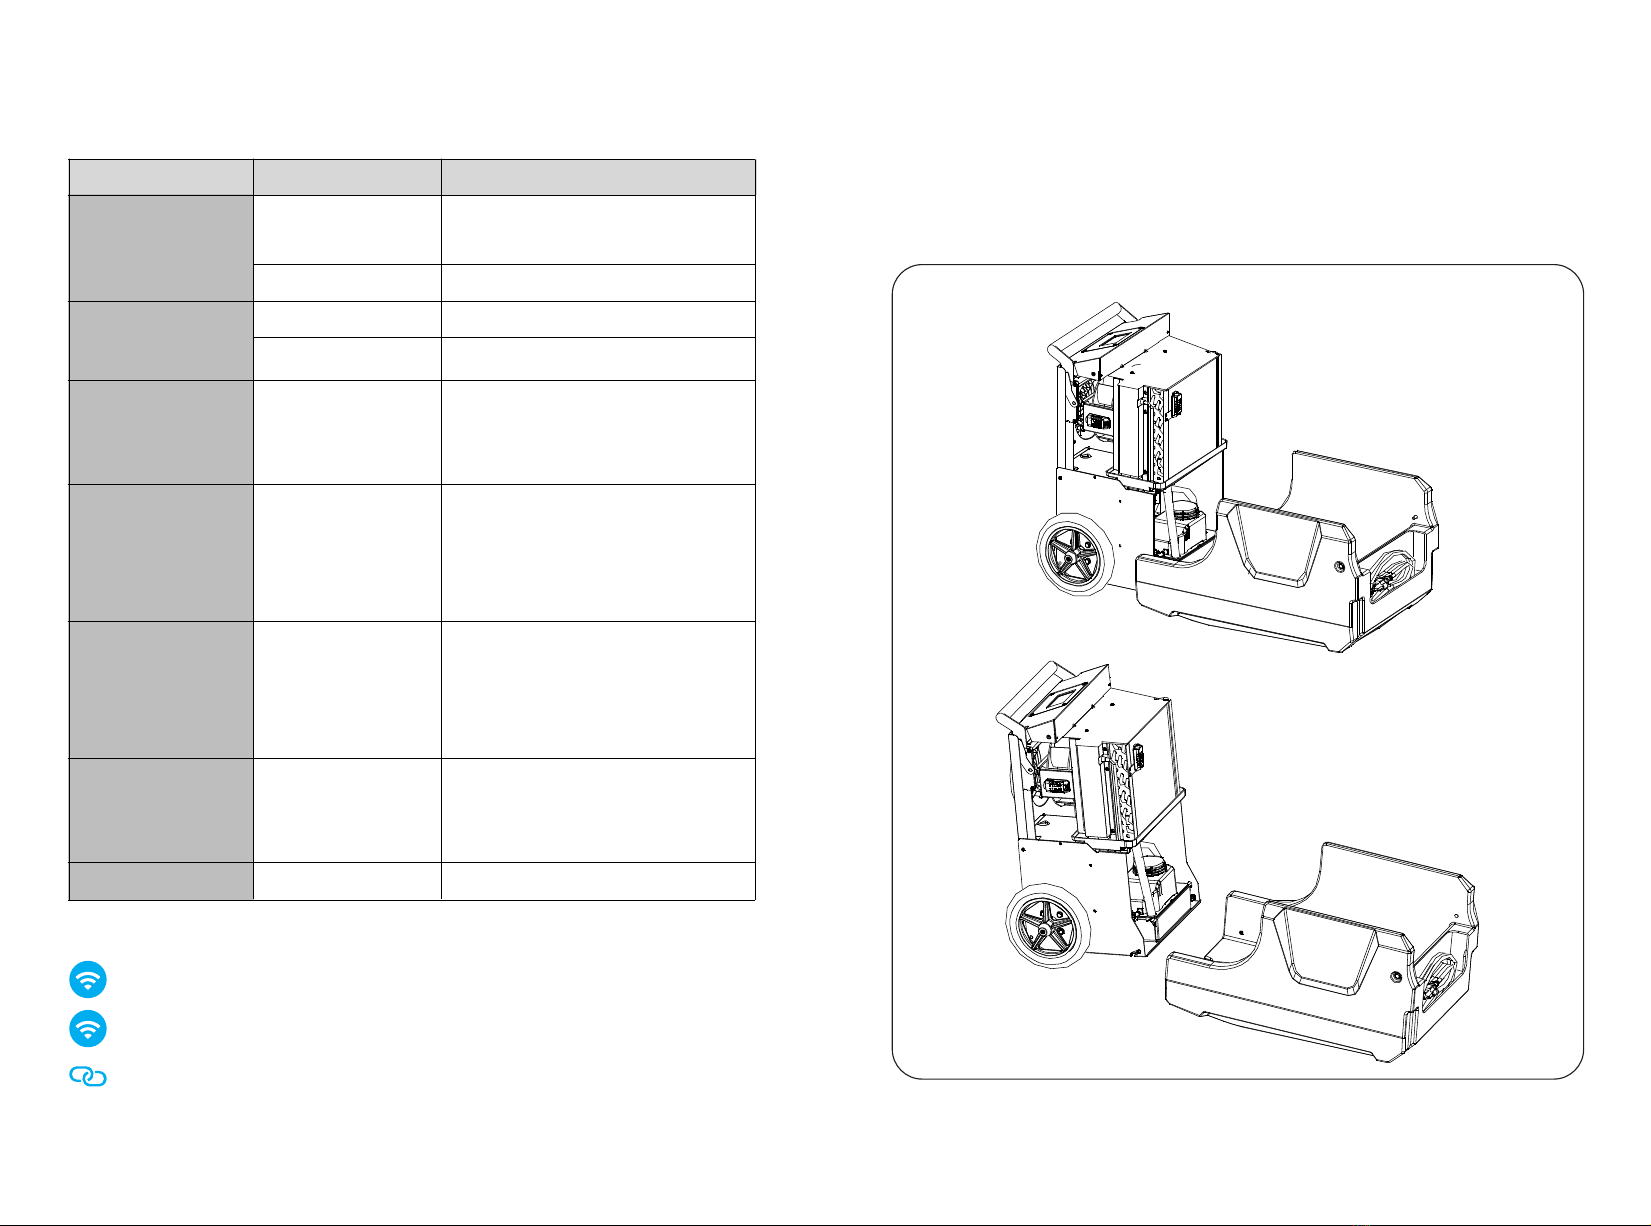
Cleaning the Machine Body
4.For MERV-8 or Pre-filter, wash it in warm
water or vacuum it. Do not use soap or
cleaners. Also, shake it gently and ensure
the filters are dry before reinserting it.
3.Check for dirt and build-up
2.Remove the filter by sliding it upward from
the bottom by hand to remove it
Operation Step:
1.Unplug the unit 5 Years (From Date of Purchase):
Customer Responsibilities:
1. The client should send the warranty card via email to Abestorm will. If there is not card submitted, the
warranty starts at the point of dispatch from the warehouse. Note the serial number of the product
and the date when it was installed on page 2 of the manual provided. The information will be required
to grant you an RA number.
Warranty Procedure:
Limited Warranty
ABESTORM INC.
Berlin,GermanyPhone
+44 (20) 81243974
www.abestorm.com
Warranty rights only apply to the original owner of the product and are counted from the date of purchase.
If resold, it will continue within the original period. Abestorm provides a warranty that will work free of
defects in material and workmanship. Abestorm will repair or replace any parts that malfunction free of
charge (the owner will take care of transportation charges).
1. To gain the full advantage of the warranty, the customer is expected to care for the unit including cleaning
and routine maintenance.
3. All the costs related to transporting the unit to a certified technician will be borne by the owner, including
ancillary charges such as wrapping, labeling, picking up the customer and palletizing.
2. Reinstallation and removal of the unit will be done by the owner.
4.The customer is also responsible for risks related to damage and loss while shipping If shipped, customer
is responsible for all risk of loss or damage.
2. If there is a need for warranty service, the customer should contact Abestorm Tech Support on
to get an RA ( Return Authorization number)44(20) 81243974
3. After you have been issued with your RA, the customer is the one to take the unit to a certified
technician/repair center. If the customer is unable to arrange for the same, Abestorm will arrange for
shipping at the expense of the customer.
4. Once the unit is received BY Abestorm, an inspection will be done. If the results show that the warranty
is invalid, the repair or other associated action will only be taken following the receipt of payment from
the owner of the unit
6. Remember that we only provide service during the normal working hours. Before the units that have
brought in for repair are released back to the customer, they are taken through a rigorous testing process.
5. If a defect is noted, the unit will be fixed and the relevant parts repaired or replaced. It will be ready for
picking up from the repair point via shipment, at the cost of the customer.
7. After the unit or part is repaired and returned to the customer, the original warranty continues to apply –
there is no extension.
12 13

Warranty Exclusions
There is no warranty for the following:
FLOODING
WATER DAMAGE
2. IMPROPER USAGE/WRONG – SUCH AS, BUT NOT LIMITED TO:
1. ACTS OF NATURE- SUCH AS, BUT NOT LIMITED TO:
POOL/SPA/TUB APPLICATIONS
IMPROPER VOLTAGE
IMPROPER INSTALLATION OR DESIGN
FAILURE TO FOLLOW INSTRUCTIONS
LACK OF NORMAL CARE
TAMPERING, MISUSE OR ABUSE WHETHER ACCIDENTAL OR INTENTIONAL
FIRE
HURRICANE/STORM DAMAGE
3. ANY COSTS DUE TO LOST PROFIT OR DELAY
5. ANY ADDITIONAL COSTS DUE TO CHANGES IN LAWS OR BUILDING CODES
4. FREEZING
6. FREIGHT CHARGES
7. CORROSION
8. CAUSE BEYOND CONTROL
9. FILTERS
10. CONSUMABLE PARTS, INCLUDING BUT NOT LIMITED TO:
SWITCHES
POWER CORDS
BATTERIES
VALVES
RUBBER PARTS
14
Other manuals for Water Damage Series
4
This manual suits for next models
1
Table of contents
Other Abestorm Dehumidifier manuals

Abestorm
Abestorm Guardian SN90 User manual

Abestorm
Abestorm Guardian SNS100 User manual

Abestorm
Abestorm Water Damage Series User manual

Abestorm
Abestorm SLGR Elite User manual

Abestorm
Abestorm Guardian SNS90 User manual

Abestorm
Abestorm Hurricane 140P User manual

Abestorm
Abestorm Living Environment Series User manual

Abestorm
Abestorm Living Environment Series User manual

Abestorm
Abestorm DualPro Water Damage Series User manual