Abus PPIC44520 User manual

WLAN AUSSEN-KAMERA
WI-FI OUTDOOR CAMERA
QUICK GUIDE
PPIC44520

2
SYSTEMVORAUSSETZUNGEN
SYSTEM REQUIREMENTS
Netzwerke ohne Verschlüsselung werden nicht unterstützt.
Networks without encryption are not supported.
Aktivieren Sie den „Standortdienst“ (z. B. „GPS“) Ihres Smartphones bzw. Tablets, mit dem Sie die Inbe-
triebnahme durchführen. Dieser wird später benötigt, um die Netzwerke in der Umgebung anzuzeigen.
Activate the „Location service“ (e.g. „GPS“) of your smartphone or tablet with which you are
performing the startup. This will be required later to display the networks in the surrounding area.
WLAN-Netzwerk mit Passwort und Verschlüsselung.
Das WLAN-Passwort darf eine Länge von 31 Zeichen nicht überschreiten.
Wi-Fi network with password and encryption.
The WLAN password must not exceed a length of 31 characters.
Der Standortdienst des mobilen Endgeräts muss aktiviert sein.
The site service of the mobile end device must be activated.
Bluetooth des mobilen Endgeräts muss aktiviert sein.
Bluetooth of the mobile end device must be activated.
Die Kamera kann nur in Verbindung mit der App2Cam Plus benutzt werden.
The camera can only be used in conjunction with the App2Cam Plus.
Bei der Eingabe des WLAN-Passwortes werden folgende Sonderzeichen unterstützt.
The following special characters are possible when entering the Wi-Fi password.
Bei der Eingabe des WLAN-Passwortes sind folgende Sonderzeichen nicht möglich.
The following special characters are not possible when entering the Wi-Fi password.

3
ABUS WLAN Außen-Kamera (PPIC44520)
ABUS Wi-Fi Outdoor Camera (PPIC44520)
LIEFERUMFANG
SCOPE OF DELIVERY
Netzteil, 5V DC / 2A
Power supply, 5V DC / 2A
WLAN Außen-Kamera
Wi-Fi Outdoor Camera
1
Innensechskanntschlüssel
Allen key
Entnahmehilfe
für die microSD-Karte
Removal aid
for the microSD card
1
1
Bohrschablone
Drilling template
Antenne
Antenna
1
1
microSD-Karte
(vorinstalliert)
microSD card
(preinstalled)
1
Montagematerial
Mounting material
Wandhalterung
(vorinstalliert)
Wall bracket
(preinstalled)
1
1
1

4
KAMERA
CAMERA
Vorderseite
Front
Für eine Aufzeichnung ist eine handelsübliche microSD-Karte (max. 128 GB Speicherkapazität / mind.
Klasse 10) erforderlich. Zum Einsetzen und Entnehmen der microSD-Karte muss die Kamera vom Strom
getrennt werden. Beim Einsetzen rastet die mircoSD-Karte hörbar ein. Für die Entnahme steht das bei-
liegende Entnahmewerkzeug zur Verfügung.
Objektiv
Lens
Mikrofon
Microphone
Lichtsensor
Light sensor
IR-LEDs

5
Rückseite
Rear
A standard microSD card (max. 128 GB storage capacity / min. Class 10) is required for recording.
The camera must be disconnected from the PSU in order to insert and remove the
microSD card. The microSD card audibly snaps into place when fully inserted.
The provided removal aid can be used to remove the card.
Spannungsversorgung (5V DC / 2A)
Power supply (5V DC / 2A)
microSD-Karte
microSD card
RJ45-Buchse für LAN-Anschluss
RJ45-Connector for Ethernet
Power-LED Reset-Taste
Reset button
Antennen-Anschluss (RP-SMA)
Antenna connection (RP-SMA)

6
WERKSEINSTELLUNGEN
FACTORY RESET
STROMVERSORGUNG
POWER SUPPLY
Falls es während der Inbetriebnahme Schwierigkeiten gibt
oder Sie die Zugangsdaten (Passwort und Sicherheitscode)
vergessen haben, setzen Sie die Kamera auf werkseitige
Einstellungen zurück:
Önen Sie die die Abdeckung auf der Kamerrückseite mithil-
fe eines Innensechskantschlüssels und drücken Sie für min-
destens 5 Sekunden die Reset-Taste mithilfe eines dünnen
Gegenstands (z. B. der Entnahmehilfe für die microSD-Karte
oder einer Büroklammer), bis die Power-LED blinkt.
If there are any diiculties during the setup or you have
forgotten the access data (password and security code),
reset the camera back to factory settings:
Open the cover on the back of the camera using an
allen key and press the reset button, on the bottom of the
camera, for at least 5 seconds, using a thin object (e.g. the
removal tool for the microSD card or a paper clip) until the
power LED ashes.
Einsatzbereit in 60 Sekunden:
Sobald die rote LED 2x kurz
und 1x lang blinkt.
Ready in 60 seconds:
When the red LED ashes quickly
two and then once for longer.

7
KAMERAMONTAGE
CAMERA INSTALLATION
Option 1: Leitungsverlegung Unterputz
Option 1: Flush mounted cable routing
• Markieren Sie am gewünschten Einsatzort mithilfe der Bohrschablone
oder der Wandplatte der Halterung und z. B. einem Sti die Position
der benötigten 3 Bohrlöcher. Hierfür schrauben Sie die Halterung bitte
auseinander.
• Bohren Sie die Löcher und legen Sie die beiliegenden Dübel ein.
• Mark the position at the desired location using the drilling template
or the wall plate of the holder and e.g. a pencil to mark the position of
the of the required 3 drill holes. To do this, please unscrew the holder.
• Drill the holes and insert the enclosed dowels.
1
Ø
Ø
Ø
Ø
Ø
Ø
• Verbinden Sie das Stromkabel und LAN-Kabel (bei WLAN-Nutzung
optional) mit den Anschlüssen der Kamera.
• Führen sie die Kabel in die Wand.
• Connect the power cable and LAN cable (optional when using Wi-Fi) to
the 2 connectors of the camera.
• Lead the cables into the wall.
2
3
• Befestigen Sie die Wandplatte der Halterung mit den beiliegenden
Schrauben.
• Fasten the wall plate of the bracket with the enclosed screws.
• Setzen Sie das Kugelgelenk ein und die Abdeckung auf.
• Im Anschluss wird der Fixierring ein Stück aufgedreht.
• Insert the ball joint and put on the cover.
• The xing ring is then screwed on a bit.
4
• Richten Sie nun die Kamera auf den grob gewünschten Erfassungs-
bereich aus und drehen Sie den Fixierring fest.
• Setzen Sie die Antenne auf den Anschluss und drehen Sie diese fest.
• Now align the camera with the roughly desired detection area and
tighten the xing ring.
• Place the antenna on the connector and tighten it.
5

8
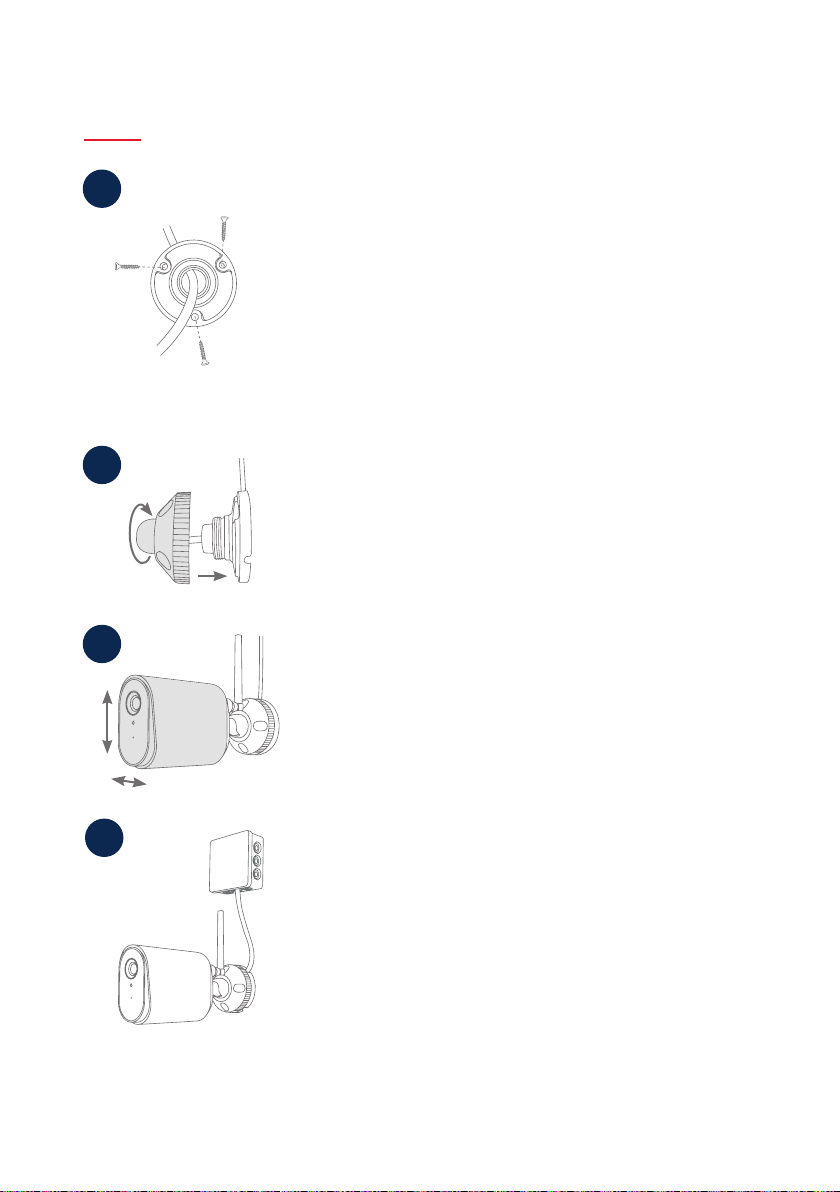
Option 2: Spannungsversorgung Aufputz
Option 2: Power supply surface mounting
1• Markieren Sie am gewünschten Einsatzort mithilfe der Bohrschablone
oder der Wandplatte der Halterung und z. B. einem Sti die Position
der benötigten 3 Bohrlöcher. Hierfür schrauben Sie die Halterung
bitte auseinander.
• Bohren Sie die Löcher und legen Sie die beiliegenden Dübel ein.
• Führen Sie das Kabel durch eine der Aussparungen der Wandplatte
• Befestigen Sie die Wandplatte der Halterung mit den beiliegenden
Schrauben.
• Mark the position at the desired location using the drilling template or
the wall plate of the holder and e.g. a pencil to mark the position of
the of the required 3 drill holes. To do this, please unscrew the holder.
• Drill the holes and insert the enclosed dowels.
• Lead the cable through one of the cutouts in the wall plate
• Fasten the wall plate of the bracket with the enclosed screws.
2
• Setzen Sie das Kugelgelenk ein und die Abdeckung auf.
• Im Anschluss wird der Fixierring ein Stück aufgedreht.
• Insert the ball joint and put on the cover.
• Aerwards, slightly screw on the xing ring.
3• Richten Sie nun die Kamera auf den grob gewünschten
Erfassungsbereich aus und drehen Sie den Fixierring fest.
• Setzen Sie die Antenne auf den Anschluss und drehen Sie diese fest.
• Now align the camera with the roughly desired detection area and
tighten the xing ring.
• Place the antenna on the connector and tighten it.
4• Verwenden Sie eine handelsübliche wettergeschützte
Installationsdose / Abzweigdose (Breite und Höhe mind. 105 mm,
Tiefe mind. 35 mm) für eine wasserfeste Installation.
• Führen Sie das Kabel der Kamera in die Installationsdose /
Abzweigdose und führen Sie dort die Verkabelung durch.
Für die weitere Installation mit einer Abzweigdose,
beachten Sie die Installationshinweise der Dose.
• Use a commercially available weather-protected installation box
(width and height min. 105 mm, depth min. 35 mm)
for a waterproof installation.
• Guide the camera cable into the installation box and run the cabling
there. For further installation with an installation box, follow the
installation instructions for the box.

9
INBETRIEBNAHME
INITIAL START-UP
Die folgenden Abbildungen entstammen der iOS-App.
Der Prozess mit der Android-App läu in den gleichen Schritten.
The following illustrations are from the iOS app.
The process with the Android app follows the same steps.
Bluetooth des Smartphones/Tablets muss aktiviert sein.
Bluetooth of the smartphone / tablet must be activated.
Installation App2Cam Plus und Inbetriebnahme
Installation of App2Cam Plus and start-up
Starten Sie App2Cam Plus und wählen Sie
„Neues Gerät hinzufügen“ aus, um die Inbetriebnahme zu starten.
Launch App2Cam Plus and select
"Add new device" to start the start-up.
2
App
- App2Cam Plus -
Laden Sie App2Cam Plus auf Ihr Smartphone oder Tablet
Download App2Cam Plus to your smartphone or tablet
iOS
Apple App Store
Android
Google Play Store
1

10
Für eine optimale Inbetriebnahme müssen die Kamera und das Smartphone/Tablet möglichst nahe
nebeneinander sein, maximal in 3 Meter Entfernung.
For optimal startup, the camera and the smartphone/tablet must be as close as possible next to each
other, at a maximum distance of 3 meters.
Option 1: Scannen Sie den QR-Code auf der Rückseite der Kamera.
Option 1: Scan the QR code on the back of the camera.
Option 2: Wählen Sie Ihr Kameramodell aus.
Option 2: Select your camera model.
Wählen Sie „Inbetriebnahme via Bluetooth“ aus.
Select "Setup via Bluetooth".
3a
3b
4

11
Für eine optimale Inbetriebnahme müssen die Standortdienste in den Einstellungen aktiviert sein.
The site services must be activated in the settings fot optimal operation.
Falls noch nicht geschehen: Aktivieren Sie Bluetooth in den Einstellungen des
mobilen Endgerätes. Tippen Sie anschließend auf „Weiter“.
If not already done: Activate Bluetooth in the settings of the mobile device.
Then tap on "Next".
Versorgen Sie die Kamera jetzt mit Strom und warten Sie 2 Minuten
bis die Status-LED der Kamera 2x kurz und einmal lang blinkt.
Tippen Sie anschließend auf "Weiter".
Now supply the camera with power and wait 2 minutes until the LED
ashes two times short and one time long. Then tap on "Next".
Wählen sie Ihre Kamera anhand der Erkennungsnummer aus. Die Erkennungs-
nummer (DID) Ihrer Kamera nden Sie unter dem QR-Code, der sich auf Ihrer
Kamera be ndet und zusätzlich in der Verpackung beigelegt ist.
Tippen Sie anschließend auf "Weiter".
Select your camera by its identi cation number. The identi cation number (DID)
of your camera can be found under the QR code that is located on your camera
and is also enclosed in the packaging.
Then tap on "Next".
6
7
5

12
9
Network 1
8
Network 1
10
Siehe Systemvoraussetzungen „WLAN-Netzwerk“ und „Sonderzeichen“
See system requirements „Wi-Fi network“ and „special characters“
Das Admin-Passwort kann nach der Installation in den Einstellungen der Kamera geändert werden.
The admin password can be changed in the camera settings a er installation.
Network 1
Wählen Sie Ihr Heimnetzwerk/WLAN aus,
indem Sie die Kamera dauerha betreiben wollen.
Tippen Sie anschließend auf "Weiter".
Select your home network/WLAN,
where you want to operate the camera permanently.
Then tap on "Next".
Geben Sie das Passwort Ihres Netzwerkes ein.
Tippen Sie anschließend auf "Weiter".
Enter the password of your network.
Then tap on "Next".
Vergeben Sie nun einen Sicherheitscode und ein Admin-Passwort.
Diese müssen bei der Einrichtung per Bluetooth identisch sein.
Tippen Sie anschließend auf "Weiter".
Now assign a security code and an admin password.
These must be identical during Bluetooth setup.
Then tap on "Next".

13
Schritte für eine alternative Inbetriebnahme finden Sie in der Bedienungsanleitung.
You can nd additional steps for the „Alternative installation“ in the operating instructions.
11
Die Kamera startet nun neu. War die Inbetriebnahme bis hier hin erfolgreich,
so zeigt die App die Artikelnummer der Kamera in der Maske "Übersicht" an.
Dies kann bis zu 60 Sekunden dauern.
The camera will now restart. If the startup was successful up to this point, the
app displays the camera's article number in the "Overview" screen.
This can take up to 60 seconds.
Tippen Sie nun in der Übersicht auf das Kamerabild-Icon
mit den zwei Pfeilen bzw. das Vorschaubild,
um das erste Livebild Ihrer Kamera anzuzeigen.
Now tap in the overview on the camera image icon with
the two arrows or the preview image to display
the rst live image of your camera.
12
Für das bestmögliche Kamera-Erlebnis empfehlen wir, die Kamera immer
mit der neuesten Firmware zu betreiben. Den aktuellen Firmware-Stand
und bereitstehende Updates nden Sie unter "Erweiterte Einstellungen"
-> "Geräteeinstellungen". Bestätigen Sie den Hinweis mit "OK".
For the best possible camera experience, we recommend to operate
the camera always with the latest rmware. You can nd the current
rmware version and available updates at "Advanced Settings"
-> "Device Settings".Con rm the message with "OK"
13
PPIC31020

14
14
1. Menüssymbol unten
1. Menu symbol bottom
2. Einstellungsicon oben
2. Settings icon top
Um weitere Einstellungen an der Kamera
vorzunehmen:
1. Tippen Sie in der Menü-Leiste am unteren
Bildschirmrand auf das Menüsymbol.
2. Tippen Sie nun oben im Kamera-Bild auf
das Symbol mit den zwei Zahnrädern.
In order to congure additional
settings on the camera:
1. Tap on the menu symbol in the menu bar
at the bottom of the screen.
2. Now tap on the icon with the two gearsin
the camera image.
PPIC44520
Sie haben die Inbetriebnahme erfolgreich abgeschlossen.
Alle Einstellungen und Funktionen sind über die Menü-Leiste am unteren
Bildschirmrand aufruar.
You have successfully completed the start-up.
All settings and functions can be called up via the menu bar at the bottom
of the screen.
15
Aktiv
PPIC44520

15
Alarm ist aktiv
Die Kamera zeichnet bei
erkannten Bewegungen auf
und versendet Nachrichten
(Push oder E-Mail).
Alarm is active
The camera records when
motion is detected and
sends noti cations
(push or e-mail).
Alarm ist deaktiviert
Die Kamera zeigt ein
Livebild, führt aber keine
weiteren Aktionen bei
erkannten Bewegungen
durch.
Alarm is deactivated
The camera displays a
live view but does not
carry out any other actions
when motion is detected.
WLAN Aussen-Kamera
Manuelle Aufnahme starten
Start manual recording
Schnappschuss erstellen
Create a snapshot
Audioübertragung der Kamera aktivieren/deaktivieren
Enable/disable audio transmission of the camera
APP2CAM PLUS
APP2CAM PLUS
Der gezeigte Screenshot entstammt der iOS-App. Die Android-App enthält eine leicht
abweichende Anordnung, Beschri ung und Funktionalität.
The screenshots and icons shown here are from the iOS app.
There may be some deviations in the labels, design or functionality when using Android devices.
Die Liveansicht in App2Cam Plus
The live view in App2Cam Plus
Aktiv Deaktiv

ABUS | Security Center GmbH & Co. KG
abus.com
Linker Kreuthweg 5
86444 Ang
Germany
Tel: +49 8207 959 90-0
Fax: +49 8207 959 90-190
info.[email protected]
Eine alternative Inbetriebnahme sowie detaillierte Informationen zu Ihrer Kamera
erhalten Sie in der Bedienungsanleitung, erhältlich auf der Webseite abus.com.
For an alternative start-up procedure and detailed information on your camera you will nd in the
operating instructions, available on the abus.com website.
Pour un démarrage alternatif et des informations détaillées sur votre appareil, veuillez vous référer
au mode d'emploi disponible sur le site Web d'abus. Veuillez vous référer au mode d'emploi, qui est
disponible sur le site Web abus.com.
Voor een alternatieve opstart en gedetailleerde informatie over uw camera verwijzen wij u naar de
gebruiksaanwijzing die beschikbaar is op de abus.com website.
Per un avvio alternativo e informazioni dettagliate sulla vostra videocamera, consultate le istruzioni
per l'uso disponibili sul sito abus.com.
For en alternativ opstart og detaljerede oplysninger om dit kamera henvises til
betjeningsvejledningen, som ndes på abus.com-webstedet.
Alternatywny sposób uruchomienia aparatu oraz szczegółowe informacje na jego temat można
znaleźć w instrukcji obsługi dostępnej na stronie internetowej abus.com.
Para una puesta en marcha alternativa e información detallada sobre su cámara, consulte el manual
de instrucciones, disponible en el sitio web abus.com.
För en alternativ uppstart och detaljerad information om kameran, se bruksanvisningen på webb-
platsen abus.com.
abus.com/products/
PPIC44520
Table of contents
Other Abus Outdoor Camera manuals