ACTi INR-450 User manual

Quick Installation Guide
INR-450
200-Channel 12-Bay RAID Rackmount Standalone NVR with
Redundant Power Supply, Additional Computing Power
Available from A1 Security Cameras

Available from A1 Security Cameras
BEFORE YOU START
Thank you for purchasing ACTi Standalone Network Video Recorder. This
guide contains all the information you need to quickly set up ACTi INR server
system via local interface.
For detailed instructions on installation, operation and how to log in to
INR as a web client, please refer to the product manuals available on ACTi
corporate website.
The items below are prerequisite for installation and setup:
• Network cameras
• Network cables
• Network switch
• Monitor (with VGA cable)
• USB mouse
• USB keyboard
• At least one ACTi-certied 3.5-inch SATA hard disk
Find the certied disk models at http://www.acti.com/hddselector
Standalone NVR Quick Installation Guide 3

Available from A1 Security Cameras
HARDWARE INSTALLATION
UNPACK
This package contains:
• INR x 1 • Power Cable x 2
• Rail Kit x 1
• Extension Cord x 2
• Front Cover x 1
• Accessory Pack
x 1
• Warranty Card x 1
• Service Documents
AT A GLANCE
Front Panel
VGA Port
Storage Disk Bays x 12 USB 2.0 Port
Power Button
Hard Drive Status Indicator
Hard Drive Activity Indicator
System Health
Hard Drive
Electrical Status
Temperature
Memory
PCIe Status
Diagnosis Indicator
Rear Panel
Power Connector
VGA Port
Serial Port
Ethernet Port x 4 Power Modules x 2
USB 3.0 Port x2
Standalone NVR Quick Installation Guide4

RACKMOUNT THE UNIT
This unit is designed to be mounted on a standard server rack, occupying 2U
(3.5″) of vertical space. Install this unit into the rack with another person’s aid
following the instructions supplied with the rails. Remember to remove the
power supply modules in advance to make this unit lighter.
Standalone NVR Quick Installation Guide 5
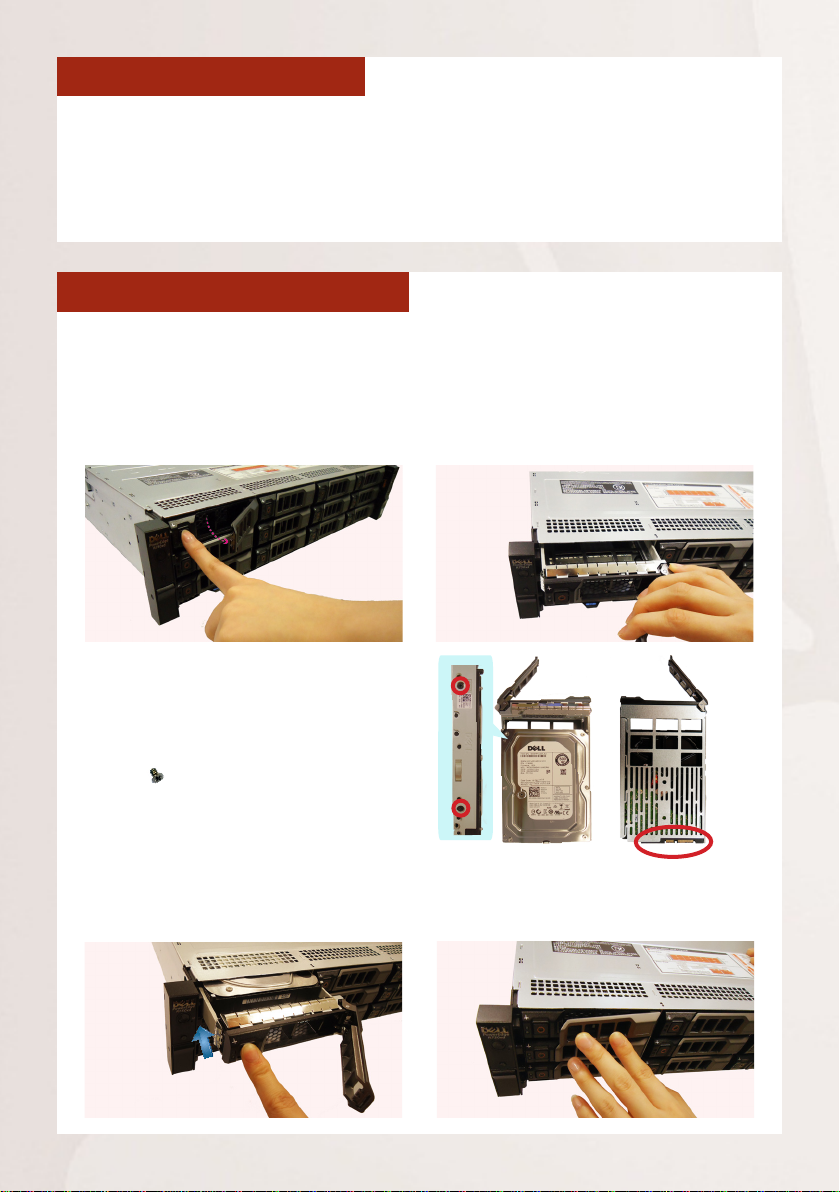
REMOVE THE TRAY
Step 1
Press the key lock to have the hinge
tab pop out by itself.
Step 2
Hold the tab lever and pull out the
empty tray.
HARD DISK INSTALLATION
MOUNT THE DISK
Step 3
Secure the hard disk on both sides
of the tray with the provided disk
screws , and make sure the SATA
connector faces outwards.
INSTALL THE TRAY
Step 4
Place your thumb on the key lock
and push the tray into position.
Step 5
Press the hinge tab until it clicks into
place.
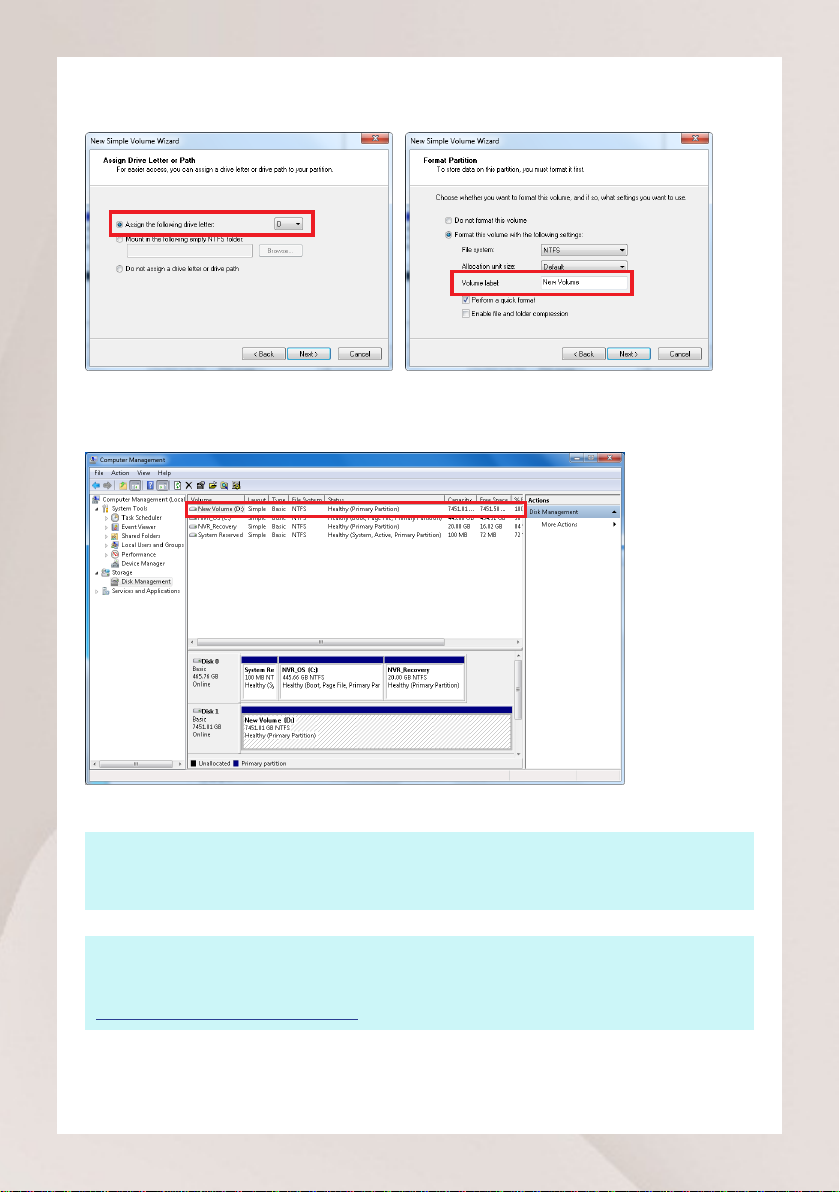
Install the disks into the disk bays in this chassis.
Available from A1 Security Cameras

Available from A1 Security Cameras
ATTACH THE FRONT COVER
After nishing installing the disks, attach the front cover to its front panel.
Step 1
Hook the left end of the cover onto
the chassis’ left ear.
Step 2
Fit the free end of the cover onto the
unit.
CONNECT THE DEVICES
The example below displays a network consisting of only INR, network
cameras and required peripherals. Please remember to enable the DHCP
service on your router for INR to obtain an IP address automatically.
Switch
Cameras
Power Source
USB Devices
Note
To assign a static IP address to INR, enter
Windows and congure the network
settings in Network and Sharing Center.
Note
Please make sure
both power cords are
fully inserted.
VGA Monitor
START UP
1. On the unit’s front panel, press down Power Button to power on this unit.
The power status indicator will turn green.
2. On Windows logon screen, input the password “123456“ to log in as an
administrator.
Standalone NVR Quick Installation Guide6

Available from A1 Security Cameras
CREATE HARDWARE RAID
As this unit supports hardware RAID conguration, you can make disk arrays
using the bundled software utility.
1. On Windows Desktop, double-click on the shortcut to initialize the
RAID management utility.
2. On Remote servers list, select the IP address of this server and click on
“Login“. On logon window, input the credentials and click on “Login“.
User Name: administrator
Password: 123456
3. On Dashboard page, click on “Create virtual drive” .
Standalone NVR Quick Installation Guide 7

Available from A1 Security Cameras
4. Choose “Simple“ mode and then click on “Next“.
5. Select the RAID level, number of Virtual drives (arrays) and the Capacity
of the array, and then click on “Next”.
6. On conrmation window, click on “Finish“.
Standalone NVR Quick Installation Guide8

Available from A1 Security Cameras
SOFTWARE CONFIGURATION
CREATE DISK VOLUMES
Use Windows Disk Management to create disk volumes so that INR can
access the available storage space.
1. In Windows Search Box, search and enter “computer management”.
2. Select “Disk Management”, right-click on a disk title and select “Initialize
Disk”, choose “GPT” as the partition style and click on“OK”.
3.Right-click on the initialized disk and select the volume type to make a
new volume.
Standalone NVR Quick Installation Guide 9

Available from A1 Security Cameras
4. On New Volume Wizard window, make sure you assign the desired drive
letter and give a proper label name to this volume.
5.After the volume is created, it is shown on Volume List and is ready for
recording.
Note
To make aStriped volume, aMirrored volume or aRAID-5 volume, it is recommended that
you select disks of the same model and capacity.
Note
For detailed instructions on choosing the RAID types and troubleshooting hard disk issues,
please refer to System Administrator’s manual provided on ACTi Download Center at
http://www.acti.com/downloadcenter
10 Standalone NVR Quick Installation Guide

Available from A1 Security Cameras
LOG IN
On Windows Destop, double-click on
to enter NVR interface. Input the default
account and password to log in.
Account: admin
Password: 123456
“123456” is the default password of NVR
administrator’s user account. For security reasons,
please remember to replace it with a new one.
CREATE USERS
On NVR screen, click Setup button to enter Setup page and then Users tab.
1. Select “User Groups”, click “Add” to start adding a new user group.
2. Input group ID and click “Apply”.
3.Click on the title bar of Users panel, click “Add” to start adding a new user.
4. Input user’s Account, Password, Email address and select its User Group,
and then click “Apply”.
Standalone NVR Quick Installation Guide 11

Available from A1 Security Cameras
SELECT STORAGE DRIVES
1. Go to Setup page and then Storage tab.
2. On Disk Drive
List, de-select
Cdrive and
select other
storage drives.
3.Click “Apply“.
ADD CAMERAS
1. Go to Setup page and then Devices tab.
2. Click “Add”.
3. Choose your
desired search
method
based on
your network
environment
and camera
brand.
Search Cameras
Use “Hybrid Search” to auto-search
the network for all cameras, or “ONVIF
Search” for ONVIF-compliant cameras
of any brand. After selecting your
desired cameras, click “Apply”.
Add Camera Manually
If you are adding a camera located in
another network, use “Add Camera
Manually”. Fill in Media Type,
Protocol, IP Address, HTTP Port,
Account and Password. Finally, click
“Get Device Settings” and then
“Apply”.
To nd ONVIF-compliant
cameras, input the correct
account and passowrd rst,
and then click to start
searching.
12 Standalone NVR Quick Installation Guide

Available from A1 Security Cameras
CONFIGURE CAMERA SETTINGS
1. Go to Setup page and then Devices tab. Choose the camera from Camera
List.
2. Select Basic, Video, PTZ, or Preset Tour tab to congure related settings.
3.Cllick “Apply“
to save the
settings.
SET RECORDING SCHEDULE
The recording service automatically starts full-time recording for a newly
added camera. You can modify the recording schedule to suit your needs.
1. Go to Setup page and then Schedule tab. Select the camera from Camera
List.
2. Choose a recording mode:
Schedule Recording: Records video continuously during the scheduled
session.
Event Recording:Records video based on specic triggers such as when
a motion is detected by the camera.
or
3.Drag on the
time table to
dene the
time session.
4. Click “Apply“.
Note
If you have any question during system installation, please feel free to contact our
engineers via ACTi Customer Help Desk platform at http://www.acti.com/CHD
Standalone NVR Quick Installation Guide 13

Available from A1 Security Cameras
CUSTOMIZE VIEWS
1. Go to Live View page. On top of the screen, click on view tool bar to
create a new layout, then click to enter edit mode.
2. Select a layout style.
3.To add a camera view, pull a camera from Camera List to a channel. To add
a map view, select a channel and click , upload the map, drag the lower
right corner to adjust channel size.
4. On view tool bar, click to save this view.
5.You can set this view as default view by clicking on .
Layout styles Edit view Save view
Add new view Set as default view
View Tool Bar
VALIDATION
To check live streaming of all channels, go to Live page, double-click on
on Camera List.
To check recording, go to Playback page, and then select (double-click)
a view from View List or a camera from Camera List. Drag on the time
bar to see the recorded video.
14 Standalone NVR Quick Installation Guide

Due to continuous product improvements, some contents may have
changed from the time this documentation was printed. You can download
the latest user documentation, which shall prevail over the printed version
provided in the package, from
http://www.acti.com/downloadcenter
.
www.acti.com V2016.06.17
Available from A1 Security Cameras
Table of contents
Other ACTi Network Hardware manuals