ACTi NVR 3.0 User manual

NVR 3.0
User’s Manual
2013/12/20
For Version 3.0.08

www.acti.com
NVR 3.0 User’s Manual
2
About This Manual
Target Audience
This manual is intended for End Users who actually execute security tasks such as monitoring
activities, patrolling secured zones, searching video data and managing alarms with use of
NVR surveillance system. The reader is expected to own not only the basic operation skills but
permissions to access major functionalities, as the access rights are based upon different user
roles defined by the System Administrators.
You may also check video management system section on ACTi corporate website:
http://www.acti.com/nvr3 for updates or release information about this software and this
document.
Content Overview
This manual provides information needed for monitoring the whole system and playback
recordings. Its content consists of the following sections:
Login provides instructions on how to log in to NVR server system as different clients.
NVR User Interface Overview gives you a glance of the user interface components and
module functions.
Live View introduces the methods to add your desired channels and arrange your
customized live view layout on live view screen.
Monitoring provides guidance on how to read the system alerts and status, do live view
PTZ operations, take a snapshot and execute manual recording.
Playback gives instructions on how to perform synchronized playback and export files
from NVR server system.

www.acti.com
NVR 3.0 User’s Manual
3
Related Documentation
Since this manual focuses on operation instructions for live view operations, playback, search
video and export files from NVR server, there is very limited information about system
installation and configurations for System Administrator.System Administrators and End
Users who would like to obtain the instructions on NVR system setup, please acquire the
latest ACTi NVR 3.0 System Administrator’s Manual from ACTi Corporation website via
http://www.acti.com/nvr3
Technical Support
For technical support or feedback, please contact our engineers via our Customer Help Desk
platform http://www.acti.com/CHD

www.acti.com
NVR 3.0 User’s Manual
4
Conventions Used in This Manual
The following are typographic conventions used in this manual:
Bold:Bold typeface is used for a keyword, major functions of NVR, or a title of a
section/column.
Italic:Italic typeface is used for a filename or location path.
Underlined: Underlined typeface is used for a document name or hyperlink.
“Bold”: Bold interface enclosed in double quotation marks indicates the name of a button or
a choice item.
Some notices are placed within the following boxes; each type of the box indicates different
purposes or levels of importance for system:
Important Notice
Tip
The content within this box is a tip. A tip gives you an alternative method to easily or quickly
achieve an objective, usually for specific conditions.
The content within this box is an important notice. This notice is important for you to get
certain function to work properly, or to prevent from certain potential problems that may damage
your system. Make sure you read this notice and follow the instructions.
Note
The content within this box is a note. A note is some necessary information you need to know
about the action you are currently taking, like what will happen after you follow or don’t follow
certain procedure.

www.acti.com
NVR 3.0 User’s Manual
5
Legal Notice
Disclaimer.
The information contained in this document is intended for general information purposes.
ACTi Corporation shall not be liable for errors contained herein or for incidental or
consequential damages arising from the furnishing, performance, or use of this manual.
The information contained herein is subject to change without notice.
The English version of this document is the official one for all purpose. All the translated
versions are provided as a convenience. Any discrepancies or differences created in the
translations of any other languages are not legally binding.
Copyright .
Copyright ©2003-2014 ACTi Corporation All Rights Reserved.
Trademarks
ACTi Connecting Vision and its logo are registered trademarks of ACTi
Corporation.
Microsoft® and Windows® are registered trademarks of Microsoft Corporation.
All other product or company names mentioned in this document may be trademarks or
registered trademarks of their respective owners.

www.acti.com
NVR 3.0 User’s Manual
6
Table of Contents
1 About This Manual 2
Target Audience.......................................................................................2
Content Overview ....................................................................................2
Related Documentation...........................................................................3
Technical Support....................................................................................3
Conventions Used in This Manual..........................................................4
2 Legal Notice 5
Disclaimer.................................................................................................5
Copyright .................................................................................................5
Trademarks...............................................................................................5
3 Table of Contents 6
4 Overview 9
ACTi NVR Server / Client Architecture...................................................9
5 Log in to the System 10
Access via Internet Explorer Browser .................................................10
Login............................................................................................ 11
A. Enter Account & Password 11
B. Change UI language 11
C. Remember Account/Password 11
D. Retrieve the Forgotten Password 11
Access via NVR3 Workstation .............................................................. 12
Login............................................................................................ 12
A. Choose a Server 12
B. Server IP & Server Port 13
C. Enter Account & Password 13

www.acti.com
NVR 3.0 User’s Manual
7
D. Choose the Initial Screen 13
E. Language 13
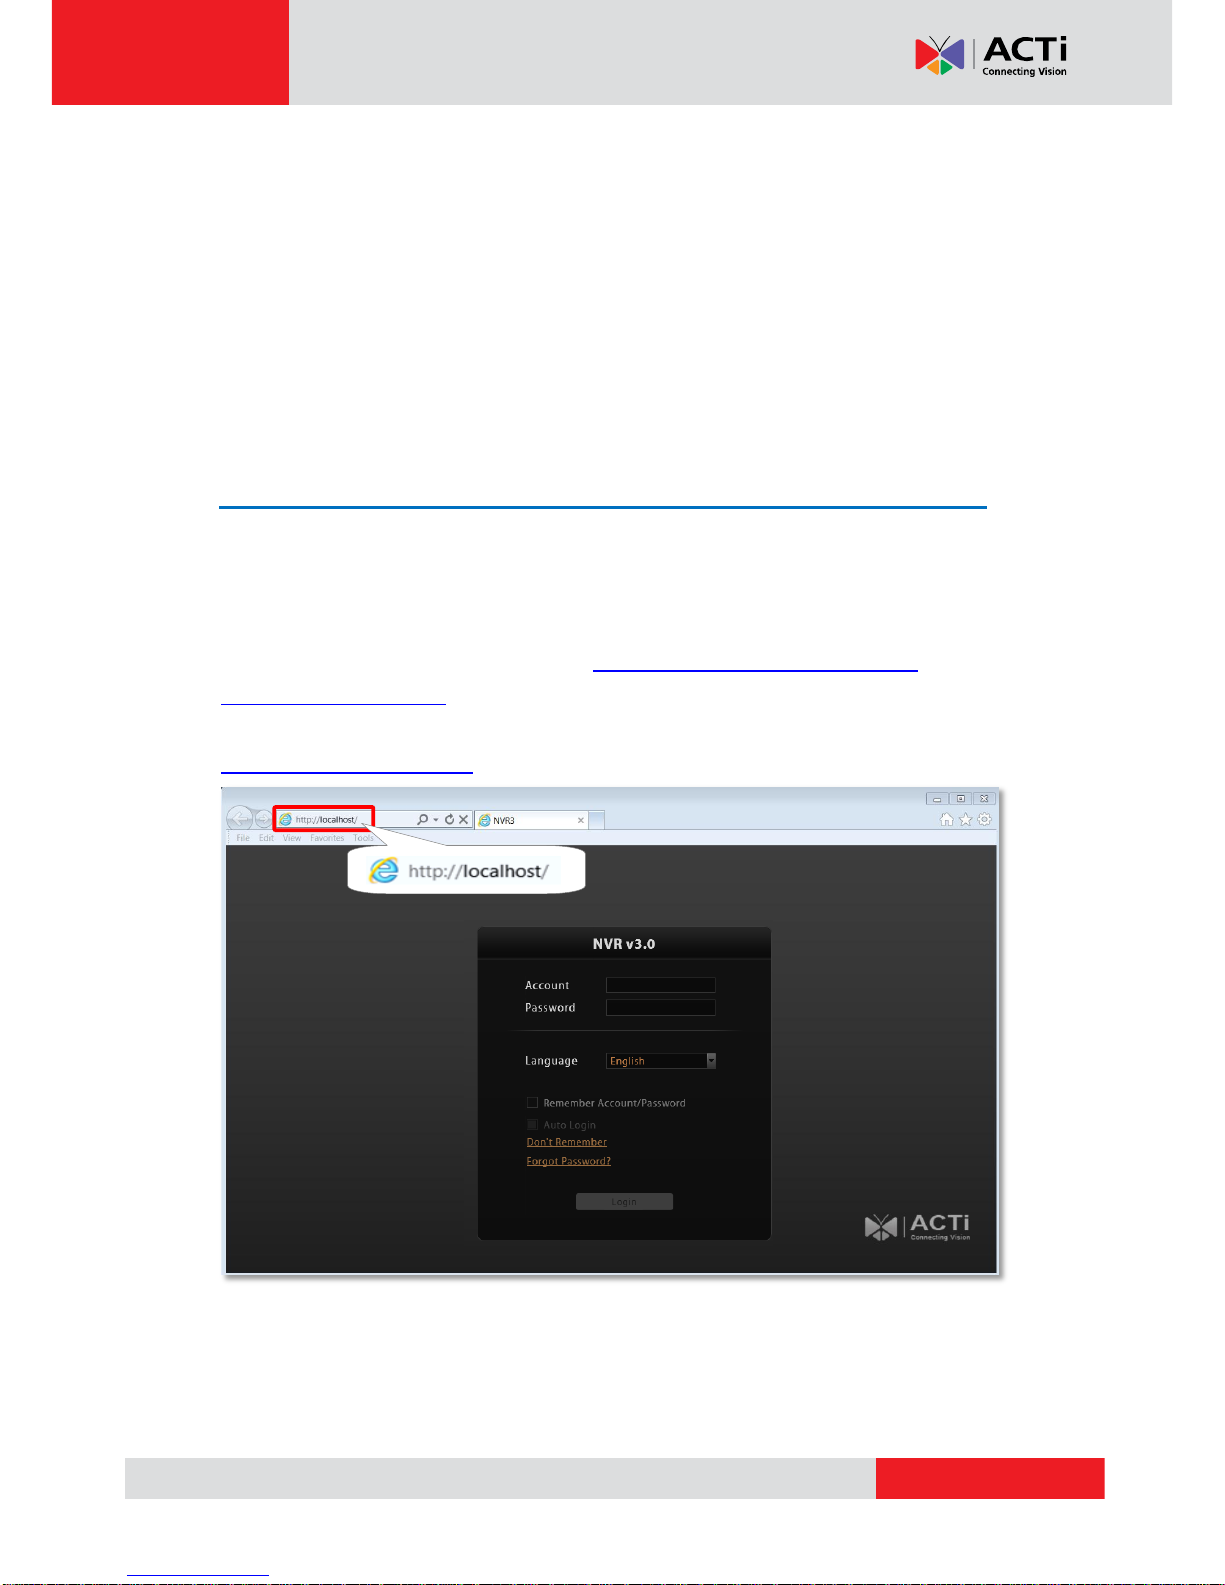
F. Remember Login Information 13
G. Retrieve the Forgotten Password 13
Change User Profile...............................................................................14
6 NVR User Interface Overview 15
NVR Resident Tool Bars........................................................................15
NVR Main Module Screens.................................................................... 17
Live View......................................................................................17
Playback ......................................................................................17
Setup............................................................................................17
7 Live View 18
Watch Live View.....................................................................................19
Select a View............................................................................... 19
Select a Camera ..........................................................................20
Device List 20
Remove a Channel......................................................................21
Remove All Channels...................................................................21
Enable View Patrol.......................................................................22
8 Monitor the System 23
Acknowledge System Alerts and Channel Status............................... 23
Channel Status ............................................................................23
Event Panel..................................................................................24
Instant Event Playback.................................................................25
Pop-up Event Playback................................................................26
Hot-Spot Window.........................................................................26
Live View Operations.............................................................................27
Show Mini Live View Windows on a Map.....................................27
Adjust Audio-in Volume................................................................28
Send Audio Signal........................................................................28
Trigger Digital-out Device.............................................................29
Watch Instant Playback of a Channel ..........................................30

www.acti.com
NVR 3.0 User’s Manual
8
Manual Recording........................................................................30
Take a Snapshot of Live Image....................................................31
Digital PTZ Operation ..................................................................31
Optical PTZ Operation .................................................................32
PTZ Panel Overview 32
Using Mouse Controls 33
Navigate a Fisheye Camera Channel..........................................33
Change Fisheye Mode 33
PTZ Operation 34
9 Playback 35
Playback UI Introduction.......................................................................35
How to Do Playback...............................................................................36
Add Video Source........................................................................ 36
Remove Unwanted Channels ......................................................36
Search on Time Bar............................................................................... 38
Display Event Types.....................................................................38
Event Type Highlight Colors 38
Playback Controls........................................................................38
Turn On Daylight Saving Time Function.......................................39
Digital Zoom on Playback .....................................................................40
Explore Fisheye View ............................................................................41
Search by Filter......................................................................................42
View Search Results....................................................................43
Take a Snapshot of the Playback View ................................................ 44
Export the Recordings .......................................................................... 45
Define the Section of Exported Video on Time Bar......................45
Set the Export Video Settings ......................................................46

www.acti.com
NVR 3.0 User’s Manual
9
Overview
ACTi NVR 3.0 (hereafter referred to as NVR 3.0) is a Windows-based software that provides
distributed network video surveillance solution with full functionality. This software supports
centralized management, real-time monitoring and recording of up to 64 ACTi video streaming
devices from local or remote network, with rule-based services to trigger multiple schedules
and events.
ACTi NVR Server / Client Architecture
NVR 3.0 is a typical web-based server/client system. In a video surveillance system
architecture, the Server serves as a video management service provider, aimed to run 24/7
offering non-stop services for clients. A Client makes requests of monitoring video streams or
playback recordings to Server, which can reside on the same computer with server program
(as from local) or on another computer (as from remote). Server starts automatically as soon
as the Server computer (where it is installed) boots up, and operates in the background
without requiring login by administrator. It would provide services over the TCP/IP network to
multiple Clients upon request through HTTP Protocol.
There are two types of Clients in NVR 3.0 system: Web Client and Workstation Client. A
user, connecting from whether web browser or workstation, will enjoy the same user interface
and NVR functions.
Web Client: the web version of interface to access NVR server without need of installing
any client program to become a client. Logging in the NVR server is as simple as visiting a
website through IE browser.
Workstation Client: the client application making accessing NVR server free from the use
of browser .The workstation includes a set of programs that provide interface between users
and the NVR server.

www.acti.com
NVR 3.0 User’s Manual
10
Log in to the System
There are two types of clients in NVR 3.0 system: Web Client and Workstation Client.
Both clients will enjoy the same user interface and functions. A web client can access NVR 3.0
system via the Windows default browser: Internet Explorer; while a workstation client
requires the NVR3 Worksation pre-installed on the computer. This section will include the said
methods to access your NVR 3.0 system.
Access via Internet Explorer Browser
The computer where NVR server is installed is called Server Computer. You may access the
server directly via Internet Explorer or NVR3Workstation on any other client computer.
Please open your browser, in URL box, type http://server ip address:port number, e.g.
http://220.228.146.22:8888 (generally, the port number is 80 and can be ignored in the URL).
If your computer is exactly where the NVR server is installed, you may simply type
http://localhost:port number.

www.acti.com
NVR 3.0 User’s Manual
11
Login
A. Enter Account & Password
Please obtain the Account & Password
information from System Administrator
who has previously set up your User
account in NVR 3.0 system.
●Account (non case-sensitive): deckard
kain (example)
●Password (case-sensitive): Aa123456
(example)
B. Change UI language
To change UI language, select the desired
language from “Language” dropdown list.
C. Remember Account/Password
To have the server remember your Login Account and Password for future,
check “Remember Account/Password”. Click “Don’t Remember” will clear
your input text and reset to default.
To directly enter the main page every time you log in from this PC in the future
Check “Remember Account/Password” then “Auto Login” to skip the Login
page. If your computer may be accessed by someone without proper
authority, please DO NOT use either of these functions.
To cancel auto-login, on title bar, click “Logout”to return to login page,
and this function is cancelled.
D. Retrieve the Forgotten Password
Once you forget the password, you may first contact the System Administrator or try helping
yourself with this procedure. NVR can send your password to the email address you saved in
NVR server, and it is strongly that you update your personal information after your first login
(please refer to Change User Profile on page 14). Please note that this procedure is only
available when the NVR server has access to SMTP service.
B
A
The email address input in Forgot
Password window should match
the one under your User account
saved in NVR server.
C
D

www.acti.com
NVR 3.0 User’s Manual
12
Access via NVR3 Workstation
NVR3 Workstation includes a set of programs that provide interface between users and the
NVR server. It may be installed on the same PC as the NVR server, or they may be installed
separately and connected to NVR Server via network.
Double-click the shortcut icon on your desktop to execute this workstation
application.
Login
Fill in the following fields then click “Login” to log in to the system. The login process of
Workstation is very much the same as that of Web browser.
A. Choose a Server
NVR3 Workstation can remember multiple server sites and their login settings. Click on the
arrow next to Server Name, and select a site from the dropdown list to log in.
B
D
E
F
G
A
C

www.acti.com
NVR 3.0 User’s Manual
13
B. Server IP & Server Port
In Server IP field, key in localhost or 127.0.0.1 if NVR3 Workstation is on the same
computer with NVR server. If you are connecting from another computer, please input the ip
address of server computer, for example: 220.228.146.21.
In Server Port field, key in the server port number, default is 80.
C. Enter Account & Password
Please obtain the Account & Password information from System Administrator who has
previously set up your User account in NVR 3.0 system.
Account (non case-sensitive): deckard kain (example)
Password (case-sensitive): Aa123456 (example)
D. Choose the Initial Screen
NVR 3.0 user interface consists of three main module screens:
Live View, Playback and Setup, you may choose one where you
would like to enter after logging in. Default is Live View screen.
E. Language
Choose a UI language from dropdown list.
F. Remember Login Information
To have NVR3 Workstation remember the Account,Password, your
choices of Initial Page and UI Language, simply check “Remember
login info”. Click “Don’t Remember” will clear your input text and reset
to default.
To directly enter the desired page every time you log in from this PC ,
check “Remember login info” then “Auto Login” to skip the Login page.
If your computer may be accessed by someone else, you might
consider not to use either of these functions.
To cancel auto-login, on title bar, click “Logout”to return to login
page, and this function is cancelled.
G. Retrieve the Forgotten Password
Please refer to D. Retrieve the Forgotten Password on page 11.

www.acti.com
NVR 3.0 User’s Manual
14
Change User Profile
You can maintain your own account information on NVR interface without System
Administrator’s help.
On NVR screen, click “Update Profile”.
You may change the email address or password and then click “Apply” to save the settings to
NVR server.

www.acti.com
NVR 3.0 User’s Manual
15
NVR User Interface Overview
Unlike some NVR system products on the market, whose tree-like structure may easily
confuse the User. NVR 3.0’s easy user interface structure saves you a lot of time and hassle
going from one page to another. Once you log in to the system, you may switch to any of the
main function modules: Live View, Playback and Setup on any screen.
Live View Playback Setup
NVR Resident Tool Bars
These resident tool bars are important functions or links that you often need through all the
operations in NVR system.
Layout Selection Bar
Tool Bar
NVR
Module
Bar
3
View Tool Bar
4
2
1

www.acti.com
NVR 3.0 User’s Manual
16
Tool Bar: To the right of title bar reside three links to most-used functions throughout all
screens:
Options are certain useful functions you mostly need. The provided functions vary
on different screens.
Live view Screen Playback Screen Setup Screen
System Log provides the search
module for you to review the
records of user’s behavior on this server. This
is only available when your User right has
permission to access it.
About Us displays the software version number and required ActiveX Control
version number. You may also find ACTi supportive links here.
NVR Module Bar includes three main module screens: Live View, Playback and Setup. You
can click the button to enter the function page directly.
Layout Selection Bar provides different layout styles for Live View and Playback screen.
View Tool Bar provides function keys for View editing on Live View screen.
1
4
3
2

www.acti.com
NVR 3.0 User’s Manual
17
NVR Main Module Screens
Click on the orange buttons on Module Bar to switch among these three main screens directly.
Live View
Playback
Setup
In this module you can see live
view from cameras and devices,
perform PTZ operations with
mouse or Joystick, view system
log, receive alert on the Event
panel, setup view layouts,
perform manual recording or
take a snapshot.
You may find and playback
existing recordings in this
module. synchronously.
Snapshots or video segments
can be taken from playback files.
Recorded files can also be
exported to AVI format here.
This module includes user
setup, device setup, event
setup, schedule setup and
system-wide settings

www.acti.com
NVR 3.0 User’s Manual
18
Live View
Live View is the interface where you see the live views from your cameras. It is where most of
the security professionals access the surveillance system. Aside from keeping an eye on the
video, you may also cycle through View layouts, drag and drop various cameras to the screen,
review a log of events, take snapshots, control PTZ cameras, start or stop recording on a given
channel, trigger Digital output and broadcast or talk to specific cameras. In this section, you
will be given instructions on the said fundamental operations. To start, click Live View tab to
enter live view screen.
.
View Info: displays the information: [Current View name][Focused Channel name].
Video Source Panels: View List panel and Device List panel provide two types of video
source for live view display area.
Event Panel: displays alerts of detected motion, abnormal system and device status.
Live View Command Panels: Control panel and PTZ panel provide most used live view
operation commands.
Layout Selection Bar: offers different layout styles.
View Tool Bar: you may create a view and save it using the buttons here. You may also
assign specific layout to start patrolling.
Live View Display Area: you may add up to 64 channels into this area to monitor them
concurrently.
View Tool Bar
Layout Selection Bar
Video Source Panels
Command Panels
Event Panel
Live View Display Area
View Info

www.acti.com
NVR 3.0 User’s Manual
19
Watch Live View
Upon logging in to the system, you will enter the live view screen. If your System Administrator
or colleagues have already set the default layout, you may immediately see the live view, and
start monitoring without the need to arrange the devices or layouts.
Select a View
In NVR 3.0 system, a View refers to the layout where the live images of a few devices are
arranged in proper positions to suit the monitoring purpose. This is very similar to a Camera
Group, which consists of cameras in the same physical location or with the same device
functions. For example, a View named First Floor may contain the cameras that actually
placed in the secured area on the first floor. Once created, each camera view is assigned to a
certain channel on the layout style selected by creator.
To watch a saved View, simply click on it on View List panel.
Above the View List panel title will display
[Current View name]:Device name
The Public Views are open to every User
The Private Views are only available to the User
who created them. You may not see this folder if without the
User right to own the Private Views.
The view with a pin on it is set by System
Administrator as default view. You will enter this view every
time you log in.
For details about how to create and edit a View, please refer to the chapter Customize Views
in NVR 3.0 Administrator’s Manual.
Note
Based on your User Group permissions, you may or may not own the privilege
To create, edit or delete a Public View or a Private View
To assign a specific View as default View
To see all the cameras included in a Public View.
Therefore, you may find certain view edit functions not available on the View Tool Bar.

www.acti.com
NVR 3.0 User’s Manual
20
Select a Camera
To watch the live view of individual devices, you need to identify and add this device video
stream to a blank channel in display area. All the devices that you are allowed to see are in the
Device List panel on the left. The permissions to watch different devices are defined by your
User Group, the details of which are managed by the System Administrator.
To pull in video sources to the display area:
From Device List panel, double-click on a device or drag it to Display area. By double-clicking
on “All Device”, all the devices will be added to the Display area.
Device List
To view the device information, put the cursor over the device
figure to bring the info box up.
In Device List panel, you may also sort the devices in different order. Click on title bar,
select “Device Sort”, and choose “by IP” or “by ID” as the sorting method.
By Device IP By Device ID (default)
Other manuals for NVR 3.0
2
Table of contents
Other ACTi Network Hardware manuals

ACTi
ACTi GNR -3000 User manual

ACTi
ACTi ECD-1000 User manual

ACTi
ACTi INR-450 User manual

ACTi
ACTi INR-440 User manual

ACTi
ACTi GNR-410 User manual

ACTi
ACTi INR-460 User manual

ACTi
ACTi GNR-2000 User manual

ACTi
ACTi GNR-3000 User manual

ACTi
ACTi ENR-2000 Series Service manual

ACTi
ACTi ENR-1100 Instruction Manual
Popular Network Hardware manuals by other brands

RSA
RSA Authentication Manager 8.2 Getting started

TLS Electronics
TLS Electronics BL 30110 HDBaseT Set2 user manual

Panasonic
Panasonic Transistors 2SC3938G Specifications

Centrica
Centrica Panoramic Power Programmer's guide

Triax
Triax TDX user guide

Omnitron Systems Technology
Omnitron Systems Technology iConverter Gx AN quick start guide