ADE PWI30 User manual

OPERATING MANUAL
Electronic bench scales
ADE Germany GmbH & Co.KG
Hammer Steindamm 27-29
22089 Hamburg, Germany
+49 (0) 40 432776-0
Fax
+49 (0) 40 432776-10
E-mail:
info@ade-germany.de
Portion scale PWI30 with induction charging
PWI30-190920-Rev005-UM-en
IMPORTANT
READ CAREFULLY BEFORE USE
PLEASE KEEP FOR FUTURE REFERENCE

1 PWI30-190920-Rev005-UM-en
Table of Contents
Table of Contents .................................................................................................................................... 1
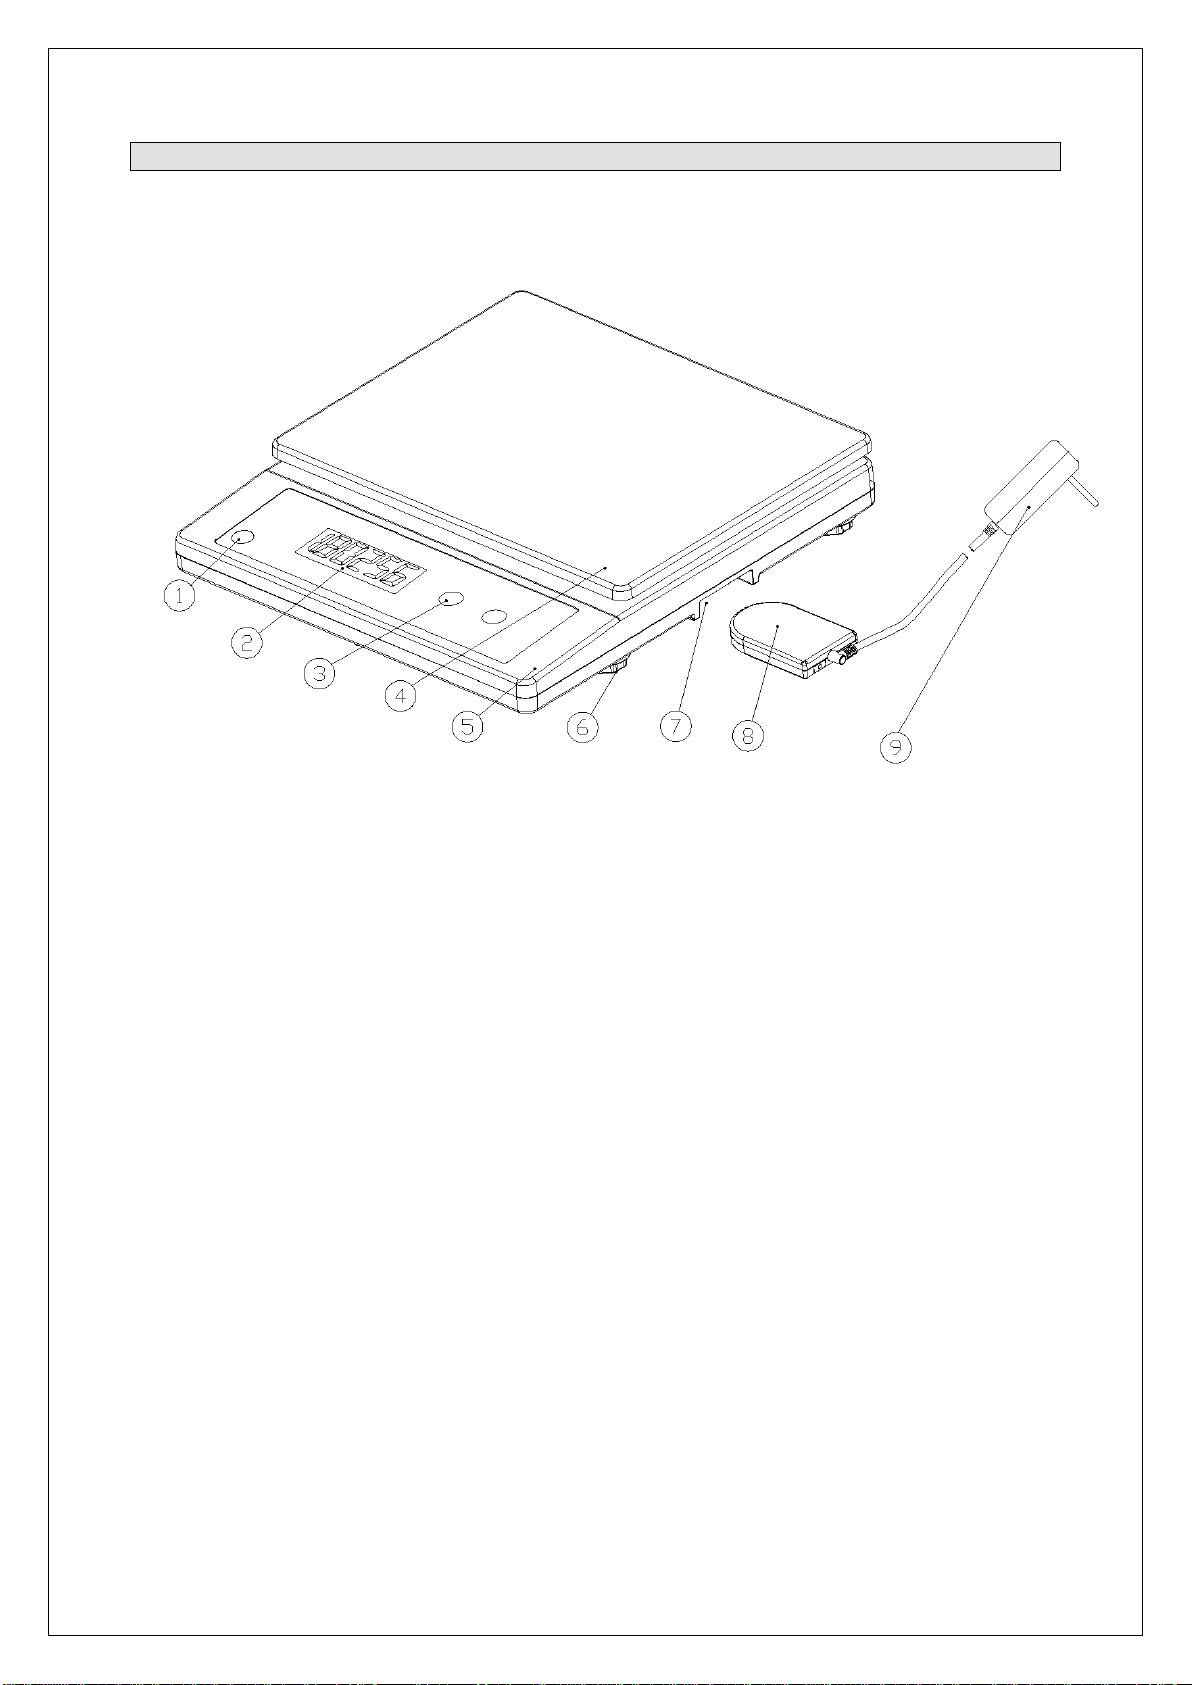
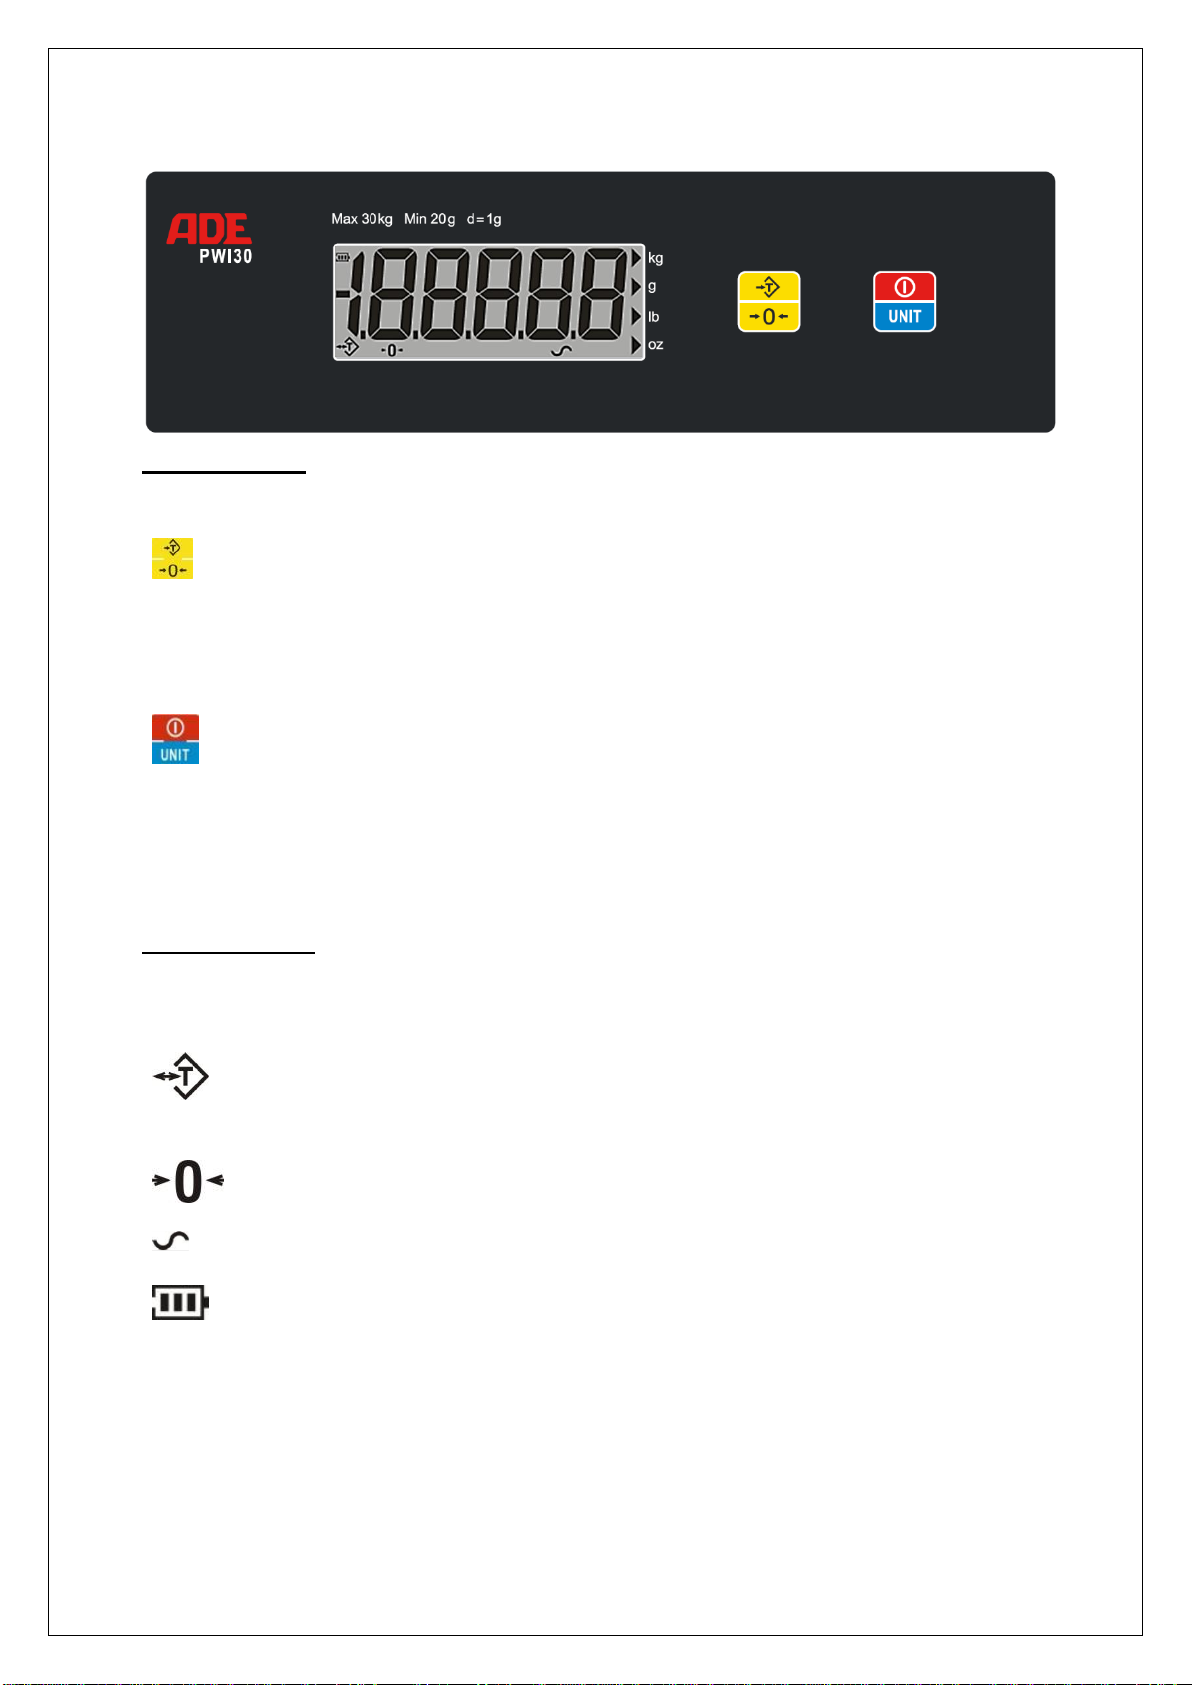
Overview display ..................................................................................................................................... 2
Button function............................................................................................................................ 3
Display symbols.......................................................................................................................... 3
Scale installation and operation .............................................................................................................. 4
Inspecting the contents of the box............................................................................................ 4
Safety information....................................................................................................................... 4
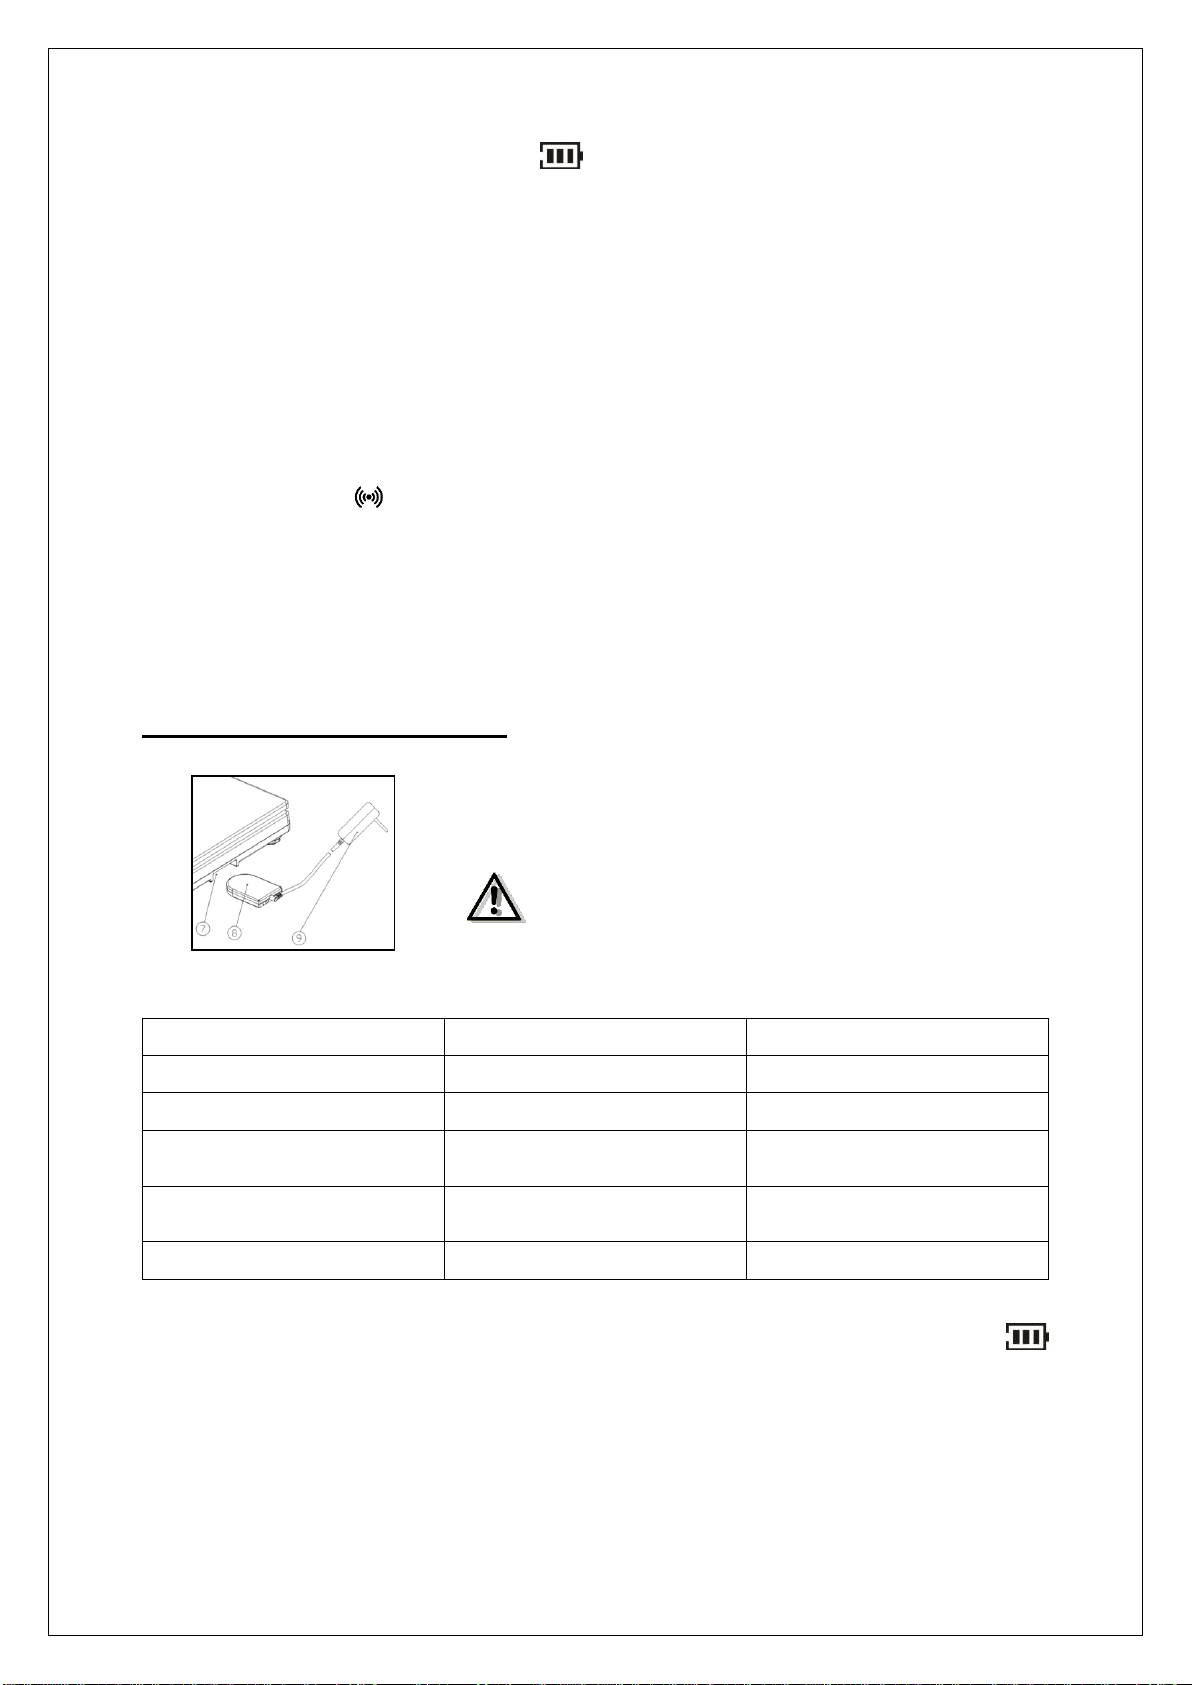
Mains and battery connection of the scale............................................................................... 4
LED display for induction charging .......................................................................................... 5
Assembling and levelling the scale........................................................................................... 6
Using the scale........................................................................................................................................ 6
Switching on the scale................................................................................................................ 6
Determining weight..................................................................................................................... 6
Zeroing the scale......................................................................................................................... 6
Tare function................................................................................................................................ 6
Setting the unit of weight ........................................................................................................... 7
Switching off the scale ............................................................................................................... 7
Error messages ........................................................................................................................... 7
Parameter settings .................................................................................................................................. 7
Backlight ...................................................................................................................................... 8
Selecting the unit ........................................................................................................................ 8
Automatic power-off in battery mode ....................................................................................... 9
Digit interval d ............................................................................................................................. 9
Zero offset.................................................................................................................................... 9
Cleaning................................................................................................................................................. 10
Safety information.................................................................................................................................. 10
Storage and transport conditions .......................................................................................................... 10
Warranty................................................................................................................................................ 11
Technical data ....................................................................................................................................... 12
CE - marking and declaration of conformity.......................................................................................... 13

PWI30-190920-Rev005-UM-en 2
Overview display
1 ………………………………..
Spirit level
2 ………………………………..
LCD display
3 ………………………………..
Buttons
4 ………………………………..
Weighing plate
5 ………………………………..
Housing
6 ………………………………..
Foot
7 ………………………………..
Induction charging base
8 ………………………………..
Induction charger
9 ………………………………..
Charging adapter

3 PWI30-190920-Rev005-UM-en
Button function
Buttons:
Functions:
………………
Multifunction:
To zero the scale in weighing mode.
To tare a desired weight value in weighing mode.
To set parameters in setting mode.
…………………
Dual function:
To turn on and off.
To toggle between the units of weight.
Display symbols
EEEEEE ……………..
Overload, a beep sounds at the same time - immediately remove the
object from the weighing platform!
…………………...
Indication that a fixed weight value has been stored, which will be
subtracted at each subsequent weighing process (TARE symbol).
…………………
Indication that the scale is reset to zero
……………………...
Indication that the achieved weight value is stable.
…………………...
Battery charge status.

PWI30-190920-Rev005-UM-en 4
Scale installation and operation
Your ADE portion scale with induction charging is a quality product.
It is ideal for use wherever dusty or harsh working conditions prevail, including professional
commercial kitchens, bakeries, butcher shops, etc. With the ProSeal technology, the
annoyance about dirt, dust, splashing water and corrosion is a thing of the past.
Thanks to the induction charging used, the scale has no interfaces at all in order to avoid
corrosion or contamination of connections. From the polymer membrane to the foot thread, it
offers a completely sealed housing with IP65 dust and splashing water protection that has
been intelligently designed and moulded to meet the highest demands, with no inaccessible
grooves, gaps or acute angles at all. In addition, the weighing surface and the supporting
substation can be disassembled in no time thanks to a practical quick-release fastener. Ideal
for all-round easy cleaning that leaves no residues behind.
Backlight and automatic power-off, as well as the display of different units can be set or
disabled.
To achieve precise results, please read the user guide carefully and follow the instructions
contained therein.
Inspecting the contents of the box
➢Portion scale
➢Load cross, silicone mat and weighing plate
➢Quick-release fastener for the load cross
➢Induction charger
➢User manual incl. declaration of conformity
Safety information
The induction charger generates an electromagnetic field. This can pose
a threat to persons with pacemakers or other implants!
Never attempt to charge the scale with/on an induction hob/cooker. This
is NOT technically feasible and can also cause destruction of the scale.
Mains and battery connection of the scale
Power is supplied either by means of the rechargeable batteries already installed in the device
or through mains operation using the included AC adapter (230 V AC). The printed voltage
level must comply with the local voltage.
- The rechargeable batteries are already installed in the scale housing.
- When charging the device for the first time, use the included AC adapter. The charging
time is approx. 12 hours during initial charging.
- When fully charged, the scale has an operating time of up to 120 hours.

5 PWI30-190920-Rev005-UM-en
- The charge status is indicated by on the display. Charge the battery as soon as a
low charge status is indicated by flashing charge status or LO lights up on the display
and the scale turns off automatically.
- When charging, make sure that the adapter is at least 5 cm away from metal objects.
- If the operating time with fully charged batteries is drastically reduced, the battery must
be replaced. In this case, please contact your local dealer or service partner.
- Make sure that the local mains voltage matches the operating voltage printed on the
adapter.
- If you will not be using the scale for an extended period of time, disconnect the power
supply from the mains and remove the battery to protect the scale.
- The energy transfer between the induction charger and the scale is contactless. The
radio symbols indicate the position of the transmission and reception elements (top
side of the induction charger and in the area of the induction charging base of the
scale). Charging takes place only when both elements/symbols are opposite each
other!
- The charging function is available only if the distance between the transmission and
reception elements is sufficiently small. It is therefore necessary to ensure that the
induction charger is properly positioned in the induction charging base.
LED display for induction charging
Slide the induction charger into the induction
charging base and connect the charging adapter
to the local mains supply.
The printed voltage level must comply with the
local voltage.
The batteries in the scale will start to charge.
The induction charger LED indicates the charge status as follows:
Charger LED
Battery symbol on the display
Charge status
LED off
Current battery status indicator
Charger is not connected to mains.
LED steady green
Evenly rolling battery symbol
Charging is ongoing
LED steady green
no battery symbol
Charging is complete or mains
operation (without batteries)
LED steady red
Current battery status indicator
Charger connected to mains, but not to
scale.
LED flashes red and green
Current battery status indicator
Sensor fault.
If the scale is turned on, the charging process will be indicated by a rolling battery symbol
on the display. Once charging has been completed, the rolling will stop.

PWI30-190920-Rev005-UM-en 6
Assembling and levelling the scale
Carefully remove the delivery contents from the packaging.
Put the load cross on the scale. Make sure that the holes in the centre of the load cross sit
over the pin in the centre of the housing. Attach the load cross to the quick-release fastener.
Place first the silicone mat and then the weighing plate on the load cross.
Place the scale on a level and stable installation surface and make sure that all four feet are
in contact with it. In addition, check the footing of the scale by means of the spirit level, the
bubble of which should be in the centre of a circle.
Put the weighing bowl on the scale. The four pins of the weighing bowl should grip into the
appropriate scale openings.
Insert the AC adapter into the socket located below the scale next tothe power button. Connect
the AC adapter to an AC power outlet (pay attention to the correct voltage).
Using the scale
Switching on the scale
To turn on the scale, press and hold down the button for about three seconds.
The display will show “ADE” for two seconds and will then automatically switch to weighing
mode. “0,000” is shown on the display.
If this is not the case, press the button. As a result, measurement inaccuracies will be
compensated after turning on the scale and will be reset to zero before the actual weighing
process.
The display now shows “0.000” and the figure indicates the zero position. shows that
the weight value is stable. The scale is now ready for use.
If the display shows only “0.00”, please check the selected digit interval in the parameter
settings of the unit of weight.
Determining weight
Make sure that the display shows “0.000”, and as described above.
Put the object to be weighed on the weighing surface. The weight value will appear on the
display and will show that the weight value is stable.
Zeroing the scale
If the weight is lower than 10% of the maximum capacity (here: 3 kg) and the display shows
the stability symbol , press the button to perform the zeroing function.
The display will show “0.000”, and .
Tare function
If the weight value is greater than or equal to 10% of the maximum capacity (here: 3 kg) and
the display shows , press the button to perform the tare function.
The display will show “0.000”, and .

7 PWI30-190920-Rev005-UM-en
With this function, the user can weigh objects together with other items (such as container, film
or paper towel), without the weight of those items affecting the weighing result. Only the net
weight will be displayed.
When unloading the weighing surface, the tare value will be displayed as a negative value.
If the stored objects are always the same, you can now weigh another object. The scale will
automatically subtract the stored weight and the net weight of the object will reappear.
If the scale is turned off automatically or manually, the content of the tare memory will go out.
If you want to correct or delete the stored value, make sure that the scale is completely
unloaded and press the button again.
Setting the unit of weight
The scale has kg, g, lb and oz as the units of weight.
To change the units of weight, press and hold down the button for two seconds.
As soon as a beep sounds, release the button and the unit will switch to the next one. After
the oz unit, the display will switch back to the kg unit.
The selected unit is shown as on the display.
Switching off the scale
To manually turn off the scale, press and hold down the button for four seconds in
weighing mode. As soon as a beep sounds, release the button and the scale will turn off.
Error messages
Overload - EEEEE display
The scale overload (+9d) is signalled by the “EEEEE” display. The overload must be eliminated
immediately to prevent the scale from being damaged.
Low battery charge - LO display
A low battery charge is indicated by “LO”. Charge or replace the batteries immediately.
Electronic error - --ERR display
The --ERR display shows an error in the electronics. Restart the scale and/or resume the
parameter settings. If the error message appears again, there is a defect in the electronics and
the circuit board must be replaced. Please contact your dealer or the manufacturer.
Parameter settings
You can make presets for various parameters.
When the scale is turned off, press the button and then simultaneously press and hold
down the button for four seconds to enter the parameter settings.
Press the button in setting mode to select the parameter values.
Press the button to save the selected setting and switch automatically to the next
parameter.

PWI30-190920-Rev005-UM-en 8
Backlight
Press to select the setting.
Use this parameter setting to select the desired backlight.
“BL ON”: Backlight always remains on
“BL OFF”: Backlight always remains off
“BL AUT”: Backlight is on only when the weighing surface is loaded
Press the button to save the selected setting and switch automatically to the next
parameter.
Selecting the unit
Use this parameter setting to disable the units of weight, the display of which is not required.
“t9”: Enable (On) or disable (Off) the display of kg as the unit of weight
“9”: Enable (On) or disable (Off) the display of g as the unit of weight
“lb”: Enable (On) or disable (Off) the display of lb as the unit of weight
“oZ”: Enable (On) or disable (Off) the display of oz as the unit of weight
Press the button to save the selected setting and switch automatically to the next unit of
weight.
After selecting oz as the unit of weight, the scale will automatically switch to the next
parameter.

9 PWI30-190920-Rev005-UM-en
Automatic power-off in battery mode
Use this parameter setting to select the desired time for the automatic power-off in battery
mode.
“P OFF”: Automatic power-off is disabled - the scale always remains on.
“P 2.5”: The scale will turn off automatically in 2 ½ minutes to conserve the battery.
“P 5”: The scale will turn off automatically in 5 minutes to conserve the battery.
“P 15”: The scale will turn off automatically in 15 minutes to conserve the battery.
“P 30”: The scale will turn off automatically in 30 minutes to conserve the battery.
Press the button to save the selected setting and switch automatically to the next
parameter.
Digit interval d
Use this parameter setting to select the division of the scale, the displayed digit interval.
It is recommended to leave this setting unchanged and use the button to
switch immediately to the next parameter setting.
If it is necessary to adjust the division, there are the following setting options:
“d 1”: 1 g division
“d 2”: 2 g division
“d 5”: 5 g division
“d 10”: 10 g division
“d 20”: 20 g division
Press the button to save the selected setting and switch automatically to the next
parameter.
Zero offset
Use this parameter setting to select the zero offset range in weighing mode.
It is recommended to leave this setting unchanged and use the button to
switch immediately to the next parameter setting.
If it is necessary to adjust the zero offset range, you can select the setting values 1 –7.
“Ztrc x” appears on the display.
In this case, the larger the set value x, the larger the automatic zero offset range.
Press the button to save the selected setting and switch automatically to the first
parameter (backlight).

PWI30-190920-Rev005-UM-en 10
Once all the desired parameter settings have been selected, press and hold down the
button for four seconds to exit the mode.
The settings will be accepted and the scale will turn off.
Cleaning
Before cleaning, disconnect the device from the power supply. Do not use any aggressive
cleaning agents while cleaning, but only a damp cloth or conventional disinfectants.
The weighing bowl and the silicone mat can easily be removed for cleaning. Open the
quick-release fastener of the load cross and remove both of them from the scale housing. All
parts can now be cleaned separately. The housing that is designed completely without
inaccessible grooves, gaps or acute angles can be wiped off from all sides with a cloth as
described above. After cleaning, assemble all parts in reverse order.
In addition to the four adjustable feet that can be unscrewed for cleaning, there are two
membranes on the underside that prevent the formation of condensate inside the scale. To
ensure protection against mechanical damage, the membranes are provided with two bleed
screw caps that must also be cleaned if they are soiled. During assembly, make sure that the
membranes and seals are inserted correctly!
Safety information
Safe operation is no longer guaranteed:
•If the AC adapter or the power cord shows visible damages.
•If the AC adapter no longer functions properly.
•After prolonged storage in humid areas.
Notify your service partner in these cases for your own safety.
No other power supply and battery other than those provided by the manufacturer may
be used. Otherwise, there is a risk of interference with other electrical devices!
The connection cable must be laid such that there is no danger of stumbling.
Storage and transport conditions
Keep all parts of the packaging in case you need to return the shipment to avoid possible
damage during transportation.
Disconnect all connected cables before shipping. You can thus avoid unnecessary damage.
Bleed screw cap
Seal
Membrane
Flat seal
Membrane film

11 PWI30-190920-Rev005-UM-en
Warranty
ADE will repair or replace this product if it is proven that it failed within 1 year from the date of
sale (proof of purchase is required) due to faulty workmanship or defective materials. All
moveable parts such as batteries, cables, plug-in power supply units, rechargeable batteries
etc. are excluded. This warranty does not cover external, normal signs of wear and tear or
damages caused by accident or misuse. The warranty will not apply for devices that have been
opened by unauthorised persons. In addition, the operation of the scale with damaged or
missing membranes is not allowed and will void the warranty. The statutory rights of the
customer are not affected by this agreement in any way.
The dealers where the scale was purchased is responsible for complaints, after-sales service
and spare parts.

PWI30-190920-Rev005-UM-en 12
Technical data
Model
PWI30
Maximum load:
30 kg
Digit display:
1 g
Weighing Surface:
330 x 260 mm
Dimensions:
330 x 360 x 70 mm
Net weight:
4.5 kg
Packaging dimensions:
403 x 398 x 97 mm
Packaging weight:
5.0 kg
Display:
Large LCD display with backlight, 26 mm
Housing:
ProSeal technology: Completely sealed, sturdy scale housing
(IP65) without grooves, gaps and acute angles
Keypad:
Easy-care membrane keypad
Weighing Surface:
Stainless steel, dishwasher safe
Quick-release fastener for disassembly of the weighing
surface
Working conditions:
Ambient temperature: -10°C –50°C
Relative humidity; 1% - 80%
Functions:
Weighing, taring, units of weight (kg, g, lb, oz)
User-friendly 2-button operation
Unit conversion:
1 kg = 1000 g
1 kg = 2.206 lb
1 kg = 35.27 oz
Power supply:
230 V AC mains and battery operation, interface-free
Induction charging; power adapter 5 V DC/1 A; high-
performance lithium-ion battery (3.7 V/5200 mA) with
operating time of up to 120 hours, charging time of
approx. 12 hours
Automatic power-off:
adjustable after 2.5 / 5 / 15 or 30 minutes or can be disabled
Backlight:
adjustable permanent, when loaded or can be disabled
Overload signal

13 PWI30-190920-Rev005-UM-en
CE - marking and declaration of conformity
Declaration of conformity by the manufacturer
These scales have been manufactured in accordance with the harmonised European standards. It
conforms to the provisions of the EC directives cited below:
−EMC Directive 2014/30/EU regarding electromagnetic compatibility
−Low voltage directive 2014/35/EU
−RoHS Directive 2011/65/EC
in the currently valid versions.
This declaration will lose its validity if any modification is made to the scale without our consent.
Hamburg, January 2019
ADE Germany GmbH & Co. KG
Hammer Steindamm 27-29
D-22089 Hamburg
Manufacturer:
ADE Germany GmbH & Co. KG
Hammer Steindamm 27-29
D –22089 Hamburg
Germany
+49 (0) 40 432776-0
Fax
+49 (0) 40 432776-10
E-mail:
info@ade-germany.de

PWI30-190920-Rev005-UM-en 14

15 PWI30-190920-Rev005-UM-en
Distributor:
Table of contents
Other ADE Scale manuals