Advance acoustic NOVA 2 Quick setup guide

2
CENTRAL VACUUM UNIT
NOVA 2
ASSEMBLY, USE AND
MAINTENANCE MANUAL


3
• Type: feeding system for solid fuel boilers
• Model: Nova 2
• Revision 1.0.6
VACUUM UNIT
NOVA 2
INSTRUCTION MANUAL
22/07/22 Rev:1.0.6
1 INTRODUCTION 4
1.1 Use of this manual 4
2 WARNINGS 4
2.1 Installer’s responsibilities 4
3 TECHNICAL DATA, EXPLODED VIEW DRAWINGS AND DIMENSIONS 5
3.1 Identification plate 8
3.2 Safety symbols 8
4 KIT AND ACCESSORIES 9
5 PROPER USE OF THE PRODUCT 10
6 INSTALLATION 10
6.1 Instruction for the installation of systems 10
6.2 Positioning 11
6.3 Connection to the piping network 12
6.4 Electrical connection 12
7 START UP AND USE 13
7.1 Thermal switch 14
8 MAINTENANCE AND END-OF-LIFE 15
8.1 Spare parts 15
8.2 End-of-life 15
9 SAFETY REQUIREMENTS FOR FUEL STORAGE TANKS 16
10 WARRANTY 17
11 CERTIFICATION 18
INDEX

Instruction manual for vacuum unit
4
22/07/22 Rev:1.0.6
1 INTRODUCTION
Dear customer,
the manufacturer would firstly like to thank you for the choice you made in buying an product, whose
technical features will certainly meet Your needs.
Our products have been designed and manufactured in total compliance with the current regulations, by
choosing the best materials to obtain durability and ease of use of the product.
We ask you, therefore, to read this manual carefully and completely, following strictly the instructions
contained herein.
1.1 Use of this manual
The instruction manual is a document drawn up by the manufacturer and is part of the product: it
integrates the specific rules of application and general rules for people, animals and objects safety. In the
event that the product is resold, handed over, rented or sold to others, it must always be accompanied
by this manual; therefore, it is recommended to use and keep it with care for the entire operative life of
the product.
The main objective of this manual is to make known the proper and safe way to use the equipment.
No part of this manual may be reproduced, copied, or shared in any way, without the written permission
of the manufacturer.
The manufacturer reserves the right to make improvements or modifications to this manual
and to the equipment at any time, without obligation to advise third parties.
2 WARNINGS
• Do not use the product for improper uses.
• This product must not be used by children or persons without the appropriate knowledge.
• Only use original spare parts.
• In order to be able to operate the product easily, it must be installed leaving a space around it
completely free of any obstructions.
• This product can be installed on pneumatic conveying systems for granular fuels derived from biomass for
other uses ask your seller for advice.
• Before first ignition, check that it is carefully installed.
• Never use the structure of the product as a supporting or fixing element for any other support or equipment.
• It is essential to ventilate the room where the product is installed when loading fuel into the tank.
• Remove the inspection doors only to carry out repairs and maintenance after disconnecting the power supply.
• The manufacturer disclaims all liability or warranty if the purchaser or anyone on his behalf makes any changes
or adjustments, however slight, to the product purchased.
2.1 Installer’s responsibilities
To ensure proper operation of the product, follow these guidelines:
• Only perform the activities described in these instructions
• Perform all activities in accordance with applicable regulations
• Explain to the user the operation and use of the product
• Explain to the user how to maintain the product
• Report to the user the potential dangers related to the use of the product

5
English
22/07/22 Rev:1.0.6
3 TECHNICAL DATA, EXPLODED VIEW DRAWINGS AND DIMENSIONS
G
HF
A
B
CLD
E
Model
Article
Nova 2
AP1000.50.01
Dust inlet pipe Ø mm 50 M
Discharge pipe Ø mm 50 M
IP protection degree IP 44
Operating temperature min/max °C 0 ÷ 40
Degree of humidity min/max % 30 ÷ 95
Power supply V ac 230
Frequency Hz 50/60
Motor power kW 1,35
Absorption A 5,6
Thermal switch A 7
Insulation class 2
Maximum air ow m3/h 234
Filtering surface cm26700
Filtering material PTFE-H11
Dust container capacity l 18
Air discharge silencer SI
Weight kg 7
Measurement A mm 160
Measurement B mm 110
Measurement C mm 210
Measurement D mm 395
Measurement E mm 605
Measurement F mm 270
Measurement G mm 175
Measurement H mm 310
Measurement L (min) mm 180
Noise Level dB(A) < 70
N. B: Nominal noise levels. The values may vary depending on the environment in which
the system is installed and the type of positioning.

Instruction manual for vacuum unit
6
22/07/22 Rev:1.0.6
Soundproof dome
Motor
Machine body
Filter cartridge
Dust container
1
2
3
4
5
Electric power cable
Activation signal cable (micro lines)
7
8
Dust inlet
Air vent
Vacuum breaker
10
11
9
Handle and closure hook
12
Thermal switch
6

7
English
22/07/22 Rev:1.0.6
Filter
tightening
knob
Filter
cartridge
Motor
Protection
grid
Motor lower
gasket
Motor upper
gasket
Fixing plate
2
3
4
5
6
Machine
body
Vacuum
breaker
Conveyor cone
with gasket
Handle and
closure hook
Dust bin 15
14
11
12
13
10
9
1
Cover
Electronic
board
Thermal switch
7
8

Instruction manual for vacuum unit
8
22/07/22 Rev:1.0.6
3.1 Identification plate
The CE identification plate is located to the piping network attachment side. Do not remove or damage
the plate.
....................................
.........................................................................
Model:
P/N: S/N:
Vacuum unit type Manufacturer identification
CE Mark of
conformity
Technical data of the electric motor
Serial number
Item number
It is recommended to pay full attention to pictograms and warnings of danger and prohibition
in the present different parts of the equipment: if not respected, hazardous situations may
occur.
DANGER OF VOLTAGE OR ELECTRICAL CURRENT
Danger of serious personal injuries.
During maintenance operations, always disconnect the power supply and make
sure that it cannot be restored.
DANGER OF CUTTING
Danger of serious personal injuries.
During maintenance operations, always disconnect the power supply and make
sure that it cannot be restored.
DANGER OF AUTOMATIC STARTING
Danger of serious personal injuries.
During maintenance operations, always disconnect the power supply and make
sure that it cannot be restored.
DANGER FOR THE HAND WHEN THE SCREW CONVEYOR IS IN OPERATION
Danger of serious personal injuries.
During maintenance operations, always disconnect the power supply and make
sure that it cannot be restored.
3.2 Safety symbols

9
English
22/07/22 Rev:1.0.6
Manuale Tecnico
per centrali aspiranti civili
4 KIT AND ACCESSORIES
Check that the product corresponds to what was ordered and that there is no obvious damage
caused by transport, otherwise notify the retailer immediately.
After opening the packaging, check that the material contained in the package is
conforms to the list below:
1) N°1 vacuum unit
2) N°1 fixing plate for wall mounting of the vacuum unit
3) N°2 gum sleeves for the connection to the piping network
4) N°4 metal clamps for sleeves fixing
5) N°1 warranty form
6) N°1 assembly, use and maintenance manual
7) N°1 air discharge silencer
21 34
67
5

Instruction manual for vacuum unit
10
22/07/22 Rev:1.0.6
5 PROPER USE OF THE PRODUCT
The vacuum unit has been designed to be installed for the pneumatic transport of pellets or other
biomass fuels with a medium-fine size: it can move a large amount of air into the pipes connected,
allowing the solid fuel to be conveyed and transported together with the air.
This product is suitable for working with biomass fuel such as pellets, olive pomace, crushed
shells of dried fruit, corn, but it cannot work with fuels having excessive dimensions and, in any
case, having lengths over 40 mm or diameter greater than 15 mm.
It is recommended to use only ENplus A1 certified pellet.
The vacuum unit moves the fuel from the main storage tank and convey it to the boiler tank continuously
and automatically: obviously, to achieve this, it is also essential to install the other components of the
system.
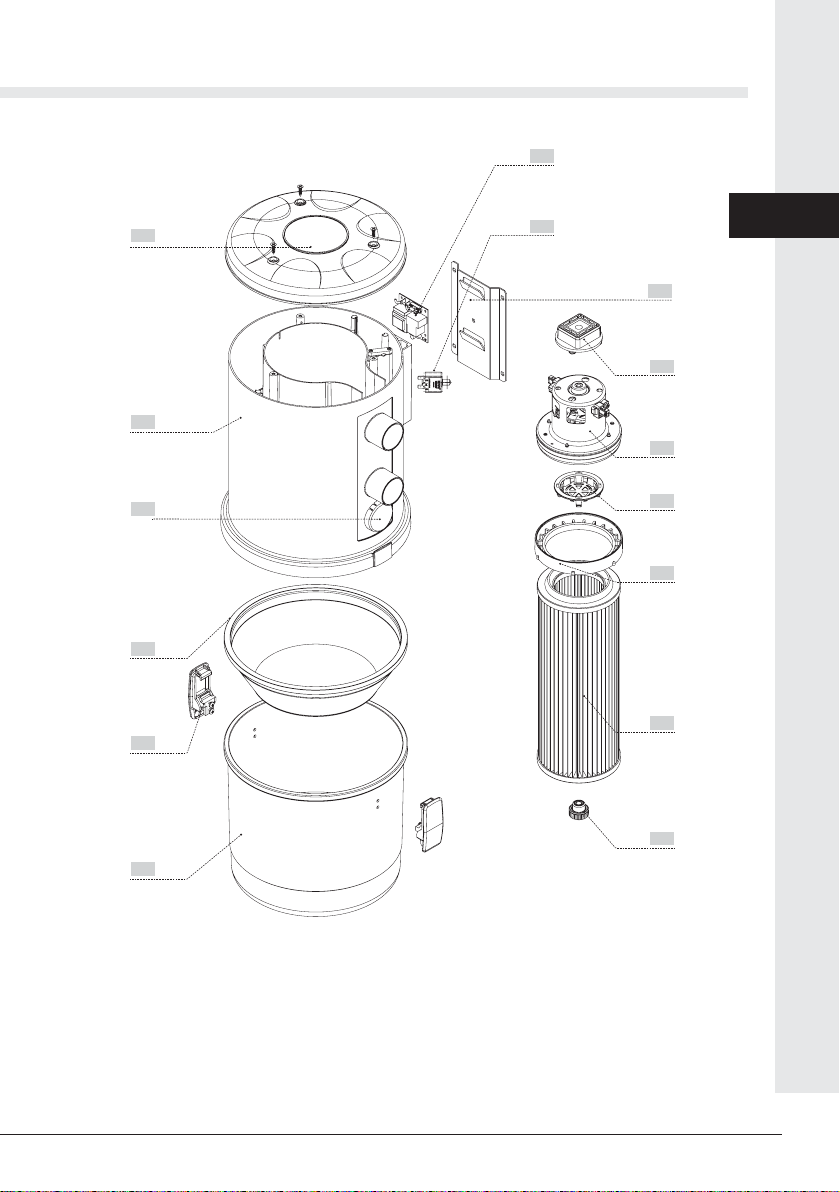
When the vacuum unit is working, it also eliminates the dust from the transported fuel, retaining the
waste in the bucket thanks to the high efficiency filter inside it.
Using the vacuum unit, the fuel transport system can be combined with a central vacuum system with
one or more cleaning sockets. In the catalog you can find all the accessories needed for this purpose
(see chapter 7).
The product is suitable to serve boilers with a maximum power of 100 Kw/h and with a fuel consumption
lower than 25 kg/h.
The vacuum unit cannot be included in any fuel transport system that involves the recirculation of
suctioned air to the storage tank (two pipe system).
6 INSTALLATION
It is the installer’s responsibility to verify the presence of any risk of danger in the installation
area and to determine the suitability in accordance with both the applicable laws and the product
characteristics described in this manual.
The installer must also comply with the requirements of this manual as well as inform the user of the
operation and maintenance of the installed products and report any dangers related to their use.
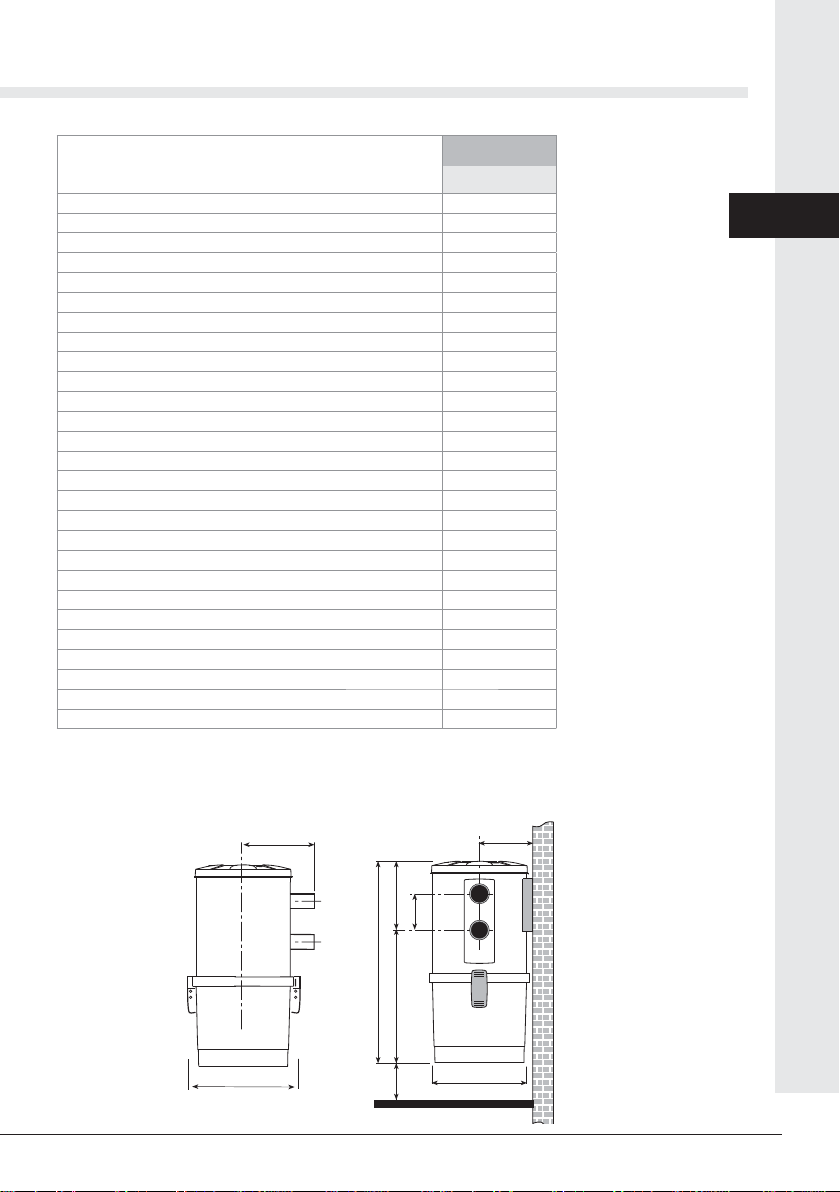
It is necessary to leave a free space of adequate size all around the product, in order to permit any
repair, maintenance or inspection operation.
The product should not be exposed to atmospheric agents and should not be installed in areas subject
to high humidity, possible flooding, high temperatures and dust presence.
6.1 Instruction for the installation of systems
Consider that in pneumatic fuel transport systems there are two different types of pipe features:
A sections of pipes where only air and eventually dust pass through
B- sections of pipes where both air and fuel pass through
Mandatory all sections of piping through which the fuel passes must be made with PU or steel pipe and they
must be connected to be antistatic.
We remind you that the lengths of the various pipe sections described in our manuals and catalogs are pu-
rely indicative: when we speak of “available length” we mean the total development of the various sections.
It is always advisable to make mainly straight and horizontal piping sections and, in any case, with the least
number of changes of direction and vertical paths.
For all the sections where fuel passes, it is recommended to follow these simple rules:
the maximum length allowed for the various sections of piping depends on the components chosen for your

11
English
22/07/22 Rev:1.0.6
6.2 Positioning
The control unit must be firmly fixed to the wall or to another stable and robust support. A
support plate is provided to facilitate this operation.
The floor height of the unit must be at least 18 cm in order to allow the removal of the filter and
the emptying of the bucket.
2
Trace the drilling points using the plate supplied as drilling
template
Do the drilling
1
system:
1- the characteristics and technical data provided for each component must always be evaluated
in advance, so that the system works at its best and has the required characteristics.
2- in two-pipe systems (fuel suction and air return to the silo) the limits on the lengths are generally
much lower and never exceed 10 meters. With some products pipe lenght cannot be more than 3
meters.
3- in single-pipe systems, the maximum length allowed for the various sections of pipe, despite
being limited by the components chosen for your system, is more generous, but even in these
cases it is necessary to evaluate in advance the characteristics and technical data provided for
each component installed.
4- paths with many curves or with very close curves should always be avoided.
5- the minimum radius of the curves must be equal to or greater than 0.5 meters.
6- sections of pipes that include both positive and negative siphons must be avoided.
7- the sections of horizontal pipes must be kept perfectly leveled.
8- vertical pipe sections longer than 3.5 meters must always be avoided and at the bases of these
the minimum radius of the bends must be equal to or greater than 1 meter
9- the sections of piping where fuel passes must be well fixed at least every 1.5 meters.
10- the pipe sections may be built-in or installed under flooring, but only for very short linear traces
and only by inserting them into an additional casing pipe of properly larger diameter.
It is recommended to use only pipes, fittings and accessories present in our catalog, as they have
been designed, tested and built specifically for these systems.
Before installation and start-up of the system, it is essential to carefully read the instructions sup-
plied with the various components and in case of doubts it is advisable to contact specialized
personnel.
The realization of the systems and the installation of the components must always meet the
safety standards corresponding to the type of rooms in which they are positioned.

Instruction manual for vacuum unit
12
22/07/22 Rev:1.0.6
6.3 Connection to the piping network
Using the sleeves or a flexible hose section, connect the suction and discharge pipes from the system
to the vacuum unit.
The exhaust pipe must be connected to the outside by interposing the supplied silencer.
An eventual wall discharge grid is available on the catalog.
Do not glue the pipe ends to the fittings of the unit.
The maximum permissible length for the air descharge pipe is 5 m.
Screw the screws into the dowels
and check that the plate is well an-
chored to the wall. 3
Hook the suction unit to the anchor plate
by lifting it, placing it against the wall and
lowering it until it engages in the fixing
plate.
4

13
English
22/07/22 Rev:1.0.6
6.4 Electrical Connection
Before making the electrical connection, check that the supply voltage corresponds
to the one required and that the electrical system to which the product is connected
is done in compliance with current regulations.
Connect the two MICRO line wires to the MICRO OUT terminal on the control panel.
Connect the power cable to a 230 V ac power outlet.
.
220 V
Micro line
230 V ac
3
1
0
OFF
OFF
ON
2
F0030683
ALARM MICRO
OUT AUX
REED
MICRO
IN TIMER VALVE
SENSOR A SENSOR B
- + PNP NPN - + PNP NPN
POT
RELAY
SWITCHING
AC/DC
FUSE
RELAY
RELAY
L
N
F0030683
ALARM MICRO
OUT AUX
REED
MICRO
IN TIMER VALVE
SENSOR A SENSOR B
- + PNP NPN - + PNP NPN
POT
RELAY
SWITCHING
AC/DC
FUSE
RELAY
RELAY
L
N
F0030683
ALARM MICRO
OUT AUX
REED
MICRO
IN
ER VALVE
SENSOR A SENSOR B
- + PNP NPN - + PNP NPN
L
N
REED
MICRO
IN
SENSOR A SENSOR B
- + PNP NPN - + PNP NPN
L
N
F0030683
ALAR
M
MICR
O
OU
T
AU
X
ER
VA
LV
E
Don’t use the vacuum unit without filter cartridge.
Before proceeding to unit start up, it is opportune to check that the pipes are correctly and firmly
fixed to it, and that electrical connections comply with the current law, as well as the electric system
to which it is connected.
Read all the manuals of the different components of the system before proceeding.
The vacuum unit can be installed in systems only for pneumatic fuel transport or in systems where
dust suction is also possible.
If the vacuum unit is used only for pneumatic fuel transport, its operation is managed automatically
by the control panel, and it only works when it is required to transport the fuel.
7 START UP AND USE

Instruction manual for vacuum unit
14
22/07/22 Rev:1.0.6
Control Panel
Separator of fine powders and
ash with casters
Fixed separator of
powders and ashes
Cleaning suction inlet Sectioning valve
Fuel/Dust
If the plant is also used for dust aspiration and so if one or more aspiration sockets have been provided
in the system, its operation is twofold and it is always managed by the control panel.
In this case it works either when it is required to transport the fuel or when it is required the dust suction
through the installed suction inlets (see components and accessories in the catalog).
To switch on the vacuum unit, simply insert the plug into an electrical outlet; at this point it is ready to
work only when prompted by the already connected control panel (see 6.4).
In order to avoid irreparable damages to the filter and the central unit, the suction of fine powders such
as ash, cement, gypsum, flour, talcum etc. must be avoided without the interposition of an additional and
adequate filter available among those in the catalog.
7.1 Thermal switch
The thermal switch’s task is to protect the electrical and electronic parts of the vacuum cleaning unit from
overcurrents and short circuits.
The button of the switch during correct operation will be positioned inside its own seat, while in the event
of a successful protection the button will be released from its seat.
The reset must be done manually by pressing the button, this operation will be effective only if the cause
of the block has been solved.
If blocking occurs repeatedly, the intervention of a specialized technician is necessary.

15
English
22/07/22 Rev:1.0.6
8 MAINTENANCE AND END-OF-LIFE
Before carrying out any maintenance operation, it is obligatory to disconnect the power
supply cable from the main socket and to aerate the premises in which it is installed for
at least 15 minutes.
Complex or long maintenance operations must be done out of fuel storage and heating
unit premises.
Any maintenance and repair operation must be carried out by experienced personnel
and authorized by the manufacturer.
In the absence of a specific maintenance plan, a complete product inspection is recommended
for each filling of the fuel storage tank.
The checks to be carried out at least yearly are:
- Check electrical wiring condition
- Check motor brushes condition
- Check filter cartridge condition
The checks to be carried out at least every two weeks are:
- clean the filter with compressed air or wash it with low pressure water
- Empty the dust collecting bucket
The filter cartridge should always be correctly fixed. A wrong mounting could cause
serious damages to the motor and the control panel.
Do not use the vacuum unit without the filter cartridge.
It is also advisable to thoroughly clean the fuel storage tank at least annually, in order to
avoid dust accumulation and presence of foreign bodies.
8.1 Spare parts
To guarantee longevity and optimum performance of the vacuum unit, it is recommended to use
only original spare parts.
8.2 End-of-life
Thedisposalofpackaging,accessories and machinemust be executedin accordance withapplicable
laws, ensuring the recycling of any of the core components.
SPARE PART DESCRIPTION
Electronic board
Motor
Motor Brushes
Thermal switch
Filter PTFE
Transparent dust bin
Cone of bin sealing

Instruction manual for vacuum unit
16
22/07/22 Rev:1.0.6
9 SAFETY REQUIREMENTS FOR FUEL STORAGE TANKS
SAFETY REQUIREMENTS
for pellet storage tanks
with capacity up to 10 t
Keep the doors closed. Access is permitted only
to authorized personnel under the supervision of a
person outside
Do not smoke and approach flames or other sources
of ignition.
Danger of death due to high concentrations of carbon
monoxide (CO) and lack of oxygen.
In the 4 weeks after the fuel filling, enter only with a
CO detector.
Aerate the storage room for at least 15 minutes
before entering and keep the door open during your
permanence.
Ensure an adequate and permanent aeration of the
storage room through vent covers, openings or fans.
Wounding risk for moving systems
Turn off the boiler at least one hour before the pellet
is delivered.
Proceed to the filling according to the requirements of
the boiler manufacturer and the pellet supplier.
Protect pellets from humidity
In case of fire suspect keep the front door and any
other opening of the storage room close and call the
firemen.

17
English
22/07/22 Rev:1.0.6
10 WARRANTY
PRODUCT LIMITED WARRANTY CONDITIONS
The Manufacturer guarantees to the original purchaser the absence of defects in material and
workmanship of the product for the period stated, from the date of purchase. Except as prohibited
by applicable law, this warranty is non transferable and it is limited to the
original purchaser. The present warranty gives the buyer specific legal rights and the possibility
to claim rights which can vary under local laws.
Read all warnings and instructions before using the product purchased.
The entire liability of the manufacturer and your exclusive remedy for any breach of warranty will
be at the discretion of the Manufacturer:
(1) To repair or replace the product, or (2) refund the purchase price, provided that the product
has been returned to the point of purchase, or such other place as may be specified by the
manufacturer, with a copy of the sales receipt or detailed and dated receipt. The shipping and
handling are not free of charge, except in cases where this is prohibited by applicable law.
To repair and replace the product, the manufacturer may, at their own discretion, use new,
refurbished or used parts in good working condition. Any replacement product will be warranted
for the remaining time of the original warranty period, or for any period of time that complies with
the provisions of the current law.
This warranty does not cover problems or damage resulting from (1) accident, abuse,
misapplication, repair, alteration or unauthorized disassembly; (2) maintenance operation, use
which is not in accordance with the product instructions or connection to an improper voltage
supply; or (3) use of consumables and spare parts which are not supplied by the manufacturer
or authorized service center.
Valid warranty claims are generally processed through the point of purchase of the product.
Please agree this detail with the retailer where you purchased the product.
The Warranty claims that cannot be processed through the point of purchase, as well as any
other product related questions, should be addressed directly to the manufacturer. Addresses
and contact information for customer support can be found at the web.
Except as stated by relevant laws in force, any implied warranty or condition of
merchantability or suitability for a particular purpose relating to this product is limited to the
duration of the Limited Warranty period for the specific product purchased.
Some jurisdictions do not allow limitations on the duration of implied warranties or the exclusion
or limitation of incidental or consequential damages, so the above limitation may not apply to you.
This warranty gives you specific legal rights and you may have other rights that vary from state
to state, or from jurisdiction to jurisdiction.
Consumers have legal rights under applicable national legislation governing the sale of
consumer products. Such rights are not affected by the warranties in this Limited Warranty.
No dealer, agent, or employee of the manufacturer is authorized to make any modification,
extension or addition to this warranty.

Instruction manual for vacuum unit
18
22/07/22 Rev:1.0.6
11 CERTIFICATION
Declaration of absence of harmful substances
The manufacturer declares that their products and equipment are made with materials compliant
with the current regulations regarding protection of health and the environment and does not
contain substances classified as SVHC (Substance of Very High Concern) in accordance with
Regulation EC 1907/2006 (REACH, or registration, evaluation, authorization and restriction of
chemical substances).
Although in the working cycles of raw materials and our products such substances are not
used, their presence in the size of p.p.m. (parts per million) cannot be excluded due to micro-
pollution of raw materials.
EC declaration of conformity
The Manufacturer declares that its products and equipment comply with the following standards:
EN ISO 12100:2010 (Risk Assessment Calculator)
EN ISO 14121-1 (Safety of machinery)
And following directives:
N° 2006-42-CE
N° 2014/35/UE (LVD)
N° 2014/30/UE (EMC)

Register your warranty
Registra la tua garanzia
Enregistrez votre garantie
Registrieren Sie Ihre Garantie
Registre su garantía
advanceeasymoving.it/registrazione-prodotto

VACUUM UNIT NOVA 2
F0920235.1
info@advanceeasymoving.com - www.advanceeasymoving.com
Table of contents
Other Advance acoustic Vacuum Cleaner manuals

Advance acoustic
Advance acoustic VacRide3400C User manual

Advance acoustic
Advance acoustic Turbo 56100687 User manual

Advance acoustic
Advance acoustic Aquamatic Selectric User manual

Advance acoustic
Advance acoustic SC100 Instruction Manual

Advance acoustic
Advance acoustic VU500 15 INCH SMU US User manual

Advance acoustic
Advance acoustic SD 4317 User manual

Advance acoustic
Advance acoustic L/A 114 User manual

Advance acoustic
Advance acoustic Carpetwin 56704200 User manual

Advance acoustic
Advance acoustic Adgility 6XP User manual

Advance acoustic
Advance acoustic AdVac 11 User manual