14 15CLINICAL TOOLSMarvel CI
1. The SoundWave 3.2 file must have a Visit History and Intellilink™ enabled in order to migrate the recipient information.
2. It is important to close both SoundWave 3.2 and Target CI between migration. This ensures that the most current data is migrated from SoundWave 3.2 to Target CI.
3. Migrate one patient file at a time.
4. Modification date is the date the most recent visit history was created.
5. Client files will not be migrated if the recipient has no active implants or is identified as a test patient.
6. If the SoundWave file contains a C1 implant, the C1 data will not be migrated. If the recipient is bilateral, only data for a non-C1 implant will be migrated.
This guide provides the fitting steps needed to upgrade an existing recipient to Marvel CI.
FITTING HARDWARE
Marvel CI sound processors are programmed in the Target CI fitting software, using either the Noahlink Wireless or CPI-3
programming interface.
FITTING GUIDE
When migrating client data from SoundWave 3.2 to Target CI, it is recommended that individual client files be migrated at the
time that each recipient chooses to upgrade to Marvel CI. This ensures that the most recent recipient information is transferred
to Target CI at the time of the upgrade.
1. VERIFY SETTINGS IN SOUNDWAVE 3.2
• Ensure that the recipient has a visit history for a Naída CI Q sound processor. Migration will not occur for sound processors
prior to Naída CI Q. Only the most recent visit history will be migrated. If there is no Naída CI Q visit history for a given side,
that side will not be migrated.
• Ensure the recipient’s preferred program is saved to Program Slot 1, as information from Program Slot 1 in the most recent
SoundWave 3.2 Visit History will be migrated to Target CI1.
• Note the client’s date of birth in SoundWave 3.2. Close SoundWave 3.2 fitting software2.
2. OPEN TARGET CI AND MIGRATE CLIENT DATA
If Target CI is used as standalone software, migrating client data will add a new client to the database.
If Target CI is installed as a Noah module, it’s necessary to first enter the recipient demographic information into Noah, select
the client, and open a new fitting session.
• In Target CI access the File menu and select Migrate client data
3.
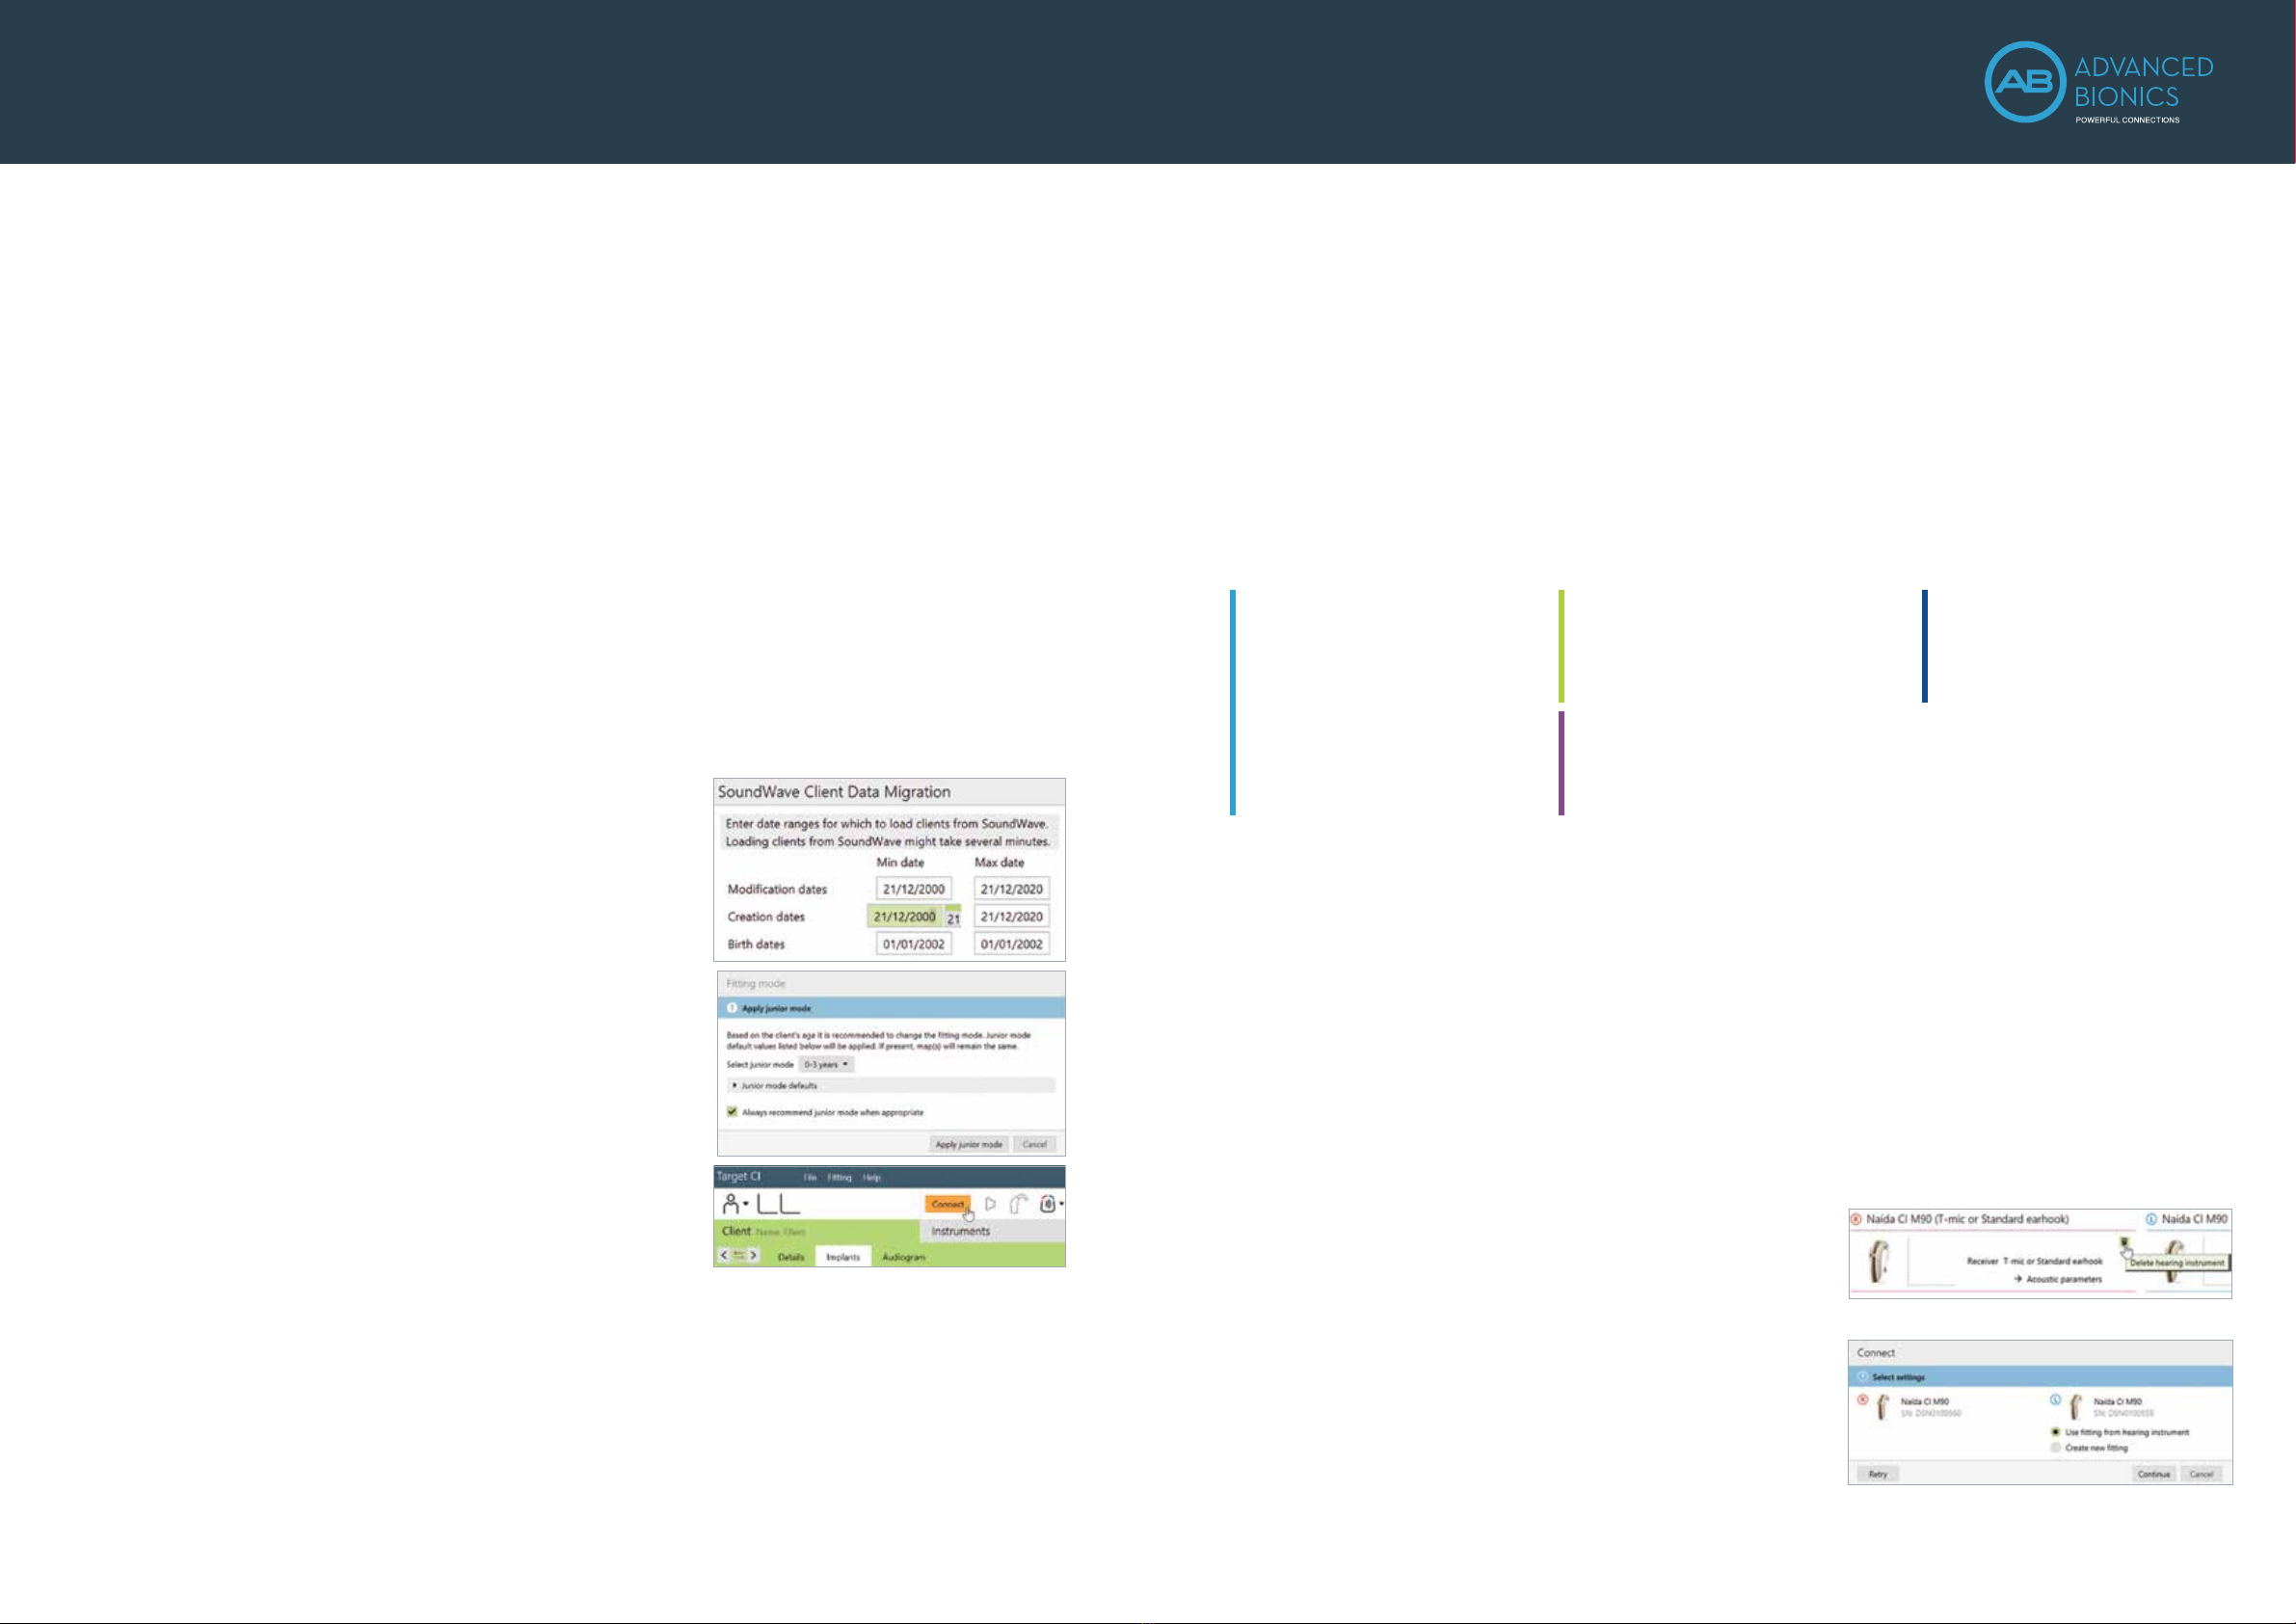
• Enter the required information in the SoundWave Client Data Migration
window (Modification dates, Creation dates, Birth dates).
– Enter the date of birth accurately.
– Enter a wide Modification
4and Creation date under the Min date
e.g. dd/mm/2000; then, click Start.
• Verify the client’s name. Confirm that the appropriate sound
processor is chosen for the upgrade.
• Click Start and follow any prompts.
• The session is now available in the client file. The Notes section
of the client details will indicate the session was migrated5,6.
For pediatric Marvel CI upgrades:
• Target CI will ask if the hearing care professional wants to apply Junior
mode default settings (based on the client’s age) to the map.
• Target CI will prompt the hearing care professional to choose between
Create new fitting or Keep current mapping parameters and match
Junior mode defaults.
• Select Keep current mapping parameters and match Junior mode
defaults to maintain the recipient’s current map parameters.
• Select Create new fitting to reset the recipient’s map parameters.
3. CONNECT TO THE HEARING INSTRUMENT
• Connect to the hearing instrument via Noahlink Wireless, CPI-3, or Remote Programming.
• When programming wirelessly, ensure that a fully charged rechargeable battery is used. Remove and re-attach the battery
to put the sound processor into pairing mode. Click the Connect button within the 3-minute pairing window.
• Verify the side for which the device is intended to be used.
• Once device connection is successful, Close to proceed.
4. CONNECT TO THE INTERNAL DEVICE
• Place the headpiece on the recipient’s head to achieve lock with the implant. Lock must be achieved prior to making any
changes to the Implants tab. If lock is not achieved, the sound processor will not stimulate the implant and the fast blinking
red LED will be observed.
5. SELECT THE APPROPRIATE ATTACHMENT
• Under the Instruments tab, go to Acoustic parameters and ensure that T-Mic/Standard is selected as the appropriate
attachment.
6. MEASURE IMPEDANCES AND NEURAL RESPONSE IMAGING (NRI)
• Impedances will run automatically. Under Client, access the Impedance tab to run impedances.
7. VERIFY THE MAP SETTINGS AND COMFORT
• Under the Fitting tab, access Mapping to verify the electrical parameters like M-Levels and T-Levels, Strategy, Pulse
Width, IDR, etc.The settings in the table below should be considered.
• Verify comfort using Live Speech stimulation.
The following settings from the SoundWave 3.2 data migration should be considered:
8. FINE TUNING
• Access the Fine tuning tab to verify the program settings. Confirm settings in the Map options tab, as desired.
• Access the Program options tab to fine tune individual programs further, if desired.
9. MANAGE DEVICE OPTIONS
• Access the Device options tab to manage Manual controls, Bluetooth®, Signals & alerts, Indicator light, Startup and
Datalogging, as needed, based on each recipient’s unique preferences.
• For ease of discovering the device during Bluetooth pairing, access the Bluetooth tab and label each side with the recipient’s
name.
10. SAVE AND CLOSE THE SESSION
• Select Save & close to finalize the fitting session.
• Run and review the sound processor Battery estimation, if desired.
• Add any notes to the fitting session, if desired.
• Follow the prompts to Save the fitting session to the Hearing instruments and/or the Database. Select Close to complete the
session.
BILATERAL RECIPIENTS UPGRADING ONLY ONE SIDE TO MARVEL CI
• When migrating a recipient’s SoundWave 3.2 file into Target
CI, data from both sides are migrated over. For a simpler fitting
experience, it may be helpful to delete the hearing instrument
on the side that you do not intend to upgrade, in the Hearing
Instruments tab.
• Access the Fine Tuning tab. Under Automatic programs, ensure
Speech in loud noise is not enabled (this program requires a compatible
hearing instrument on the contralateral ear).
When upgrading the second side to Marvel CI:
• Simply repeat the migration of the recipient’s SoundWave 3.2 file into
Target CI.
• When connecting to the hearing instruments, select Use fitting from
hearing instrument on the side that was previously upgraded. Select
Continue to proceed with the fitting.
SETTINGS PRESERVED
FROM SOUNDWAVE
• M-Levels / T-Levels
• ClearVoice – If Enabled in SoundWave 3.2,
will be set to Medium in Target CI.
• SoftVoice
• IDR
• Disabled / Spanned / Clipped electrodes
• Strategy
• Filter type
• RF (Set to AutoVoltage or Manual)
• Electrical gain settings
RE-EVALUATE IN TARGET CI
• Acoustic parameters – The audiogram must be
manually entered in Target CI.
• Pulse Width –May be impacted by New
Impedance Measurement.
SETTINGS DIFFERENT IN TARGET CI
• Program structure – AutoSense OS now available
• T-Mic + Processor Mic – This microphone option
is not available for Marvel CI
CANNOT BE MODIFIED IN TARGET CI
• QuickSync is always enabled
• Volume Min/Max (±20%)
Marvel CI Upgrade
PROGRAMMING GUIDE