Advantech AMiS-72 User manual

Device Reference Guide
Telehealth Cart

1
Table of Contents
About Advantech Device Reference Guide---------------------------- 2
Abbreviations -------------------------------------------------------------------- 3
1. Camera & Speaker Phone 5
AVer CAM520-------------------------------------------------------------------------- 5
Package Contents ������������������������������������������������������������������������� 5
Instructions ���������������������������������������������������������������������������������� 5
Safety and storage������������������������������������������������������������������������� 5
Cleaning Instructions���������������������������������������������������������������������� 6
Application ����������������������������������������������������������������������������������� 7
Jabra Speak 510 --------------------------------------------------------------------- 8
Package contents �������������������������������������������������������������������������� 8
Instructions ���������������������������������������������������������������������������������� 8
Safety and storage������������������������������������������������������������������������� 8
Cleaning Instructions���������������������������������������������������������������������� 8
Application ����������������������������������������������������������������������������������� 9
2. VSee Messenger ---------------------------------------------------------- 10
System Requirements and Specications 10
Instructions ��������������������������������������������������������������������������11
Secure handling of software 18
Application�������������������������������������������������������������������������� 19
3. Horus Scope----------------------------------------------------------------- 20
Package contents �������������������������������������������������������������������������20
Instructions ���������������������������������������������������������������������������������22
Safety and storage������������������������������������������������������������������������27
Cleaning Instructions���������������������������������������������������������������������31
Applications���������������������������������������������������������������������������������32

2
Advantech Device Reference Guide comprises of user�ready information about
Advantech’s devices and software systems. This document will provide users
with quick familiarity of devices’ features; handling; general instructions for use;
sterilization and disinfection; storage; diagnostic scopes, and applications. The
devices and software systems discussed include AVer CAM520 camera and
Jabra Speak 510 speakerphone, VSee messenger, and Horus Scopes.
About Advantech Device Reference Guide

3
AP Access Point
CMD Command Prompt
CPU Central processing unit
CT Computed tomography
DICOM Digital Imaging and Communications in Medicine
ECG Electrocardiogram
EHR Electronic Health Record
ENT Ears, Nose, and Throat
FAT File Allocation Table
HDMI High-Denition Multimedia Interface
HIPAA Health Insurance Portability and Accountability Act of 1996
ID Identication
LCD Liquid Crystal Display
LED Light Emitting Diode
Li�ion Lithium�ion
MRI Magnetic Resonance Imaging
MCU Multipoint Control Unit
Abbreviations

4
OSD On�screen Display
OS Operating Systems
PC Personal Computer
PDT Photodynamic Therapy
PTZ camera Pan–Tilt–Zoom Camera
TV Television
USB Universal Serial Bus
UV Ultraviolet
UVC USB Video Class

5
■Package Contents
Once power is connected, the power
indicator lights up and the camera head
rotates. LED indicators provide camera
status by flashing different colored lights.
When the camera head starts rotating,
the indicator will ash blue light, and solid
blue if everything remains normal. When
a computer does not use the camera, the
light turns orange and remains solid when
the camera is not connected with its head
down.
■Instructions
To make a video call, a video application (SkypeTM, Microsoft LyncTM, Google
HangoutsTM, Cisco WebEx, GoToMeetingTM, WebRTC, etc.) should run on a
computer or laptop and CAM520 should be set as the primary camera for video
application. The position of the camera lens can be adjusted using the direction
buttons of the remote. For continuous pan or tilt, the long press of a button is
advised. The zoom function on the remote can be used to zoom in and out. To
move the camera at the saved position, the preset and preset position button
should be pressed together. Facial features can be enhanced by correcting skin
tone and activating autofocus and auto-exposure using the FaceLumi feature of
the remote control. This feature may be disabled while tilting, panning, zooming,
or disconnecting the camera.
■Safety and storage
AVer CAM520 complies with the limits for a Class ‘A’ digital device, under Part
15 of the Federal Communications Commission statement. However, if not
installed or used per instructions, the device may cause harmful interference to
1. Camera & Speaker Phone
Advantech offers Aver CAM520 and Jabra Speak 510 to meet the needs of
telemedicine. These devices are compatible with numerous applications.
AVer CAM520

6
adio communication. The user in such a situation is encouraged to correct the
interference by the following measures:
• Reorient or relocate the receiving the antenna.
• Increase the separation between the equipment and receiver.
• Connect the equipment into an outlet on a circuit different from that to
which the receiver is connected.
• Consult the dealer or an experienced radio/television technician for help.
AVer CAM520 should not be exposed to rain or moisture to avoid risks of re or
electric shock. To maintain the safety of the remote control battery, the following
safety measures should be followed:
• Store batteries in a cool and dry place.
• Specially approved disposal methods should be used to safely dispose of
old batteries instead of disposing batteries in the trash.
• Batteries should be removed when not in use to avoid the risk of battery
leakage and corrosion, which may damage the remote control.
• Old batteries should not be used with new batteries.
• Different types of batteries should not be mixed, for example, alkaline,
standard (carbon-zinc), or rechargeable (nickel-cadmium).
• Batteries should not be disposed of by throwing in a re.
• A short�circuit should not be attempted.
■Cleaning Instructions
Frequently handled systems such as touch system or remote should be
regularly disinfected. The camera lens should be disinfected using a 0.1%
sodium hypochlorite solution (commonly known as bleach). An alcohol-based
mixtures should never be used to clean a camera lens, as it harms the coating
of the lens. The bleach available in stores generally comes as a 5% sodium
hypochlorite solution, which needs to be further diluted for safe usage on a
camera. As the solution has a short shelf life of 24 hours, so it should not be
stored for future use. Below is a mixing guide to making a solution diluted to
0.1%:

7
Original Bleach Concentration (%) Parts of Bleach Parts of Water
1 1 9
21 19
3129
4139
5149
Once a 0.1% sodium hypochlorite solution is prepared, all cables and external
power supplies should be unplugged. The camera can be cleaned with a lint�
free, microber cloth moistened with bleach solution. The solution can be wiped
off with water after 10 minutes and then dried using a microber cloth.
Note
• Store batteries in a cool and dry place.
• Specially approved disposal methods should be used to safely dispose of
old batteries instead of disposing batteries in the trash.
• Batteries should be removed when not in use to avoid the risk of battery
leakage and corrosion, which may damage the remote control.
• Old batteries should not be used with new batteries.
• Different types of batteries should not be mixed, for example, alkaline,
standard (carbon-zinc), or rechargeable (nickel-cadmium).
• Batteries should not be disposed of by throwing in a re.
• A short�circuit should not be attempted.
■Application
• AVer CAM520 can be used in telemedicine for high-quality real-time
conferencing between physicians and patients.
• Aver CAM250 offers high-denition resolution with clear views of patient
or test results able to be viewed even in poor light without experiencing
motion blur.
• Physicians can use a remote to shift the camera from a wide view to a
close�up view for diagnosis.

8
■Package contents
The Jabra speaker comes with a Jabra Speak 510 USB
cable to connect with a computer. The speaker has
buttons with features power on/off; answer or reject a
call; volume modulation; Bluetooth connection; battery
level LED indicator and mute/unmute microphone. The
USB cable can also be used to charge the speaker by
connecting it to a computer.
■Instructions
This speaker can be plugged to any computer via USB cable and can be turned
on or off by pressing and holding the power button. Jabra Speak 510 should be
set as the default audio device in the Windows control panel sound and audio
settings of the softphone. The Jabra Speak 510 can answer, end, reject, and
mute calls. The device can accept and handle multiple calls simultaneously. It
has an omnidirectional microphone and wideband audio for exceptional sound
quality. The speaker has different indicators including LED, audio indicators, and
voice guidance. The battery offers up to 15 hours of talk time without a break.
The speaker can be connected to a computer, headset, and mobile.
■Safety and storage
The Jabra Speak 510 should be stored with the power off for safety. Storage
at extreme temperatures (above 70°C/158°F or below -20°C/-4°F) should
be avoided, as this can shorten battery life and may affect operation. High
temperatures may also degrade performance. The Jabra Speak 510 should not
be exposed to rain or other liquids.
■Cleaning Instructions
Jabra Speak 510 can be cleaned using normal dish soap and water with a cloth
by gently wiping the product, making sure there is not a layer of suds on the
surface. After resting it for at least 1 minute, the surface can be rinsed by wiping
it with a slightly damp cloth using water only.
Jabra Speak 510

9
Note
• The speaker should be kept clean by avoiding contact with dirty surfaces
when not in use.
• Store the speaker in a protective case or pouch, or dock at the base.
• If dirt particles settle in the speaker, then the front plate of the device
needs to be cleaned. For continued sound distortion, the device can be
opened to take out the speaker to clean more extensively.
• Only soap and water should be used for cleaning. Strong cleaning agents
should not be used.
• While cleaning, the excess liquid should be wrung so the cloth is not
dripping wet.
■Application
• Jabra Speak 510 offers high-quality audio with no echoes or noises even
at maximum volume.
• Jabra Speak 510 can be easily connected to electronic devices such as
laptops, computers, headsets, and mobiles.
• Jabra Speak 510 can be operated for multiple call handling and
conferencing.

10
VSee Messenger is a video conferencing application specically designed for
healthcare users. With this software, users can send pictures through text chat,
instant message privately or in a group, share documents, share screens and
application windows, live annotate or draw on any shared application, record
audio and video, and stream videos securely.
■System Requirements and Specications
The VSee screen�sharing software system can be downloaded using the
link. The compatible devices and operating systems (OS) recommended are
Windows 7 or later, 2GHz dual-core CPU up to a 3-way call, i5, or i7 CPU for
group video calls. VSee only works on the Windows Surface tablet with full
Windows OS. For MAC, OS X 10.11 or later is suggested, while there are
known compatibility issues with OS X version. Mobile OS is recommended for
iPhone (iOS) 11 or newer. Other compatible devices include iPad Air or newer,
iPad Mini 2nd generation or newer, and iPhone SE or newer. For Android,
Android 5.0 or later, NEON compatible ARM processor or x86 processor, Dual-
core CPU, and Amazon Fire phone and tablets 2014 or later is supported.
2. VSee Messenger

11
Other recommendations include Google Pixel 2 or newer, Samsung Galaxy
S8 or newer, and Samsung Galaxy Note 8 or newer. Linux and Chrome
OS (Chromebook) are currently not supported. Hardware that can be used
in conjunction with VSee messenger are webcams with built-in or HD/PTZ
webcam, microphones with built-in mic and speakers, or Jabra 410 and 510
speakerphones and earphones/headphones. VSee Messenger offers 16 kHz
audio sampling with software acoustical echo cancellation, special digital
stethoscope audio mode, and automatic audio over video priority during network
congestion. Video streaming has HD resolution up to 720p at 30 fps; low
required upload/download speeds at ~200kbps (less than Skype, Vidyo, and
Cisco); network sensing streaming protocol optimized for 3G, Wi-Fi, satellite,
and congested networks; far�end pan, tilt, zoom camera control; and audio and
video lip synchronization based on Dr. Milton Chen’s Stanford Ph.D. research.
Users can send up to four camera feeds at the same time to share medical
peripheral cameras such as an otoscope, dermatoscope, etc.
Interfaces that can be used along with VSee messenger are USB and HDMI for
MRI and X-ray (AverMedia Game Broadcaster HD C127). An internet connection
of 500 kbps is recommended with a required minimum of 200 kbps for upload
and download. VSee does not require any video router or MCU, wherein
VSee trafc streams directly between the computers for 1-on-1 calls, thus not
requiring any media server. VSee is securely encrypted and HIPAA compliant.
■Instructions
Healthcare providers can sign-up for VSee Messenger based on their needs.
After registering, the user should log in with an email address and password.
Passwords can be reset by clicking “forgot password” or stay signed in by
checking the box to prevent being logged out of the app. Users can edit their
prole and set online status (online, busy, hidden, ofine, idle, mobile). However,
for security purposes, the system does not allow changing an account’s email
address. When using another email address, users need to create a new VSee
Messenger account. However, it is possible to migrate contacts from an old
account to a new one. To migrate VSee Messenger contacts, users should

12
Users can only be contacted via chat or call from other approved users due to
contact security. Users can accept, decline, or mark a contact request as spam
through the VSee app. For coworkers within an organization, users can use the
‘My Company’ feature to connect quickly. This feature is disabled by default and
can be enabled upon request. For more details, please use the following link.
Users can check their current app version and account subscription plan by
clicking the icon > Help > About VSee. While for MAC, users can click
VSee from the top bar and check ‘About VSee’ for details. For general settings,
users can check the boxes as per their preference under the general tab in
VSee.
Invite others to join in VSee Messenger Users can invite others (patients or
colleagues) by following this path: Contacts > Click on + icon > Add Contact >
Type email address > Search > Invite to VSee if an email cannot be found. If the
email already has a VSee account, users can directly send a contact request.
Users can also send email invitations, import contacts, or use the invitation link.
• Click on the contacts icon. Type the email address and click Find this
Person.

13
• Alternatively, you may click on the plus icon then Add Contact to type the
email address.
Audio and Video Settings Users can run a guided audio/video check via this
link or they can manually check the setup by clicking the gear icon on VSee,
then audio or video tab while selecting mic, speaker, and camera from the
dropdown lists. Users can check the settings during a call by going to More >
Settings > Audio and Camera Setup. For video settings, the following needs to
be prepared:
• Resolution - This refers to the number of distinct pixels that can be
displayed in each dimension. There is a choice between Low, Medium,
High (480p), or HD (720p), though the recommended setting is High
(480p). Users can lower the resolution if network and CPU usage issues
arise.
• Frame Rate - This is the frequency (rate) at which consecutive images,
called frames, appear on a display. There is a choice between Low
Bandwidth, Adaptive, or 30fps. The recommended setting is Adaptive.
• Mirroring � Users have the option to flip the video image for sign
language.
Camera Settings – Users can also adjust camera lters and proc amp settings.
Users can even add up to 4 more cameras for peripheral streaming. This feature
is available through the following link: https://vsee.com/contactsales.

14
Users can also change and save video window size and layout by choosing a
tile layout from the video windows. Users can resize the windows while in a call
by dragging the windows at the corner. To resize all windows simultaneously:
• Increase size: Ctrl + (Win) or Cmd + (Mac)
• Decrease size: Ctrl - (Win) or Cmd - (Mac)
Likewise, users can merge, pop�out, snap�in, or pin a video window. For more
details, please follow the link.
Chats and Calls – To begin a 1-on-1 conversation in a chat or call, the user can
double-click the chosen contact through the search box and start typing or call.
Users can only mute their mic and speaker by clicking on the icons.

15
Users can also adjust a participant’s audio volume by opening the video window
of the specific participant and moving the volume slider. Likewise, users can
also initiate group chats by selecting the ‘chat with this group’ tab.
More contacts can added to a group by the ‘add contact’ icon. More group chat
options are available through the icon‘ ’ towards the top right corner. Users
can send images and les to contacts. All chat messages will be automatically
archived by the system after 30 days. Users can also manually delete or archive
messages.
For calls, users may initiate a video call by clicking the video icon. Participants
can be added to an ongoing call or directly call a group. To invite others via a
VSee meeting link or phone, the meeting instructions should be copied and
details should be sent. To automatically accept calls, the user should go through
the following path: > General > Check Automatically. Users can drag and
drop images and les to contacts during a call and vice versa. Users are able to
record and stop a call by going to – > Call / Meeting > Record > Stop.

16
Users will be prompted to save the le rst. A red recording indicator appears
on all video windows, whereas if a recording is done by other participants, no
indicator will be displayed on the user’s screen. A recording can be played using
the VLC media player, by the following path – Tools > Preference > uncheck
‘Allow only one instance’ and ‘Use only one instance’ when starting from a le
manager. To play all videos at the same time, all should be selected and played.
Note–
• Recorded videos are saved as matroska (.mkv) les.
• There is only one le per participant.
• Any screen and le sharing during a call will not be recorded.
• Refrain from using Windows 10 Movie & TV player, as it does not play the
audio of the recording. Third�party recorders such as Screencast�o�matic
can be tried.
As VSee does not have a built�in functionality to clear the call history, users
must manually delete the history le in the VSee directory. VSee is technically
capable of supporting up to 32 concurrent meeting participants, however for
quality issues, it is recommended to limit group calls to 3�6 participants. VSee
automatically scales down audio�video quality when it notices that it cannot
send all its data to users. This might sometimes appear as a sudden blurriness.
If everyone has a good network connection, it is possible to host larger group
calls.
Screen Share, Annotate, and Remote Control–Users can share application
windows or their entire desktop. Screen share is only possible while in a video
call. Sharing users can annotate, type text, and use remote control features.
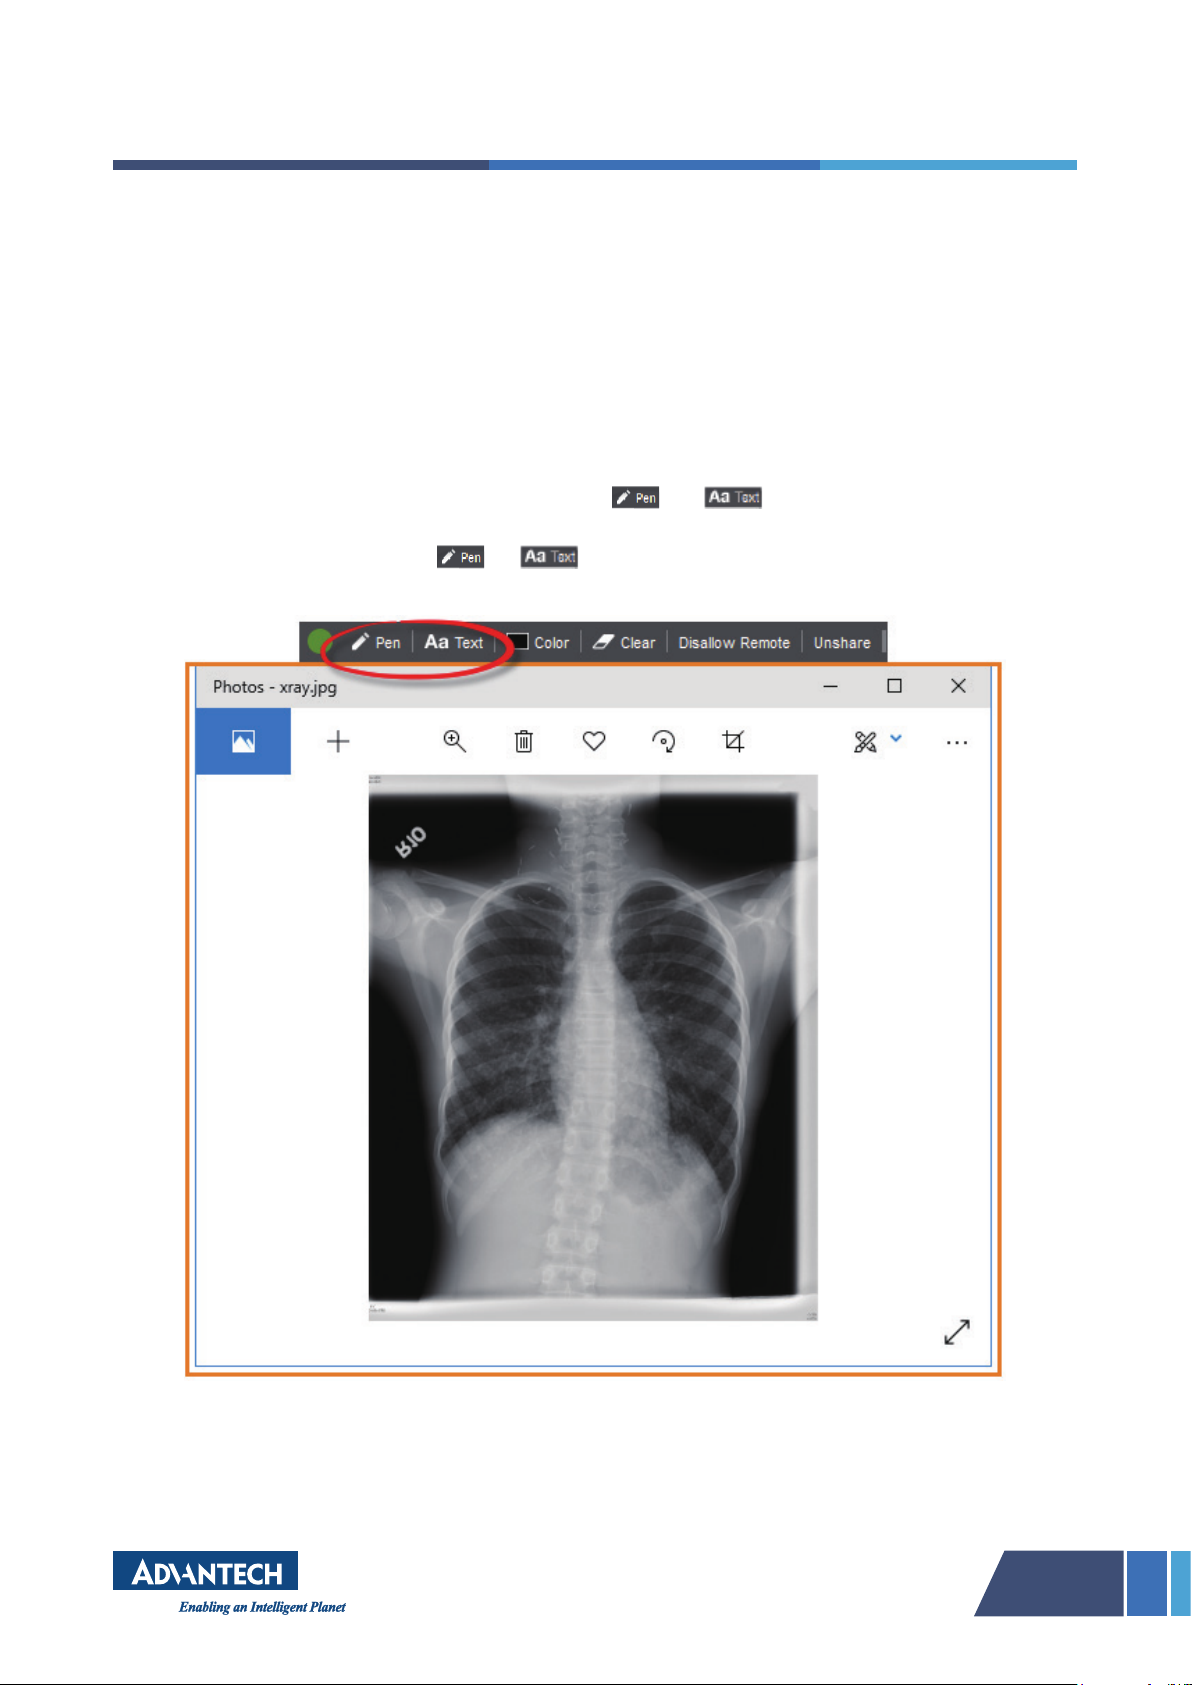
17
Users can share multiple windows at a time. This is currently not supported
on mobile devices, however, receiving shared and annotated screens are
supported. To share a screen while on a call, a green ‘Share’ button located
on the upper right corner of any window should be clicked. An orange border
appears around a window if it is being shared.
Technically, a video share is also possible but not recommended, as the screen
sharing feature is not designed for such a feature. There may be no audio or the
shared video's quality will be affected. Instead, sending the video le via chat or
video call is recommended. To annotate, or icons should be clicked
and an ink color can be chosen. All annotations can be cleared using the ‘clear’
icon. To stop annotating, or icons respectively can be clicked again.

18
All participants in the same call can control a screen or desktop that is being
shared. By clicking ‘Take Remote Control’, a user can take control while
someone else is sharing a screen. Likewise, the same button can be clicked
again to release control. If a user does not want others to control what he/she
is sharing, then a button ‘Disallow Remote’ can be clicked. Users can have
unlimited access to screen�share.
Stethoscope Mode–Users can turn on stethoscope mode in VSee Messenger.
The recommended stethoscope with VSee is ThinkLabs One Stethoscope.
Once the stethoscope is turned on, the user should follow the path: > Audio
> Microphone > Select Microphone (Generic USB Audio Device) from the
dropdown list. The mic name may vary depending on the user’s device but it
will always include the word “USB”. The stethoscope should be tapped until the
microphone's green volume wave moves. Then under ‘Microphone’, ‘Advanced’
and ‘Check Stethoscope’ should be clicked. A warning message displays which
should be agreed to complete the process. For more information, users may
refer to the stethoscope manual for details on how to further optimize the
stethoscope’s sound quality.
Peripheral Streaming– VSee Messenger allows users to use an existing laptop
or computer to stream USB peripheral images (otoscope, ultrasound, EKG, etc.)
while still seeing patients’ faces. Before adding another camera, users should
ensure that a secondary camera or device is connected. Users may add up to
4 cameras while in a call, through the video window, by going to the following
path: More > Settings > Add another Camera.
■Secure handling of software
To securely run VSee Messenger, users should use compatible devices and
recommended OS, keep a track of internet speed, and follow other applicable
recommendations. A user can enable network warning and statistics features
through VSee Messenger. To automatically show warnings if a user or other
participant experiences network issues in a call, users should follow the path:
> General > Check Show Network Warnings. Similarly, to view the network
statistics of each participant, users can follow the path: > Tools > Network
Statistics. The statistics window opens and shows various data such as current
upload and download speed, CPU usage, and network. This information is
particularly useful for troubleshooting purposes. In case of any technical issues,
the user should take a screenshot of the network statistics window and send it

19
Another useful feature to check the working status of audio and video features
Users should follow the few tips discussed below during a large group call as a
measure to successfully carry out the call:
• Have participants with low upload bandwidth mute their video.
• Users should mute audio while not talking and unmute when they need to
talk.
• While sharing an application, only the relevant areas should be
considered to balance the load.
• It should be ensured that no other applications (or devices on the
network) are using bandwidth (downloading, streaming media, etc.)
■Application
• VSee Messenger allows real�time video communication even at lower
rates (e.g., 3G cellular networks), assisting healthcare providers to
securely video chat with patients in their homes.
• VSee can provide medical device integration with stethoscopes,
otoscopes, ultrasounds, X-rays, surgical uoroscopes, etc.
• VSee system allows users to use their existing laptops or computers to
stream USB peripheral images (otoscope, ultrasound, ECG, etc.) while
still seeing patients’ faces.
• VSee can help doctors to both receive clear medical device readings and
observe patients in HD videos simultaneously.
• Through VSee, doctors and patients can instantly share and mark lab
results, CT scans, documents, and EHR records in real-time just as
though they are working in person.
• Healthcare providers can take snapshots and securely send them through
individual or group chats for consultations with colleagues. VSee also
includes the ability to record locally.
• Remote physicians can control a Pan-Tilt-Zoom (PTZ) camera on the
patient’s end to get clear close-ups for telestroke and remote exams.
Table of contents
Other Advantech Medical Equipment manuals


Popular Medical Equipment manuals by other brands


Ziehm Imaging, Inc.
Ziehm Imaging, Inc. VISION installation manual

SAFEGUARD MEDICAL
SAFEGUARD MEDICAL Team-8 Instructions for use

Cardioline
Cardioline Cubestress System user manual

PharmAdva
PharmAdva MedaCube Getting Started Guide & user's manual
Teleflex
Teleflex Arrow EZ-IO Instructions for use

KaVo
KaVo 2052 CHC Instructions for use


