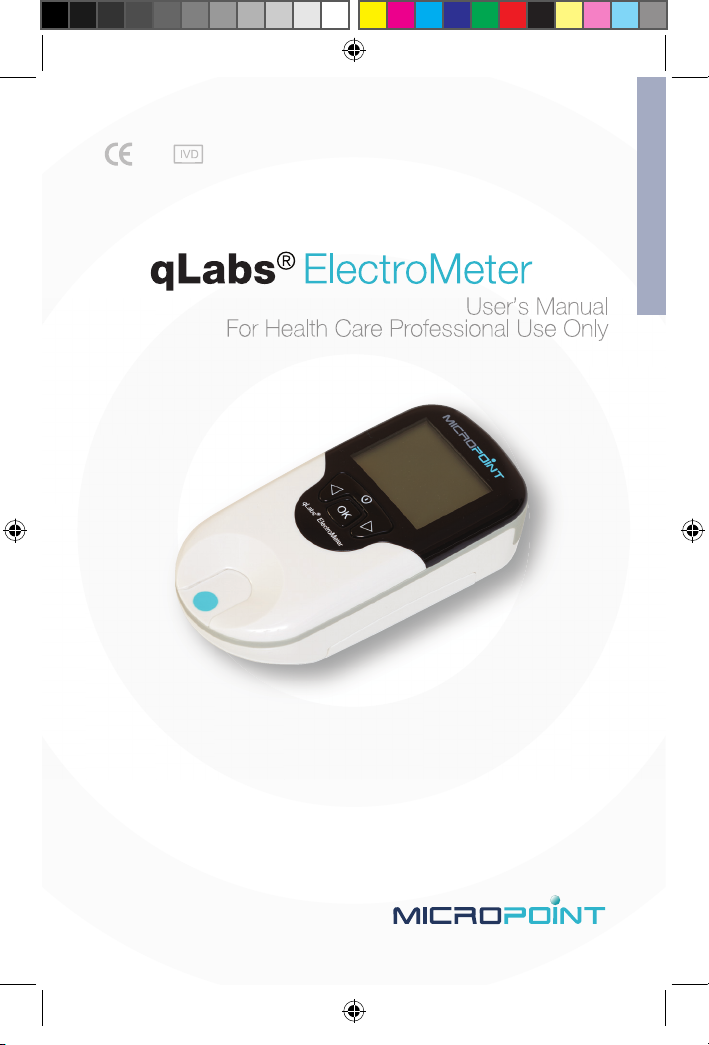
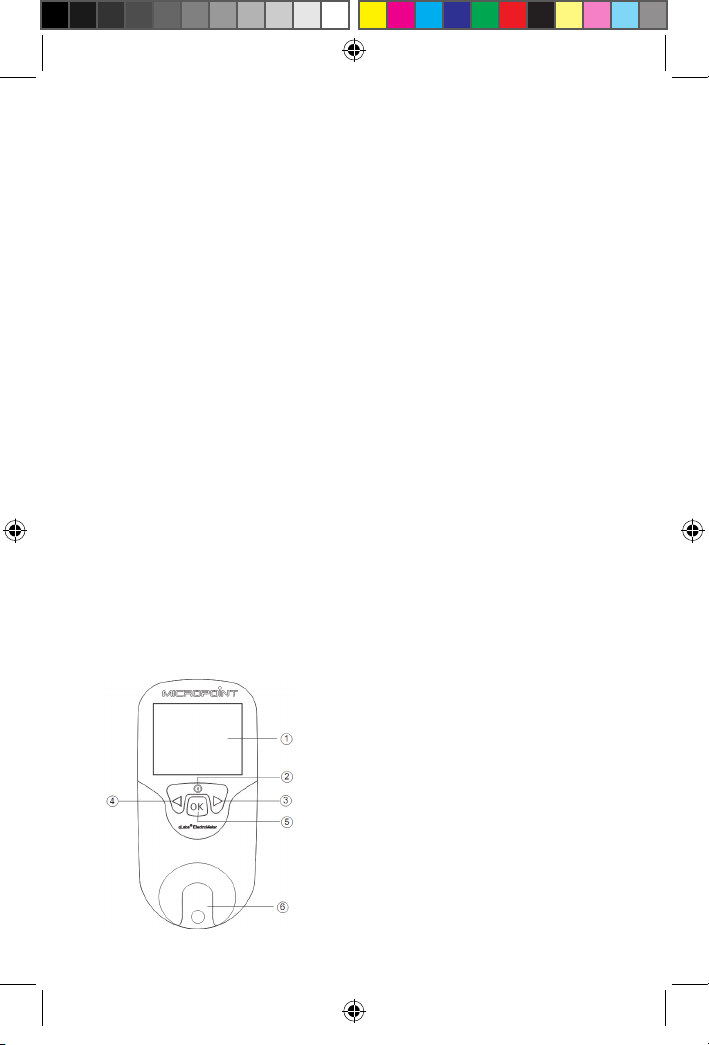
MICROPOINT qLabs ElectroMeter Plus User manual

EN
REF Q-2 Plus
Plus
qLabs.ElectroMeter.manual.Q-2 Plus.indd 1 2/12/2014 6:16:27 PM

Table of Contents
1. Introduction.....................................................................................3
1.1 Before You Start
1.2 Intended Use
1.3 Test Principle
1.4 Packaging
2. Accessory List................................................................................5
3. Product Overview...........................................................................5
4. OperationSummary........................................................................7
5. Before Testing.................................................................................7
6. Precautions, Limitations and Warnings.........................................8
6.1 Care of Your qLabs®ElectroMeter Plus
6.2 Patient Health Status
6.3 Performing a Test
6.4 Collecting a Finger Stick Blood Sample
6.5 Electromagnetic Compatibility
7. Powering the qLabs®ElectroMeter Plus ON and OFF...............10
7.1 Power Connection
7.2 Powering the qLabs®ElectroMeter Plus On
7.3 Powering the qLabs®ElectroMeter Plus Off
8. qLabs®ElectroMeter Plus Settings.............................................12
8.1 Enter Setup Mode
8.2 Setting the Date
8.3 Setting the Time
8.5 Patient ID Setup
8.6 QC Lockout Setup
8.7 Selecting Language
9. Perform a Test..............................................................................15
9.1 Entering Test mode
9.2 Insert a Test Strip
9.3 Entering the Patient ID
9.3.1 Manual Input
9.3.2 Auto Scan
9.4 Confirming the Patient ID
9.5 Entering the Strip Code
1
EN
qLabs.ElectroMeter.manual.Q-2 Plus.indd 1 2/12/2014 6:16:27 PM

9.5.1 Manual Input
9.5.2 Auto Scan
9.6 Confirming the Code
9.7 Heating Up
9.8 Getting a Finger stick Sample
9.9 Performing the Test
9.10 Results and Explanation
9.11 Finishing the Test
10. Reviewing Previous Results.........................................................22
10.1 Displaying QC Test Results
10.2 Displaying Patient Test Results
10.3 Deleting Patient Test Results
10.4 Printing Patient Test Results
11. Quality Control..............................................................................25
11.1 Onboard QC Test
11.2 Liquid QC Test
12. Maintenance.................................................................................26
12.1 Care and Cleaning of Your Screen
12.2 Installing/Replacing Batteries
12.3 Maintenance
13. Troubleshooting............................................................................27
14. Symbols........................................................................................29
15. Performance Characteristics & Product Specifications.............30
15.1 Operation Condition
15.2 Product Specifications
16. Warranty........................................................................................31
17. Contact Address and Phone Number..........................................33
2
EN
qLabs.ElectroMeter.manual.Q-2 Plus.indd 2 2/12/2014 6:16:27 PM

1. Introduction
1.1 Before You Start
Before using qLab®ElectroMeter Plus, read the entire User’s Manual
carefully.
1.2 Intended Use
The qLabs®ElectroMeter Plus is intended for use with qLabs®Coag Panel
2 test strips for in vitro quantification Prothrombin Time (PT)/International
Normalized Ratio (INR), Activated Partial Thromboplastin Time (APTT).
Blood normally clots to slow down the flow of the blood in response to
the damage of blood vessels, in order to prevent excessive bleeding. A
clot formed inappropriately in the areas of heart, lung and brain, however,
can hinder normal blood flow and may result in life-threatening events
such as stroke and heart attack. For patients who lose their ability to
properly reabsorb clots and patients who have low tolerance to clots,
anticoagulation medicine (blood thinner) is prescribed. Because these
medications may have narrow therapeutic windows and be sensitive to
diet and lifestyle, it may be necessary for patients to adjust their dosage
regularly. In order to make good decisions regarding the need for such
an adjustment, it is important for the patient to know the clotting status
of their blood. A quick and accurate measurement of clotting capacity is
critical for the safety and effectiveness of the anticoagulation therapy.
The PT is an extrinsic coagulation pathway, which is commonly used
for monitoring vitamin K antagonist therapy because of its sensitivity to
variations in the concentration of the vitamin K dependent factors II, VII
and X. While PT times may vary depending on the test method used, INR
values should be the same regardless of the method used. International
Normalized Ratio (INR) is recommended by WHO to remove dependence
on reagent and test method. The qlabs®ElectorMeter calculates the PT
value based on an analysis of the test data, and then converts this to the
correct INR value.
The APTT is a general coagulation test used for screening and measuring
the functionality of the intrinsic coagulation pathway, which involves the
coagulation factor XII, XI, IX, VIII, X, V, II and fibrinogen. It is also used to
monitor the effectiveness of heparin therapy. The APTT is a modification of
3
EN
qLabs.ElectroMeter.manual.Q-2 Plus.indd 3 2/12/2014 6:16:27 PM

the Partial Thromboplastin Time (PTT). It can provide a more precise and
sensitive assay.
Micropoint Biotechnologies, Inc. provides various combinations of the
above tests in one strip, including:
• PT/INR Test Strips
• APPT Test Strips
• PT/APTT combo Test Strips
1.3 Test Principle
qLabs®ElectroMeter Plus automatically detects the insertion of a
qLabs®Coag Panel 2 test strip and heats the strip to a preset operating
temperature. After a drop of blood is applied to the strip, the capillary
channels carry the blood to the reaction zones, where the blood mixes
with pre-printed reagents and starts to coagulate. Each strip contains two
reaction zones. Each reaction zone contains a pair of metallic electrodes,
to which a constant voltage is applied by the qLabs®ElectroMeter Plus.
As the coagulation of the blood proceeds, the current monitored across
the two electrodes changes. The qLabs®ElectroMeter Plus detects the
change of the current in the test zone and determines the PT and/or APTT
results. The qLabs®ElectroMeter Plus and test strips provide APTT, PT
and INR results.
1.4 Packaging
The qLabs®ElectroMeter Plus was packed individually.
Upon receipt of package, please open and remove the packaging
materials. Place the qLabs®ElectroMeter Plus on a flat surface and
connect the power adapter.
Do not keep the qLabs®ElectroMeter Plus in direct sunlight, near a high
heat source, or near an area with a strong magnetic field.
4
EN
qLabs.ElectroMeter.manual.Q-2 Plus.indd 4 2/12/2014 6:16:27 PM

2. Accessory List
qLabs®ElectroMeter Plus includes the following accessories:
• Power Adapter
• User’s Manual
• Carrying Case
• Lancet Device
• Instructional DVD
• Quick Start Guide
• Data Manager Installation DVD
• Data Manager Operation Guide
• eCable
NOTE:
• To avoid the possibility of damage, use only the power adapter
supplied with the qLabs®ElectroMeter Plus.
• Standard AA alkaline batteries can also be used for qLabs®
ElectroMeter Plus.
• The qLabs®eStation can be purchased separately from Micropoint
Biotechnologies, Inc. Please contact your local distributor for ordering
information.
3. Product Overview
Identification of Components
Front View
1) LCD Screen
2) Returning/Power Button
3) Right Button
4) Left Button
5) OK Button
6) Test Strip Guide
5
EN
qLabs.ElectroMeter.manual.Q-2 Plus.indd 5 2/12/2014 6:16:27 PM

Back View
1) Battery Cover
2) Battery Cover Screw
3) Battery Cover Release
Top View
1) Power Supply Jack
2) Data Port
Bottom View
1) Barcode Scanner (Laser)
qLabs®Coag Panel 2 Test Strip
1) Electrode Leads
2) Test Zone
3) Sample Well
4) Test Name
6
EN
qLabs.ElectroMeter.manual.Q-2 Plus.indd 6 2/12/2014 6:16:37 PM

4. Operation Summary
5. Before Testing
Before using qLabs®system to do a test, you will need:
• qLabs®Coag Panel 2 test strip
• Power supply or batteries
• Alcohol wipes
• Gauze and Band-Aid
• Lancet device
• Puncture proof container
7
EN
qLabs.ElectroMeter.manual.Q-2 Plus.indd 7 2/12/2014 6:16:47 PM

6. Precautions, Limitations and
Warnings
qLabs®blood coagulation testing system is intended for in
vitro diagnostics use only. Before using this system, take
special note of CAUTIONS throughout this User’s Manual.
6.1 Care of Your qLabs®ElectroMeter Plus
• The qLabs®ElectroMeter Plus is a delicate instrument and should
be handled with care. Dropping or other mishandling may cause
malfunction of qLabs®ElectroMeter Plus.
• The qLabs®ElectroMeter Plus should be transported in a carrying
case or a secure container.
• DO NOT spill any liquid on the qLabs®ElectroMeter Plus. If this
should occur, immediately contact local distributor from Micropoint
Biotechnologies, Inc.
• DO NOT store the qLabs®ElectroMeter Plus below -10 ºC or above
40 ºC.
• DO NOT use the qLabs®ElectroMeter Plus for any other types of test
strips not provided by Micropoint Biotechnologies, Inc.
6.2 Patient Health Status
Current patient health status may cause inaccurate or unexpected test
results. It is important to take certain health factors into consideration
when interpreting the test results and deciding on a course of action for
your patients. Failure to do so may lead to an incorrect interpretation of
the test result.
6.3 Performing a Test
• The qLabs®ElectroMeter Plus should be operated on a level surface
that is free of vibration. Testing on an uneven or unstable surface may
cause inaccurate results. DO NOT hold the qLabs®ElectroMeter Plus
in your hands during the testing.
• The blood sample must be applied to the test strip immediately after
collection. Otherwise, the blood sample may begin clotting, causing
inaccurate results.
8
EN
qLabs.ElectroMeter.manual.Q-2 Plus.indd 8 2/12/2014 6:16:47 PM

• Plasma samples or whole blood samples with anticoagulation
reagents are not suitable for the qLabs®Coag Panel 2 test.
• DO NOT move or touch the qLabs®ElectroMeter Plus during testing.
DO NOT switch power supplier from adapter to battery or
vice versa during testing!
6.4 Collecting a Finger Stick Blood Sample
• Sanitize the site of the nger stick with alcohol wipe before testing.
• Use fresh capillary nger stick blood sample for testing.
• Squeezing the nger stick site excessively (milking) may release
interstitial fluid into the blood sample, which may lead to inaccurate
results.
• The site of the nger stick must be completely dry. If any alcohol
remains on the finger, it may cause hemolysis, which may lead to
inaccurate results.
6.5 Electromagnetic Compatibility
• This equipment has been tested and found to comply with applicable
EMC emission requirements as specified in EN 61326-1: 2006 and
EN 61326-2-6: 2006, immunity to electrostatic discharge as specified
in IEC 61000-4-2, and immunity to radio-frequency interference
at the frequency range and test levels specified in IEC 61000-4-3.
The emissions of the energy used are low and not likely to cause
interference in nearby electronic equipment.
• Do not use this instrument in a dry environment, especially if
synthetic materials are present. Synthetic clothes, carpets, etc., may
cause damaging static discharges in a dry environment. That may
cause incorrect operation or damage to the device.
• Do not use this instrument near cellular or cordless telephones,
walkie talkies, garage door openers, radio transmitters, or other
electrical or electronic equipment that are sources of electromagnetic
radiation, as these may interfere with the proper operation of the
instrument.
9
EN
qLabs.ElectroMeter.manual.Q-2 Plus.indd 9 2/12/2014 6:16:47 PM

7. Powering the qLabs®ElectroMeter
Plus ON and OFF
7.1 Power Connection
The qLabs®ElectroMeter Plus comes with a power supply which must
be plugged into the qLabs®ElectroMeter Plus power supply jack.
Alternatively, the qLabs®ElectroMeter Plus can use 4 standard AA
batteries (See Section 12.2).
The messages on the four-cell grid displayed at the
bottom of the screen provide hints for the functions of the
buttons.
7.2 Powering the qLabs®ElectroMeter Plus On
When the qLabs®ElectroMeter Plus is initially
powered on, it will beep and automatically
enter Setup mode. In the Setup mode you
can change the qLabs®ElectroMeter Plus
settings, or
Press the “OK” button to view the prompt to
insert a test strip.
When qLabs®ElectroMeter Plus is in the standby mode, you have two
choices to power on the monitor:
1) Press the Power button, to view the prompt to insert a test strip, or
2) Insert a fresh test strip if you are ready to perform a test. The
qLabs®ElectroMeter Plus will then prompt you to confirm the Strip
Code.
Turning the qLabs®ElectroMeter Plus ON in CHOICE 1, allows the user
to:
• Perform a test, or
10
ENENEN
qLabs.ElectroMeter.manual.Q-2 Plus.indd 10 2/12/2014 6:16:49 PM

• Check the version of the software and the manufacturer information
by pressing OK button, or
V7.0.01
MICROPOINT
S/N
033200F0200009
• Enter Setup mode by pressing “SET” button to change the
ElectroMeter Plus setting, or
• Enter Memo mode by pressing “MEM” button to review previous
results.
Turning the qLabs®ElectroMeter Plus ON in CHOICE 2, allows the user
to:
• Perform a test.
See the appropriate sections of this User’s Manual for
complete information for all of these options
7.3 Powering the qLabs®ElectroMeter Plus Off
In the interface where the monitor prompts
you to insert a test strip, press the functional
“OFF” button to enter the shut down mode.
In shut down mode, the user can:
• Press the functional “OFF” button to
turn off and enter standby mode, or
• Press functional “BACK” button to
return to the previous interface.
NOTE:
• Manually turn off the qLabs®ElectroMeter Plus if not in use to
conserve the batteries.
• If the qLabs®ElectroMeter Plus is left idle for about 5 minutes, it will
turn off automatically and enter standby mode.
11
EN
qLabs.ElectroMeter.manual.Q-2 Plus.indd 11 2/12/2014 6:16:51 PM

8. qLabs®ElectroMeter Plus Settings
Follow the steps below to change the date, time, and a target range for
your INR results.
8.1 Enter Setup Mode
When the qLabs®ElectroMeter Plus is turned
on for the first time, it will automatically enter
to the Setup Mode.
When the qLabs®ElectroMeter Plus is
powered on from standby mode, a prompt
to insert a test strip will appear. Press the
functional “SET” button to enter the Setup
Mode.
8.2 Setting the date
The date format is DD/MM/YY. The first
set of digit (YY) will be highlighted. Use the
functional “+” and “-”buttons to change the
date.
Press functional “NEXT” button to go to
the second digit (MM) after a correct date
is selected. Change the month and the day
using the same method.
12
EN
qLabs.ElectroMeter.manual.Q-2 Plus.indd 12 2/12/2014 6:16:53 PM

8.3 Setting the Time
The time is in 24-hour format: “HH:MM” (Hour: Minute).
After the day setting, the setting option will
prompt you to the hour setting mode. The
hour will be highlighted on the display. Use
“+” and “-” functional buttons to adjust the
hour. Press “NEXT” functional button when
you have the correct hour on the display.
The minute will be highlighted on the display.
Use “+” and “-” buttons to change the
minute. Press “NEXT” button when you have
the correct minute on the display.
8.4 Patient ID Setup
You can use right button “ ” or left button “
” to set the input of Patient ID ON or OFF.
If you set the Patient ID ON, the meter will
prompt you to input the Patient ID before you
process a patient test.
Press “Next” button to enter the QC Lockout
Setup interface. Press “OK” button to return
to main menu.
8.5 QC Lockout Setup
The QC Lockout ensures that the optional quality control tests are run on
a regular basis. In order to activate the QC Lockout, you need to define
the frequency for conducting quality control test.
You can use right button “ ” or left button “
” to set the expire days. If the expired day
is set to “0”, the QC Lockout will be inactive.
Press “Next” button to enter the Language
Selection interface. Press “OK” button to
return to main menu.
13
EN
qLabs.ElectroMeter.manual.Q-2 Plus.indd 13 2/12/2014 6:16:54 PM

NOTE:
• To make sure the QC lockout function goes right, please keep the
meter’s built-in timer working. Just set up the time when the meter was
initially powered on and keep either adapter or battery power supply
uninterrupted. Interruption in power supply will reset the timer.
• Automatically powering off after 5 min of idle or manually powering
off by pressing the “OFF” button will NOT stop the timer.
8.6 Selecting Language
You can use right button “ ” or left button
“ ” to select desired language and then
press “OK” button to return to main menu.
14
EN
qLabs.ElectroMeter.manual.Q-2 Plus.indd 14 2/12/2014 6:16:55 PM

9. Perform a Test
9.1 Entering Test Mode
When the qLabs®ElectroMeter Plus is
turned on by pressing the “OK” button, the
display screen will prompt the user to insert
a test strip. Go to Section 9.2 for test strip
insertion.
When the qLabs®ElectroMeter Plus is
turned on by inserting a new test strip, the
display screen will prompt the user to enter
patient ID or enter the Strip Code if patient ID
function is turned off.
9.2 Insert a Test Strip
Remove a fresh test strip from its foil pouch.
Insert the strip into the test strip guide.
The following two observations indicate that
you inserted the strip correctly:
1) The electrode leads go in first.
2) You can read test strip name clearly on
the end of strip, left to right.
If the input of patient ID is set to ON, go to Section 9.3 for entering the
patient ID; otherwise, jump directly to Section 9.5 for entering the Strip
Code.
15
ENEN
qLabs.ElectroMeter.manual.Q-2 Plus.indd 15 2/12/2014 6:17:03 PM

9.3 Entering the Patient ID
The Patient ID can be composed of numbers
or letters, with a length of no more than 14
digits.
The Patient ID can be entered either via
user’s manual input or the built-in barcode
scanner.
9.3.1 Manual Input
Use “+” and “-” buttons to change the
highlighted digit. Press “NEXT” button to
accept and advance to next digit.
If the input of the Patient ID is completed,
press “OK” button to accept.
9.3.2 Auto Scan
In the Patient ID INPUT/SCAN interface,
press “SCAN” and scan the patient barcode
from a distance of approx. 15cm (6 inches).
The meter beeps once the barcode has been
read successfully. The barcode information
appears in the CONFIRM interface.
If a barcode is not scanned, the scanner
turns off after 10 seconds.
Do not stare directly at the laser beam.
9.4 Confirming the Patient ID
If the Patient ID is entered correctly, press
“OK” button to confirm.
Otherwise, press “BACK” button to go back
to the first digit and repeat Section 9.3 until
all numbers are correctly entered.
16
EN
qLabs.ElectroMeter.manual.Q-2 Plus.indd 16 2/12/2014 6:17:12 PM

9.5 Entering the Strip Code
ENTER CODE
NEXT
OK
-+
PT/APTT
471022636
The Strip Code can be entered either via
User’s Manual input or the built-in barcode
scanner.
NOTE:
• The Strip Code contains information of the type of test. After you
entered the Strip Code, the test name will be recognized automatically
and displayed on the screen.
• A different type of test may have different length of code. Make sure
both the length and each digit are exactly the same with those on the
pouch.
9.5.1 Manual Input
ENTER CODE
NEXT
OK
-+
PT/APTT
471022636
If the displayed code and test item match
those on the pouch, press “OK” button to
accept.
If the displayed code and test item do not
match the pouch’s code and test item, use
“+” and “-” buttons to change the first digit
highlighted.
ENTER CODE
NEXT
OK
-+
PT/APTT
471022636
Press “NEXT” button to accept and advance
to next digit.
To change numbers more quickly, hold down the functional “+” and “-”
buttons.
17
ENEN
qLabs.ElectroMeter.manual.Q-2 Plus.indd 17 2/12/2014 6:17:13 PM

9.5.2 Auto Scan
User can also use the built-in barcode
scanner to scan the Strip Code on the
pouch.
9.6 Confirming the Code
CONFIRM
BACK
OK
PT/APTT
471022636
If the Strip Code is entered correctly, press
“OK” button to confirm the code.
Otherwise, press “BACK” button to go back
to the first digit and repeat Section 9.5 until
all numbers are correctly entered.
Always match the code and test item name on the display
with the one on the strip pouch. Failure to do so may yield
inaccurate results.
9.7 Heating Up
After confirming the code, the qLabs®
ElectroMeter Plus will heat up automatically
for the test.
When qLabs®ElectroMeter Plus is ready for
sample testing, it will beep and prompt the
user to apply a blood sample.
18
EN
qLabs.ElectroMeter.manual.Q-2 Plus.indd 18 2/12/2014 6:17:24 PM

9.8 Getting a Fingerstick Sample
Good finger stick technique is beneficial to both the professional
user and the patient. Getting a good finger stick will ensure
minimal discomfort for the patient and accurate test results for
the user.
9.8.1 Maximize Good Blood Circulation
1) If needed, briefly warm the hand in warm water or with a heating
pad
2) Massage the finger with a downward motion several times before
performing the fingerstick
3) Lower the hand to below the heart level when collecting the blood
drop
9.8.2 Identify a site on the finger to puncture
1) On one of the middle fingers of either hand
2) Near the top of the finger on either side
3) Away from any calluses or scars
9.8.3 Clean the selected area with 70%
isopropyl alcohol, or an alcohol pad. Dry
thoroughly with cotton or gauze.
9.8.4 Puncture the finger following the
instructions for the lancet that you are
using.
9.8.5 Apply gentle, continuous pressure until a large, hanging drop of
blood forms.
19
EN
qLabs.ElectroMeter.manual.Q-2 Plus.indd 19 2/12/2014 6:17:25 PM
Table of contents
Other MICROPOINT Medical Equipment manuals

MICROPOINT
MICROPOINT mLabs Smar User manual

MICROPOINT
MICROPOINT eStation II MBI92 User manual

MICROPOINT
MICROPOINT qLabs ElectroMeter User manual

MICROPOINT
MICROPOINT qLabs Vet User manual

MICROPOINT
MICROPOINT qLabs Vet QV-3 Plus User manual

MICROPOINT
MICROPOINT qLabs Data Manager User manual

MICROPOINT
MICROPOINT qLabs ElectroMeter Q-3 Pro User manual

MICROPOINT
MICROPOINT qLabs ElectroMeter Q-1 User manual

MICROPOINT
MICROPOINT qLabs ElectroMeter Q-3 Pro User manual

MICROPOINT
MICROPOINT qLabs QSV-1-CL Pro User manual