AG Neovo SC-2402 User manual

SC-2402 LCD Monitor
User Manual
www.agneovo.com

TABLE OF CONTENTS
2
SAFETY INFORMATION
Federal Communications Commission (FCC) Notice (U.S. Only)................................................................4
WEEE...........................................................................................................................................................4
PRECAUTIONS
Notice ...........................................................................................................................................................5
Cautions When Setting Up ........................................................................................................................... 5
Cautions When Using...................................................................................................................................6
Cleaning and Maintenance........................................................................................................................... 7
Notice for the LCD Monitor........................................................................................................................... 7
CHAPTER 1: PRODUCT DESCRIPTION
1.1 Package Contents .................................................................................................................................. 8
1.2 Installation ..............................................................................................................................................9
1.2.1 Installing the Stand...................................................................................................................... 9
1.2.2 Adjusting the Tilt ........................................................................................................................10
1.2.3 Wall Mounting............................................................................................................................10
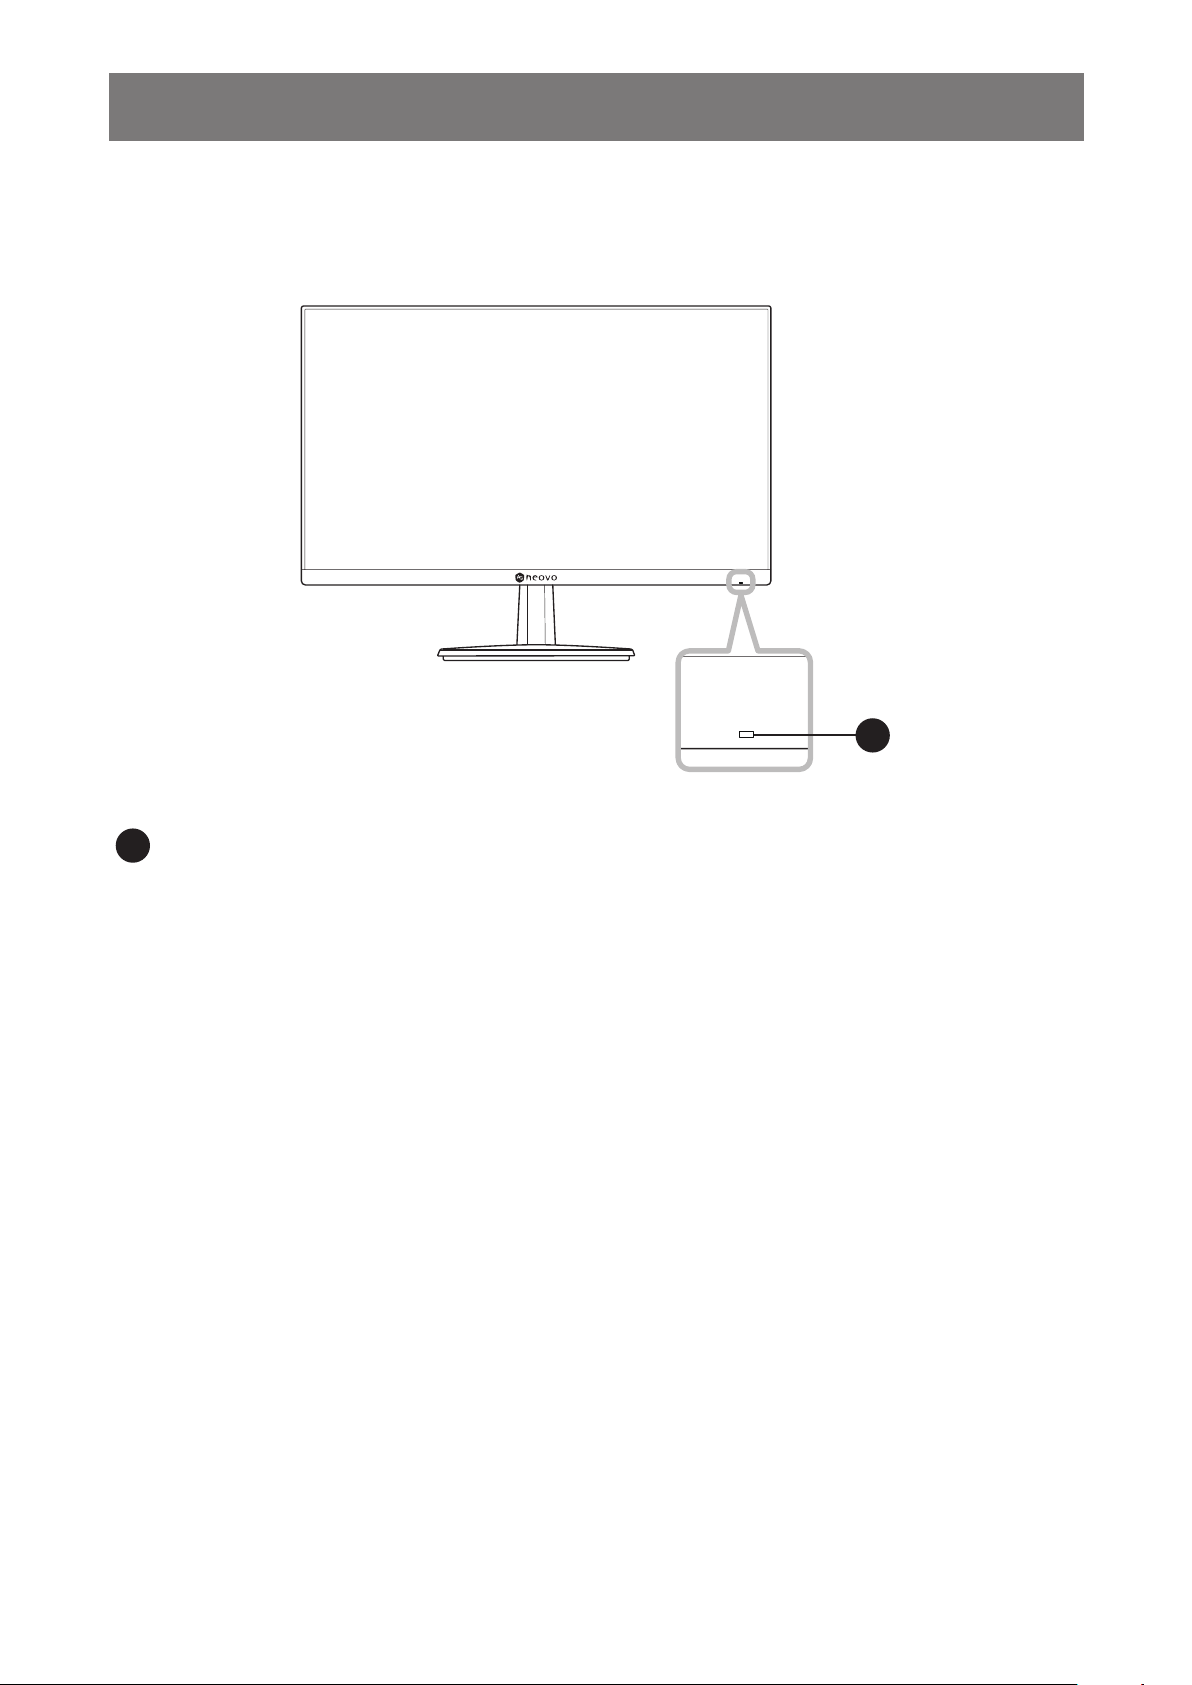
1.3 Overview .............................................................................................................................................. 11
1.3.1 Front View ................................................................................................................................. 11
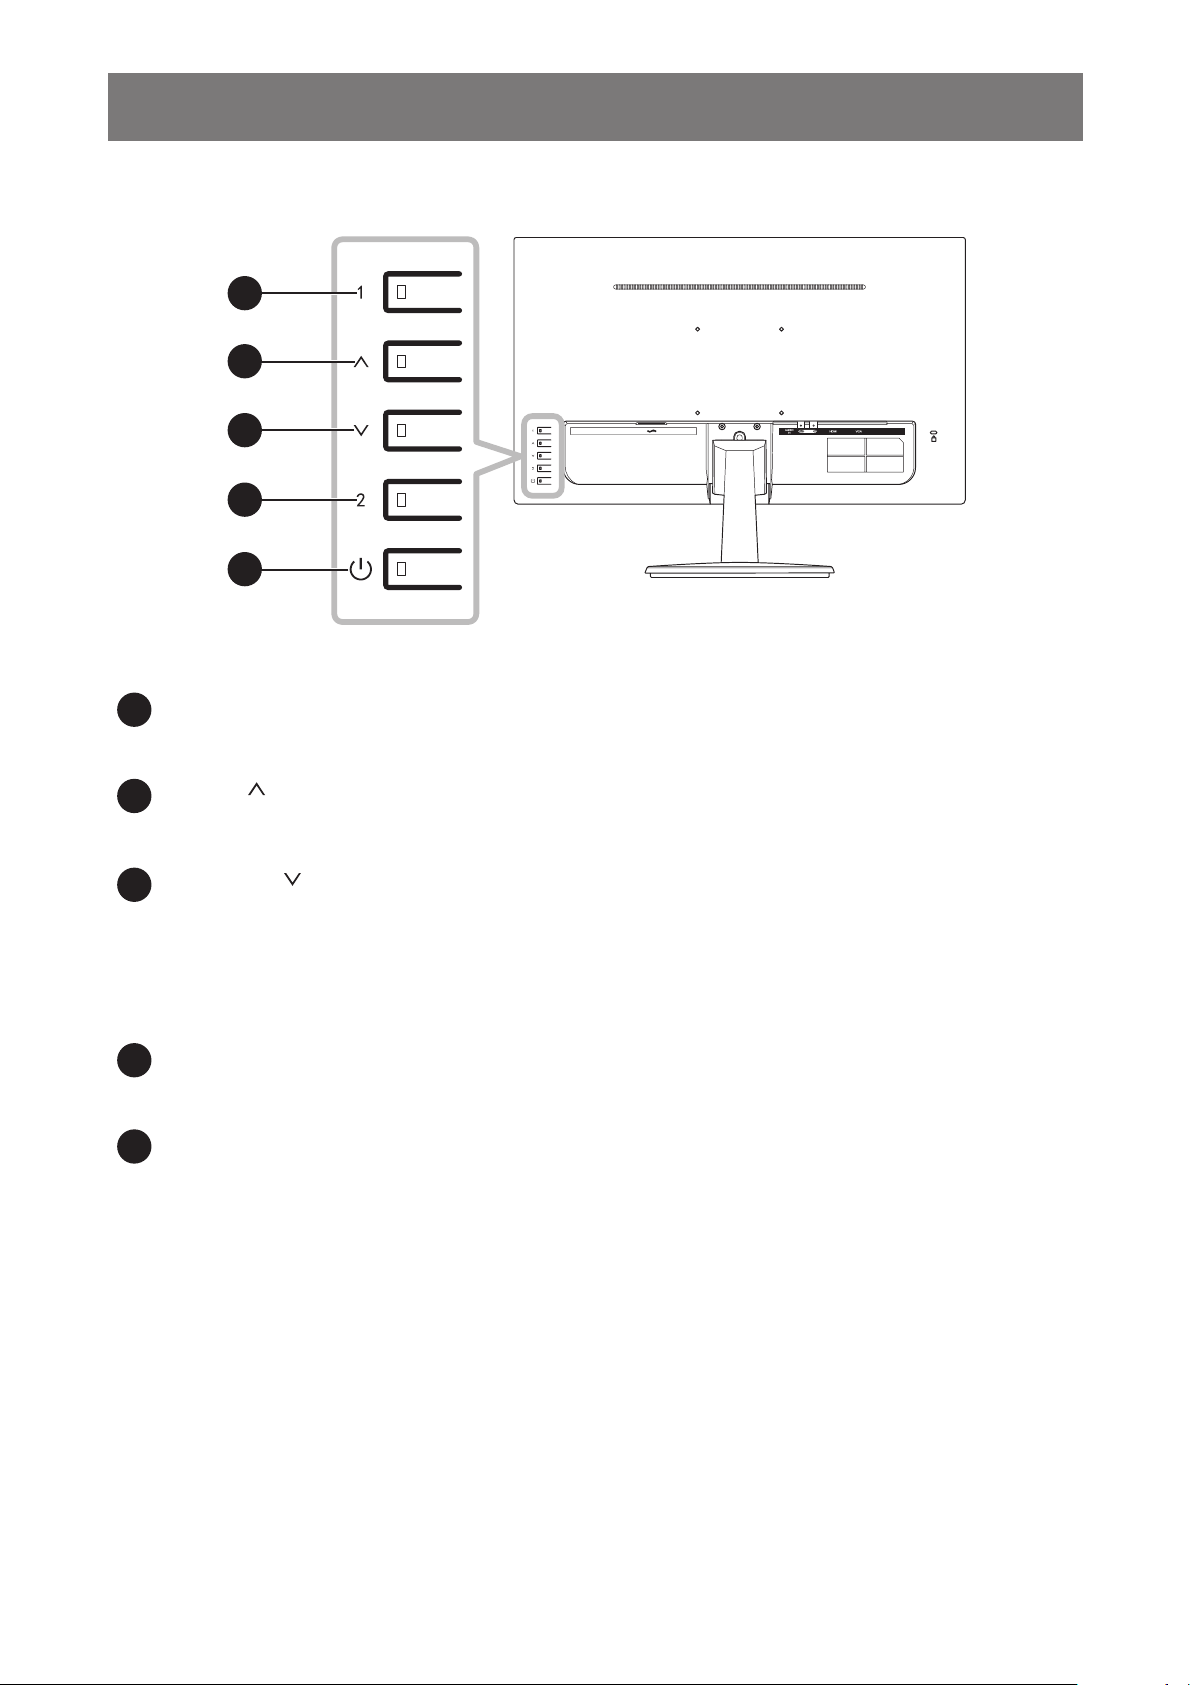
1.3.2 Control Panel.............................................................................................................................12
1.3.3 Rear View..................................................................................................................................13
CHAPTER 2: MAKING CONNECTIONS
2.1 Connecting the AC Power .................................................................................................................... 14
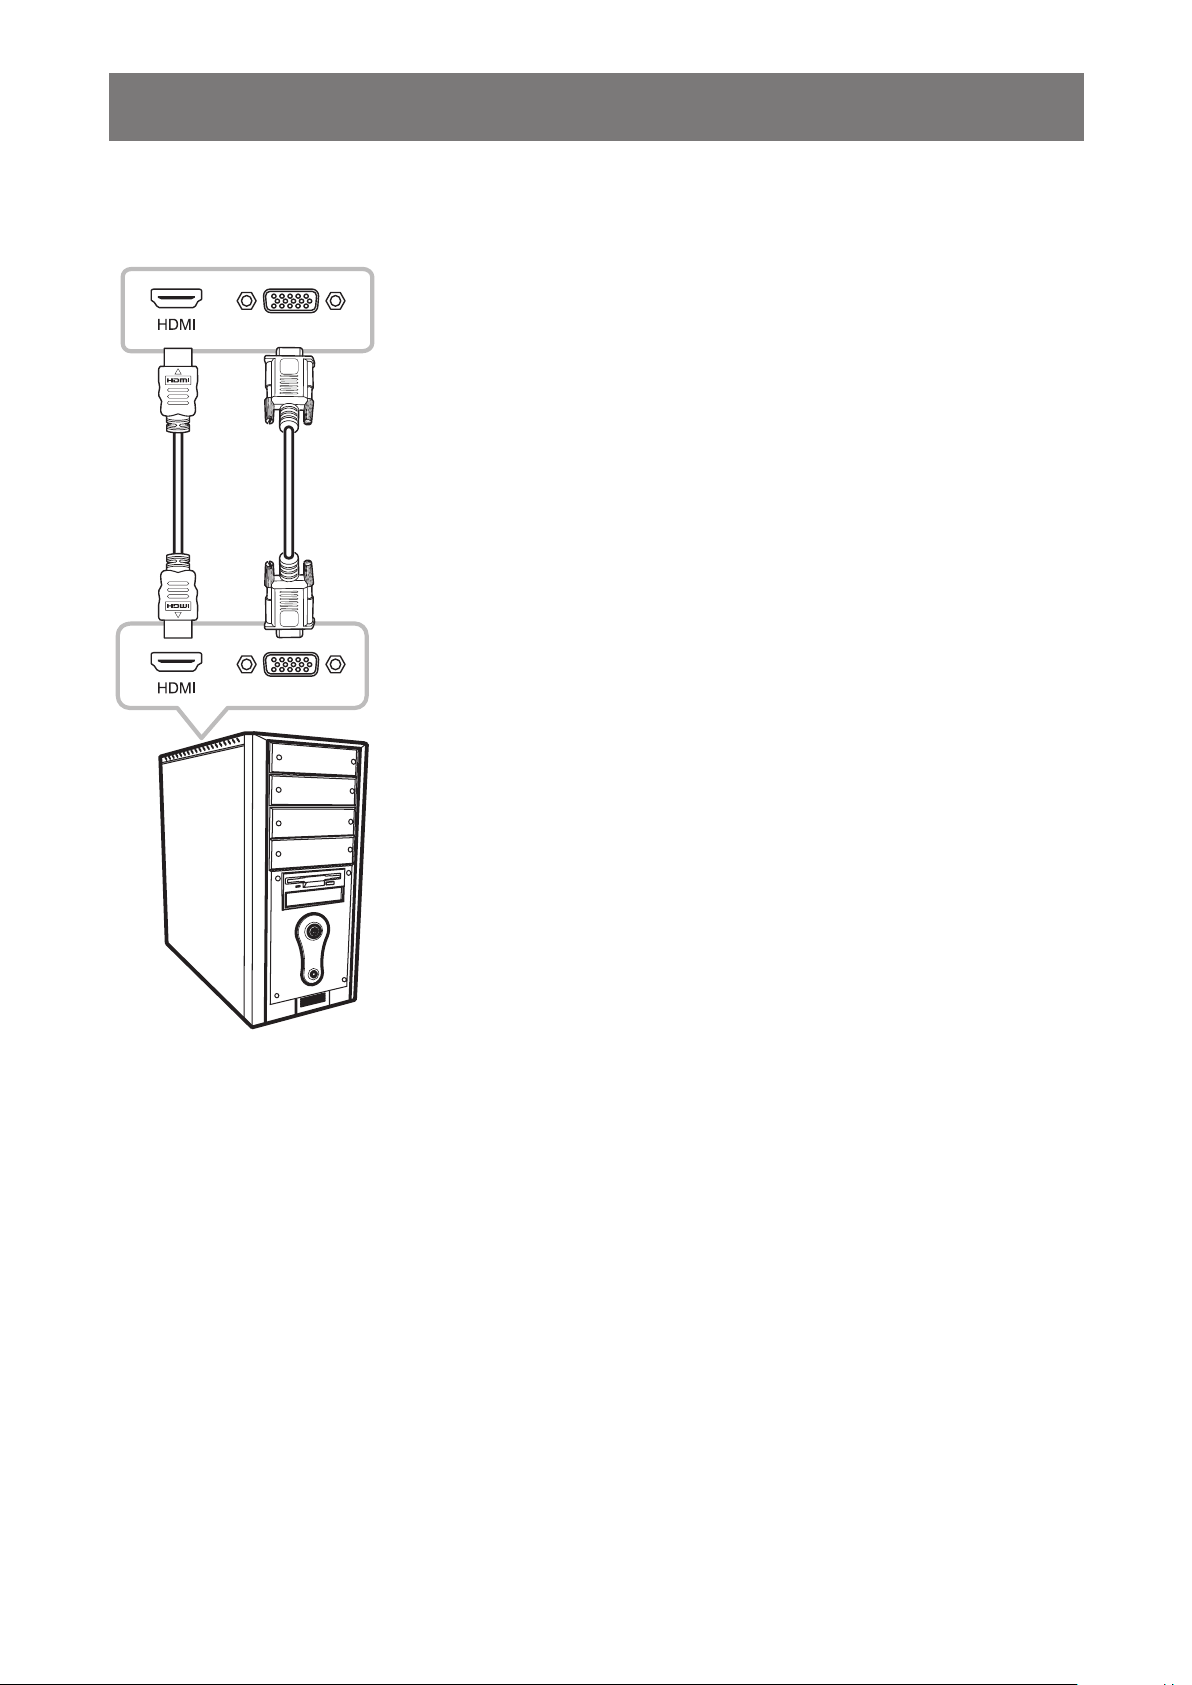
2.2 Connecting Input Source Signals ......................................................................................................... 15
2.3 Connecting Audio Devices ................................................................................................................... 16
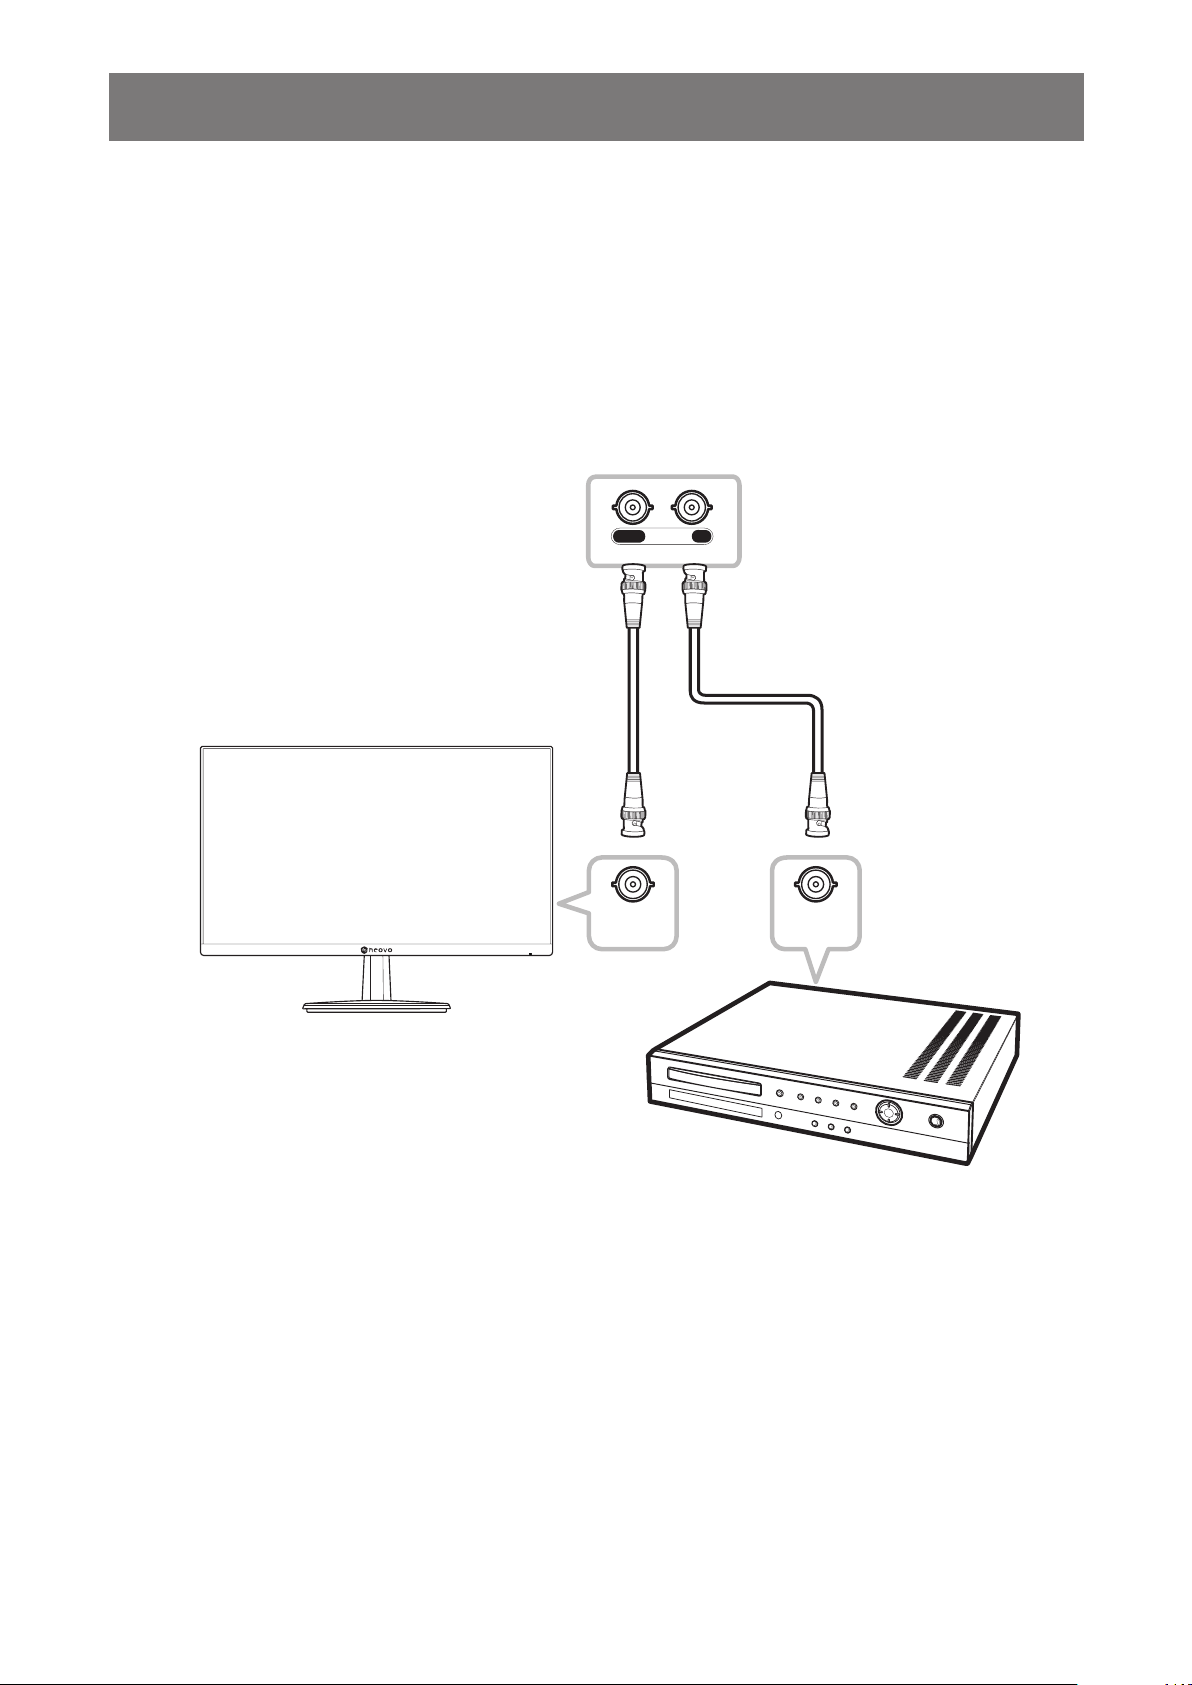
2.4 Connecting a Video Device .................................................................................................................. 17
CHAPTER 3: USING THE LCD MONITOR
3.1 Turning on the Power ........................................................................................................................... 18
3.2 Displaying the OSD Menu .................................................................................................................... 18
3.3 Selecting a Source ...............................................................................................................................19
3.4 Adjusting the Volume............................................................................................................................ 20
3.5 Auto Adjusting the Screen (For VGA Source Only) ..............................................................................20
3.6 Locking the Control Keys ..................................................................................................................... 21
CHAPTER 4: ON SCREEN DISPLAY MENU
4.1 Using the OSD Menu ........................................................................................................................... 22
4.2 OSD Menu Tree ................................................................................................................................... 23
CHAPTER 5: ADJUSTING THE LCD MONITOR
5.1 VIDEO Menu ........................................................................................................................................25
5.2 AUDIO Menu ........................................................................................................................................29
5.3 SETTING Menu....................................................................................................................................30
5.4 INFO Menu...........................................................................................................................................33
CHAPTER 6: APPENDIX
6.1 Warning Messages...............................................................................................................................34
6.2 Timing...................................................................................................................................................35
Contents

3
TABLE OF CONTENTS
6.3 Troubleshooting....................................................................................................................................36
6.4 Transporting the LCD Monitor .............................................................................................................. 37
CHAPTER 7: SPECIFICATIONS
7.1 Display Specications .......................................................................................................................... 39
7.2 Display Dimensions..............................................................................................................................40

SAFETY INFORMATION
4
Safety Information
Federal Communications Commission (FCC) Notice (U.S. Only)
This equipment has been tested and found to comply with the limits for a Class B digital
device, pursuant to part 15 of the FCC Rules. These limits are designed to provide reasonable
protection against harmful interference in a residential installation. This equipment generates,
uses and can radiate radio frequency energy and, if not installed and used in accordance with
the instructions, may cause harmful interference to radio communications. However, there
is no guarantee that interference will not occur in a particular installation. If this equipment
does cause harmful interference to radio or television reception, which can be determined
by turning the equipment off and on, the user is encouraged to try to correct the interference by
one or more of the following measures:
• Reorient or relocate the receiving antenna.
• Increase the separation between the equipment and receiver.
• Connect the equipment into an outlet on a circuit different from that to which the receiver is
connected.
• Consult the dealer or an experienced radio/TV technician for help.
Changes or modications not expressly approved by the party responsible for compliance could
void the user’s authority to operate the equipment.
Use only an RF shielded cable that was supplied with the monitor when connecting this monitor to a computer
device.
To prevent damage which may result in re or shock hazard, do not expose this appliance to rain or excessive
moisture.
THIS CLASS B DIGITAL APPARATUS MEETS ALL REQUIREMENTS OF THE CANADIAN INTERFERENCE-
CAUSING EQUIPMENT REGULATIONS.
This device complies with Part 15 of the FCC Rules. Operation is subject to the following two
conditions: (1) this device may not cause harmful interference, and (2) this device must accept
any interference received, including interference that may cause undesired operation.
WEEE
Information for users applicable in European Union countries
The symbol on the product or its packaging signies that this product has to be disposed
separately from ordinary household wastes at its end of life. Please kindly be aware that
this is your responsibility to dispose electronic equipment at recycling centers so as to help
conserve natural resources. Each country in the European Union should have its collection
centers for electrical and electronic equipment recycling. For information about your recycling
drop off area, please contact your local related electrical and electronic equipment waste
management authority or the retailer where you bought the product.

5
PRECAUTIONS
PRECAUTIONS
CAUTION
RISK OF ELECTRIC SHOCK
DO NOT OPEN
Symbols used in this manual
This icon indicates the existence of a potential hazard that could result in personal injury
or damage to the product.
This icon indicates important operating and servicing information.
Notice
• Read this User Manual carefully before using the LCD monitor and keep it for future reference.
• The product specications and other information provided in this User Manual are for reference only. All
information is subject to change without notice. Updated content can be downloaded from our web site at
www.agneovo.com.
• To protect your rights as a consumer, do not remove any stickers from the LCD monitor. Doing so may
affect the determination of the warranty period.
Cautions When Setting Up
Do not place the LCD monitor near heat sources, such as a heater, exhaust vent, or in direct
sunlight.
Do not cover or block the ventilation holes in the housing.
Place the LCD monitor on a stable area. Do not place the LCD monitor where it may subject to
vibration or shock.
Place the LCD monitor in a well-ventilated area.
Do not place the LCD monitor outdoors.
Do not place the LCD monitor in a dusty or humid environment.
Do not spill liquid or insert sharp objects into the LCD monitor through the ventilation holes.
Doing so may cause accidental re, electric shock or damage the LCD monitor.
Precautions

6
PRECAUTIONS
Cautions When Using
Use only the power cord supplied with the LCD monitor.
The power outlet should be installed near the LCD monitor and be easily accessible.
If an extension cord is used with the LCD monitor, ensure that the total current consumption
plugged into the power outlet does not exceed the ampere rating.
Do not allow anything to rest on the power cord. Do not place the LCD monitor where the
power cord may be stepped on.
If the LCD monitor will not be used for an indenite period of time, unplug the power cord from
the power outlet.
To disconnect the power cord, grasp and pull by the plug head. Do not tug on the cord; doing
so may cause re or electric shock.
Do not unplug or touch the power cord with wet hands.
WARNING:
Unplug the power cord from the power outlet and refer to qualied service personnel under
the following conditions:
• When the power cord is damaged.
• If the LCD monitor has been dropped or the housing has been damaged.
• If the LCD monitor emits smoke or a distinct odor.
Ceiling mount or mount on any other horizontal surface overhead are not advisable.
WARNING:
Installation in contravention of the instructions may result in undesirable consequences,
particularly hurting people and damaging property. Users who have already mounted the
monitor on the ceiling or any other horizontal surface overhead are strongly advised to
contact AG Neovo for consultations and solutions to help ensure a most pleasurable and
fullling monitor experience.

7
PRECAUTIONS
Cleaning and Maintenance
Do not attempt to service the LCD monitor yourself, refer to qualied service personnel.
Opening or removing the covers may expose you to dangerous voltage or other risks.
Notice for the LCD Monitor
In order to maintain the stable luminous performance, it is recommended to use low brightness setting.
Due to the lifespan of the lamp, it is normal that the brightness quality of the LCD monitor may decrease
with time.
When static images are displayed for long periods of time, the image may cause an imprint on the LCD
monitor. This is called image retention or burn-in.
To prevent image retention, do any of the following:
• Set the LCD monitor to turn off after a few minutes of being idle.
• Use a screen saver that has moving graphics or a blank white image.
• Switch desktop backgrounds regularly.
• Adjust the LCD monitor to low brightness settings.
• Turn off the LCD monitor when the system is not in use.
Things to do when the LCD monitor shows image retention:
• Turn off the LCD monitor for extended periods of time. It can be several hours or several days.
• Use a screen saver and run it for extended periods of time.
• Use a black and white image and run it for extended periods of time.
There are millions of micro transistors inside the LCD monitor. It is normal for a few transistors to be
damaged and to produce spots. This is acceptable and is not considered a failure.

CHAPTER 1: PRODUCT DESCRIPTION
8
1.1 Package Contents
When unpacking, check if the following items are included in the package. If any of them is missing or
damaged, contact your dealer.
Chapter 1: Product Description
Quick Start Guide
LCD Monitor
SC-2402_Quick Guide_V010
Quick Start Guide
SC-2402 LCD Monitor
www.agneovo.com
VGA Cable
Note:
• Use only the supplied power cord.
• The above pictures are for reference only. Actual items may vary upon shipment.
Power Cord
Base Stand
Audio Cable

9
PRODUCT DESCRIPTION
1.2 Installation
1.2.1 Installing the Stand
1. Pinch the latches on the base and then attach the base to the arm. Ensure the base latches
are secured to the slots on the arm.
2. Place the LCD monitor with the screen side down on a cushioned surface.
3. Attach the stand to the monitor.

10
PRODUCT DESCRIPTION
1.2.2 Adjusting the Tilt
For comfort viewing, tilt the LCD monitor up to an angle of -5° to 20°. Hold the stand with one hand and use
the other to adjust the LCD monitor to the desired angle.
20°~-5°
1.2.3 Wall Mounting
To wall mount the LCD monitor, do the following steps:
1. Remove the base stand.
Refer to page 37.
2. Wall mount the LCD monitor.
Screw the mounting bracket to the VESA holes at the rear of the LCD monitor.
CVBS
100
mm
100
mm
Note: Take measures to prevent the LCD monitor from falling down and lessen possible injury and damage
to the monitor in case of earthquakes or other disasters.
• Use only the 100 x 100 mm wall mount kit recommended by AG Neovo. All
AG Neovo wall mount kits comply with VESA standard.
• Secure the LCD monitor on a solid wall strong enough to bear its weight.
• It is suggested to wall mount the LCD monitor without tilting it facing
downward.

11
PRODUCT DESCRIPTION
1.3 Overview
1.3.1 Front View
6
6Power status indicator: Indicates the operating status of the monitor:
• Blue – Power On mode.
• Amber – Standby mode.
• LED off – Off mode.

12
PRODUCT DESCRIPTION
1.3.2 Control Panel
CVBS
2
1
3
4
5
11: MENU
OSD menu ON/OFF.
2UP ( ): Hot Key: Source Key
When OSD menu is ON, navigate through adjustment icons or adjust a function.
3DOWN ( ): Hot Key: Volume Key
• When OSD menu is ON, navigate through adjustment icons or adjust a function.
• When the Down key is pressed, the volume can be adjust. The Up/Down key can be used for
the volume adjust.
42: Hot Key: Auto adjust for VGA
When OSD menu is ON, the key is used for function adjust conrm.
5POWER:
Press to turn the monitor on or off.

13
PRODUCT DESCRIPTION
1.3.3 Rear View
CVBS
CVBS INOUT
AUDIO IN HDMI
VGA
1 2 3 4 5 6
1:
AC power input.
2AUDIO IN:
Connect to audio input source (3.5 mm Stereo Audio Jack).
3COMPOSITE (CVBS) OUT:
Connect Composite (CVBS) signals output.
4COMPOSITE (CVBS) IN:
Connect Composite (CVBS) signals input.
5HDMI IN:
Connect HDMI signals input.
6VGA IN:
Connect VGA signals input.

CHAPTER 2: MAKING CONNECTIONS
14
CAUTION:
Make sure that the LCD monitor is not connected to the power outlet before making any
connections. Connecting cables while the power is ON may cause possible electric shock or
personal injury.
2.1 Connecting the AC Power
1. Connect the power cord to the AC power input at the rear of the LCD monitor.
2. Connect the power cord plug to a power outlet or a power supply.
CAUTION:
When unplugging the power cord, hold the power cord by the plug head. Never pull by the cord.
Chapter 2: Making Connections

15
MAKING CONNECTIONS
2.2 Connecting Input Source Signals
Input source signals can be connected with either of the following cables:
VGA
VGA
• HDMI
Connect one end of an HDMI cable to the HDMI connector of the LCD
monitor and the other end to the HDMI connector of the computer.
• VGA
Connect one end of a D-Sub (VGA) cable to the D-Sub (VGA) connector
of the LCD monitor and the other end to the D-Sub (VGA) connector of
the computer.

16
MAKING CONNECTIONS
2.3 Connecting Audio Devices
Connect one end of an audio cable to the AUDIO IN connector of the LCD monitor and the other end to the
AUDIO OUT connector of the computer.
AUDIO
OUT
AUDIO IN

17
MAKING CONNECTIONS
2.4 Connecting a Video Device
• CVBS OUT
Connect one end of a composite cable to the CVBS OUT connector of the LCD monitor and the other end
to the CVBS IN connector of the external display.
• CVBS IN
Connect one end of a composite cable to the CVBS IN connector of the LCD monitor and the other end to
the CVBS OUT port of the video device.
CVBS
OUT
CVBS
IN
CVBS INOUT

CHAPTER 3: USING THE LCD MONITOR
18
3.1 Turning on the Power
1. Plug the power cord to a power outlet or power supply.
2. Press the key on the control panel
Power Key
When the LCD monitor is turned on, press the key to turn off the LCD monitor.
Note: The LCD monitor still consumes power as long as the power cord is connected to the power outlet.
Disconnect the power cord to completely cut off power.
3.2 Displaying the OSD Menu
Press the 1 key to open the OSD menu. Press the key again to close the OSD menu.
For more information on adjusting settings, refer to page 23.
VIDEO
PICTURE MODE
BRIGHTNESS
CONTRAST
BLACK LEVEL
SATURATION
SHARPNESS
GAMMA
COLOUR TEMPERATURE
ADVANCED CONTROL
STANDARD
2.2
NEUTRAL
50
50
50
50
50
1 Key
Chapter 3: Using the LCD Monitor

19
USING THE LCD MONITOR
The following menu appears on the screen:
VIDEO
PICTURE MODE
BRIGHTNESS
CONTRAST
BLACK LEVEL
SATURATION
SHARPNESS
GAMMA
COLOUR TEMPERATURE
ADVANCED CONTROL
STANDARD
2.2
NEUTRAL
50
50
50
50
50
3.3 Selecting a Source
Press the key to call out the source selection menu.
INPUT SOURCE
CVBS
HDMI
VGA
UP Key
The following menu appears on the screen:
INPUT SOURCE
CVBS
HDMI
VGA
Press the key continuously to select the desired input source. Then press the 2 key to conrm or wait
until the source menu disappears from the screen automatically. The available input options include “CVBS”,
“HDMI”, and “VGA”.
Note: Every time you switch to the VGA source, the LCD monitor performs screen adjustment automatically.

20
USING THE LCD MONITOR
3.4 Adjusting the Volume
Press the key to call out the volume bar.
53
DOWN Key
The following menu appears on the screen:
53
Press the or key to adjust volume.
Note: During volume or menu setting adjustment, press and hold the or key to change the values
continuously.
3.5 Auto Adjusting the Screen (For VGA Source Only)
Auto Adjustment function automatically tunes the LCD monitor to its optimal setting, including horizontal
position, vertical position, clock, and phase.
Press the 2 key to perform auto adjustment for VGA source.
AUTO ADJUSTING...
2 Key
Table of contents
Other AG Neovo Monitor manuals

AG Neovo
AG Neovo HMQ-4301 User manual

AG Neovo
AG Neovo TX-22 User manual

AG Neovo
AG Neovo X-20A User manual

AG Neovo
AG Neovo HX-24 User manual

AG Neovo
AG Neovo TM-23 User manual

AG Neovo
AG Neovo QX-32 User manual

AG Neovo
AG Neovo RX-W32 User manual

AG Neovo
AG Neovo E-W22 User manual

AG Neovo
AG Neovo SC-17P User manual

AG Neovo
AG Neovo TX-42P User manual

AG Neovo
AG Neovo F-417 User manual

AG Neovo
AG Neovo HX-24 User manual

AG Neovo
AG Neovo S-18 User manual

AG Neovo
AG Neovo TX-32 User manual

AG Neovo
AG Neovo NSD-6501Q User manual

AG Neovo
AG Neovo QM-65A User manual

AG Neovo
AG Neovo M-19 Instruction Manual

AG Neovo
AG Neovo S-15T User manual

AG Neovo
AG Neovo RX-W22 User manual

AG Neovo
AG Neovo TX-2401 User manual