AGPtek LW11 Operating and safety instructions


1
Thanks for choosing this product. Please
read this [user manual] carefully before
use and keep it for future reference. Any
problem about this product, please
PRODUCT OVERVIEW
1. Touch Screen
4. Optical Sensor
2. Power Button
5. Charging Point
3. TPU Straps
6. Strap Slot
Note:Long press the power button to
turn on/off the watch.
INSTALL WATCH
1. One side of the
spring bar should be
inserted into the
hole of your watch
at first.
2. Simply slide the pin
with your finger.
3. Point the other side of the spring bar

2
at the other hole of your watch.
4. Release the pin and attach the strap.
CHARGING WATCH
Attach the supplied magnetic charger to
charging contact on the back of watch,
and insert the other end of the charger
into USB wall charger or USB interface
of computer.
Note:
1. Install your watch first, and fully
charge your watch before use.
2. To ensure smooth charging, please
put the watch face down during
charging. Charging time: about 2 hrs.
DOWNLOAD APP
1. Scan the left QR code.
2. Find [Settings] > [QR Code]
in Watch. Then, tap it & scan
the QR Code with phone.
3. Download “FitCloudPro” from “Apple
store” or “Google play store” (Android
App store).
Note: Mobile phone must support
Android 5.0 or above, iOS 9.0 or above
and Bluetooth 4.0+.
BINDING
⦁FIRST CONNECTION
1. For first use, open App “FitCloudPro”,
register and login.
2. Follow the instruction of App to start
binding watch. Click [Search Now], and

3
the smartphone will start searching for
devices for about 10s that can be
connected.
3. After a successful search, select and
click “LW11-xxx” to complete the
connection. There are two situations:
1) iOS: A pairing request will appear, just
click "Pair" to connect.
2) Android: No pairing request, directly
connect.
⦁SECOND CONNECTION
Open App, go to [Device] > [+ Add
Peripheral Now] > [Search Now]. Follow
the above [FIRST CONNECTION] steps 3
to complete the connection.
BASIC OPERATION
On main interface, swipe left to enter
daily activity analyse; Swipe right to
enter main menu; Swipe up to enter the
message list; Swipe down to enter
shortcut interface.
MAIN MENU
⦁SPORT DATA
Record your steps, walking
distance & burned calories on
that day. They also can be
viewed after syncing to the App.

4
⦁SPORTS
Swipe up/down to cycle
through 8 different sports (Run
-ning/Hiking/Swimming etc.),
and select one of your favorite
sport and tap it to start. Find the sport
data on the [Sports Record].
⦁HEART RATE
On the heart rate interface, it
will enter into the real time
monitoring. Swipe up to get
the analysis chart of your heart
rate. And it can also be viewed in App
after syncing.
⦁SLEEP
Record your sleep from 21:00
pm to 12:00 am. Sync and
update the data to “Sleep” in
App through manually pulling
down the "Home" page of App.
⦁BP&BO
On the blood pressure (BP) or
blood oxygen (BO) interface, it
will automatically detect your
blood pressure or blood
oxygen until the vibration is
felt, which indicates
completing the measurement.
Note: Only reference, it cannot be used
as a basis for medical related aspects.
⦁MUSIC
After connecting the watch and
App, tap Music in main menu
to access its function. Tap

5
pause, play, forwards or backwards icon
to control the songs on your phone.
Swipe right on the screen to exit.
Note: The music interface will not
switch during operation, but the watch
will vibrate to remind you after you have
operated.
⦁WEATHER
Display the current weather.
Only the watch connects
successfully to the App, the
weather information will be
shown or updated in watch. Note: The
App should be allowed to access into GPS
& Internet of your phone
⦁STOPWATCH
On the main menu, Tap it to
access its function, and a new
interface displays. Tap to
start, and tap to stop or tap
to resume. Exit the stopwatch by
swiping right on the screen.
⦁TIMER
With 8 timers + a customized
timer. 8 Timers are: 1M, 3M,
5M, 10M, 20M, 30M, 1H, 2H.
Tap one of timers you want to
start. Then, follow the operation of the
stopwatch to use the timer.
⦁MESSAGE
Find message on main menu or
swipe up the main interface to
quickly access to Message. All
notifications of your phone will

6
be automatically synchronized to the
watch after a successful connection
between watch and App (Ensure
enabling all message reminding in App).
Swipe up or down to switch messages.
Tap the message you want to check to
view the whole content of the message.
⦁FIND PHONE
Tap Find Phone in main menu
or find its icon by swiping
down the main interface to
start searching for your phone.
When searching successfully, your
phone will vibrate or give a ringtone
(According to your settings).
⦁SETTINGS
Tap Settings in main menu or
find its icon by swiping down
the main interface, to access
its function. A relative list will
show: Display, Vibration Intensity,
Language, QR Code, System.
-Display. Set Dial Switch, Brightness,
Screen Time, Turn Wrist Wake.
1. Dial Switch.
1) Watch: 4 Built-in Dials. Tap Dial
Switch in the main menu or long
press the screen on the main
interface to enter. Swipe left/right to

7
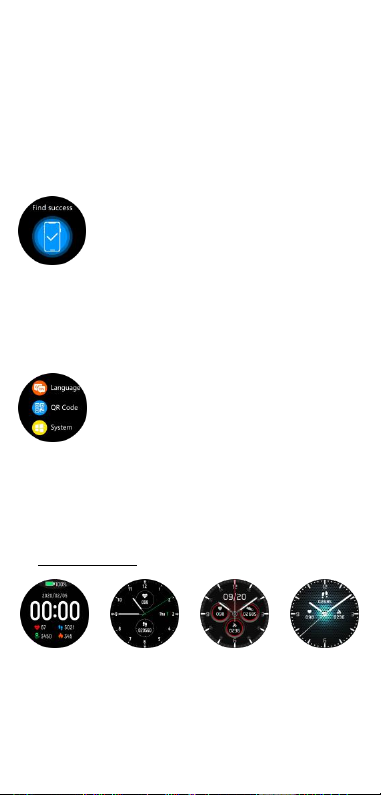
switch, and tap one of your favorite
dials to confirm.
2) App: Find [Device] > [Watchface] >
[Watchface Store], and click first one
dial to start editing. Then, select your
favorite picture as background of the
main interface and customize it
according to your preference. Your set
watch face can be found in [My
Watchface] quickly.
2. Brightness. Tap Brightness in the main
menu or find its icon by swiping down
the main interface to access its
function. Tap +to increase the
brightness of display; Tap -to
decrease it.
3. Screen Time. Automatically turn off
the screen display when reaching the
set time (5-9s). Swipe up or down to
switch the time, and tap ✔to
confirm your settings.
4. Turn Wrist Wake. Set the time(2-6s)
of screen display when you lift wrist.
Swipe up or down to switch the time,
and tap ✔to confirm your settings.
Besides, App can set its begin time
and end time.
-Vibration Intensity. Set the intensity
of vibration reminder (0-3), and tap
✔to confirm your settings.
-Language. After a successful
connection, the watch will
automatically recognize and sync the
language of App. If want to make your

8
watch language differ from App, just
find Setting > Language in watch, to
set language of watch alone.
-QR Code. Tap it and scan the QR Code
with your phone to download
“FitCloudPro”.
-System. Includes: About, Shutdown,
Reset.
1. About. Display the basic information:
Bluetooth Name, Mac Address,
Software Version, UI Version.
2. Shutdown. Turn off the watch.
3. Reset. Reset your watch.
ATTENTIONS
1. DON’T use over 5V/2A power adapter
to charge it.
2. This device is is an electronic product,
not for medical reference, so the
detected data (Especially for blood
pressure and blood oxygen) is for
reference only.
3. Blood pressure monitoring method:
Quiet rest for over 5 minutes before
monitoring. Do not eat, smoke, take
medicine and drink coffee for 2 hours
before monitoring.
4. Monitoring process:
Take a comfortable, restful
sitting position and keep
your mind easeful.
Forbidden to speak. Place
the watch is at the same height as your
heart (as shown on the left).

9
5. With IP68 waterproof, sweat proof
and rain proof, it can be used directly
in daily washing, shower (cold water)
and other daily environments.
6. Do not use in bath, sauna, hot spring
or other environments with corrosive
liquid and hot steam, which will lead
to product failure.
7. Don’t operate the watch underwater.
8. Do not wear the watch to deep dive.
FAQ
⦁Why the measurement of blood
pressure is inaccurate ?
Affected by the external environment
and the skin color of the individual, so it
is only used to monitor changes in blood
pressure, which can not really monitor
the blood pressure of patients with
hypertension.
⦁Why can't I receive the notification?
1. Android: When you turn on the QQ/
Wechat reminder for the first time,
the App will get the corresponding
permissions automatically.
2. iOS: (Call, SMS, SNS) When the
reminders in the App are turned on,
your phone will automatically pop up
the accessing request, you just need
to select OK.

10
SPECIFICATIONS
Waterproof level
IP68
Sensor
3 Axis G-sensor
Sync method
Bluetooth
Resolution
240*240
Display
1.28'' TFT Full
Touch Color
Screen
Working time
About 8-10 days
Working
Temperature
-10℃~50℃
Compatible
Systems
IOS 9.0 or above;
Android 5.0 or
above

11
Vielen Dank, dass Sie sich für dieses
Produkt entschieden haben. Bitte lesen
Sie diese [Bedienungsanleitung] vor der
Verwendung sorgfältig durch und
bewahren Sie sie zum späteren
Nachschlagen auf. Bei Problemen mit
diesem Produkt wenden Sie sich bitte an
support@agptek.com.
PRODUKTÜBERSICHT
1. Berührungsbildsc
hirm
4. Optischer
Sensor
2. Ein-/Ausschalter
5. Ladestation
3. TPU-Gurte
6. Gurtschlitz
Hinweis: Drücken Sie lange auf den
Netzschalter, um die Uhr ein- und
auszuschalten.
UHR INSTALLIEREN
1. Eine Seite der
Federstange sollte
zuerst in das Loch
Ihrer Uhr eingeführt
werden.

12
2. Schieben Sie einfach den Nadel mit
dem Finger.
3. Richten Sie die andere Seite der
Federstange auf das andere Loch
Ihrer Uhr.
4. Lassen Sie den Nadel los und
befestigen Sie den Gurt.
LADEUHR
Schließen Sie das mitgelieferte
magnetische Ladegerät an den
Ladekontakt auf der Rückseite der Uhr
an und stecken Sie das andere Ende des
Ladegeräts in das USB-Ladegerät oder
die USB-Schnittstelle des Computers.
Hinweis:
1. Installieren Sie zuerst Ihre Uhr und
laden Sie Ihre Uhr vor dem Gebrauch
vollständig auf.
2. Um einen reibungslosen Ladevorgang
zu gewährleisten, legen Sie die Uhr
während des Ladevorgangs mit der
Vorderseite nach unten. Ladezeit: ca.
2 Std.
HERUNTERLADE APP
1. Scannen Sie den linken
QR-Code.
2. Suchen Sie in der Uhr nach
[Einstellungen]> [QR-Code].
Tippen Sie dann darauf und scannen
Sie den QR-Code mit dem Telefon.
3. Laden Sie “FitCloudPro” aus dem
“Apple store” oder “Google play

13
store” (Android App store).
Hinweis: Das Handy muss Android 5.0
oder höher, iOS 9.0 oder höher und
Bluetooth 4.0+ unterstützen.
BINDUNG
⦁ERSTE VERBINDUNG
1. Öffnen Sie bei der ersten Verwendung
die App “FitCloudPro”, registrieren
Sie sich und melden Sie sich an.
2. Befolgen Sie die Anweisungen der
App, um die Bindung der Uhr zu
starten. Klicken Sie auf [Jetzt suchen],
und das Smartphone sucht etwa 10
Sekunden lang nach Geräten, die
verbunden werden können.
3. Wählen Sie nach erfolgreicher Suche
"LW11-xxx" aus und klicken Sie darauf,
um die Verbindung herzustellen. Es
gibt zwei Situationen:
1) iOS: Eine Pairing-Anfrage wird
angezeigt. Klicken Sie einfach auf
"Pairing", um eine Verbindung
herzustellen.
2) Android: Keine Pairing-Anfrage, direkt
verbinden.
⦁ZWEITE VERBINDUNG
Öffnen Sie die App und gehen Sie zu
[Gerät] > [+ Jetzt Peripheriegerät
hinzufügen] > [Jetzt suchen]. Befolgen
Sie die obigen Schritte [ERSTE
VERBINDUNG] 3, um die Verbindung
herzustellen.

14
GRUNDBETRIEB
Wischen Sie auf der Hauptoberfläche
nach links, um die tägliche
Aktivitätsanalyse aufzurufen, nach
rechts, um das Hauptmenü aufzurufen,
nach oben, um die Nachrichtenliste
aufzurufen, nach unten, um die
Verknüpfungsoberfläche aufzurufen.
HAUPTMENÜ
⦁SPORTDATEN
Notieren Sie die Anzahl der
Schritte, Gehentfernung und
verbrannten Kalorien an
diesem Tag. Sie können sie auch
nach der Synchronisierung mit der App
anzeigen.
⦁SPORT
Wischen Sie nach oben/unten,
um 8 verschiedene Sportarten
(Laufen/Wandern/Schwimmen
usw.) zu durchlaufen. Wählen
Sie eine Ihrer Lieblingssportarten aus
und tippen Sie darauf, um zu beginnen.
Finden Sie die Sportdaten auf der
[Sportaufzeichnung].
⦁HERZSCHLAG
Auf der Herzfrequenz-Schnittstelle wird
es in die Echtzeit-Überwachung

15
eingeben. Wischen Sie nach
oben, um das
Analysediagramm Ihrer
Herzfrequenz zu erhalten. Und
es kann auch in der App nach der
Synchronisierung angezeigt werden.
⦁SCHLAFEN
Notieren Sie Ihren Schlaf von
21:00 bis 12:00 Uhr.
Synchronisieren und
aktualisieren Sie die Daten in
der App auf "Schlafen", indem Sie die
"Startseite" -Seite der App manuell
aufrufen.
⦁BP&BO
An der Schnittstelle für
Blutdruck (BP) oder
Blutsauerstoff (BO) wird
automatisch Ihr Blutdruck
oder Blutsauerstoff erfasst, bis
die Vibration spürbar ist, was
auf den Abschluss der
Messung hinweist.
Hinweis: Nur Referenz, es kann nicht als
Grundlage für medizinische Aspekte
verwendet werden.
⦁MUSIK
Tippen Sie nach dem
Verbinden der Uhr und der
App im Hauptmenü auf Musik,
um auf deren Funktion
zuzugreifen. Tippen Sie auf das Symbol
Pause, Wiedergabe, Vorwärts oder
Rückwärts, um die Titel auf Ihrem

16
Handy zu steuern. Wischen Sie zum
Beenden nach rechts auf dem
Bildschirm.
Hinweis: Die Musik Schnittstelle schaltet
während des Betriebs nicht um, aber die
Uhr vibriert, um Sie nach dem Betrieb
daran zu erinnern.
⦁WETTER
Zeigen Sie das aktuelle Wetter
an. Nur die Uhr stellt eine
erfolgreiche Verbindung zur App
her. Die Wetterinformationen
werden in der Uhr angezeigt oder
aktualisiert. Hinweis: Die App sollte Zugriff
auf GPS und Internet Ihres Handys haben.
⦁STOPPUHR
Tippen Sie im Hauptmenü auf,
um auf die Funktion
zuzugreifen. Eine neue
Benutzeroberfläche wird
angezeigt. Tippen Sie zum Starten auf
und zum Stoppen oder zum Fortsetzen.
Verlassen Sie die Stoppuhr, indem Sie
nach rechts über den Bildschirm
wischen.
⦁TIMER
Mit 8 Timern + einem
benutzerdefinierten Timer. 8
Timer sind: 1M, 3M, 5M, 10M,
20M, 30M, 1H, 2H. Tippen Sie
auf einen der Timer, die Sie starten
möchten. Folgen Sie dann der
Bedienung der Stoppuhr, um den Timer
zu verwenden.

17
⦁NACHRICHT
Suchen Sie eine Nachricht im
Hauptmenü oder streichen Sie
über die Hauptoberfläche, um
schnell auf die Nachricht
zuzugreifen. Alle Benachrichtigungen
Ihres Telefons werden nach einer
erfolgreichen Verbindung zwischen Uhr
und App automatisch mit der Uhr
synchronisiert (Stellen Sie sicher, dass
alle Nachrichtenerinnerungen in der
App aktiviert sind). Wischen Sie nach
oben oder unten, um die Nachrichten zu
wechseln. Tippen Sie auf die Nachricht,
die Sie überprüfen möchten, um den
gesamten Inhalt der Nachricht
anzuzeigen.
⦁TELEFON FINDEN
Tippen Sie im Hauptmenü auf
Telefon suchen oder suchen Sie
das entsprechende Symbol,
indem Sie über die
Hauptoberfläche wischen, um nach
Ihrem Telefon zu suchen. Bei
erfolgreicher Suche vibriert Ihr Telefon
oder gibt einen Klingelton aus
(entsprechend Ihren Einstellungen).
⦁EINSTELLUNGEN
Tippen Sie im Hauptmenü auf
Einstellungen oder suchen Sie
das Symbol, indem Sie über die
Hauptoberfläche wischen, um
auf die Funktion zuzugreifen. Eine
relative Liste zeigt: Anzeige,

18
Vibrationsintensität, Sprache, QR-Code,
System.
-Anzeige. Stellen Sie den Wählschalter,
die Helligkeit, die Bildschirmzeit und
die Handgelenkspur ein.
1. Schnittstelle.
1) Uhr: 4 eingebaute Schnittstellen.
Tippen Sie im Hauptmenü auf
Schnittstelle oder drücken Sie lange
auf den Bildschirm der
Hauptoberfläche, um ihn aufzurufen.
Wischen Sie zum Umschalten nach
links/rechts und tippen Sie zur
Bestätigung auf eines Ihrer
Lieblingsschnittstelle.
2) App: Suchen Sie [Gerät] >
[Zifferblatt] > [Zifferblatt Geschäft]
und klicken Sie auf das erste
Einstellrad, um die Bearbeitung zu
starten. Wählen Sie dann Ihr
Lieblingsbild als Hintergrund für die
Hauptoberfläche aus und passen Sie
es Ihren Wünschen an. Ihr
festgelegtes Zifferblatt finden Sie
schnell in [Mein Zifferblatt].
2. Helligkeit. Tippen Sie im Hauptmenü
auf Helligkeit oder suchen Sie das
Symbol, indem Sie über die
Hauptoberfläche wischen, um auf die
Other manuals for LW11
2
Table of contents
Languages:
Other AGPtek Watch manuals

AGPtek
AGPtek W20 User manual

AGPtek
AGPtek W06 User manual

AGPtek
AGPtek W3 User manual

AGPtek
AGPtek LW31 User manual

AGPtek
AGPtek G20 Operating and safety instructions

AGPtek
AGPtek LW31 User manual

AGPtek
AGPtek G22 Operating and safety instructions

AGPtek
AGPtek SW03 User manual

AGPtek
AGPtek W06 User manual

AGPtek
AGPtek W20 User manual