AIGOSTAR 8433325504007 User manual

The plastic material in contact with the food
is PP(polypropylene), BPA free.
HTTP://WWW.AIGOSTAR.COM
MADE IN P.R.C
SAMSPARTY SL
CL CABAÑA 78, 45210 YUNCOS ,TOLEDO,ESPAÑA
B45824786

NL
FR
PT
1-40
41-80
81-118
119-156
157-194
195-230
231-270
271-310

Read the instructions, keep them safe, pass them on if you
pass the appliance on. Remove all packaging before use.
AN IMPORTANT SAFEGUARD
Follow basic safety precautions, including:
1. This appliance can be used by persons with reduced
physical, sensory or mental capabilities or lack of experience
and knowledge if they have been supervised / instructed and
understand the hazards involved.
● Children must not use or paly with the appliance.
● Keep the appliance and cable out of reach of children.
2. Use the appliance only with the connector and cable
supplied, and vice versa.
3. If the connector or cable is damaged, they must be
replaced by a special assembly available from the
manufacturer or its service agent.
4. Don’t connect the appliance via a timer or remote control
system.
5. Cleaning and user maintenance shall not be made by
children without supervision.
6. This appliance is for household use only. Do not use
outdoors.
7. Don’t put frozen meat or poultry in the appliance-defrost
fully before use.
8. Cook meat, poultry, and derivatives (mince, burgers, etc.)
till the juices run clear. Cook fish till the flesh is opaque
throughout.
Don’t immerse the appliance in liquid.
The surfaces of the appliance will get hot. Residual heat
will keep the surfaces hot after use.
9. Don’t try to cook anything in the body of the
cooker-cook only in the removable bowl.
10. Don’t fill the bowl above max.
11. Don’t reach over the appliance, and keep hands, arms,
face, etc. Clear of the escaping steam.
12. Don’t cover the appliance or put anything on top of it.
13. Don’t cook foods that foam when heated (like laver,
Chinese cabbage, kelp, corn grits, pasta), they may block
the filter, and overwhelm the appliance.
14. Attach the connector to the appliance before plugging
the cable into the power socket.
15. Unplug the appliance when not in use.
16. Don’t use accessories or attachments other than those
we supply.
17. Don’t use the appliance for any purpose other than
described in these instructions.
18. Don’t use the appliance if it’s damaged or
malfunctions.
BEFORE USING FOR THE FIRST TIME
Hand wash the removable parts.
HOW IT WORKS
1. Measure the ingredients into the bowl.
2. Give the bowl quarter of a turn each way, to ensure the
bottom of the bowl makes good contact with the element.
3. Close the lid.
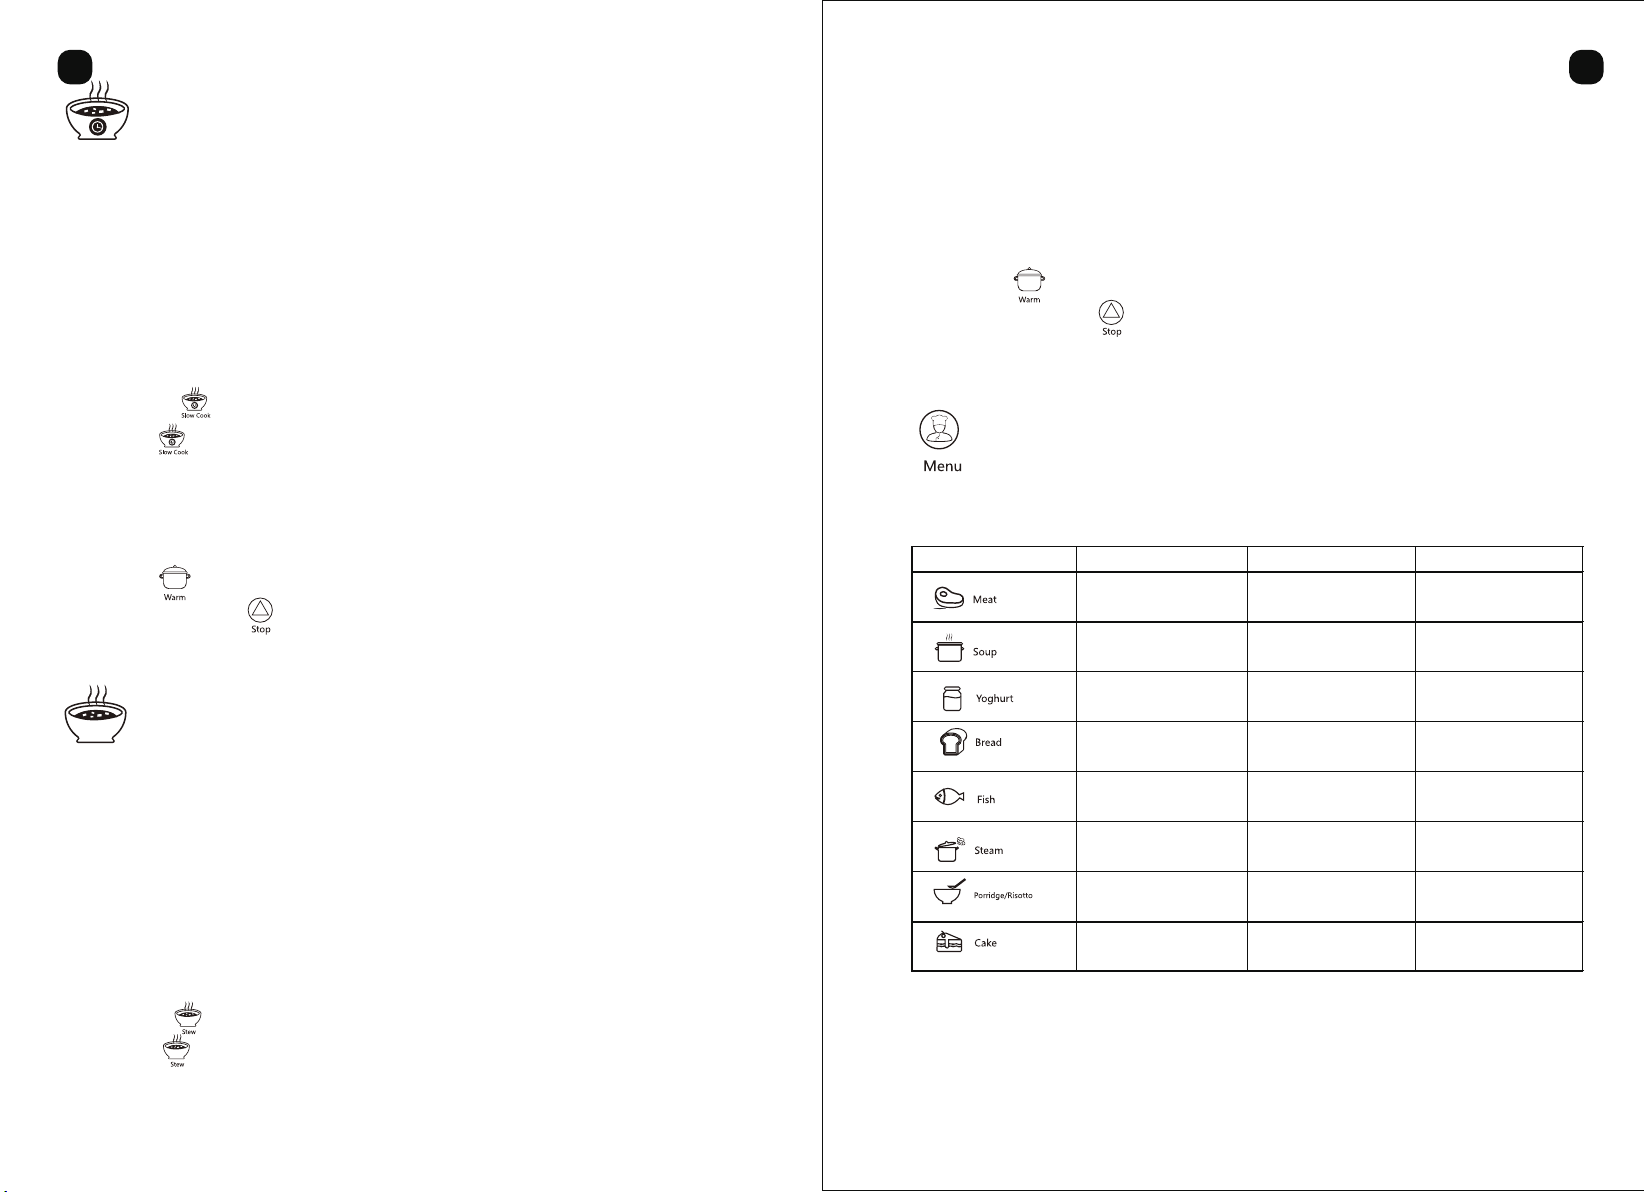
4. Use the menu button to select the program you
want.
5. The three big buttons at the bottom, rice cooking,
GB GB
1 2 3 4 5 6 7 8 9 10 11 12 13 14 15 16 17 18 19 20
21 22 23 24 25 26 27 28 29 30 31 32 33 34 35 36 37 38 39 40

PREPARATION
RICE COOKING
POWER UP
slow cooking, and stewing, over-rule the menu
and the start button.
6. Set the timer if appropriate.
7. Press the start button
8. To stop the appliance, press stop once if the display
is not counting down, or twice if the display is counting
down.
9. After using the appliance, let it rest for 15 minutes
before using it again.
1. Sit the appliance on a stable, level, heat-resistant
surface.
2. Don’t use the appliance near or below curtains, shelves,
cupboards or anything else likely to be damaged by the
escaping steam.
3. Have oven gloves (or a cloth) to hand, and a
heat-resistant mat or dinner plate to put the bowl on after
cooking.
4. Put the bowl inside the cooker.
5. Give the bowl quarter of a turn each way.
1. Put the lid on the bowl.
2. Put the connector into the plug into the power
socket.
3. The display will light up briefly.
4. The light will blink.
1. Use the cup to put rice into the bowl.
2. Don’t use more than 10 cups of rice.
3. The scale on the left inside the bowl is marked form 2
to 10.
4. Fill the bowl with water up to the number
corresponding to the number of cups of rice.
5. Close the lid.
6. Press
7. The light will glow.
8. The outer segment of the display will blink while the
food heats up.
9. The display will then show the remaining cooking
time (13 minutes), and count down.
10. At the end of the cooking time, the appliance will go
into “keep warm” mode.
11. The light will glow.
12. Press stop .
13. Open the lid.
14. Lift out the bowl and set it down on a heat-resistant
mat or dinner plate.
15. Use the spatula to turn and mix the rice, to let all the
steam escape.
16. Sometimes the layer of rice in contact with the bowl
will form a crust.
17. If you don’t want it you can remove it with the
spatula, after you’ve served the rice.
GB GB
1 2 3 4 5 6 7 8 9 10 11 12 13 14 15 16 17 18 19 20
21 22 23 24 25 26 27 28 29 30 31 32 33 34 35 36 37 38 39 40

MENU RANGE DEFAULT
Meat
Soup
yoghurt
bread
fish
steam
Porridge/risotto
cake
10 min-1h
1-5h
6-10h
1-3h
10min-1h
30min-2h
1-4h
30min-2h
20min
1h
8h
3h
20min
30min
1h
40min
SLOW COOKING
STEWING
1. Brown meat and vegetables (see “BROWN/ SAUTE/
SOFTEN/ BOIL” on page 9).
2. Boil the cooking liquid (see “BROWN/ SAUTE/
SOFTEN/ BOIL” on page 9).
3. Put the solid ingredients into the bowl, then add the
cooking liquid.
4. Close the lid.
5. Press .
6. The light will glow.
7. The display will show 8 hours, and count down.
8. At the end of the cooking time, the appliance will go
into “keep warm” mode.
9. The light will glow.
10. Press stop , open the lid, then remove the food.
1. Brown meat and vegetables (see “BROWN/ SAUTE/
SOFTEN/ BOIL” on page 9).
2. Boil the cooking liquid (see “BROWN/ SAUTE/
SOFTEN/ BOIL” on page 9).
3. Put the solid ingredients into the bowl, then add the
cooking liquid.
4. Close the lid.
5. Press .
6. The light will glow.
7. The display will show 1 hour, and count down.
8. At the end of the cooking time, the appliance will go
into “keep warm” mode.
9. The light will glow.
10. Press stop , open the lid, then remove the food.
USING THE MENU
GB GB
1 2 3 4 5 6 7 8 9 10 11 12 13 14 15 16 17 18 19 20
21 22 23 24 25 26 27 28 29 30 31 32 33 34 35 36 37 38 39 40

MEAT
TIMER
1. Rub the meat all over with cooking oil.
2. Rub any seasonings over the surface of the meat.
3. Put a tablespoon of cooking oil in the bowl.
4. Lay the meat in the centre of the bowl.
5. Close the lid.
COOKING TIME
6. Cooking time will depend on the type and weight of
food.
7. Don’t cook more than about 500g at a time.
8. We suggest cooking times of 10 minutes + 10
minutes per 100g of weight for beef.
9. Don’t cook pork or poultry for less than 30 minutes.
10. Cook meat ,poultry, and derivatives (mince,
burgers, etc.)till the juices run clear.
11. Cook fish till the flesh is opaque throughout.
12. Use the menu button to select .
13. The default time is 20 minutes.
14. You can use the “h” and “min” buttons while the
display time is blinking.
15. Use the “min” button to move the display through
the options, 10,15,20,25,30,35,40,45,50 and 55.
16. If you want to cook for 1 hour, press the “h” button.
17. To undo the 1 hour setting, press the “h” button
again, while the display time is blinking.
If you do nothing for 2 minutes, the appliance will
revert to standby mode.
18. When you have chosen the cooking time, the
appliance will go into “keep warm” mode.
19. The display will count down.
20. At the end of the cooking time, the appliance will go
into “keep warm” mode.
21. The light will glow.
22. Press stop , open the lid, then remove the food.
1. You may use the delay timer with the soup ,
yoghurt , bread , steam , and
porridge programs.
2. Do this immediately after setting the cooking time,
and before pressing start .
a) Press .
b) The light will glow, to remind you that you are
using the delay timer.
c) Decide when you want your food to be ready.
d) For example, if it is 2:00 now, and you want it to be
ready at 9:00, you must set the ready time to 7 hours.
e) Use the “h” and “min” buttons to set the ready time.
f) Press start .
GB GB
1 2 3 4 5 6 7 8 9 10 11 12 13 14 15 16 17 18 19 20
21 22 23 24 25 26 27 28 29 30 31 32 33 34 35 36 37 38 39 40

SOUP
YOGHURT
1. Brown meat and vegetables (see “BROWN/ SAUTE/
SOFTEN/ BOIL” on page 9).
2. Put the solid ingredients into the bowl, then add the
cooking liquid.
3. Close the lid.
4. Use the menu button to select
5. Choose the cooking time..
6. The default time is 1 hour.
7. You can use the “h” and “min” buttons while the display
time is blinking.
8. Use the “min” button to move the display through the
options, 10,15,20,25,30,35,40,45,50 and 55.
9. Use the “h” button to move the display through the
options, 1,2,3,4 and 5.
10. To undo the 5 hour setting, press the “h” button
again, while the display time is blinking.
If you do nothing for 2 minutes, the appliance will
revert to standby mode.
11. You have the option of using the timer with this
program (see TIMER).
12. Press start .
13. The display will count down.
14. At the end of the cooking time, the appliance will go
into “keep warm” mode.
15. The light will glow.
16. Press stop , open the lid, then remove the food.
Yoghurt culture
1. You may use 30ml (2 tablespoons) of:
a) Unflavoured live yoghurt-it must be fresh (look for a
long expiry date).
● Different brands will give different results.
b) Yoghurt you made previously.
● The bacteria weaken over time, so you can only do
this 10 times before using another new culture.
c) Freeze-dried yoghurt culture from a pharmacy of
health food shop.
● If the instructions on the culture package differ from
this guide, follow those on the package.
Milk
2. You will need 1 litre of milk.
3. Whole milk gives thicker yoghurt than low fat milk.
4. To make it even thicker, you may add up to 8
tablespoons of powdered milk.
5. You may also use reconstituted powdered milk, or
tinned evaporated milk.
Making yoghurt
6. You need to kill the bacteria in the milk, to prevent
GB GB
1 2 3 4 5 6 7 8 9 10 11 12 13 14 15 16 17 18 19 20
21 22 23 24 25 26 27 28 29 30 31 32 33 34 35 36 37 38 39 40

BREAD
them competing with the bacteria in the yoghurt
culture.
7. While you are heating the milk, let the yoghurt culture
get to room temperature.
8. Open the lid.
9. Use the STEAM (BROWN/SAUTE/SOFTEN/BOIL)
program to heat the milk to just below boiling.
10. Switch off when small bubbles form round the edges
of the bowl.
11. Leave the milk cool to between 37℃and 45℃.
12. Stir the yoghurt culture into the milk.
13. They must be thoroughly mixed, or the yoghurt will
be lumpy.
14. Close the lid.
15. Use the menu button to select
16. Choose the cooking time..
17. The default time is 1 hour.
18. You can use the “h” and “min” buttons while the
display time is blinking.
19. Use the “min” button to move the display through
the options, 10,15,20,25,30,35,40,45,50 and 55.
20. Use the “h” button to move the display through the
options, 6,7,8,9,and 10.
21. To undo the 10 hour setting, press the “h” button
again, while the display time is blinking.
If you do nothing for 2 minutes, the appliance will
revert to standby mode.
22. You have the option of using the timer with this
program (see TIMER).
23. Press start .
24. The display will count down.
25. At the end of the cooking time, the appliance will
go into standby mode.
26. It will not keep the yoghurt warm.
27. Press stop , open the lid, then remove the
food.
1. Defrost frozen dough thoroughly before use.
2. Don’t use more than 500g, or the dough might
overwhelm the appliance.
3. Wipe the bowl with cooking oil.
4. Put the dough into the bowl.
5. Close the lid.
6. Use the menu button to select
7. Choose the cooking time.
8. The default time is 3 hours.
9. You can use the “h” and “min” buttons while the
display time is blinking.
10. Use the “min” button to move the display through
the options, 10,15,20,25,30,35,40,45,50 and 55.
GB GB
1 2 3 4 5 6 7 8 9 10 11 12 13 14 15 16 17 18 19 20
21 22 23 24 25 26 27 28 29 30 31 32 33 34 35 36 37 38 39 40

11. Use the “h” button to move the display through the
options, 1,2,3,4, 5 and 6.
12. To undo the 6 hour setting, press the “h” button
again, while the display time is blinking.
If you do nothing for 2 minutes, the appliance will
revert to standby mode.
13. You have the option of using the timer with this
program (see TIMER).
14. Press start .
15. The display will count down.
16. At the end of the cooking time, the appliance will
go into “keep warm” mode.
17. The light will glow.
18. Press stop , open the lid, then remove the food.
FISH
1. Rub the fish all over with cooking oil.
2. Rub any seasonings over the surface of the fish.
3. Put a tablespoon of cooking oil in the bowl.
4. Lay the fish in the centre of the bowl.
5. Close the lid.
COOKING TIME
6. Cooking time will depend on the type and weight of
food.
7. Don’t cook more than about 500g at a time.
8. We suggest cooking times of 10 minutes per 100g of
weight.
9. Cook fish till the flesh is opaque throughout.
10. Use the menu button to select .
11. The default time is 20 minutes.
12. You can use the “h” and “min” buttons while the
display time is blinking.
13. Use the “min” button to move the display through
the options, 10,15,20,25,30,35,40,45,50 and 55.
14. If you want to cook for 1 hour, press the “h” button.
15. To undo the 1 hour setting, press the “h” button
again, while the display time is blinking.
If you do nothing for 2 minutes, the appliance will
revert to standby mode.
16. When you have chosen the cooking time, press
start .
17. The display will count down.
18. At the end of the cooking time, the appliance will
go into “keep warm” mode.
19. The light will glow.
20. It’s best to remove the food as soon as it has
cooked, to prevent it drying out.
21. Press stop , open the lid, then remove the
food.
GB GB
1 2 3 4 5 6 7 8 9 10 11 12 13 14 15 16 17 18 19 20
21 22 23 24 25 26 27 28 29 30 31 32 33 34 35 36 37 38 39 40

STEAMING
1. Fill the bowl with cold water up to the 6 mark.
2. Sit the basket inside the top of the bowl.
3. Put the food into the basket.
4. For uniform cooking, cut all pieces of food to roughly the
same size.
5. For peas, or anything that’ll break up or drop into the
water, make a parcel with aluminium foil.
6. Take care when removing the parcel-wear oven gloves
and use plastic tongs/ spoons.
7. Close the lid.
8. Use the menu button to select .
9. Choose the cooking time-these should cook within the 30
minute default time:
Food (fresh) quantity
Green beans 200g
Broccoli 200g
Brussels sprouts 200g
Cabbage quarter
Carrots (sliced) 200g
Corn cobs 2
Potatoes (quartered) 400g
Cooking times & food safety
10. Cook meat, poultry, and derivatives (mince, burgers, etc.)
till the juices run clear. Cook fish till the flesh is opaque
throughout.
11. You should cook leaf vegetables as little as possible, to
keep them green and crisp. Plunging them into iced water
will stop the cooking process.
12. The default time is 30 minutes.
13. You can use the “h” and “min” buttons while the
display time is blinking.
14. Use the “min” button to move the display through the
options, 30,35,40,45,50 and 55.
15. Use the “h” button to move the display through the
options, 1,and 2.
16. To undo the 2 hour setting, press the “h” button again,
while the display time is blinking.
If you do nothing for 2 minutes, the appliance will
revert to standby mode.
17. You have the option of using the timer with this
program (see TIMER).
18. Press start .
19. The display will count down.
20. At the end of the cooking time, the appliance will go
into “keep warm” mode.
21. The light will glow.
22. It’s best to remove the food as soon as it has cooked,
to prevent it going soggy.
23. Press stop , open the lid, then remove the food.
GB GB
1 2 3 4 5 6 7 8 9 10 11 12 13 14 15 16 17 18 19 20
21 22 23 24 25 26 27 28 29 30 31 32 33 34 35 36 37 38 39 40

BROWN/SAUTE/SOFTEN/BOIL
1. You may use the STEAMING program at its
default setting, with the lid open, as a high temperature
pan for 30 minutes, prior to cooking with another
program.
2. Use it with a little oil to brown meat and vegetables,
to sautée, to soften onions, celery, leeks, etc.
3. Use it with water or stock to pre-heat cooking liquids.
4. When you switch to the main program, the appliance
is warmed up, and some or all of your ingredients will
already be in the bowl.
5. You don’t then have to wash the pan you would have
used during preparation.
PORRIDGE/ RISOTTO
1. Use the cup to put the grain (rice, oatmeal, etc.) into
the bowl.
Porridge
a) Use the scale on the right, inside the bowl, which is
marked from ½ to1½
b) Don’t use more than 1½cups.
Congee
a) Use the scale on the centre, inside the bowl, which is
marked from 1 to 3.
b) Don’t use more than 3 cups.
2. Fill the bowl with water up to the number
corresponding to the number if cups of grain.
3. Close the lid.
4. Use the menu button to select .
5. Choose the cooking time.
6. The default time is 1 hour.
7. You can use the “h” and “min” buttons while the
display time is blinking.
8. Use the “min” button to move the display through the
options, 5,10,15,20,25,30,35,40,45,50 and 55.
9. Use the “h” button to move the display through the
options,1,2,3, and 4.
10. To undo the 4 hour setting, press the “h” button
again, while the display time is blinking.
If you do nothing for 2 minutes, the appliance will
revert to standby mode.
11. You have the option of using the timer with this
program (TIMER).
12. Press start .
13. The display will count down.
14. At the end of the cooking time, the appliance will go
into “keep warm” mode.
15. The light will glow.
16. Press stop , open the lid, then remove the food.
Risotto-follow the recipe on page 17
GB GB
1 2 3 4 5 6 7 8 9 10 11 12 13 14 15 16 17 18 19 20
21 22 23 24 25 26 27 28 29 30 31 32 33 34 35 36 37 38 39 40

CAKE
1. Defrost frozen dough thoroughly before use.
2. Don’t fill the bowl above the 6 mark on the left scale,
or the dough might overwhelm the appliance.
3. Wipe the bowl with cooking oil.
4. Put the dough into the bowl.
5. Close the lid.
6. Use the menu button to select .
7. Choose the cooking time..
8. The default time is 40 minutes..
9. You can use the “h” and “min” buttons while the
display time is blinking.
10. Use the “min” button to move the display through
the options, 30,35,40,45,50 and 55.
11. Use the “h” button to move the display through the
options, 1,and 2.
12. To undo the 2 hour setting, press the “h” button
again, while the display time is blinking.
If you do nothing for 2 minutes, the appliance will
revert to standby mode.
13. When you have chosen the cooking time, press start
.
14. The display will count down.
15. At the end of the cooking time, the appliance will go
into “keep warm” mode.
16. The light will glow.
17. It’s best to remove the food as soon as it has cooked,
to prevent it going soggy.
18. Press stop , open the lid, then remove the food.
KEEP WARM
CARE AND MAINTENANCE
● If you want to use the keep warm feature after a
program that doesn’t support it, then, when the only
thing showing on the display is the blinking light,
press
● Press stop to exit the feature.
1. Unplug the appliance and let it cool.
Remove the plug from the power socket, then
remove the connector from the power inlet on the
appliance.
2. With the lid closed, grip the top of the filter and lever it
out of the lid.
3. Turn it over, to expose the markings on the front edge.
4. Hold the filter lid fast, and turn the rest of the filter
towards the open padlock .
5. Press on the tabs at the bottom of the inner lid ,
and pull it off the appliance.
6. Hand wash all removable parts.
7. Wipes all surfaces with a clean damp cloth.
8. Don’t put any part of the appliance in s dishwater.
9. Reassemble the filter, and replace it in the lid.
10. Replace the inner lid in the lid.
GB GB
1 2 3 4 5 6 7 8 9 10 11 12 13 14 15 16 17 18 19 20
21 22 23 24 25 26 27 28 29 30 31 32 33 34 35 36 37 38 39 40

Recipes
“cup” means the 180ml rice measuring cup supplied with
the appliance
Veggie and couscous chilli
1 tbsp oil
1 large onion
2 cloves garlic
1 each of red, yellow and orange peppers
1 jar green jalapenos
1 tin cannellini beans
1 tin butter beans
1 tin chopped plum tomatoes
2 tbsp chilli powder
2 tbsp oregano
1 tsp ground coriander
2 tsp cumin
1 tsp tomato puree
1 tsp sugar
2 tbsp hot tomato sauce (Heinz fiery tomato sauce or
similar)
850ml vegetable stock
120-240ml conscous
To serve
Grated cheese
1 small tub sour cream
Small bunch coriander finely chopped
Firstly turn on your Multi Cooker, select the steam
program, and add the oil. Add the chopped onion and
garlic and let them soften, this should take a couple of
minutes. Then add the rest of the ingredients except the
couscous. Note: with the beans-rinse and drain before
adding to the cooker. Select the slow cook button. This
program is an 8 hour cycle-perfect if you are going out to
work. With around 30 minutes to go add the couscous. If
the cycle has already reached the end just select the
Steam setting again and leave for about 20 minutes. Serve
in a bowl with a handful of cheese a drizzle of sour cream
and s sprinkle of fresh coriander.
Top Tip: if you just want a classic veggie chilli, don’t put
the couscous in.
Home-made yoghurt in the multi cooker
1200ml whole milk
100ml plain yoghurt (full fat)
Flavor option
50g frozen mix summer berries
1 tbsp clear honey
Pour the milk into your Multi Cooker and select the steam
program. Allow the milk to heat up until it begins to
bubble at the edges. Turn the multi Cooker off and allow
the milk to cool to about 37 degrees.
Once the milk has cooled add the yoghurt and mix well,
removing all lumps. Select the yoghurt program. When
the program is complete take out and place in the fridge
to completely cool. Meanwhile, place the mixed berries in
a pan and heat gently, add the honey and cook until the
fruit begins to fall. Take off the heat and cool. Mix the fruit
GB GB
1 2 3 4 5 6 7 8 9 10 11 12 13 14 15 16 17 18 19 20
21 22 23 24 25 26 27 28 29 30 31 32 33 34 35 36 37 38 39 40

and the yoghurt together.
If you want to store your yoghurt you must sterilize the
jars you are going to use. Place them in the oven at
around 100 degrees for 10 minutes or so. You do not want
them in for too long as they could crack. The yoghurt will
last for up to a couple of weeks.
Fiery NY beef chilli
450g braising beef
1 tbsp olive oil
2 onions
3 garlic cloves
2 tbsp chilli powder
1 tbsp cayenne
1 tbsp smoked paprika or chipotle powder
2 tbsp tmato sauce
2 tins tomatoes
1 green pepper
1 bay leaf
1 tbsp salt
1 tsp pepper
1 tin kidney beans-add at the end
Large handful fresh basil
Peel and chop the onions and garlic. Chop the beef,
tomatoes and pepper into bite sized chunks. Place the oil
in your Multi Cooker and select the steam program. After
1 minute add the meat chunks and brown, turning
occasionally-leave the lid open so you can check the meat.
When browned slightly, take the meat out of the Multi
Cooker and leave in a bowl. Add the onions, garlic and all
the herbs to the oil in the Multi Cooker and stir well. When
the onions have softened, place the meat back into the
bowl. Then place everything but the kidney beans into the
bowl, stir well. Close the lid and select the stew option.
After an hour check the meat-if it is still a little tough, add
a little water so it does not go dry, and run the meat
program for an additional 30 minutes.
Moroccan fish tagine
1 onion, coarsely chopped
2 garlic cloves, finely chopped
1 red pepper, chopped or sliced in strips
2 sticks celery-sliced
2 tomatoes, chopped
1 tsp whole or ground cumin seeds
1 stp ground ginger
1 stp turmeric
1 cinnamon stick
1 tbsp harissa paste
120ml white wine
120ml fish stock
I pinch of saffron (or a tsp tomato puree)
675g fish-such as cod, salmon, finnan haddock
Salt and pepper to taste
1 lemon
Handful of green olives
Small bunch of coriander
*Most supermarkets do fish pie mixes- one of these would
GB GB
1 2 3 4 5 6 7 8 9 10 11 12 13 14 15 16 17 18 19 20
21 22 23 24 25 26 27 28 29 30 31 32 33 34 35 36 37 38 39 40

work o treat!
Add all of the ingredients except the coriander to your
Multi Cooker and select the fish program setting.
Depending on the size of your fish pieces cook for
between 40-60 minutes, until fish becomes flaky. Stir in
the chopped coriander, check the seasoning and serve
immediately. This would be great with couscous.
Split pea and ham hock soup
1150ml chicken stock
225g split peas
1 onion, diced small
2 carrots, diced small
1 celery stick, diced small
2 garlic cloves, minced
1 tbsp fresh thyme, finely chopped
1 bay leaf
1 ham hock
Pepper
Select the slow cook program on your Multi Cooker and
place the Ham Hock in the pot. Add the split peas, onion,
carrots, celery, garlic, thyme, bay leaf, and pour in the hot
chicken stock; season with pepper.
When the program has finished, remove ham hock from
pot. Discard skin and bones; dice meat.
Discard the bay leaf. Lightly mash peas with the back of a
wooden spoon. Return ham to soup and season to taste
with salt and pepper. Heaven in a bowl!
Top Tip: If it is a big hock you can keep some of the ham
back for sandwiches.
Salmon with a spicy rub
2 salmon fillets-skin on
1 tsp olive oil
1 tsp paprika
1 tsp chili powder
tsp cumin
Pinch salt and pepper
1 tsp soft brown sugar
1 lemon
Mix the paprika, chilli powder, cumin sugar and the salt
and pepper in a bowl. Take your Salmon fillets and
sprinkle on the rub. Turn on your Multi Cooker and select
the fish program. Add the oil to the bowl and after a
couple of minutes when the oil has heated add the fillets
skin down and close the lid. This is a great combination of
steaming and pieces of fish but you get a crispy skin.
Serve with a wedge of lemon- a great light meal.
Chocolate brownie cake
170g butter unsalted, melted
340g sugar
170g cocoa powder
75g plain flour
3 large eggs, lightly beaten
1 tsp vanilla essence
A good pinch salt
110g milk chocolate drops
Optional vanilla ice cream, for serving
GB GB
1 2 3 4 5 6 7 8 9 10 11 12 13 14 15 16 17 18 19 20
21 22 23 24 25 26 27 28 29 30 31 32 33 34 35 36 37 38 39 40

Line the bowl of your Multi Cooker with a large piece of
foil, and then generously butter the foil. Whisk together
the melted butter, sugar, cocoa powder, flour, eggs, vanilla
and the salt in a medium bowl. Fold in the chocolate
chunks. Scrape the batter out into the prepared insert in
an even layer. Close the lid and cook on the cake program.
You need to change the default time to 1 hour 30
minutes; the cake should be set around the edges and
slightly gooey in the centre.
Serve the cake warm, scooped into a bowl and topped
with ice cream.
Irish stew with goats cheese dumplings
For the stew:
1.8kg lamb shoulder
Olive oil
5 rashers streaky bacon, chopped into bite sized pieces
3 garlic cloves
Salt and pepper to taste
950ml lamb stock
1 large onion, diced
2 carrot, diced
2 celery sticks, diced
2 sprigs fresh rosemary
2 tbsp tomato puree
For the dumplings:
100g self raising flour
50g suet
1 tsp baking powder
1 tsp salt
5 tbsp water
40g soft goat’s cheese
1 tsp parsley, marjoram and thyme
1 tsp pepper
Take all the meat off the bone and chop into bite sized
chunks. Slice the bacon and chop the onion, carrots and
celery. Turn on your Multi Cooker and select the steam
program. Place the onions with the oil into the bowl and
cook for a few minutes until they soften. Add the meat ,
garlic, rosemary and the other vegetables, and cook for
about 5 minutes. Add the stock and the tomato puree and
select the stew option.
The dumplings: place the flour, herbs and suet into a bowl
add the water and then mix in the goat’s cheese. Portion
into 6 dumplings and leave to rest for 20 minutes.
In a cup add the cornflower and a little cold water and mix
until smooth.
When the stew has had 30 minutes left on the timer add
the cornflower mix and mix and stir well. Then place the
dumplings into the stew. Close the lid and leave until the
end of the program. A fabulous bowl of comfort food!
Note: if you do not have any cooked lamb-take a shoulder
and take the meat off the bone –chop into bite sized
chunks. Do as you would the cooked lamb but select the
slow cook option instead of the stew program. When
done, go back to the above recipe from the dumplings
moment.
GB GB
1 2 3 4 5 6 7 8 9 10 11 12 13 14 15 16 17 18 19 20
21 22 23 24 25 26 27 28 29 30 31 32 33 34 35 36 37 38 39 40

Steamed artichoke
2 globe artichoke
1 lemon
Fresh herb sprigs such as tarragon, mint, parsley and / or
thyme
1 clove garlic, peeled and sliced
Cut the top quarter off the artichokes, snap off and
discard any battered outer leaves. Rub the cut surfaces
with a slice of lemon. Cut the stem flush with the artichoke
body. Slice the remaining lemon and place that in the
steaming basket and of your Multi Cooker. Add the sprigs
of fresh herbs and the garlic to the basket and place the
Artichoke on top. Fill with water to the 2 level on the rice
scale on the inside of the bowl. Place the steaming basket
into the bowl and close the lid.
Select the steaming program. The artichoke is cooked
when the outer leaves can be easily removed. Serve the
artichoke warm or cold with a vinaigrette. Amazing!
Pearl barley and borlotti bean one-pot
1 tbsp olive oil
1 tin borlotti beans, drained and rinsed
1 onion, finely chopped
175g pearl barley
1 tin tomatoes chopped
1 tbsp tomato puree
Salt and pepper to taste
1ltr vegetable stock
125ml dry red wine
Handful of parsley, chopped
Hot chilli oil, to serve (optional)
Place the oil in your Multi Cooker and add the onion and a
pinch of salt; select the steam program and cook the
onions till soft. Add the wine and cook for a few minutes.
Add the pearl barley, and stir well until it begins to take on
the color of the wine. Stir in the beans, tomatoes, and hot
stock. Select the stew program. Check after 30 minutes
that there is enough liquid in the pot. Serve with a splash
of chilli oil and serve hot, either on its own or with some
fresh crusty bread.
Syrup sponge pudding
115g butter
100g caste sugar
2 eggs, beaten
tsp vanilla essence
175g self raising flour
2 tbsp milk
4 tbsp golden syrup
Grease a two pint oven-proof bowl or pudding basin.
In large bowl, cream together the butter and sugar. Add, a
little at a time, the beaten eggs, vanilla and flour, until well
mixed. Fold in milk to achieve a smooth consistency.
Pour the syrup into the bottom of prepared basin and
layer the mixture over the top. Cover the basin with baking
parchment and then with foil and tie with string to ensure
it. Place in your Multi cooker (make sure there is room all
around the bowl. Add boiling water to the Multi Cooker,
GB GB
1 2 3 4 5 6 7 8 9 10 11 12 13 14 15 16 17 18 19 20
21 22 23 24 25 26 27 28 29 30 31 32 33 34 35 36 37 38 39 40

about an inch lower than the lip of the bowl. Select the
Steam program for 1 to hours, or until pudding springs
back when touched, Invert onto serving plate and serve
warm. This is a great pudding any time of the year!!
White loaf
1 tbsp golden syrup
1 tbsp melted butter
320ml warm milk
1 sachet yeast
500g strong white flour
1 tsp salt
In a bowl, place the flour and salt and mix well. Add the
yeast sachet and add the melted butter and golden syrup.
Finally add the warm milk and knead into a ball. Add a
little extra flour if the mix ix very sticky. Cover and leave in
a warm place for 10 minutes. Take out and knead again
well. Place back in the bowl, cover and leave again for 10
minutes. Then place the bread in your Russell Hobbs Multi
Cooker and select the bread program. Check when the
display shows 2.30. Turn the bread over and cook for the
last 30 minutes-this will help to give the top of the loaf a
little colour and a crunch. Serve with lashing of butter.
Soda bread
1 packet soda bread mix
350ml water
Butter to grease the bowl
Firstly grease the base and lower sides of the machines
bowl with a little butter. This stops the bread from sticking
to the sides when baking. Turn on your Multi Cooker and
select the bread option. The default time of 3 hours will
show. Select the timer and reduce the time to 2 hours 15
minutes. In a large baking bowl place the packet mix and
the water and combine by hand. This will take a minute or
so. Then place the mix in the now warm bowl, it should
almost cover the entire base of the bowl. With a plastic
spatula divide the bread dough into quarters. Close the
lid. After 1 hour 45 minutes check on the bread- the base
should be golden brown and have a hollow sound to it
when tapped. Turn the loaf over and leave for the last half
an hour- this is so the top of the loaf becomes slightly
crispy. Take out and place in a cooling tray for as long as
you can resist the smell of warm bread. Eat with salted
butter on its own or with a meal.
Top Tip: don’t leave the bread in after it had finished
cooking as it will end up being a bit soggy.
Porridge
1 cups oats
Water
1 large tsp salt
2 tsp sugar
To serve
Dark muscovado sugar
Cream or milk
A small tot of whisky-optional
GB GB
1 2 3 4 5 6 7 8 9 10 11 12 13 14 15 16 17 18 19 20
21 22 23 24 25 26 27 28 29 30 31 32 33 34 35 36 37 38 39 40

Using the cup provided place two measures into the Multi
Cooker bowl. Add the salt and the sugar- this means you
get a good start to your end flavor from the start of the
cooking process. Fill with water to the 1 line on the bowl
marked porridge. Close the lid an select the porridge/
risotto option. It will take 1 hour. If you are doing less
reduce by 15 minutes per less oats. If you feel the urge
you can stir it during the process but only if you want to.
Top Tip: this batch will serve 6 easily so you can pop it in
the fridge once cooled and use it over a couple of days…
mmmm.
You could add chopped dried apricots or halved prunes
(stoned) into the mix when there are about 15 minutes left
to cook if you fancy an alternative to your porridge!
Nutty Porridge
cup rolled oats
Water
120ml milk
3 tbsp desiccated coconut
1 tsp cinnamon
To serve
Golden syrup
Nibbed almonds
Place the oats, cinnamon, milk, and coconut in your Multi
Cooker. Add enough water to reach the line on the
porridge scale. Select the porridge/ risotto program. When
finished, drizzle over a little golden syrup and sprinkle
nibbed almonds on the top. Serve immediately.
Multi-Cooker beetroot risotto
2 tbsp olive oil
400g beetroot, fresh
1 onions
2 cloves garlic
250g Arborio rice for risotto
250ml white wine
1 tsp thyme fresh
900ml vegetable or chicken stock
To finish
100g plain low fat yoghurt
1 tbsp parsley finely chopped
1 tbsp butter
Firstly turn your Multi Cooker and select the porridge/
risotto program. Finely chop the garlic cloves, onions and
peel and chop the beetroot into small cubes. Place them
into the Multi Cooker and sauté for around 10 minutes
until the onions have softened. Add the rice and stir well.
Close the lid and allow to cook for another 3-4 minutes.
Add the wine, stir and again allow to cook for 3-4 minutes.
Add the chopped thyme and hot stock. When the
program has finished, test the rice to make sure it is
cooked- it should have a slight bite to it but not hard. If
not quite done add a little water and extend the cooking
time for a couple of minutes. Stir in the butter-this gives
the risotto its shine. Serve with a dollop of the yoghurt
and sprinkle with parsley. This is a really good as a starter
or as a light lunch option.
GB GB
1 2 3 4 5 6 7 8 9 10 11 12 13 14 15 16 17 18 19 20
21 22 23 24 25 26 27 28 29 30 31 32 33 34 35 36 37 38 39 40

Savoury rice
2 cups of rice
Water
1 vegetable stock pot-dissolved
2 sticks celery, chopped
1 pepper, chopped
2 carrots, chopped
1 pinch saffron ( turmeric will do)
Optional
A handful of peas
Place the rice into the bowl and fill with water to the 2
mark on the Rice measurement in the bowl. Add the other
ingredients, stir thoroughly, then close the lid and select
the rice option. When the water had been absorbed the
machine will beep. If the rice is not quite done, leave of a
few minute with the lid closed to continue to steam.
Tomato big soup
1 onion chopped
1 tbsp olive oil
1 tin chopped tomatoes
2 tomatoes, chopped
1 sweet pointed pepper
1 pt hot chicken stock
2 medium potatoes, peeled and cubed
1 tsp mixed herbs
1 tbsp tomato puree
1 tsp cracked black pepper
Select the soup program on your Multi Cooker. Add the
oil and the chopped onion and pepper. Cook until the
onions are soft then add the other ingredients, stir well
and close the lid. Before serving check the flavours then
serve with crusty bread.
Chorizo, cabbage and apple soup
of a chorizo sausage, chopped small
1 onion, finely chopped
2 sticks celery, finely chopped
2 carrots, finely chopped
2 tomatoes, roughly chopped
spring cabbage, finely chopped
2 garlic cloves. Finely chopped
1 tbsp tomato puree
1 tsp cayenne pepper
A good pinch salt and pepper
850ml vegetable stock
Place the chorizo, onion and garlic into your Russel Hobbs
Multi Cooker and select the steam program. Once the
onions have softened after a couple of minutes add all the
other ingredients and stir well. Close the lid and select the
soup program. This is a great soup and if you leave it
overnight in the fridge, the flavor will develop further.
Chicken with tomatoes and mushrooms
2 chicken breasts
1 tsp olive oil
450g brown mushrooms, chopped
GB GB
1 2 3 4 5 6 7 8 9 10 11 12 13 14 15 16 17 18 19 20
21 22 23 24 25 26 27 28 29 30 31 32 33 34 35 36 37 38 39 40
Table of contents
Languages:
Other AIGOSTAR Kitchen Appliance manuals

AIGOSTAR
AIGOSTAR 300100XQC User manual

AIGOSTAR
AIGOSTAR 30KDF User manual

AIGOSTAR
AIGOSTAR 8433325185879 User manual

AIGOSTAR
AIGOSTAR 300005CFO User manual

AIGOSTAR
AIGOSTAR 300002CEX User manual

AIGOSTAR
AIGOSTAR 02074SM01 700W-S User manual

AIGOSTAR
AIGOSTAR 30JDA User manual

AIGOSTAR
AIGOSTAR 30JIL User manual

AIGOSTAR
AIGOSTAR 30CEU User manual

AIGOSTAR
AIGOSTAR 8433325500290 User manual