Akai AR175D User manual

1
MANUAL DE UTILIZARE
RADIOCEAS CU AFISAJ DUAL
1.SIGURANTA
1.1 Inainte de Utilizare
Acest radio cu ceas reda muzica de la radio.Functionarea ceasului include program de alarma si somn.
Cititi cu atentie acest manual.
1.2 Etichetele manualului.
ATENTIE
Atentie ! Pentru a reduce riscul electrocutarii, nu
indepartati carcasa, nu umblati in interiorul aparatului,
adresati-va personalului calificat.

2
Acest simbol avertizeaza in privinta existentei unor tensiuni periculoase in interiorul
aparatului care sunt suficient de puternice pentru a provoca electrocutarea.
Acest semn indica utilizatorului existenta unor operatiuni si instructioni deosebite legate
de intretinere.
1.3 Instructiuni generale de siguranta
Nu impingeti aparatul.Poate sa cada si sa cauzeze raniri.
Nu lasati sa curga nici un lichid in interiorul aparatului.
Nu lasati sa patrunda obiecte metalice prin fantele de aerisire.
Nu blocati fantele de aerisire.
Acest aparat are dubla izolatie :de aceea nu este necesara impamantarea.Verificati numai daca
tensiunea de alimentare locala corespunde cu cea de pe eticheta aparatului.
2.Pregatirea pentru folosire
2.1 Despachetarea
Despachetati aparatul cu grija
Verificati continutul conform celor de mai jos.Daca lipseste ceva contactati magazinul.
Indepartati eticheta de pe panoul fata cu grija daca exista.
Se recomanda sa pastrati ambalajul original si materialele de ambalaj in caz ca sunt necesare
ulterior.Este singurul mod de a proteja aparatul la transport.Daca aruncati totusi ambalajul aveti grija
sa-l reciclati.
2.2 Continutul ambalajului
Urmatoarele componente sunt incluse in ambalajul primit:
1. Radio cu ceas
1Manual de utilizare.
3.Instalare
* Asezati aparatul pe o suprafata neteda orizontala
* Conectati aparatul la retea.
ATENTIE!
*Nu asezati aparatul langa surse de caldura,
*Nu expuneti aparatul direct in lumina soarelui.
3.1 Bateria de Siguranta
In caz de intrerupere a energiei electrice
aparatul este prevazut cu o alimentare de
siguranta.formata din doua baterii (AA)
*Bateriile nu se livreaza cu aparatul
*Bateriile nu sunt necesare in functionare
normala.
3.1 Instalarea bateriilor
*Deschideti usa compartimentului bateriilor
*Introduceti bateriile si conectati-le urmarind respectarea polaritati + si – .
*Asezati la loc usa compartimentului.
ATENTIE!
Instalarea incorecta a bateriilor poate conduce la curgerea acestora ,corodarea si defectarea
aparatului.Corodarea ,oxidarea ,curgerea bateriei sau orice defectare gradata de aceasta natura anuleaza
garantia.

3
4.FUNCTII
1.Buton RADIO
2.Buton REV
3.Buton FWD
4. Buton OFF
5.Buton Verificare timp alarma
6.Afisaj
7. Afisor timp alarma
8.Buton TUNING
9.Butonul VOLUME
10. Butonul SNOOZE
11.Butonul WAKE 1
12.Butonul WAKE 2
13.Butonul SET
14. Buton SLEEP
15. Comutator BRIGHTNESS
16.Comutator BAND
4.1 AFISAJUL
17. Indicator ALARM 1 (ton)
18. Indicator ALRAM 1 (muzica)
19.Indicator ALARM 2 (muzica)

4
20. Indicator ALARM 2 (ton)
5. FUNCTIONAREA
*Pentru a porni aparatul, apasati butonul RADIO(1)..Pentru a opri aparatul ,apasati butonul OFF (4)
*Pentru a regla nivelul volumului ,rotiti butonul VOLUME(9) la pozitia dorita
*Pentru a fixa stralucirea afisajului ,mutati comutatorul BRIGHTNESS(15) pe pozitia LO(joasa) sau
HI(inalta)
5.1 Functiile ceasului.
Cu functia ceas pot fi programati urmatorii parametrii:
-timpul curent
-timpul de alarma
Programarea orei curente
Pentru programarea timpului aparatul trebuie oprit (OFF)
Mutati comutatorul SET (13) pe pozitia TIME(timp).
Apasati butonul FWD (3) sau butonul REV(2) pana la fixarea timpului dorit
Mutati comutatorul SET (13) pe pozitia LOCK pentru a confirma programarile.
Programarea timpului de alarma.
Sunt accesibile programarile a doi timpi de alarma (ALARM 1 si ALARM 2)
Pentru programarea ALARM 1:
Mutati comutatorul SET (13) pe pozitia WAKE 1
Apasati butonul FWD (3) sau butonul REV(2) pana la obtinerea timpului dorit.
Mutati comutatorul SET (13) pe pozitia LOCK pentru confirmarea programarilor.
Pentru a programa ALARM 2
Mutati comutatorul SET (13) pe pozitia WAKE 2
Apasati butonul FWD (3) sau butonul REV(2) pana la obtinerea timpului dorit.
Mutati comutatorul SET (13) pe pozitia LOCK pentru confirmarea programarilor
ATENTIE!
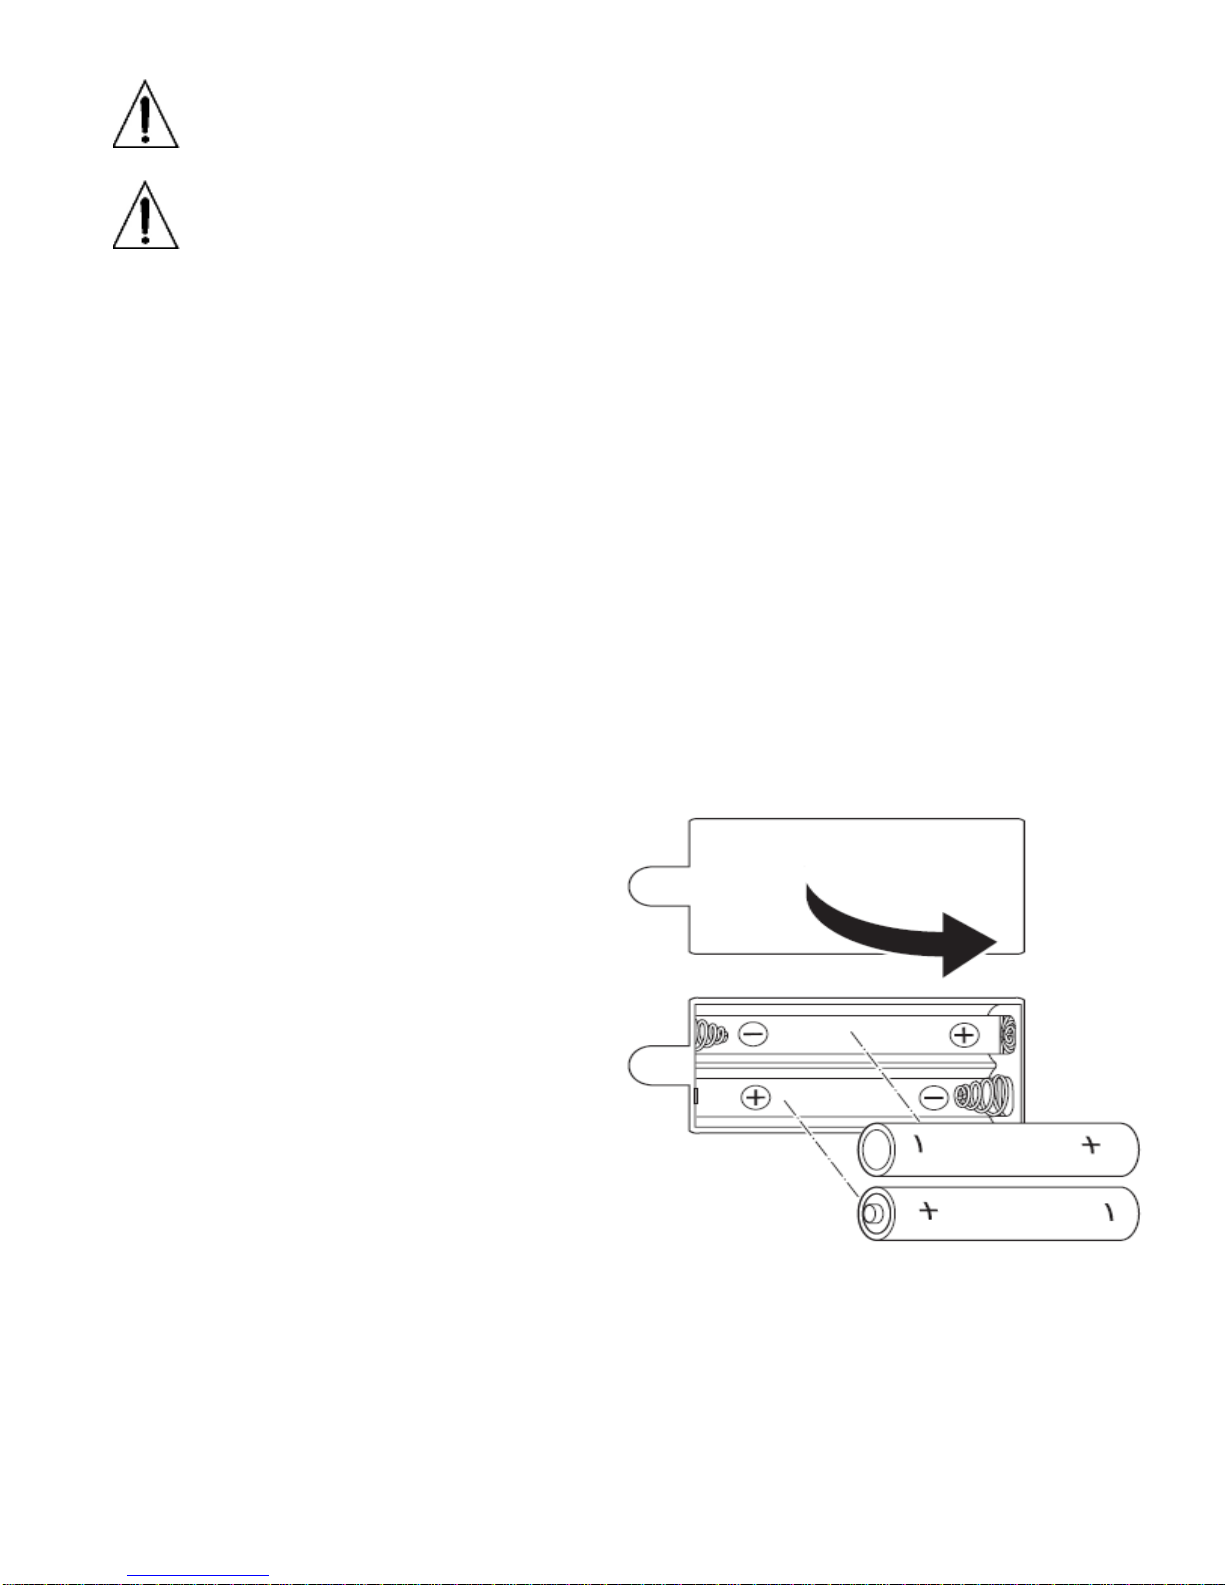
Daca se intrerupe accidental alimentarea cu energie electrica, sau ati decuplat aparatul de la retea se
pierde programarea timpului,daca nu ati instalat o bateriile de siguranta .
5.2 Functiile radio
Pentru a alege o banda radio ,mutati comutatorul BAND (16) pe pozitia AM sau FM.
Pentru a alege o frecventa sau un post radio ,rotiti butonul TUNING (8) pana la obtinerea
freceventei dorite.
ATENTIE!
Pentru imbunatatirea receptiei FM rotiti aparatul.
5.3 Folosirea functiei SLEEP
Alegeti postul radio dorit.
Apasati butonul SLEEP(14) .Timpul sleep (90 min) palpaie pe afisaj.
Apasati butonul repetat pana la programarea timpului dorit (90/60/30/15min ,OFF).
Aparatul se opreste din redare dupa ce s-a atins timpul programat.
Pentru a verifica timpul ramas ,apasati butonul SLEP(14) .
Pentru a anula timpul ,apasati butonul SLEEP pana la aparitia mesajului “OFF” pe afisaj (7)
.Alternativ apasati butonul OFF(4).
5.4 Functia alarma
Aparatul creste gradual volumul la alarma in primele 45 secunde dupa declansare.
Functia este accesibila pe radio si modul ton.Pentru alarma pe radio.
Porniti aparatul.
Alegeti postul radio dorit.

5
Reglati volumul
Opriti aparatul
Pentru a activa ALARM 1:
Alegeti modul alarma (radio sau ton) .Apasati butonul WAKE 1 (11) o data pentru alarm ape
ton. Apasati butonul de doua ori pentru alarma pe radio.
-Pentru alarma ton indicatorul (17) este ON(pornit)
-Pentru alarma radio indicatorul (18) este ON.
Pentru a anula alarma ,apasati butonul WAKE 1 (11) o data
Pentru a activa ALARM 2:
Alegeti modul alarma (radio sau ton) .Apasati butonul WAKE 2 (12) o data pentru alarma pe
ton. Apasati butonul de doua ori pentru alarma pe radio.
-Pentru alarma ton indicatorul (20) este ON(pornit)
-Pentru alarma radio indicatorul (19) este ON.
Pentru a anula alarma ,apasati butonul WAKE 2 (12) o data.
Verificarea timpului de alarma,
Apasati butonul (5) pentru a verifica timpul de alarma .
-Pentru a verifica ALARM 1 apasati butonul o data.
-Pentru a verifica ALARM 2 apasati butonul inca o data.
Daca timpul este activat ,timpul de alarma apare pe afisaj (7). Daca timpul nu este activat
,mesajul “OFF” apare pe afisaj (7).
Oprirea(snooze) alarmei
Pentru a opri alarma ,apasati o data butonul SNOOZE (10).Alarma suna din nou dupa ce timpul
snooze a trecut.
Pentru a opri alarma ,apsati butonul RADIO(1) .Alarma este automat programata pentru ziua
urmatoare.
Fixarea snooze alarm.
Din fabricatie oprirea timpului de alarma este 9 minute.
Apasati si mentineti apasat butonul SNOOZE (10)
Apasati butonul FWD (3) sau butonul REV(2) pentru a fixa timpul snooze in gama 1 ~ 30
minute.
Eliberati butonul SNOOZE (10).Timpul snooze este fixat.
6.Curatarea si intretinerea
ATENTIE!
Inainte de orice curatare sau operatie de intretinere ,opriti si decuplati de la retea aparatul.
Curatati exteriorul aparatului cu o carpa moale.Daca aparatul este foarte murdar ,muiati carpa in
apa cu solutie neutrala.
7.Probleme
________________________________________________________________________
Problema Actiunea
________________________________________________________________________
Fara afisaj Porniti aparatul
Conectati aparatul corect
Selectati functia corecta cu comutatorul BAND (16).
Fara sunet Conectati corect aparatul la retea.
Reglati volumul
Reglati butonul de acord
________________________________________________________________________

6
8.Date Tehnice
Parametrii Value
Tensiune 230 Vac~50Hz
Tensiune baterie 2 x 1,5V
Putere consumata 6 W
Putere consumata in standby 2,3 W
Putere max de iesire 0,22 W
Benzi radio AM/FM
________________________________________________________________________
Frecventa radio
AM 520 – 1630 kHz
FM 87,5 – 108 Mhz
9. Reciclarea ecipamentelor electrice si electronice uzate
Acest simbol prezent pe produs sau pe ambalaj semnifica faptul ca produsul
respectiv nu trebuie tratat ca un deseu menajer obisnuit .Nu aruncati aparatul la
gunoiul menajer la sfarsitul duratei de functionare ,ci duceti-l la un centru de
colectare autorizat pentru reciclare .In acest fel veti ajuta la protejarea mediului
inconjurator si veti putea impidica eventualele consecinte negative pe care le-ar
avea asupra mediului si sanatatii umane.
Pentru a afla adresa celui mai apropiat centru de colectare :
-Contactati autoritatile locale ;
-Accesati pagina de internet :www.mmediu.ro
-Solicitati informatii suplimentare de la magazinul de unde ati achizitionat
produsul

Clockradio with dual display
AR175D
GB 2
NL 12
FR 23
ES 34
DA 66
DE 44
EL 55
User manual
Gebruiksaanwijzing
Manuel de l’utilisateur
Manual de instrucciones
Gebrauchsanleitung
Οδηγίες χρήσεως
Brugsanvisning

2
Table of contents
Copyright notice
Design and specifications are subject to change without notice.
1. Safety...........................................................................3
1.1 Intended use....................................................................3
1.2 Labels in this manual.......................................................3
1.3 General safety instructions ..............................................3
2. Preparations for use...................................................4
2.1 Unpacking........................................................................4
2.2 Package contents ............................................................4
3. Installation...................................................................4
3.1 Battery backup.................................................................5
4. Functions..................................................................... 6
4.1 Display.............................................................................7
5. Operation.....................................................................7
5.1 Clock functions.................................................................7
5.2 Radio functions................................................................8
5.3 Setting the SLEEP function..............................................8
5.4 Alarm function..................................................................9
6. Cleaning and maintenance......................................10
7. Troubleshooting........................................................ 10
8. Technical data...........................................................10
9. Disposal of used electrical and electronic
equipment.................................................................. 11

3
AR175D
Safety1.
Intended use1.1
The Clockradio plays music from radio. The clock function includes an alarm
and sleep program. Read the manual carefully before the first use.
Labels in this manual1.2
!WARNING
A warning means that injury or death is possible if the instructions
are not obeyed.
!CAUTION
A caution means that damage to the equipment is possible.
iA note gives additional information, e.g. for a procedure.
General safety instructions1.3
!WARNING
Do not put force on the appliance. The appliance can fall and can
cause serious injury.
!CAUTION
Do not spill any liquid on the appliance.
!WARNING
Do not insert any objects in the ventilation holes.
!CAUTION
Do not block the ventilation holes.
iThis appliance is double insulated; therefore no earth wire is
required. Always check that the mains voltage corresponds to the
voltage on the rating plate.

4
Preparations for use2.
Unpacking2.1
●Unpack the appliance carefully.
●Check the package contents as described below. If any item is missing,
please contact your reseller.
●Remove the labels from the front panel carefully if present.
iWe recommend that you retain the original carton and packing
materials in case it ever becomes necessary to return your product
for service. This is the only way to safely protect the product against
damage in transit. If you do dispose of the carton and the packing
materials, please remember to recycle with due care to the
environment.
Package contents2.2
The following items are included in the received package:
1 Clockradio
1 Operator manual
iIf any item is missing, please contact your reseller.
Installation3.
●Put the appliance on a horizontal flat surface.
●Connect the appliance to the mains.
!
CAUTION
●Do not put the appliance near a heat source.
●Do not expose the appliance to direct sunlight.

5
AR175D
iThis appliance is equipped with rubber feet to prevent it from
moving. The feet are made from non-migrating material specially
formulated to avoid leaving any marks or stains on furniture.
However, certain types of furniture polishes, wood preservatives or
cleaning sprays cause the rubber to soften and leave marks or
a residue on the furniture, and potentially risk the surface to
become damaged. To prevent damage to wooden surfaces, we
recommend that you apply self-adhesive pads to the bottom of the
rubber feet before installation.
Battery backup3.1
In case of a power failure,
the appliance relies on battery
backup. For this purpose, the
appliance uses two batteries (AA).
The appliance remembers the time,
but does not display it.
i
●Batteries are not included with this
appliance.
●Batteries are not necessary for
normal operation.
Install batteries
●Remove the battery cover.
●Insert the batteries matching the (+) and (-) polarity markings.
●Re-install the battery cover.
!CAUTION
Incorrect installation can cause battery leakage and corrosion
which will damage the appliance. Corrosion, oxidation, battery
leakage and any other gradually acidic defect of this nature will
invalidate the guarantee.

6
Functions4.
1 2 3 4 5 6 7
8
9
10
16
11
12
13
15
14
1 RADIO button
2 REV button
3 FWD button
4 OFF button
5 Alarm time check button
6 Display
7 Alarm time display
8 TUNING dial
9 VOLUME dial
10 SNOOZE button
11 WAKE1 button
12 WAKE2 button
13 SET switch
14 SLEEP button
15 BRIGHTNESS switch
16 BAND switch

7
AR175D
Display4.1
17 ALARM1 indicator (tone)
18 ALARM1 indicator (music)
19 ALARM2 indicator (music)
20 ALARM2 indicator (tone)
Operation5.
●To switch on the appliance, press the RADIO button (1). To switch off the
appliance, press the OFF button (4).
●To adjust the volume level, turn the VOLUME dial (9) until the desired
level is set.
●To set the display brightness, slide the BRIGHTNESS switch (15) to the
LO (low) or HI (high) position.
Clock functions5.1
With the clock function, the following parameters can be set:
- current time
- alarm time
Setting the current time
iTo set the time, the appliance must be switched OFF.
●Slide the SET switch (13) to the TIME position.
●Press the FWD button (3) or the REV button (2) until the desired time is set.
●Slide the SET switch (13) to the LOCK position to confirm the setting.
19
20
18
17

8
Setting the alarm time
Two time slots are available (ALARM1 and ALARM2).
To set ALARM1:
●Slide the SET switch (13) to the WAKE1 position.
●Press the FWD button (3) or the REV button (2) until the desired time is set.
●Slide the SET switch (13) to the LOCK position to confirm the setting.
To set ALARM2:
●Slide the SET switch (13) to the WAKE2 position.
●Press the FWD button (3) or the REV button (2) until the desired time is set.
●Slide the SET switch (13) to the LOCK position to confirm the setting.
iDuring a power failure, or when unplugging the appliance, the time
settings are lost, unless backup batteries are installed.
Radio functions5.2
●To select the radio band, slide the BAND switch (16) to the AM or FM
position.
●To select a frequency or radio station, turn the TUNING dial (8) until the
desired frequency is set.
iTo improve the reception of the frequency, turn the appliance.
Setting the SLEEP function5.3
●Select the desired radio station.
●Press the SLEEP button (14). The sleep time (90 min) flashes on the display.
●Press the button repeatedly until the desired setting is found
(90/60/30/15 min, OFF).
The appliance stops playing after the chosen time has elapsed.
●To check the remaining time, press the SLEEP button (14).
●To cancel the SLEEP function, press the SLEEP button (14) until
the message "OFF" appears on the display (7). Alternatively, press the
OFF button (4).

9
AR175D
Alarm function5.4
The appliance gradually builds up the wake-up volume during the first
45 seconds after the alarm time.
This function is available in radio and tone mode. For radio alarm:
●Switch on the appliance.
●Select the desired radio station.
●Adjust the volume.
●Switch off the appliance.
To activate ALARM1:
●Choose the alarm mode (radio or tone). Press the WAKE1 button (11)
once to wake up by tone. Press the button twice to wake up by radio.
- For tone alarm, the indicator (17) is ON.
- For radio alarm, the indicator (18) is ON.
●To cancel the alarm, press the WAKE1 button (11) once.
To activate ALARM2:
●Choose the alarm mode (radio or tone). Press the WAKE2 button (12)
once to wake up by tone. Press the button twice to wake up by radio.
- For tone alarm, the indicator (20) is ON.
- For radio alarm, the indicator (19) is ON.
●To cancel the alarm, press the WAKE2 button (12) once.
Check the alarm time
●Press the alarm time check button (5).
- To check ALARM1, press the button once.
- To check ALARM2, press the button once again.
●If the time slot is activated, the alarm time appears on the display (7).
If the time slot is not activated, the message "OFF" appears on the display
(7).
Snooze alarm
●To snooze the alarm, press the SNOOZE button (10) once.
The alarm sounds again after the snooze time has elapsed.
●To stop the alarm, press the RADIO button (1). The alarm is automatically
set for the next day.

10
Set the snooze alarm
The default snooze time is: 9 minutes.
●Press and hold the SNOOZE button (10).
●Press the FWD button (3) or the REV button (2) to set the snooze time
(1-30 minutes).
●Release the SNOOZE button (10). The snooze time is set.
Cleaning and maintenance6.
!WARNING
Before performing any cleaning or maintenance, switch off and
unplug the appliance.
●Clean the outside of the appliance with a soft cloth. When the appliance is
very dirty, dampen the cloth slightly with water and a neutral solution.
Troubleshooting7.
Trouble Action
No display Switch on the appliance.
Connect the appliance properly.
Select the correct function with the BAND switch (16).
No sound Connect the appliance properly.
Adjust the volume.
Adjust the tuning control.
Technical data8.
Parameter Value
Voltage 230 V
AC
~ 50 Hz.
Backup voltage 2 x 1,5 V
Power consumption 6 W
Standby power consumption 2,3 W
Max power output 0,22 W
Radio bands AM/FM
Dimensions (W x H x D) 185 x 110 x 80 mm
Weight 518 g

11
AR175D
Frequency range
Parameter Value
AM radio 520 - 1630 kHz
FM radio 87,5 - 108 mHz
Disposal of used electrical9. and electronic equipment
Z
The meaning of the symbol on the material, its accessory or packaging
indicates that this product shall not be treated as household waste. Please,
dispose of this equipment at your applicable collection point for the recycling
of electrical and electronic equipments waste. In the European Union and
Other European countries which there are separate collection systems for
used electrical and electronic product. By ensuring the correct disposal of
this product, you will help prevent potentially hazardous to the environment
and to human health, which could otherwise be caused by unsuitable waste
handling of this product. The recycling of materials will help conserve natural
resources. Please do not therefore dispose of your old electrical and
electronic equipment with your household waste.
For more detailed information about recycling of this product, please contact
your local city office, your household waste disposal service or the shop
where you purchased the product.
For more information and warranty conditions, please visit: www.akai.eu
Table of contents
Languages:
Other Akai Clock Radio manuals