Akai ad200h User manual


Table of contents
Copyright notice
Design and specications are subject to change without notice.
1. Safety........................................................................... 3
1.1 Intended use ....................................................................3
1.2 Labels in this manual .......................................................3
1.3 General safety instructions ..............................................4
2. Preparations for use................................................... 4
2.1 Unpacking ........................................................................4
2.2 Package contents ............................................................5
3. Installation................................................................... 5
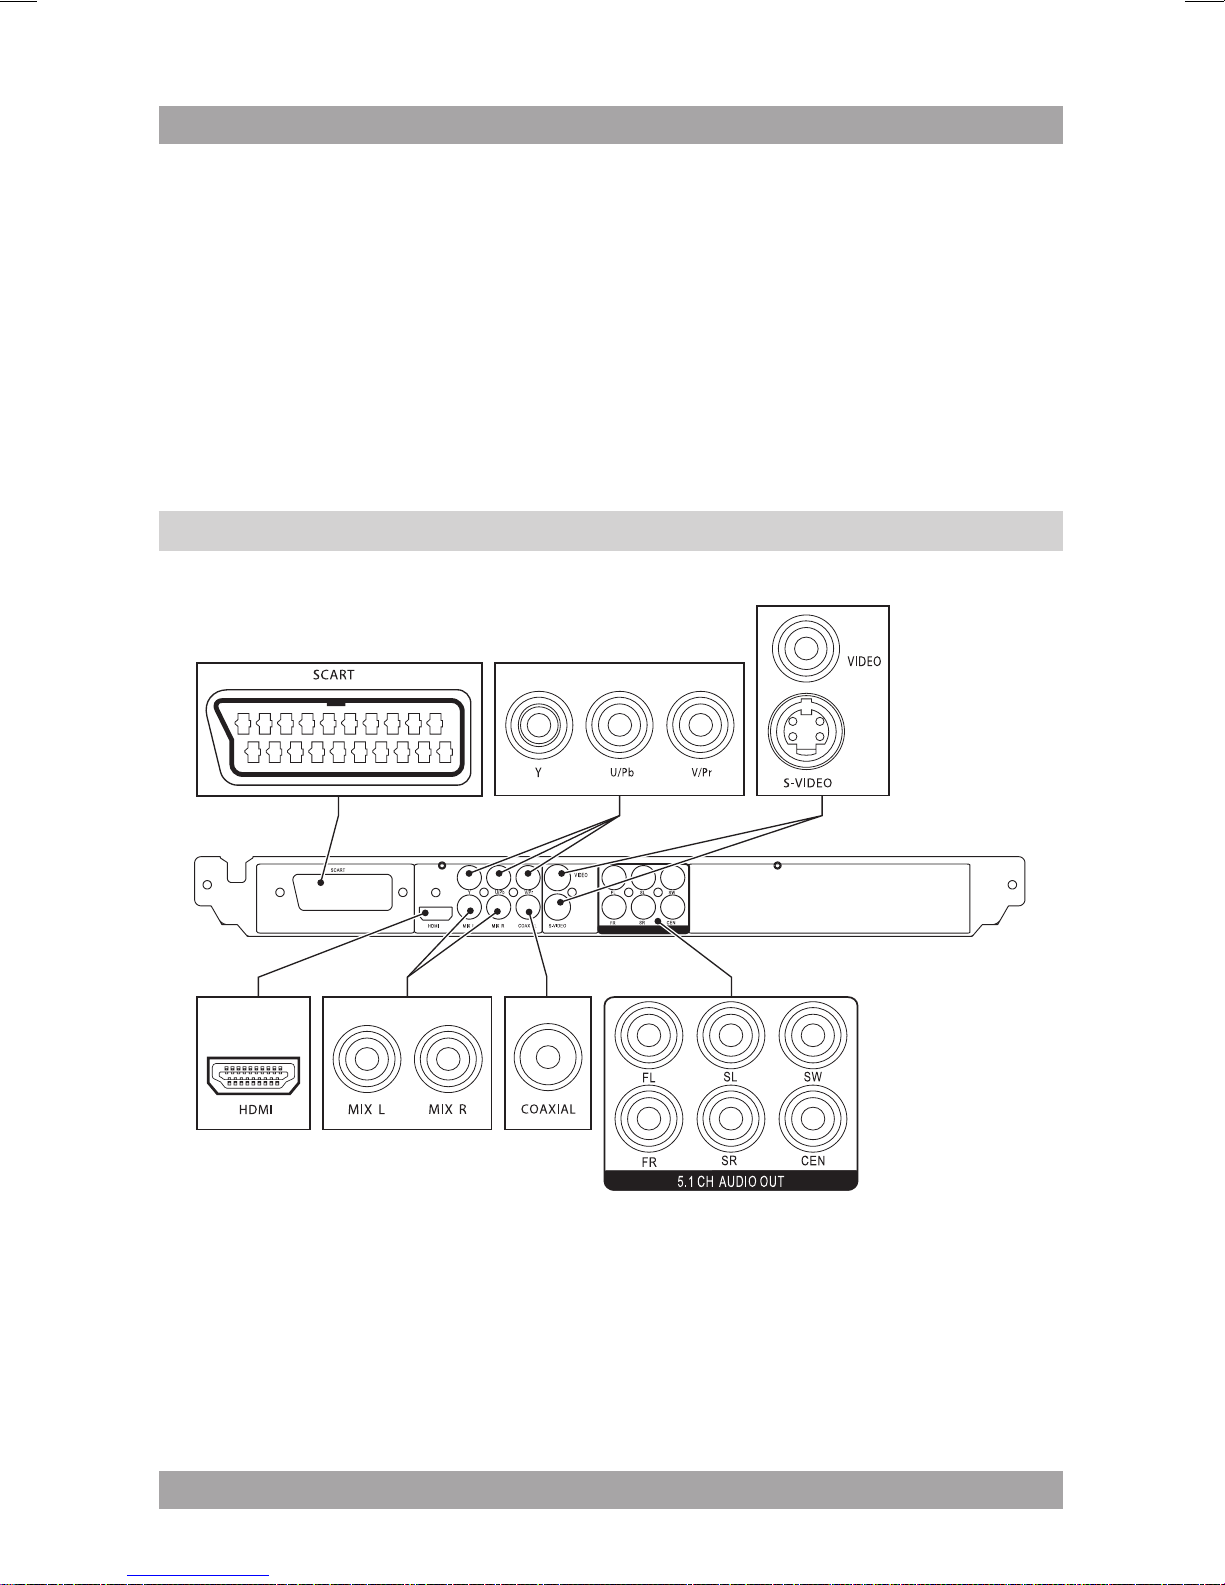
3.1 Connecting random equipment ........................................6
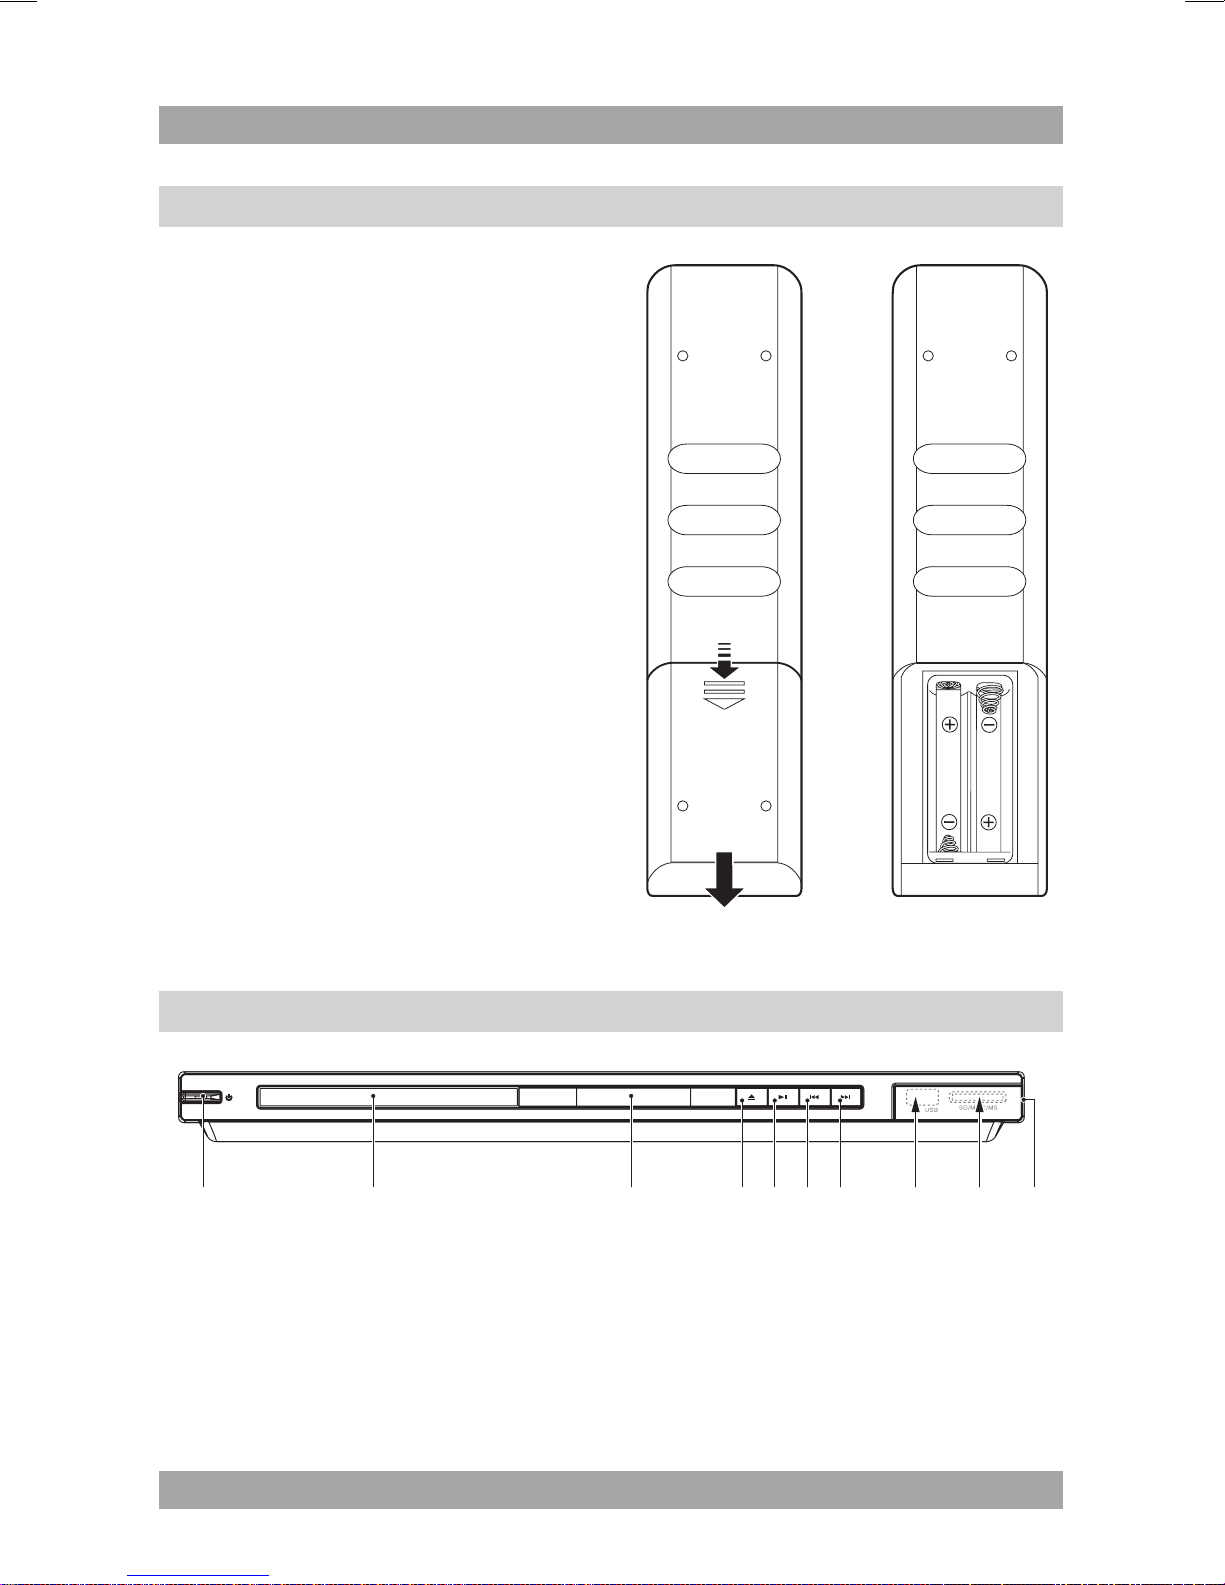
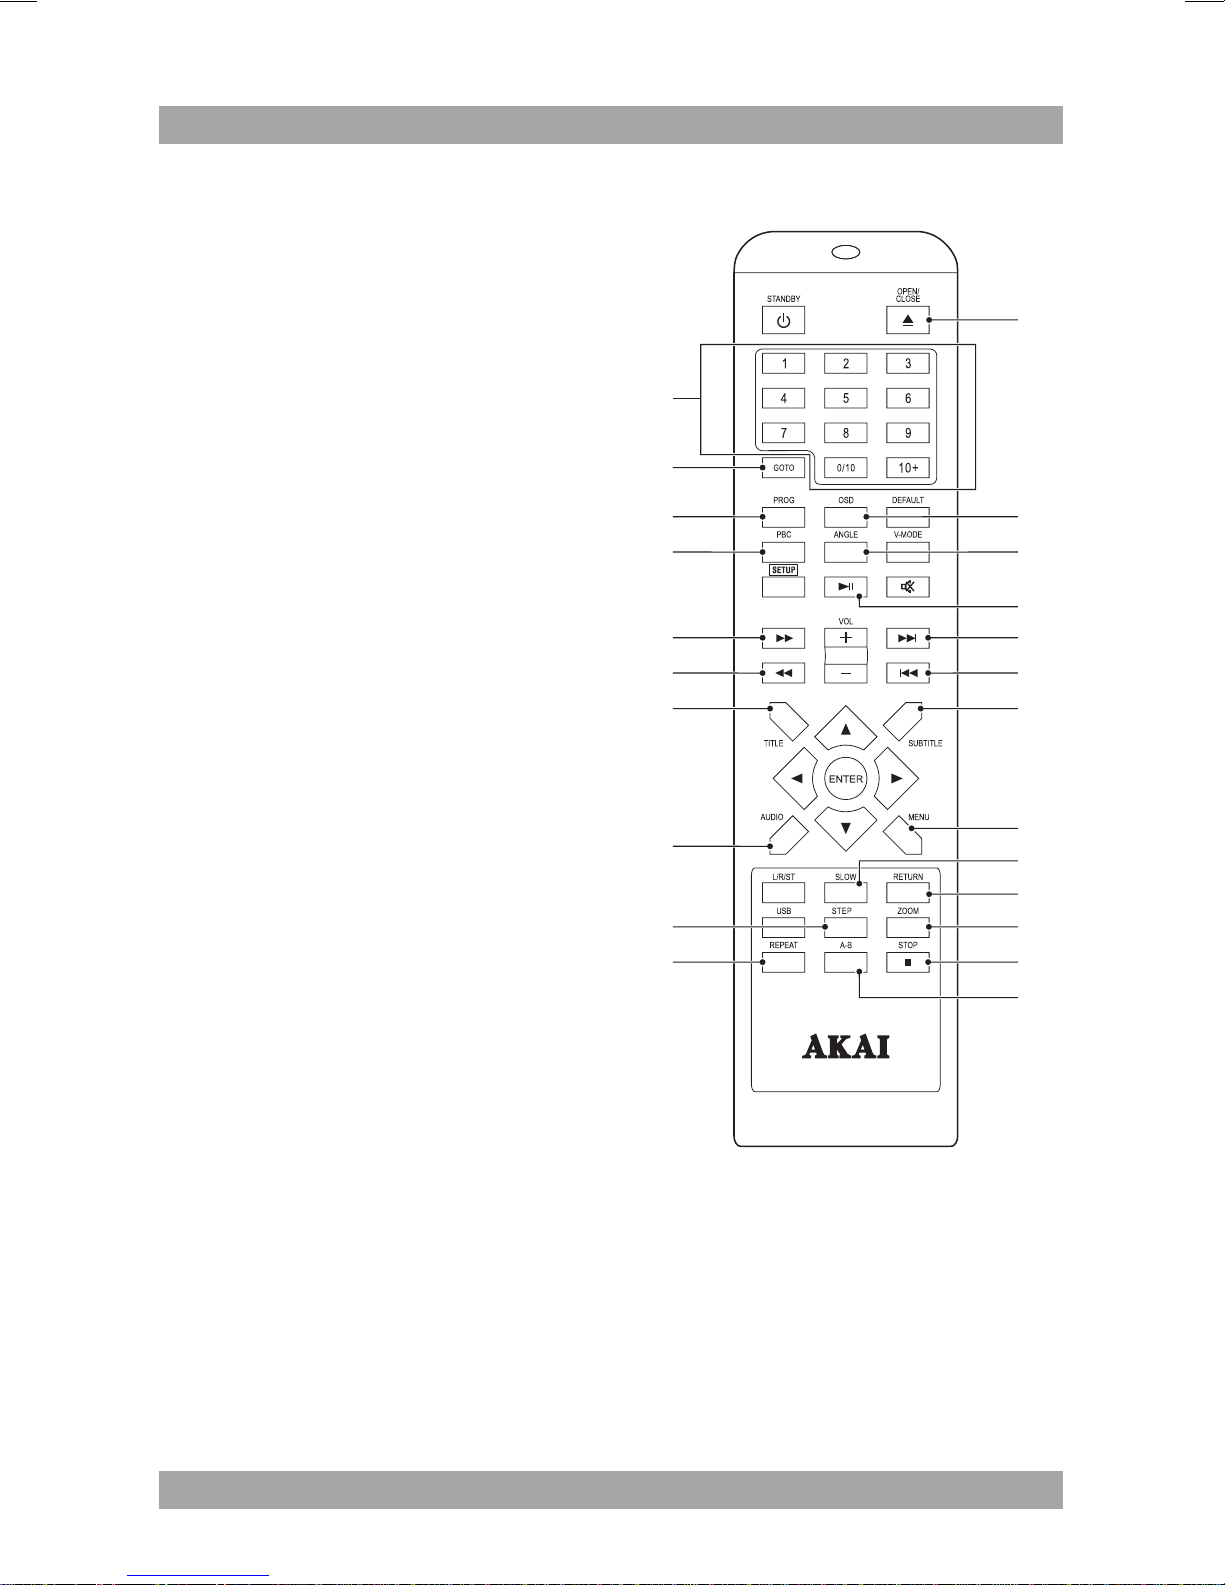
3.2 Remote control.................................................................8
4. Functions..................................................................... 8
4.1 DVD Player ......................................................................8
4.2 Remote control.................................................................9
5. Operation................................................................... 11
5.1 Quick start ......................................................................11
5.2 DVD/CD functions ..........................................................12
5.3 USB functions ................................................................15
5.4 SD/MMC functions .........................................................16
5.5 General setup menu operation ......................................16
6. Cleaning and maintenance ...................................... 22
6.1 Handle and care of a disc ..............................................22
7. Troubleshooting........................................................ 22
8. Technical data........................................................... 24
9. Disposal of used electrical
and electronic equipment ........................................ 26

3
AD200H
Safety1.
Intended use1.1
The DVD Player plays lm and photos from DVD, USB and memory card.
The appliance also plays music from CD and photos from Kodak picture CD.
Read the manual carefully before the rst use.
i Due to the great variety of products with external memory
connection (USB, SD/MMC, etc.) and their sometimes quite
manufacturer-specic functions we can neither guarantee that all
devices will be recognised, nor that all operating options that are
possible in theory will actually work.
2 DVDs and DVD appliances are manufactured under the worldwide
agreed DVD regional code system that the appliance will operate
only with corresponding disc of the same regional code. If the code
number on the label of a DVD does not match that on the label
alongside, the DVD will not play on this appliance.
i The appliance has built-in copyright protection technology that
prevents copying from a disc to any media. If a video recorder is
connected to the appliance, the video output image will be distorted
during recording.
D Manufactured under license from Dolby Laboratories. "Dolby" and
the double-D symbol are trademarks of Dolby Laboratories.
Condential unpublished works. Copyright 1992-1997 Dolby
Laboratories. All rights reserved.
Labels in this manual1.2
! WARNING
A warning means that injury or death is possible if the instructions
are not obeyed.
! CAUTION
A caution means that damage to the equipment is possible.

4
i
A note gives additional information, e.g. for a procedure.
General safety instructions1.3
! WARNING
Do not put force on the appliance. The appliance can fall and can
cause serious injury.
! CAUTION
Do not spill any liquid on the appliance.
! WARNING
Do not insert any objects in the ventilation holes.
! CAUTION
Do not block the ventilation holes.
i This appliance is double insulated; therefore no earth wire is
required. Always check that the mains voltage corresponds to the
voltage on the rating plate.
L This appliance employs a laser system. To prevent direct exposure
to the laser beam, do not open the appliance.
Visible laser radiation when open and interlock defeated.
Preparations for use2.
Unpacking2.1
● Unpack the appliance carefully.
● Check the package contents as described below. If any item is missing,
please contact your reseller.
● Remove the labels from the front panel carefully if present.

5
AD200H
i We recommend that you retain the original carton and packing
materials in case it ever becomes necessary to return your product
for service. This is the only way to safely protect the product
against damage in transit. If you do dispose of the carton and the
packing materials, please remember to recycle with due care to the
environment.
Package contents2.2
The following items are included in the received package:
1 DVD Player
1 Remote control
2 Batteries (AAA)
1 RCA cable
1 Operator manual
i
If any item is missing, please contact your reseller.
Installation3.
● Put the appliance on a horizontal at surface.
● Connect the random equipment to the appliance. Read the paragraph
"Connecting random equipment".
● Connect the appliance to the mains.
● Install the batteries in the remote control. Read the paragraph "Remote
control".
!
CAUTION
● Do not put the appliance near a heat source.
● Do not expose the appliance to direct sunlight.

6
i This appliance is equipped with rubber feet to prevent it from
moving. The feet are made from non-migrating material specially
formulated to avoid leaving any marks or stains on furniture.
However, certain types of furniture polishes, wood preservatives or
cleaning sprays cause the rubber to soften and leave marks or a
residue on the furniture, and potentially risk the surface to become
damaged. To prevent damage to wooden surfaces, we recommend
that you apply self-adhesive pads to the bottom of the rubber feet
before installation.
Connecting random equipment3.1
The appliance includes various options for permanent connection of random
equipment. Suitable cables can be purchased at your reseller.
Audio connections (output)
These connections allow you to send audio signal to a connected TV or
amplier.

7
AD200H
The appliance has the following audio outputs:
● STEREO AUDIO: Connect a suitable cable to the R/L channels of the
MIX L/R connection.
● COAXIAL DIGITAL AUDIO: Insert a suitable cable into the COAXIAL
connection.
● 5,1 CH AUDIO: Connect a suitable cable to the R/L/SR/SL/SW/CEN
channels of the 5,1 CH AUDIO OUT connection.
Video connections
The video connections allow you to send video signal (still images or
movies) to a connected TV.
The appliance has the following video outputs (in order of preference):
● HDMI: Connect a suitable cable into the HDMI connection.
● COMPONENT: Connect a suitable cable to the Pr/Y/Pb channels of the
COMPONENT connection.
● SCART: Insert a suitable cable into the SCART connection.
● S-VIDEO: Insert a suitable cable into the S-VIDEO connection.
● COMPOSITE: Insert a suitable cable into the VIDEO connection.
i Do not make all connections simultaneously as this will affect the
output quality.

8 9
AD200H
8 9
AD200H
Remote control3.2
Install batteries
● Remove the battery cover.
● Insert the batteries matching the
(+) and (-) polarity markings.
● Re-install the battery cover.
! CAUTION
Incorrect installation can
cause battery leakage and
corrosion which will
damage the appliance.
Corrosion, oxidation,
battery leakage and any
other gradually acidic defect
of this nature will invalidate
the guarantee.
Functions4.
DVD Player4.1
8 9
1 2 3 4 5 6 7 10
1 Standby button
2 Disc tray
3 Display
4 OPEN/CLOSE button
5 PLAY/PAUSE button
6 PREVIOUS button
7 NEXT button
8 USB slot
9 Memory card slot
10 Cover for connection of external
devices

8 9
AD200H
8 9
AD200H
Remote control4.2
General functions
11 Standby button
12 SETUP button
13 VOLUME +/- button
14 Arrow buttons
15 L/R/ST button
16 USB button
17 ENTER button
18 MUTE button
19 V-MODE button
20 DEFAULT button
17
18
19
20
11
12
13
14
15
16

10
DVD functions
21 Digit buttons (0-10+)
22 GO TO button
23 PROG button
24 PLAYBACK CONTROL button
25 FastForward button
26 FastRewind button
27 TITLE button
28 AUDIO button
29 STEP button
30 REPEAT button
31 A-B REPEAT button
32 STOP button
33 ZOOM button
34 RETURN button
35 SLOW button
36 MENU button
37 SUBTITLE button
38 PREVIOUS button
39 NEXT button
40 PLAY/PAUSE button
41 ANGLE button
42 OSD button
43 OPEN/CLOSE button
43
42
41
33
32
39
38
37
36
21
22
23
24
25
26
29
28
30
27
40
34
35
31

11
AD200H
Operation5.
All functions of the appliance are accessible using the remote control.
All instructions refer to operation with the remote control, unless indicated
otherwise.
Quick start5.1
General functions
● Set the appliance in the standby mode.
● To switch on the appliance, press the Standby button (11). To switch back
to the standby mode, press the Standby button (11) again.
● To select an extra signal source (USB/SD/MMC), press the USB button
(16). Press the button once again to exit this function.
● To adjust the volume, press the VOLUME + button or the
VOLUME - button (13).
● To select the audio channel during Video CD playback, press the
L/R/ST button (15).
● To mute or restore sound, press the MUTE button (18).
DVD/CD functions
● Switch on the appliance.
● Place a disc in the disc tray. To open or close the disc tray, press the
OPEN/CLOSE button (43).
The display shows the total number of tracks on the CD.
● To start playback, press the PLAY/PAUSE button (40) once.
● For extended instructions, read the paragraph "DVD/CD functions" further
on in this manual.
USB functions
● Switch on the appliance.
● Insert the device in the slot (8). The device can only be connected one
way.
● Select the USB mode.
● To start playback, press the PLAY/PAUSE button (40) once.
● For extended instructions, read the paragraph "USB functions" further on
in this manual.

12
SD/MMC functions
● Switch on the appliance.
● Insert the device in the slot (9). The device can only be connected one way.
● Select the SD/MMC mode.
● To start playback, press the PLAY/PAUSE button (40) once.
● For extended instructions, read the paragraph "SD/MMC functions" further
on in this manual.
DVD/CD functions5.2
After the disc has been loaded, a content menu will display on the TV screen.
● Press the arrow buttons (up and down, left and right) to select a menu item.
● Press the ENTER button to enter the selected menu item.
During playback, the following functions are available:
● To select a chapter (DVD) or track (CD), press the digit buttons (21).
● To select the next or previous chapter (DVD) or track (CD), press the
PREVIOUS button (38) or the NEXT button (39).
● To forward or rewind the DVD, press the FastForward button (25) or the
FastRewind button (26). The available speed rates are: 2x, 4x, 8x, 16x, 32x.
● To pause playback, press the PLAY/PAUSE button (40) once; to resume
playback, press the button again.
● To stop playback temporarily, press the STOP button (32) once.
Press the button again to stop playback permanently, or press the PLAY/
PAUSE button (40) to resume playback.
● To playback in slow-motion, either forward or backward, press the SLOW
button (35) repeatedly. The available speeds are: 1/2, 1/4, 1/8, 1/16.
● To repeat a chapter (DVD) or one or all tracks (CD):
Press the REPEAT button (30) once to repeat the current chapter or track.•
Press the button once again (2x) to repeat the current title.•
Press the button once again (3x) to repeat all chapters or tracks.•
Press the button once again (4x) to cancel the function.•
● To play the DVD frame by frame, press the STEP button (29). Press the
PLAY/PAUSE button (40) to resume normal playback.
● To view a specic title of a DVD, press the TITLE button (27). Use the
arrow buttons to select the title.
● To select the audio language of a DVD, press the AUDIO button (28)
repeatedly until the desired language is set.
● To switch on the subtitles of a DVD, press the SUBTITLE button (37).
Press the button again to switch off the subtitles.

13
AD200H
● To select extra information of a DVD or CD (remaining time/passed
playtime/track number/chapter number), press the OSD button (42).
● To select the camera angle, press the ANGLE button (41).
● To return to the main menu, press the RETURN button (34).
i
● Normally, if an MP3 disc is loaded, the unit will take longer time to read
the initial data.
● A DVD that does not match the region code cannot be read by this appliance.
● If a disc contains mixed content (e.g. MP3 and video les), the appliance
will only recognise, list and play one content type.
● The screen saver becomes active if no disc has been loaded for
3 minutes, or if the appliance has been in STOP mode for 3 minutes.
Using the GO TO function
The GO TO function can be used to select a specic starting point on a DVD
or CD.
● Press the GO TO button (22).
● Press the arrow buttons (14) to select an entry.
The possible entries for DVD are:
- Disc time
- Chapter
- Title
- Chapter time
- Title time
The possible entries for CD are:
- Track time
- Specic track
● Press the digit buttons to set a selection.
Using the PROGRAM function
● Press the PROG button (23) to enter the PROGRAM function.
● Press the digit buttons to select a desired track, and use the arrow button
down to highlight the next entry.
● To conrm the selection and start the program, move the highlight to
"START" and press the ENTER button (17).
● To stop the progam, press the PROGRAM button and press ENTER.

14
Using the A-B REPEAT function
The A-B REPEAT function can be used to repeat a specic section of a DVD.
● Press the A-B REPEAT button (31) once to select the starting point (A).
● Press the A-B REPEAT button again to select the ending point (B).
The appliance plays the section repeatedly.
● Press the button once again to cancel the function. The appliance will
resume the normal playback.
Using the ZOOM function
This function can be used for zooming in and out on photos and DVDs.
The available zoom ratios are: 2x, 3x, 4x, 1/2, 1/3, 1/4.
● Press the ZOOM button (33).
● Press the ZOOM button again to set the correct size.
● Press the arrow buttons to move through the picture.
Using the MP3/MPEG4 playback function
● Insert an MP3/MPEG4 disc. A content menu will display on the TV screen.
● Press the up/down arrow buttons (14) to select a folder or a le.
● Press the ENTER button (17) to enter the selected folder or le.
● Press the PROG button (23) to switch between folders and les.
Press ENTER (17) to conrm.
● Press the MENU button (36) to return to the content menu during playback.
Using the Kodak picture CD playback function
● Insert a Kodak picture CD.
● Press the STOP button to enter the thumbnail mode. Choose an option
(Slide show/Menu/prev-next) and press ENTER.
● Press the PROG button to change the mode and press ENTER to conrm.
● Press the PLAY/PAUSE button (40) to hold the slide show at the current
picture.
● Press the PREVIOUS button (38) or the NEXT button (39) to select the
previous or next picture.
● Press the PLAY/PAUSE button (40) to resume the slide show.
● To ip the image vertical or horizontal, press the up/down arrow buttons.
● To rotate the image left or right, press the left/right arrow buttons.
● To magnify the picture, press the ZOOM button (33). To zoom in or out on
the picture, press the FastForward button (25) or FastRewind button (26).
To move the picture, press the arrow buttons.

15
AD200H
i The slide show is paused in the zoom mode. The image rotation
and wipe effect functions are not available in the zoom mode.
Using the Video CD playback function
● Press the PLAYBACK CONTROL button (24) to switch on the playback
function.
● Insert a Video CD.
● To start playback, press the PLAY/PAUSE button (40) once.
● Press the PLAYBACK CONTROL button (24) to quit the playback and
return to the main menu.
USB functions5.3
After the device has been connected, a content menu will display on the
TV screen.
● Press the arrow buttons (up and down) (14) to select a folder or a le.
● Press ENTER to enter the selected folder or to play the le. You can also
use the digit buttons (21) to select a folder or to play the le.
● Press the PROG button to switch between folders and les.
Press ENTER to conrm.
● Press the MENU button to return to the content menu during playback.
During playback, the following functions are available:
● To select a track, press the PREVIOUS button (38) or the NEXT button
(39) until the desired track is set.
● To pause playback, press the PLAY/PAUSE button (40) once;
to resume playback, press the button again.
● To stop playback, press the STOP button (32).
● To remove the device, gently pull it out of the slot.
i Due to the great variety of products with USB ports and their
sometimes quite manufacturer-specic functions we can neither
guarantee that all devices will be recognised, nor that all operating
options that are possible in theory will actually work.

16
SD/MMC functions5.4
After the device has been connected, a content menu will display on the
TV screen.
● Press the arrow buttons (up and down) (14) to select a folder or a le.
● Press ENTER to enter the selected folder or to play the le. You can also
use the digit buttons (21) to select a folder or to play the le.
● Press the PROG button to switch between folders and les.
Press ENTER to conrm.
● Press the MENU button to return to the content menu during playback.
During playback, the following functions are available:
● To select a track, press the PREVIOUS button (38) or the NEXT button
(39) until the desired track is set.
● To pause playback, press the PLAY/PAUSE button (40) once;
to resume playback, press the button again.
● To stop playback, press the STOP button (32).
● To remove the device, gently pull it out of the slot.
General setup menu operation5.5
This chapter explains a complete setup of the appliance: settings of screen
display, audio setup and video setup.
The following actions have to be carried out with the remote control.
● Press the SETUP button (12).
● Press the arrow buttons (left and right) (14) to select a submenu.
The submenu is displayed directly.
● Press the arrow buttons (up and down) to scroll through the submenu.
● Press the ENTER button (17) to select a setting, or the left arrow button to
cancel the selection.
● Press the SETUP button to store the settings and exit.
General setup page
● TV DISPLAY to set the aspect ratio. Select 4:3 PANSCAN or 4:3
LETTERBOX for a conventional TV set. Select 16:9 or WIDE SQUEEZE
for a wide screen TV set.
● ANGLE MARK to display the angle setting information.
Switch this function ON or OFF.


18
DYNAMIC RANGE CONTROL
● Select the value (AUTO, ON or OFF).
Digital audio setup
DIGITAL OUTPUT
● Select SPDIF/OFF to switch off the digital audio signal output.
● Select SPDIF/RAW to set the digital audio signal output to its raw format
(DTS/Dolby Digital 5.1).
● Select SPDIF/PCM to set the digital audio signal output to PCM format.
LPCM OUTPUT
This option is only available when SPDIF/PCM is set.
● Select a sample rate for the digital audio output.
There are two options: 48 kHz and 96 kHz.
i Before switching this option off, check that the amplier connected
is compatible with 96 kHz digital signals.
Channel delay
This function is used to set the delay time for the centre and rear speakers
and the subwoofer. The delay compensates for the time difference caused
by the distance differences between the each of the speakers and the listener.
Equalizer
● SOUND MODE: Switch this function ON to select a desired sound mode.
● BASS BOOST: Switch this function ON to boost the bass sound.
● SUPER BASS: Switch this function ON to create the super bass sound
effect.
● TREBLE BOOST: Switch this function ON to boost the bass sound.
3D processing
i This function is only available when the DOWNMIX function is set
to 5,1CH.
PRO LOGIC II
This function is used to convert 2-channel audio signal into 5.1-channel
audio signal.
● PRO LOGIC II: When switched ON, this function is always active.

19
AD200H
When switched OFF, this function is disabled. When switched to AUTO,
this function is active only when encoded content is detected.
● MODE: To select the processing mode:
When switched to MUSIC, the audio output is processed for multi-•
channel music playback.
When switched to MOVIE, the audio output is processed for movie •
playback with an emphasis on the centre speaker.
When switched to PRO LOGIC, the audio output is decoded and •
processed according to Dolby Pro Logic processing with mono-surround
channel.
When switched to AUTO, the processing mode is automatically detected •
based on the input format.
● PANORAMA: To partially feed the front stereo audio into the surround
channels for an enveloping effect. Note: this option is only available in
MUSIC mode.
● DIMENSION: To adjust the sound eld either towards the front or towards
the rear. Note: this option is only available in MUSIC mode.
● CENTER WIDTH: To adjust the level width of the centre speaker by
blending the centre speaker with the left and right front speakers.
Note: this option is only available in MUSIC mode.
REVERB MODE
● Select this function to adjust the reverberation time.
Dolby digital audio setup
DUAL MONO
● Stereo: both channels as is. STEREO is the default setting.
● L-Mono: left channel only.
● R-Mono: right channel only.
● Mix-Mono: the average of both the left and right channel.
i This function is only available for Dolby AC-3 encoded 2-channel
discs.
DYNAMIC
● Select the value for the dynamic range compression to avoid losing sound
details resulting from a low volume.

20
Video setup page
VIDEO OUTPUT
● OFF: Select this format when the COMPOSITE output is used.
● YUV: Select this format when the COMPONENT output is used.
● RGB: Select this format when the SCART output is used.
i
● The composite video output is the default setting for video output.
● If the video output results in a poor image, then press the V-MODE
button (19) until the image is good.
RESOLUTION
● Select a resolution (480i, 576i, 720P (50/60 Hz), 1080i (50/60 Hz), 1080P
(50/60 Hz).
COLOUR SETTING
● SHARPNESS: Adjust the screen sharpness. Select High, Medium or Low.
● BRIGHTNESS: to adjust the screen brightness.
● CONTRAST: to adjust the screen contrast.
● HUE: to adjust the screen tint. This option is available for NTSC playback
only.
● SATURATION: to adjust the saturation.
● GAMMA: Adjust the colour intensity. Select High, Medium, Low or None.
● LUMA DELAY: Compensate the delay in the colour signal. Select 0T or 1T.
HDMI SETUP
● Switch this function ON or OFF.
i When HDMI is switched ON, the menu items VIDEO OUTPUT,
TV DISPLAY and TV TYPE are not available.
Preference setup page
i The preference menu can only be accessed when the disc tray is
open or empty, or when the disc in the disc tray is stopped.
Table of contents
Other Akai DVD Player manuals

Akai
Akai DV-P4575SDK User manual

Akai
Akai AD 70H User manual

Akai
Akai DV-R4035VSMC User manual

Akai
Akai DV-P3470S User manual

Akai
Akai DV-P4410 User manual

Akai
Akai AMD315 - Microset User manual

Akai
Akai STD-2001 User manual

Akai
Akai STB-2680 User manual

Akai
Akai AKH-800XS User manual

Akai
Akai DV-P3410 User manual