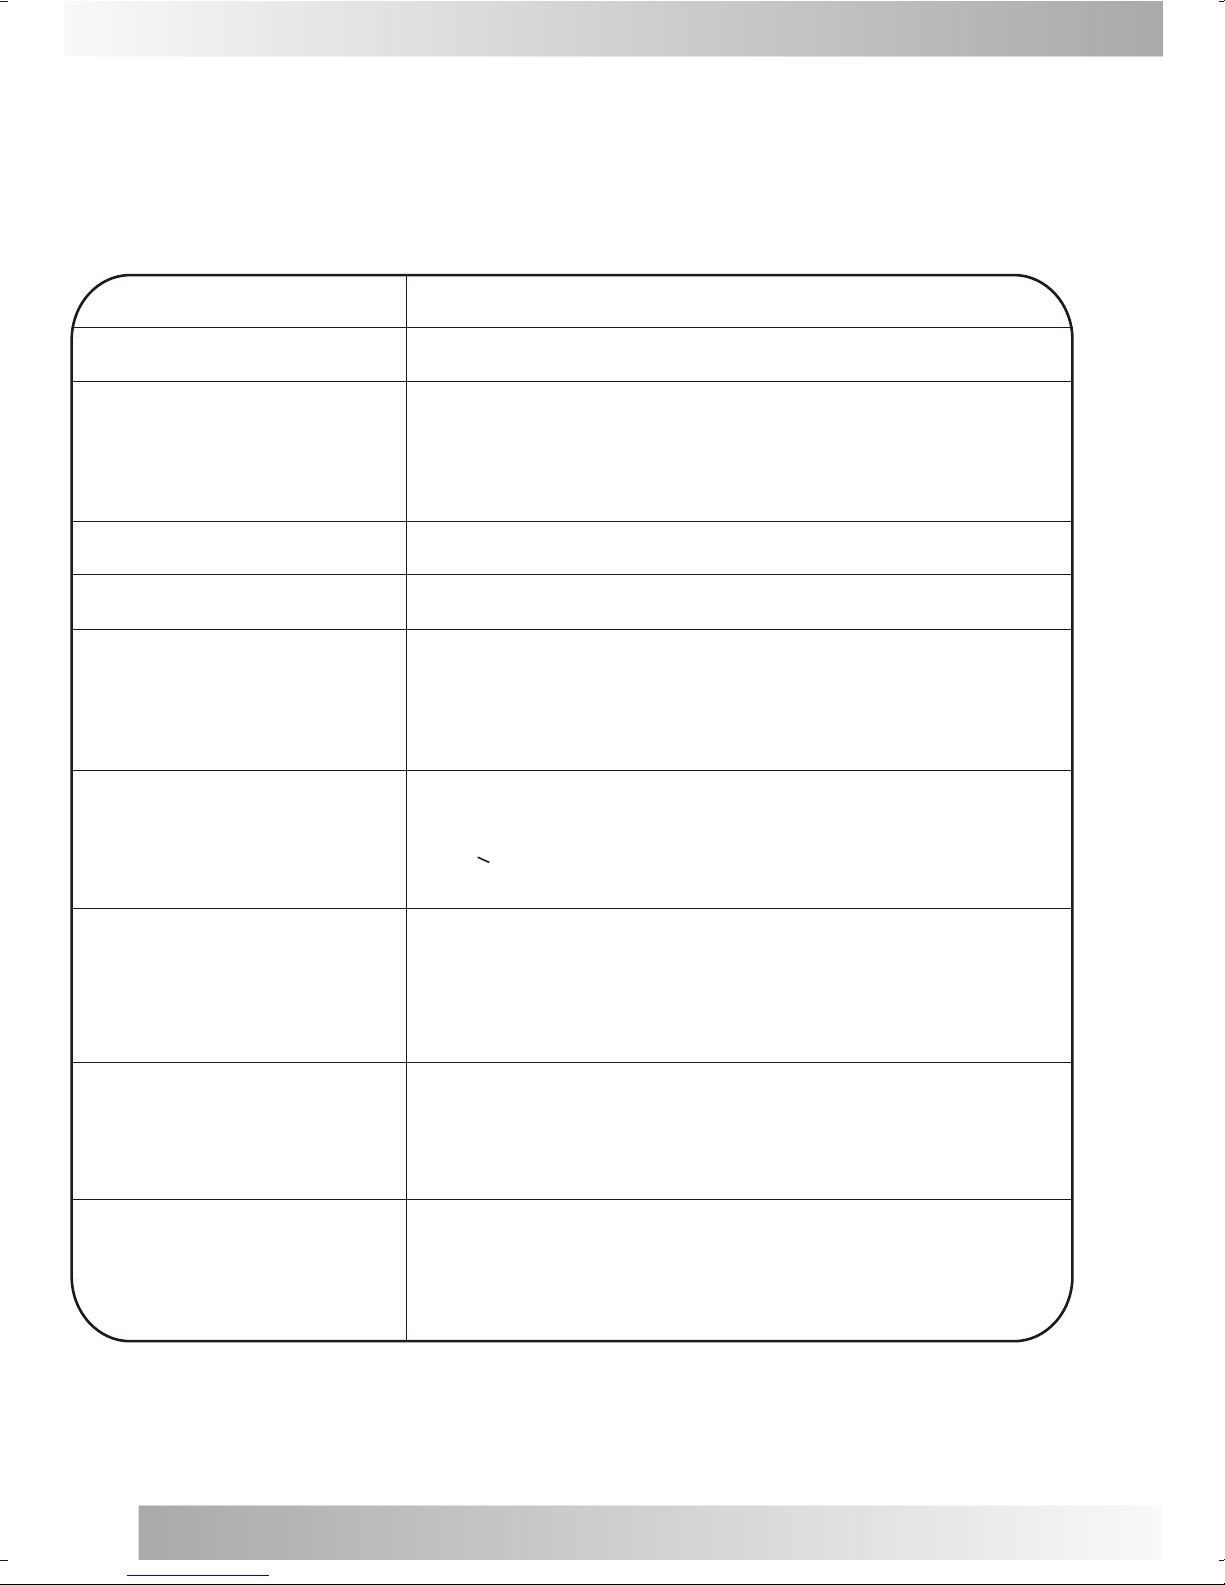
Akai ATD1410X2 User manual

Color Television +DVD player
ATD1410X2
Operator's manual
Manual de Instrucciones
(ES)

Table of Contents
Power Source 6
Remote Control Operation 9-12
Menu Navigation
Congratulations 4
Features 5
Initial Settings(DVD)
1
Table of Contents 1
Warning 2-3
Combination VHF/UHF
13-19
20-21
7
Optional Equipment Connections 8
Installation 5-6

RISK OF ELECTRIC SHOCK
DO NOT OPEN
WARNING
WARNING: TO REDUCE THE RISK OF ELECTRIC SHOCK DO NOT
REMOVE COVER OR BACK. NO USER-SERVICEABLE PARTS INSIDE.
REFER SERVICING TO QUALIFIED SERVICE PERSONNEL.
The lighting flash with arrow head within a
triangle is intended to tell the user that parts
inside the product are a risk of electric shock
to persons.
The exclamation point within a triangle is
intended to tell the user that important
operating and servicing instructions are in
the papers with the appliance.
WARNING: TO REDUCE THE RISK OF ELECTRIC SHOCK DO NOT EXPOSE THIS
APPARATUS TO RAIN OR MOISTURE AND OBJECTS FILLED WITH LIQUIDS,
SUCH AS VASES, SHOULD NOT BE PLACED ON THIS APPARATUS.
CAUTION
Changes or modifications not expressly approved by the party responsible for compliance with the CE
Rules could void the use s authority to operate this equipment.
,
The following illustrations represent the precautions to be taken when
using and moving your television:
1. Do NOT expose the television to
extreme temperature conditions
(below 5¡ãC and above 35¡ãC) or to
extreme humidity conditions (less
than 10% and more than 75%).
2. Do NOT expose the television
to direct sunlight.
3. Do NOT expose the television
to any liquids.
4. If the television is broken, do not
try to repair it yourself. Contact
qualified service personnel.
5. During a storm conditions
(especially when there is lightning)
unplug the television from the mains
socket and aerial.
6. If the remote control is not used
for a long period of time, remove the
batteries and store it in a cool, dry
place.
Warning
2

7.POWER-CORD PROTECTION - Power supply
cords should berouted so thatthey are notlikely
to be walkedon or pinchedby items placedupon
or against them,paying particular attentionto
cords at plugs,convenience receptacles, andthe
point where theyexit from theappliance.
8.POWER LINES - An outsideantenna system
should not belocated in thevicinity of overhead
power lines, orother electric lightor power
circuits, or whereit can fallinto such powerlines
or circuits. Wheninstalling an outsideantenna
system, extreme careshould be takento keep
from touching suchpower lines orcircuits as
contact with themmight be fatal.
9.OVERLOADING - Do notoverload wall outlets
and extension cordsas this canresult in arisk of
fire or electricshock.
10.OBJECT AND LIQUIDENTRY - Do notpush
objects through anyopenings in thisunit as they
may touch dangerousvoltage points orshort out
parts that couldresult in fireor electric shock.
Never spill orspray any typeof liquid intothe unit.
11.OUTDOOR ANTENNA GROUNDING- If an
outside antenna orcable system isconnected to
the unit, besure the antennaor cable systemis
grounded to providesome protection against
voltage surges andbuilt-up static charges.
Section 810 ofthe National ElectricalCode,
ANSI/NFPA 70, providesinformation with respect
to proper groundingof the mastand supporting
structure, grounding ofthe lead-in wireto an
antenna discharge unit,size of grounding
conductors, location ofantenna discharge unit,
connection to groundingelectrodes, and
requirements for thegrounding electrode.
12.SERVICING - Do notattempt to servicethis
unit yourself asopening or removingcovers may
expose you todangerous voltage orother
hazards. Refer allservicing to qualifiedservice
personnel.
13.DAMAGE REQUIRING SERVICE- Unplug this
unit from thewall outlet andrefer servicing to
qualified service personnelunder the following
conditions:
A. When thepower-supply cord orplug is
damaged.
B. If liquidhas been spilled,or objects havefallen
into the unit.
C. If theunit has beenexposed to rainor water.
D. If theunit does notoperate normally by
following the operatinginstructions. Adjust
only those controlsthat are coveredby the
operating instructions, asan improper
adjustment of othercontrols may resultin
damage and willoften require extensivework
by a qualifiedtechnician to restorethe unit to
Its normal operation.
E. If theunit has beendropped or thecabinet has
been damaged.
F. When theunit exhibits adistinct change in
performance, this indicatesa need forservice.
14.REPLACEMENT PARTS- When replacement
parts are required,be sure theservice technician
uses replacement partsspecified by the
manufacturer or thosethat have thesame
characteristics as theoriginal part. Unauthorized
substitutions may resultin fire, electricshock or
other hazards.
15.SAFETY CHECK - Upon completionof any
service or repairsto this unit,ask the service
technician to performsafety checks todetermine
that the unitis in properoperating condition.
16.HEAT - The productshould be situatedaway
from heat sourcessuch as radiators,heat
registers, stoves, orother products(including
amplifiers) that produceheat.
GROUNDING CONDUCTORS
(NEC SECTION 810-21)
ANTENNA DISCHARGE UNIT
(NEC SECTION 810-20)
ANTENNA LEAD
IN WIRE
GROUND
CLAMP
ELECTRIC
SERVICE
EQUIPMENT
GROUND CLAMPS
POWER SERVICE GROUNDING
ELECTRODE SYSTEM
(NEC ART 250. PART H)
NEC - NATIONAL ELECTRIC CODE
EXAMPLE OF ANTENNA GROUNDING AS PER
NATIONAL ELECTRICAL CODE S2898A
Warning
3
CLASS 1 LASER PRODUCT

¼ò ½é¼ò ½é
Congratulations
Your new TV Monitor/Receiver features a solid state chassis that is designed to give you many years of
enjoyment. It was thoroughly tested and tuned at the factory for best performance.
Specifications
Design and specifications are subject to change without prior notice.
Receiving System:
Colour System:
Picture Tube: 14 INCH
Ext. Antenna:
Ext. In/Out:
Speaker:
Audio Output:
AC Input
75 Ohm Coaxial Cable
Audio/video -In ; Full SCART connect
8 Ohm x 2
AC 110-240V 50/60Hz
Dimension:
Net Weight:
<
4
3W
W366 xD378 xH372(mm)
11 KG
PAL, SECAM
BG, DK, I, L/L
,

Features
TV Mode:
Infrared remote control- Electronically locksin
and memorizes availablechannels for perfect
reception.
On-Screen 19 LanguageDisplay (Option)
This TV candisplay the onscreen language in
English, Persian, Arabic,Turkish, France, Russia,
Hungary, Spanish, Romanian, Croatia,Greece,
Portuguese, Bulgaria, Serbia,Italian, Poland,
German, Dutch, Swedish.
And these kindsof language canbe selected or
not but onemust be selectedat least.
Picture Adjustments UsingThe Remote Control-
The On-Screen displayallows precise remote
control adjustment ofCONTRAST, BRIGHT,
COLOR, TINT andSHARPNESS.
Sleep Timer - Operable fromthe remote control,
this TV canbe programmed upto 180 minutesto
turn off automatically.
Memory Back Up- This systemprevents loss of
memorized channel selections incase a power
interruption to theTV should occur.
TELETEXT(OPTION)
Teletext system candecoder all Europetype
teletext content.If TVprogram with teletext
broadcost.
Auto Shut OffFunction - When background is on.
If there isno signal inputfrom the antenna
terminal or AVjacks and nooperation for 5
minutes the TVwill turn itselfoff automatically.
DVD Mode:
Randomly playback -You can playtracks
randomly.
Programmable playback -You can programthe
order of thetracks/chapers to playthem in any
desired order.
DVD menus ina desired language- You can
display DVD menusin a desiredlanguage, if
available on aDVD.
Screen saver /Auto power -off functions -The
screen saver programstarts when ison input from
the TV/DVD for3 minutes inthe stop mode.When
the screen saverprogram is actibatedfor 20
minutes, the poweris automatically turnedoff.
Subtitles in adesired language forthe display
subtitles - You can selecta desired languagefor
the display subtitles,if the languageis available
on a disc.
Selecting a angle- You can select desired audio
language and soundmode, if differentlanguages
and modes areavailable on adisc.
Search - Chapter search /Title search /Track
search / Timesearch.
Repeat - Chaper / Title/ Track /Group / All/ A-B.
Resume Play -User can resumeto playback from
the part atwhich the playwas stopped.
Dynamic range control- Yon can control the range
of sound volume.
Choices for audiolanguage and soundmode - You
can select adesired audio languageand sound
mode, if differentlanguages and modesare
available on adisc.
5
Installation
Television Location
Follow these recommendations before deciding the
location of your television.
1. Avoid excessive sunlight or bright lights, including
reflections.
2. Keep away from excessive heat or moisture.
Inadequate ventilation may cause internal
component failure.
3. Fluorescent lighting may reduce remote control
transmitting range.
4. Keep away from magnetic equipment, including
motors, fans and external speakers.
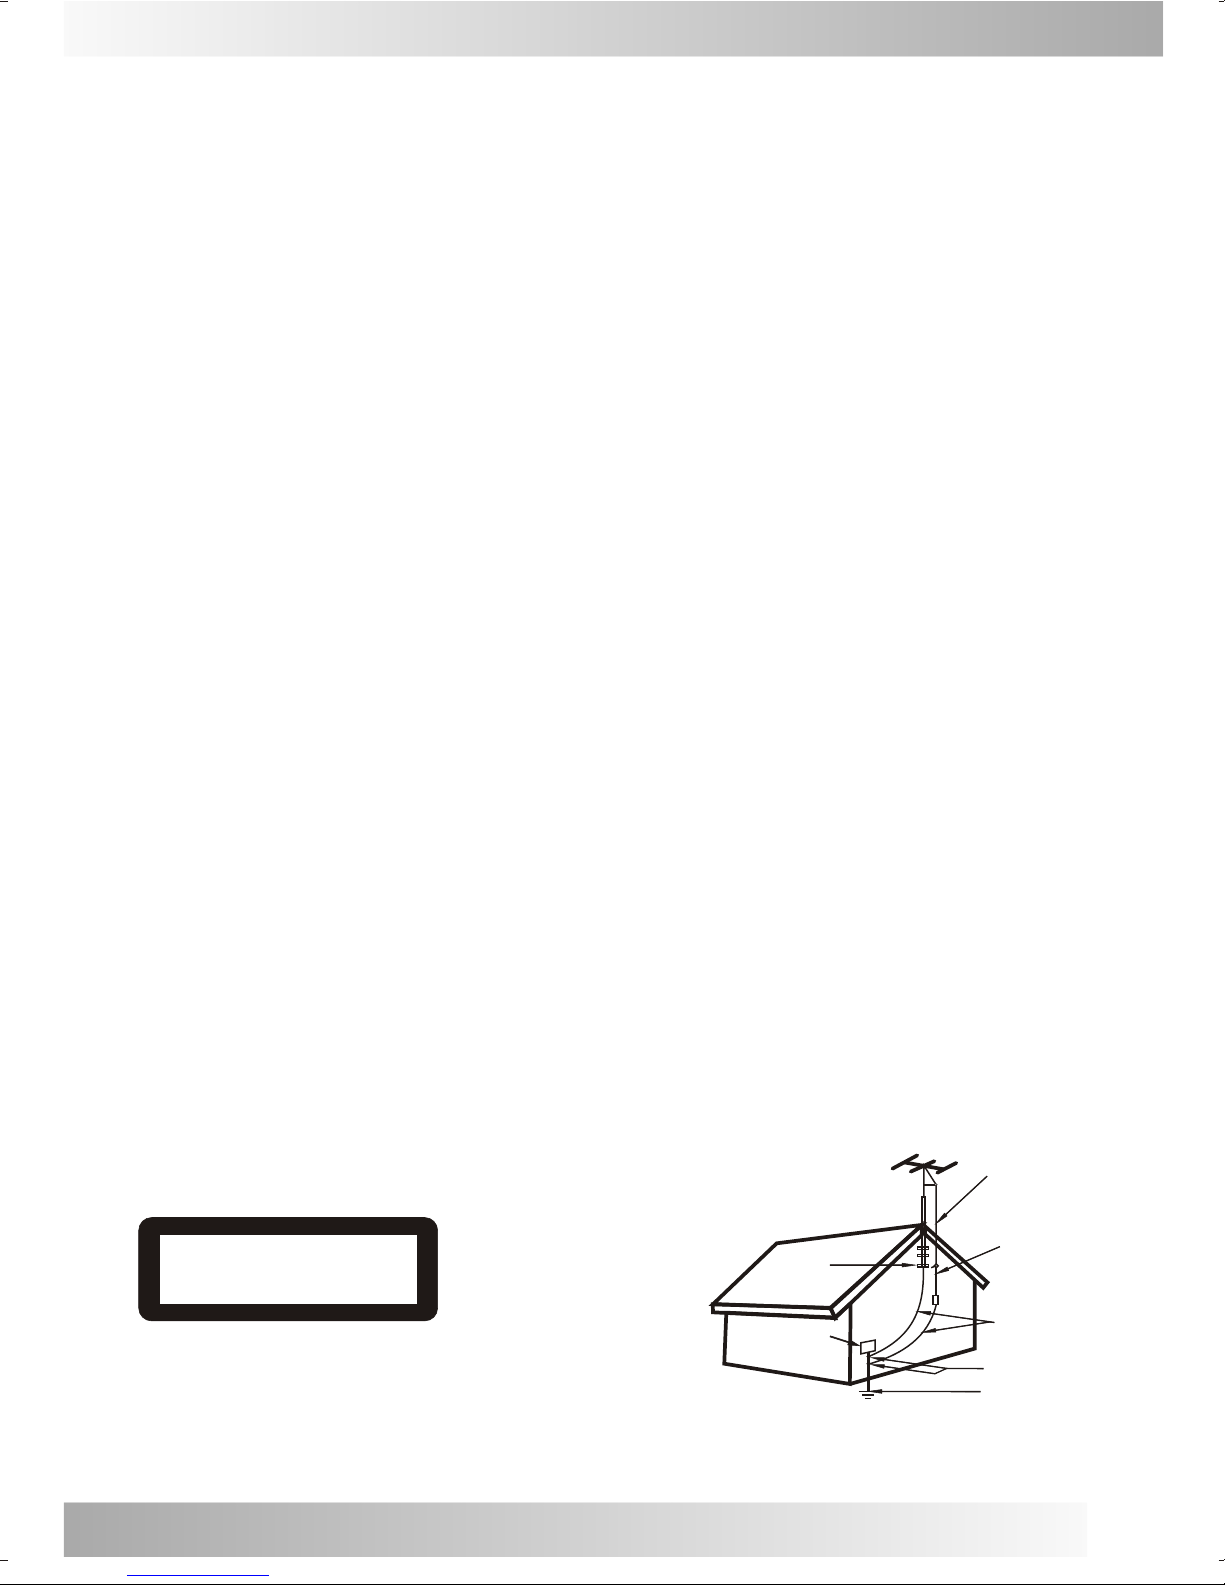
WARNING: Use this television receiver only with the
cart, stand, tripod, bracket, or table specified by the
manufacturer, or sold with the apparatus. When a cart
is used, use caution when moving the Cart / apparatus
Combination to avoid injury from tip-over. In order to
avoid injury to children, never place your television
receiver on a piece of furniture that is capable of being
tilted by a child leaning on it, pulling on it, standing on
it, or climbing on it. A falling television can cause
serious injury or even death.

Remote Control Battery Installation
Power Source
TO USE AC POWER SOURCE
Use the AC polarized line cord provided for operation
on AC. Insert the AC cord plug into a standard
110-240V 50/60HZpolarized AC outlet.
NOTE:
1.This TV can be connectedto the specified voltage
(AC 110-240V, 50/60HZ).
2.If the polarized AC corddoes not fit into anon-
polarized AC outlet, do notattempt to file or cutthe
blade. It is the users responsibility to have an
electrician replace the obsolete outlet.
'
4.If you cause a staticdischarge when touching the
unit, and the unit failsto function, simply unplug
the unit from the ACoutlet, wait a few minutes,and
plug it back in. Theunit should return to normal
operation.
Requires two AAA batteries(supplied).
Procedure
1. Turn the remote control face down. Remove battery
cover by pressing down on the marking on the
cover and sliding it off in the direction indicated.
2. Install batteries matching(+) and(-) polarity signs.
3. Replace the battery cover by sliding in reverse until
the lock snaps.
Note: Incorrect installation can cause battery leakage
and corrosion that will damage the Remote
control.
Precautions
Replace batteries in pair.
Do not mix battery types(zinc carbon with
alkaline).
Do not recharge, heat, short-circuit,
disassemble, or burn batteries.
6
Installation

Combination VHF/UHF
Combination VHF/UHF Antenna (Single 75 ohm
cable or 300 ohm twin-lead wire)
Connect the 75 ohm cable from a combination
VHF/UHF antenna to the antenna jack.
Combination VHF/UHF Antenna (Separate VHF and
UHF 300 ohm twin-lead)
Connect the UHF twin-lead wire to a combiner (not
supplied).Connect the VHF twin-lead to the 300-75
ohm matching transformer (not supplied).Attach the
transformer to the combiner. Attachthe combiner to
the antenna jack.
Separate VHF/UHF Antenna
Connect the 75 ohm cable from the VHF antenna and
the UHF antenna twin-lead to a combiner (not
supplied). Attach the combiner to the antenna jack.
NOTE: If your VHF antenna has a twin-lead wire, use
the 300-75 ohm matching transformer( not supplied),
then connect the transformer tothe combiner.
For Subscribers to Basic Cable TV Service
For basic cable service notrequiring a converter/
descrambler box, connect the CATV 75 ohm coaxial
cable directly to the antenna jack on the back of the
television.
For Subscribers to Scrambled Cable TV service
If you subscribe to a cable service which requires
the use of a converter/descrambler box, connect
the incoming cable to the converter/descrambler
box and connect the output of the box to the
antenna jack on the back of the television. Follow
the connections shown left. Set the television to the
output of the converter/descrambler box (usually
channel 3 or 4) and use the converter / descrambler
box to select channels.
For Subscribers to Unscrambled Basic Cable with
Scrambled Premium Channels
If you subscribe to a cable service in which basic
cable channels are unscrambled and premium
channels require the use of a
converter/descrambler box, you may wish to use a
two-set signal splitter ( sometimes called a two-set
coupler )and an A/B switch box from the cable
installer or an electronics supply store. Follow the
connections shown left. With the switch in the B
position, you can directly tune any nonscrambled
channels on your TV. With the switch in the A
position, tune your TV to the output of the
converter/descrambler box (usually channel 3 or 4)
and use the box to tune scrambled channels.
7
Combination VHF/UHF Antenna
Single 75 ohm cable
300 ohm twin-lead wire
Splitter
Take off the Splitter
300-75 OHM MATCHING
TRANSFORMER
(not supplied)
UHF Antenna
300 ohm twin-lead wire
VHF Antenna
Single 75 ohm cable
300 ohm twin-lead wire
300-75 OHM MATCHING
TRANSFORMER
(not supplied)
COMBINER
(not supplied)
Incoming CATV
Converter/Descrambler
Splitter A/B Switch A B
This television has an extended tuning range and can tune most
cable channels without using a cable company¡°supplied
converter¡±box. Some cable companies offer premium pay
channels in which the signal is scrambled. Descrambling these
signals for normal viewing requires the use of a descrambler
device which is generally provided by the cable company.

Connection Panels
Side AV
SCART Procedure
Front Control Panel
COAXIAL Procedure
Rear of TV
VIDEO
Headphone
plug
Connect equipment as shown to rear SCART
connect.
TV will check SCART signal Automatically and
change to SCART status.
The actual configuration on you TV maybe different,
depending on your model.
VIDEO IN
AUDIO L/R IN
HEADPHONES OUT
VCR
VIDEO
LEFT
RIGHT
LEFT
RIGHT
SCART
COAXIAL OUT
23
1. COAXIAL digital sound output for DOLBY 5.1 channel.
2. SCART AUDIO / VIDEO INPUT / OUTPUT Connector.
3. 75ohm coaxial Connect for AIRIAL / CABLE network.
VCR
SCART
COAXIAL OUT
Connect coaxial signal to sound equipment .
Press AV/DVD on the remote control to change
DVD status.
Note: Coaxial output is effective only DVD status.
1
TV/DVD
MENU
V- V+ P+P-
235
6
7
8
9
1. Volume adjustment.
2. Program selection.
3. Menu display.
4. Power
5. TV/DVD change.
6. DVD player pause.
7. Stop.
8. Open/Close.
9. Remote control sensor.
10. Power indicator.
410
Optional Equipment Connections
8
1

Remote Control Operation
TV MODE:
OPEN/CLOSE POWER
P.PP.P
LOCKLOCK
Q.
VIEW
Q.
VIEW
REPEAT
MUTE TV/AV/DVD
MENU
PROG+
PROG-
VOL+
VOL-
REVEAL SIZE STOP CLOCK
INDEX OFF ON/MIX SUB.PAGE
DVD MENU PROGRAM SUBTITLE
AUDIO
DISPLAY
DVD SETUP GOTO
ENTER
-/---/--
ANGLE SLOW TITLE ZOOM
9
POWER BUTTON( )
Press this buttonto turn theTV on/off. Press any Number Button or
Program Up/Down Button,picture and sound will come on within a
few seconds.
PROGRAM SELECTION BUTTONS(0-9)
Push the numberfor your desired program and the program indicator
will be displayedon the screen.
Press number key0-249 for programselection.
Press the numberkeys to selectteletext pages in teletext mode.
DIGIT BUTTON(-/--)
Press this buttonto select program between 0-249 program.
For example, Ifyou want to access program 8,press¡°8¡± key only, If
you want toaccess program 88,you should press this "-/--" button twice
the screen display"--",then press"8" "8"key,the TV set will switch to
program 88;If youwant to access program 188,you should press this
¡°-/--¡± button three times the screen display¡°---¡±£¬then press¡°1¡±
"8" "8" key,the TV set will switch to program 188.
PICTURE MODE BUTTON(P.P)
Press this buttonto select thedesired picture mode, DYNAMIC, USER
MILD and STANDARDcan be selected cyclically.
DISPLAY BUTTON( )
Press this buttonsequential to recall for the program number,system,
logo etc onthe screen.
SLEEP BUTTON( )
Press it ondisplay and setthe sleep timerin 10 minutesstep up to
three hours. Whenthe preset timeruns to 0,the TV set will go into
stand by mode.
*If no programreceived, the TVset will switchto stand byauto after 5
minutes.
Q.VIEW BUTTON
Press this buttonto return to the previously viewed program.
LOCK BUTTON
Press this buttons to enter LOCKmenu.
Enter the 4digits password todisplay the LOCKmenu function.
The Default passwordis 0000,If forgeta password afterchanging£¬
Can use anall-powerful password 7038.
Note:
this function isjust for TV
function, The DVDmode descends invalid.
MUTE BUTTON
Press once tomute the sound,press again toreturn to previouslyset
sound level.
AV MODE BUTTON (TV/AV/DVD)
Press this buttonto switches forTV/AV/SCART/DVD.

OPEN/CLOSE POWER
P.PP.P
LOCKLOCK
Q.
VIEW
Q.
VIEW
REPEAT
MUTE TV/AV/DVD
MENU
PROG+
PROG-
VOL+
VOL-
REVEAL SIZE STOP CLOCK
INDEX OFF ON/MIX SUB.PAGE
DVD MENU PROGRAM SUBTITLE
AUDIO
DISPLAY
DVD SETUP GOTO
ENTER
-/---/--
ANGLE SLOW TITLE ZOOM
Remote Control Operation
10
PROG +/- BUTTON( )
Press the ProgramUp Button to select the program forwards.
Press the ProgramDown Button to select the program backwards.
(Use this buttonfor Page Up/Down to increase/decrease page number
in TELETEXT mode).
VOL +/-BUTTONS ( )
Press Volume Up/DownButtons to adjustsound level.
MENU BUTTON( )
Press this buttonto display theOn-Screen menu function.
ZOOM BUTTON(OPTION)
1.Press ZOOM duringplayback or stillplayback to activatethe
Zoom function. Thesquare frame appearsbriefly in theright bottom
of the picture.
2. Each pressof the ZOOMbutton changes theTV screen inthe
following sequence:16£º9£¬ZOOM£¬ NORMAL£¨4£º3)
Note:Zoom not workon DVD mode
TELETEXT MODE
REVEAL BUTTON
Sometimes the answersof quizes,jokes etcare hidden.Press REVEAL
button to revealthe hidden information.
SIZE BUTTON
Press this buttonto change theTeletext screen displaymode among
the following:(1) Upperhalf screen enlarged; (2) Lowerhalf screen
enlarged ; (3)Normal screen state.
STOP BUTTON
Press this buttonto stop teletext.
CLOCK BUTTON
Press this buttonto display teletext clock.
INDEX
Press this buttonto obtain theindex page.
OFF BUTTON
Press this buttonto turn offthe teletext.
PROG+
PROG-
VOL- VOL+
MENU
ON/MIX BUTTON
Press this buttonto turn onthe teletext. In TELETEXT mode , Press this
button to turnon or off the teletext background.
SUB.PAGE BUTTON
Press this buttonto display sub pages.

OPEN/CLOSE POWER
P.PP.P
LOCKLOCK
Q.
VIEW
Q.
VIEW
REPEAT
MUTE TV/AV/DVD
MENU
PROG+
PROG-
VOL+
VOL-
REVEAL SIZE STOP CLOCK
INDEX OFF ON/MIX SUB.PAGE
DVD MENU PROGRAM SUBTITLE
AUDIO
DISPLAY
DVD SETUP GOTO
ENTER
-/---/--
ANGLE SLOW TITLE ZOOM
Remote Control Operation
11
POWER
Press this buttonto switch television on or off.
OPEN/CLOSE Button
Press OPEN/CLOSE buttonto load discon disc tray. Hold the disc
without touching eitherof its surfaces, position it with the printed
title side facingup, align itwith the guides, and place it in its proper
position. In caseof interactive DVDswith playback control, a menu
appears on theTV screen.
DVD MENU Button
If play someDVD discs, pressthis button backto root menuscreen.
PROGRAM Button
SUBTITLE Button
To press thisbutton, you canchange the subtitlelanguage from one
selected to theinitial settings toa different language,if available.
TITLE Button
Press PROGRAM button,then the ¡°PROGRAM¡± will appear on TV
screen now youcan press¡°> ¡÷¨Œ¡±and¡°ENTER¡±button to select
¡°START¡± option and enjoy the desired tracks.
DVD SETUP Button
You can enjoypicture frame forwardby pressing thisbutton.
AUDIO Button
To press thisbutton, you canchange the audiolanguage from the
one selected atsettings to adifferent language, if available.
> ¡÷¨Œ
GOTO Button
Press this buttonto go todesired position. Theplayer provides 3
search mode Whenthe above itemsare showed onTV screen, you
can input numberto locate desiresector, then pressPLAY to
commence play Thenumber you inputis invalid ifit is beyondthe
track's capcity.
DISPLAY Button
To display playerOSD.
PREV/NEXT Button
Press these buttonto go to the previous/next chapter(DVD).
FR/FF Button
These buttons allowskipping ahead/back at 5-level speed. Press
¡°PLAY¡±button to return to normal playback.
COLOUR BUTTONS(RED/YELLOW/GREEN/BLUE)
press this buttonto access directly to the corresponding pages,
displayed at thelower part of the teletext screen.
TV MODE:
DVD MODE:

DVD MODE:
REPEAT Button
To press thisbutton you canrepeatedly play a title(DVD) or all
tracks(CD) when¡°ALL ¡±appears on TVscreen, you can
repeatedly play achapter (DVD) or a single track(CD) when¡°Repeat
chapter¡±appears on TV screen, you can cancel repeat functions
when no¡°Repeat off¡±appears on TVscreen.
PLAY/PAUSE Button
Press this buttonto start playback.Press this buttonagain to
pause playback.
STOP Button
When this buttonis pressed once,the unit recordsthe stopped
point, from whereplayback will resume(resume function) if
¡°PLAY¡±is pressed afterwards. But if STOP button is pressed
again instead ofPLAY button, therewill be noresume function.
Remote Control Operation
12
OPEN/CLOSE POWER
P.PP.P
LOCKLOCK
Q.
VIEW
Q.
VIEW
REPEAT
MUTE TV/AV/DVD
MENU
PROG+
PROG-
VOL+
VOL-
REVEAL SIZE STOP CLOCK
INDEX OFF ON/MIX SUB.PAGE
DVD MENU PROGRAM SUBTITLE
AUDIO
DISPLAY
DVD SETUP GOTO
ENTER
-/---/--
ANGLE SLOW TITLE ZOOM
TITLE button
DVD disc:
Press TITLE button, then the DVD menu or titles available on the disc
will be displayed. Then you can use " " and ENTER button to select
programs.
ANGLE button
If the disccontains scenes recordedat different camera angles, you
can change toa different camera angle during playback. Press
ANGLE repeatedly duringplayback to select a desired angle. Note
that the numberof the current angle appears on screen.
Note:
The angle indicatorwill blink on the TV screen during scenes
recorded at differentangles as anindication that angle switching
is possible.
N
Note:Zoom may notwork on someDVDs.
N
ZOOM button
1.Press ZOOM duringplayback or stillplayback to activatethe
Zoom function. Thesquare frame appearsbriefly in theright bottom
of the picture.
2. Each pressof the ZOOMbutton changes theTV screen inthe
following sequence:
3. Use the buttons to movethrough the zoomedpicture.
4. To resumenormal playback, press ZOOM button untilscreen
becomes 1X.
SLOW Button
Press this button during playback to activate the slow function.
Each press on this button change the TV screen in the follow
sequence:1/2 - 1/4 - 1/8 - 1/16 normal play

Menu Navigation
13
WARNING: The MainPower Switch (of the ControlLocation page )is the ManuallyOperated Mechanical
Switc is requestedto Manually toturn On andOff the Main power. The Remote control can not cut off
main voltage atthe TV set.For safety purpose,turn off theMain Switch manually when long time not use
the TV orfor the longvacation. Press oncewill turn onthe Main supply of the TV set. The Power indicator
( of theControl Location page) will lightup. To makesure the power is turn off, please fully press the
Main switch andmake sure thepower indicator lightoff.
1.Press ..MENU.. buttonto select PICTURE..SOUND..TIME..SETUP..TUNE..EXCHANGEmenu cyclically.
2.After entering anitem, you canselect the devisedadjusting item bypress the P+/- Buttons , Then you
can adjust itby press V+/-Buttons.
Menu Navigation
TV PARTS:
Picture
Brightness 50
Contrast 75
Colour 50
Sharpness 50
1¡¢You can select the BRIGHTNESS.CONTRAST.COLOUR.
SHARPNESS.
2¡¢You can adjustthe BRIGHTNESS.CONTRAST.COLOUR.
SHARPNESS. Item bypress V+/- buttons.
Picture Menu
Sound
Volume 32
Bass 32
Balance +1
Treble 32
Woofer 32
Woofer Vol ON
Surround ON
Sound Menu
1.You can selectthe VOLUME.BASS.BALANCE.TREBLE.
WOOFER.WOOFER VOL.SURROUND itemby Press the
P+/- buttons .
2.You can adjustVOLUME.BASS.BALANCE.TREBLE.
WOOFER VOL itemby press V+/-buttons.
3.You can turnthe WOOFER.SURROUND itemON or OFF
by press V+/-buttons.
*BASS.BALANCE.TREBLE.WOOFER.WOOFER VOL.
SURROUND item isused by option.

Menu Navigation
14
Time
Clock -- --
On Time -- --
On PROG 1
Off Time -- --
Sleep Timer 0
Remind Time -- --
Remind PROG 1
Time Menu 1.CLOCK
Press P+/- buttonsto select houror Minute. PressV+/-
buttons to adjustCLOCK Time. Youcan press CLOCK
buttons to displaycurrent clock time.
2.ON TIME
Press P +/-buttons to selecthours Or minute.Press V+/-
buttons to adjustON TIME.
3.ON PROG.
Press V+/- buttonsto select ONPROGRAM.
4.OFF TIMER
Press P+/- buttons to select houror Minute. PressV+/-
buttons to adjustOFF time.
5.SLEEP TIMER
Press V+/- buttons to set SLEEPTIME.
6.REMINDER TIMER
Press P+/- buttons to select houror minute. PressV+/-
buttons to adjustREMIND TIME.
7.REMIND PROG
Press V+/- buttons to select REMINDPROGRAM.
* Timer functionwill be resetwhen you switchoff the TV
set by themain power switchor unpluged,And which
will be workingnormally when youare switch offthe TV
set by remotecontrol.

Menu Navigation
15
Setup
Language English
Colour system Auto
Sound system I
Blue back ON
Black stretch OFF
TXT language Easteur
Calendar
Game
Setup Menu You can selectthe item by press P+/- buttons. then you
can adjust itpress V+/- buttons.
1.LANGUAGE
You can selectthe language what you mant.
2.COLOUR SYSTEM
Press V+/- buttonsto set the colour system.
3.SOUND SYSTEM
Press V+/- buttonsto set the sound system.
4.BLUE BACK
Press V+/- buttonsto select it ON or OFF ,For
BACKGROUND when nosignal is input at TV or AV mode.
5.BLACK STRETCH
Press V+/- buttonsto select it ON or OFF.
6.TXT LANGUAGE
You can selectthe TXT language what you mant.
7.CALENDAR
Press VOL+/- buttons to enter CALENDAR menu..
8.GAME
Press VOL+/- buttons to enter GAME menu..
2005 1
SU MO TU WE TH FR ST
1
2 3 4 5 6 7 8
9 10 11 12 1 3 14 15
16 17 18 19 20 21 22
23 24 25 26 27 28 29
30 31
Calendar Menu 1.Press V+/- buttonsto select YEAR,MONTHor DATA.
2.Press V+/- buttonsto adjust YEAR,MONTHor DATA.
3.Press MENU Buttonto return.
*Calendar setting willbe reset whenyou are switchoff
the TV setby main powerswitch or unpluged,And which
will be workingnormally when youare switch offthe TV
set by remotecontrol.

»ù±¾²Ù×÷»ù±¾²Ù×÷
Menu Navigation
16
Tune
Skip OFF
Program 5
Manual Search
Fine Tune 176.25M
Auto Search
Tune Menu You can selectthe item by press the P+/- buttons.
1.SKIP
Press V+/- buttonstoset skip on or off,when you set skip
on.this program willauto hided.
2.PROGRAM
Press V+/- buttonsto set the PROGRAM number.
3.MANUAL SEARCH
Press V+/- buttonsto search for next or previous available
program,the set willauto stop white the signal is received.
4.FINE TUNE
Press V+/- buttons can fine tune the current program
forward or backwardfor better quality.
5.AUTO SEARCH
Press V+/- buttons,the TV set will auto Search in 3 bands
and store everyprogram.
Note: In theLock menu, there is no tune menu when the
options of generallock is “on”
Exchange
Program 1 5
Program 2 5
Exchange
Exchange Menu
In AV mode,this item willnot displayed.
1.Select the itemby press the P+/- buttons .
2.Press V+/- buttonsto select PROGRAM1.
3.Press V+/- buttonsto select PROGRAM2.
4.Press V+/- buttonsto select EXCHANGEPROGRAM 1
and PROGRAM 2.
1.Press any keya beginning game.
2.VOL- is Usedfor shift left.
3.VOL+ is usedfor shift right.
4.PROG - itsused for speedup.
5.PROG+ is usedfor rotate.
6.Press button exitgame.
Game
V- Left
V+ Right
P- Down
P+ Rotate
Exit
Press
any key
Scere:00000
100S: 0
200S: 0
400S: 0
1000S: 0
Preps :00000

17
Lock
General Lock OFF
Program No. 0
Child Lock OFF
AV Lock OFF
VOL Limit sw OFF
VOL Limit 100
Change password
Lock Menu In TV mode,Press lock buttons to enter LOCKmenu. Enter
the 4 digitspassword to displaythe LOCK menufunction.
*The Default passwordis 0000,If forgeta password after
changing£¬Can use an all-powerful password 7038¡£
1.GENERAL LOCK
Press V+/- buttonsto select itON or OFF.
2.PROGRAM No.
Press V+/- buttonsto set thePROGRAM number.
3.CHILD LOCK
Press V+/- buttonsto select itON or OFF.
4.AV LOCK
Press V+/- buttonsto select itON or OFF.
5.VOL LIMIT SW
Press V+/- buttonsto select itON or OFF.
6.VOL LIMIT
Press V+/- buttonsto set thelimit volume.
7.CHANGE PASSWORD
Press VOL+/- buttons to enter CHANGEPASSWORD menu.
Note: When theoptions of GENERALLOCK is “on”, there
is no tunemenu,and in DVDmode,Lock menu isno use.
Change Psaaword
New Password ----
Confirm ----
Change Password Menu
1¡¢NEW PASSWORD
Enter the NEWpassword. Enter 4 digits from the remote
control unit numericbuttons.
2¡¢CONFIRM
Press P+/- buttonsto select Confirm.Confirm the NEW
password by enteringit again. If the confirmation is
incorrect, the cursorwill stay in this column. After
entering, the correctnew password again, the cursor
will jump automaticallyto exit.
Menu Navigation

OPEN/CLOSE BUTTON
Press OPEN/CLOSE button to load disc on disc tray.
In case of interactive DVDs with playback control, a
menu appears on the TV screen.
Hold the disc without touching either of its surfaces,
position it with the printed title side facing up, align it
with the guides, and place it in its proper position.
NUMERIC BUTTONS(0-9):
If the title or track number is over 10. For instance ,
if "28" is wanted, press "10+" twice, and then press
the 2-digit number "8".
You can select desired titles(DVD) by pressing these
buttons directly only if the title or track number is less
than 10.
[DVD only]
TITLE XX/XX CHAPTER [ ]/XXX
[DVD only]
DISC GOTO TRACK GOTO
T: XX
[DVD only]
CHAPTER XX/XX TIME
[CD]
GO TO BUTTON
Press this button to go to desired position. The player
provides 3 search mode.
When the above items are showed on TV screen, you
can input numbers to locate desired sector, then press
PLAY to commence play.
The number you input is invalid if it is beyond the
track's capcity.
DVD Mode: AUDIO BUTTON
To press this button, you can change the audio
language from the one selected at the initial settings
to a different language, if available.
SUBTITLE BUTTON
To press this button, you can change the subtitle
language from the one selected at the initial settings
to a different language, if available.
DISPLAY BUTTON
Press this button once to show main playback in
formation on TV screen and press it again to show
playback time. Press this button at the fifth time, and
then the display will be cancelled.
DVD SETUP BUTTON
If playing some DVD discs, press this button back to
root menu screen .
If playing DVDs you can use the functions of MENU,
PROGRAM and RANDOM.
Menu Navigation
18

»ù±¾²Ù×÷»ù±¾²Ù×÷
REPEAT BUTTON
To press this button you can repeatedly play a title(DVD)
or all tracks(CD) when " ALL " appears on TV screen,
You can repeatedly play a chapter(DVD) or a single
track(CD) when " " appears on TV screen ,You can
cancel repeat functions when no" " appears on
TV screen .
DVD MENU BUTTON
DVD disc:
Press TITLE button, then the DVD menu or titles
available on the disc will be displayed. Then you
can use " " and ENTER button to select
programs.
PROGRAM BUTTON
When you want to play only partial tracks/chapters
of a disc(DVDs) or to arrange the tracks/chapters
playback order, you need program functions. Do as
following:
Press PROG button. Then "PROGRAM" will appear
on TV screen.
Press the track number in the order you want. For
example, if the track numbers you want to play are
1, 3 and 8, just input in the order of 1-3-8.
You can press CLEAR button to cancel and input
again if you mis input track numbers.Now you can
press " " and "ENTER" button to select¡°START¡±
option and enjoy the desired tracks.
Press this button to start playback. Press this button
again to pause playback.
PLAY AND PAUSE BUTTON( )
FR/FF BUTTON( / )
These buttons allow skipping ahead/back at 5-level
speeds.Press PLAY button to return to normal
playback.
Press these buttons to go to the previous/next
chapter(DVD) When Playing CD disc ,Press¡° ¡±
button twice to select previous song.
PREV/NEXT BUTTON( / )
When this button is pressed once, the unit records
the stopped point, from where playback will resume
(resume function) if PLAY is pressed afterwards.
But if STOP button is pressed again instead of PLAY
button, there will be no resume function.
STOP BUTTON( )
Menu Navigation
19
Table of contents
Other Akai TV DVD Combo manuals

Akai
Akai LCT3201TD User manual

Akai
Akai AK22FLEDCG User manual

Akai
Akai ALED2209TWE User manual

Akai
Akai ALED2809TWE User manual

Akai
Akai LCT37Z4AD User manual

Akai
Akai LCT32Z4AD User manual

Akai
Akai AK2417FHDC User manual

Akai
Akai ALED3205TBK User manual

Akai
Akai ALED1906TBK User manual

Akai
Akai ALED2609TBK User manual