manuals.online logo
Brands
  1. Home
  2. •
  3. Brands
  4. •
  5. Akw
  6. •
  7. Plumbing Product
  8. •
  9. Akw GW90 User manual

Akw GW90 User manual

This manual suits for next models

3

Other Akw Plumbing Product manuals

Akw SMV-001 Guide

Akw

Akw SMV-001 Guide

Akw Onyx Toilet Roll Holder User manual

Akw

Akw Onyx Toilet Roll Holder User manual

Akw Larenco User manual

Akw

Akw Larenco User manual

Akw T301 User guide

Akw

Akw T301 User guide

Akw Option P User manual

Akw

Akw Option P User manual

Akw iSure Quick guide

Akw

Akw iSure Quick guide

Akw M DigiPumps Series User manual

Akw

Akw M DigiPumps Series User manual

Akw Itherm Quick guide

Akw

Akw Itherm Quick guide

Akw PW90 User manual

Akw

Akw PW90 User manual

Akw Stone Wash Basin Service manual

Akw

Akw Stone Wash Basin Service manual

Akw Onyx Linea AKW23980WH User manual

Akw

Akw Onyx Linea AKW23980WH User manual

Akw Luda User manual

Akw

Akw Luda User manual

Akw Arka Thermostatic Cool Touch TMV2 User manual

Akw

Akw Arka Thermostatic Cool Touch TMV2 User manual

Akw Braddan 16472W Installation guide

Akw

Akw Braddan 16472W Installation guide

Akw MediCare Installation guide

Akw

Akw MediCare Installation guide

Akw AKW23196CH Quick start guide

Akw

Akw AKW23196CH Quick start guide

Akw iTherm 30306 User manual

Akw

Akw iTherm 30306 User manual

Akw Onyx Installation guide

Akw

Akw Onyx Installation guide

Popular Plumbing Product manuals by other brands

Moen SANI-STREAM 8797 manual

Moen

Moen SANI-STREAM 8797 manual

Grohe Allure Brilliant 19 784 manual

Grohe

Grohe Allure Brilliant 19 784 manual

Cistermiser Easyflush EVO 1.5 manual

Cistermiser

Cistermiser Easyflush EVO 1.5 manual

Kohler Triton Rite-Temp K-T6910-2A installation guide

Kohler

Kohler Triton Rite-Temp K-T6910-2A installation guide

BEMIS FNOTAB100 Installation instruction

BEMIS

BEMIS FNOTAB100 Installation instruction

Hans Grohe ShowerTablet Select 700 13184000 Instructions for use/assembly instructions

Hans Grohe

Hans Grohe ShowerTablet Select 700 13184000 Instructions for use/assembly instructions

Enlighten Sauna Rustic-4 user manual

Enlighten Sauna

Enlighten Sauna Rustic-4 user manual

Moen ShowHouse S244 Series quick start guide

Moen

Moen ShowHouse S244 Series quick start guide

Sanela SLWN 08 Mounting instructions

Sanela

Sanela SLWN 08 Mounting instructions

Franke 7612982239618 operating instructions

Franke

Franke 7612982239618 operating instructions

Heritage Bathrooms Granley Deco PGDW02 Fitting Instructions & Contents List

Heritage Bathrooms

Heritage Bathrooms Granley Deco PGDW02 Fitting Instructions & Contents List

Tres TOUCH-TRES 1.61.445 instructions

Tres

Tres TOUCH-TRES 1.61.445 instructions

STIEBEL ELTRON WS-1 Operation and installation

STIEBEL ELTRON

STIEBEL ELTRON WS-1 Operation and installation

Miomare HG00383A manual

Miomare

Miomare HG00383A manual

BELLOSTA revivre 6521/CR1 quick start guide

BELLOSTA

BELLOSTA revivre 6521/CR1 quick start guide

American Standard Heritage Amarilis 7298.229 parts list

American Standard

American Standard Heritage Amarilis 7298.229 parts list

BorMann Elite BTW5024 quick start guide

BorMann

BorMann Elite BTW5024 quick start guide

Moen 1225 quick start guide

Moen

Moen 1225 quick start guide

manuals.online logo
manuals.online logoBrands
  • About & Mission
  • Contact us
  • Privacy Policy
  • Terms and Conditions

Copyright 2025 Manuals.Online. All Rights Reserved.

GW90 & ONYX GW90 Shower Waste
INSTALLATION INSTRUCTIONS
Read all instructions before installation and leave this document with the end user
for future reference as it contains important warranty information
ONYX GW90- 25494
GW90 - 25404
2
Installation Instructions
General: 01905 823 298 | www.akw-ltd.co.uk
AKW wastes are designed for low maintenance and reliable operation. The trap valve is located inside
the waste body should be checked as part of a planned maintenance programme.
Keeping your wastes clean
This product should be cleaned periodically to remove any accumulation of hair or other waste
material, using normal domestic bathroom cleaning materials. To clean the waste trap, rst remove the
cover to gain access.
Disinfecting
Where disinfecting is necessary, standard procedures for disinfecting equipment should be used,
taking due care and attention to the warning signs concerning possible effects of aggressive
chemicals on plastics. After cleaning, always ush down with water then wipe thoroughly with
a damp cloth to remove any cleaning material residues before drying. Do not use strong or
concentrated acidic, alkaline or other cleaning materials as these may discolour or otherwise
damage the product. Do not use abrasive cloths.
ContentsContents
GW90 with a cover (25404) Onyx GW90 no cover (25494)
Outlet Pipe & Nut Outlet Pipe & Nut
Waste Main Body Waste Main Body
Waste Trap
Body
Waste Trap
Body
Cover
Locking
Ring (B)
Locking
Ring (B)
Locking Ring
Seal (A)
Locking Ring
Seal (A)
3
Installation InstructionsInstallation Instructions
Technical Support: 01905 560 219Order: 01905 823 299 |orders.akw-ltd.co.uk
S
u
p
p
o
rt
t
Noggins
t
A
B
A
Suitable for wooden and solid oor installations. Use these in accordance with the shower tray instructions.
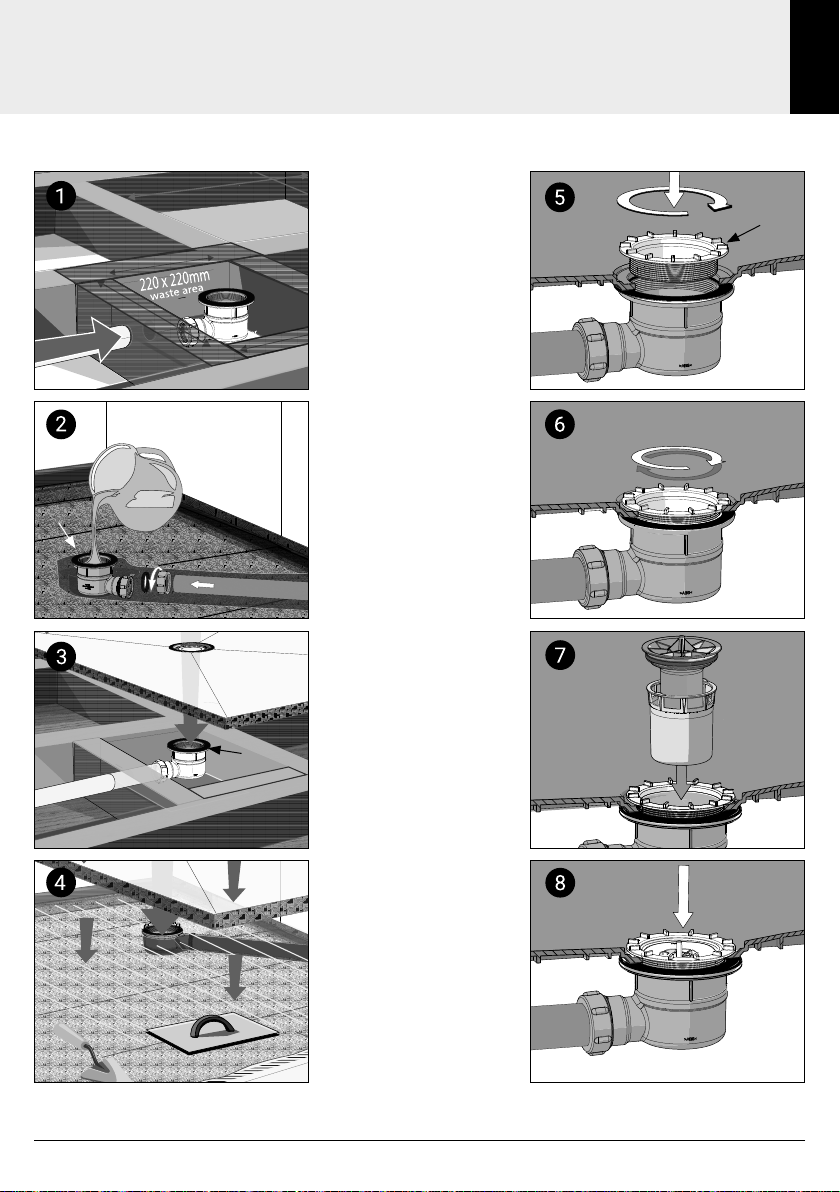
(1) As a “dry run”, rst place
the tray into the desired
location either into wooden
or solid oors. Determine
the position, the depth and
the clearance required for
the waste with at least a 1
in 40 fall from the waste to
the outlet pipe. Ensure there
is sufcient support around
the waste area, see separate
tray instructions.
(2) Before tting the waste,
place the nut onto the waste
pipe outlet, followed by the
backing ring and the seal.
Insert waste pipe into the
waste body and tighten the
nut. Check that the pipe
connection is correctly
assembled, sealed and
watertight by pouring some
water through it. Ensure that
the rubber clamping seal
(A) is positioned into the
recessed section on the top
of the waste body before
connecting to the tray.
(3-4) Apply exible adhesive
to the tray and ensure that
the tray is level. Lower the
tray into position either into
or onto wooden or concrete
oors and then re-align with
the waste body.
(5-6) Ensure the clamping
ring (B) is screwed correctly
to the waste body and is
aligned with the tray. Do not
over tighten but ensure a
tight seal.
(7) Lower the waste trap
body into waste main body
and ensure a tight seal is
achieved.
(8) Fit the cover ensuring
correct location and it is
ush with the tray. Protect
the trap from debris during
installation.
04-009-013-05 UK© AKW Medi-Care Limited 2020
Contact Us
Orders & Quotes
01905 823 299
[email protected]
General Enquiries
01905 823 298
[email protected]
Technical Enquiries
01905 560 219
[email protected]
Kitchen Enquiries
01905 823 262
[email protected]
Fax
01905 823 297
AKW
Pointon Way, Hampton Lovett
Droitwich Spa, WR9 0LR
www.akw-ltd.co.uk
orders.akw-ltd.co.uk
Guarantee
The guarantee only applies to
manufacturing or material defects,
conditional on the one-time correct
installation of the product.
Does not apply to:
• Breakages, inappropriate use or
accidental damage.
• Damage or defects that result from
incorrect installation.
• Damage caused by lack of
maintenance including the build up
of grime or damage resulting from
inappropriate cleaning.
• Damage or defects that result from
repairs or modications undertaken
by unauthorised persons.
• This guarantee excludes general
wear and tear through usage and
does not apply to surface nishes.
What to do if something goes wrong?
If you should encounter a problem with
this product, please contact your local
installer and if this does not resolve
the issue, then contact AKW Technical
Enquiries who will provide further
advice and, if necessary, arrange for a
maintenance engineer to visit and report
any issues. See the T&Cs on our website
or our catalogue for further information.
None of the foregoing affects your
statutory rights.