Al-Awail AL-Muakkita User manual

1
AL-Muakkita
User's guide
Features:
AL-Muakkita is a digital calendar and clock.
Displaying the five prayer times and the sunrise time.
Displaying the remaining time for Iqama with possibility to set this time for each
prayer individually.
Flashing alarm when it's the time for a prayer or Iqama.
It is easy to use and control by a remote control and a local keypad.
Displaying temperature.
Automatic and manual switching between summer/winter time modes.
Low power consumption (10W).
The main power cut doesn't affect the time in AL-Muakkita.
AL-Muakkita can be configured according to the authorized prayer times in the cities
and villages all over the world.
Different sizes and designs, front panels with different languages and backgrounds, a
new design is welcome at customer request.
For more details contact our authorized agents or visit our web site www.al-awail.com.
The authorized prayer times in AL-Muakkita:
The prayer times and the sunrise time are stored in AL-Muakkita according to the
authorized prayer times in each city; these are not related to any astronomic or
mathematic calculations, so they can't be changed by the user.
If you want to change these times, you need to advise the manufacturer, the sales
agent, or the authorized maintenance agent.
AL-Muakkita description:
The displays:
AL-Muakkita consists of ten displays: date display, clock (time) display, six displays for
the prayer times and the sunrise time, temperature display, and Iqama display.
The display of the remaining time for Iqama:
This display operates when it is the time for a prayer only; the remaining time for Iqama
appears on this display in minutes, and starts decreasing minute by minute, at the last
minute the display starts flashing and decreasing second by second to zero. When the
remaining time for Iqama is Zero, the display continues flashing for one more minute
then it turns off till the next prayer time.

2
Control:
All the control functions of AL-Muakkita can be achieved by:
1. The remote control which is an infrared transmitter.
2. The local keypad which is located at the back side of AL-Muakkita.
When you use the remote control, point it to the temperature display which contains
the infrared receiver, this receiver has a light indicator flashes when receiving signal
from the remote control.
The local keypad:
It is located at the back side of AL-Muakkita and consists of seven keys and two light
indicators:
Reset key.
PM light indicator.
24 hours time mode light indicator.
Increase key.
Enter key.
Decrease key.
Iqama times key.
Summer/winter switching key.
Time and date adjustment key.

3
The remote control:
Notes:the other keys of the remote control are not used in this product.
The symbol indicates that the instructions can be achieved by the remote control.
The symbol indicates that the instructions can be achieved by the local keypad.
The symbol indicates that the instructions can be achieved by both the remote
control and the local keypad.
When you are adjusting AL-Muakkita, you can cancel the whole process and return back
to the normal operation mode as follows:
Press ( )key on the remote control.
Or press reset ( ) key on the local keypad.
Important instructions for installation:
Keep AL-Muakkita away from moisture, heat sources and direct sunlight.
Clean it by a wet cotton cloth, wipe it gently and slowly to avoid electrostatic
charges.
Key symbol
function
Turning on/off, reset.
Summer/winter switching.
12/24 time mode switching.
Changing the date displaying mode
(Georgian/Hijri, Georgian only, Hijri only)
Increase key.
Enter key.
Decrease key.
Exit key.
The remaining time for Iqama adjustment.
The time and date adjustment.
The programming key (advanced settings).
To operate and test Azan sound.
AM/PM switching.
To test the displays.

4
Connect AL-Muakkita to a separated outlet with a circuit breaker exclusively used
for this purpose, do not connect it with a florescent light or an inductive load.
The operating voltage is [110 ~220Vac, 50 ~60Hz], the power consumption is 10W.
When connecting AL-Muakkita to the main power and nothing appear on the
displays after five seconds, do the following:
1. Press the ( ) key on the remote control.
2. If nothing appeared, press the reset key ( ) on the local keypad.
3. If no response occurred after setp2, press the reset key ( ) and the
adjustment key ( ) simultaneously, release the ( ) key first then the ( )
key, AL-Muakkita will operate and display the default time and date.
Default time: 12:00AM
Default date: 01st Jan. of the software version issuing year.
4. Adjust the time and date by pressing the adjustment ( ) key and follow
the instructions explained later.
If the time (clock) display is bugged (frozen), press the reset ( ) key to refresh
it.
When the main power is off; the displays are all off, but the internal timing circuit is
still working by means of an internal battery, so AL-Muakkita doesn't need to be
readjusted even if the main power cut lasted one month.
Adjusting AL-Muakkita:
How to set the time and date:
Press and hold the adjustment key ( ) for five seconds, the year digits
appear flashing on the date display.
Use the increase ( , )/decrease ( , ) keys to set the year to the
required value then press ( , ), the month digits start flashing.
Use the increase ( , )/decrease ( , ) keys to set the month (1 ~ 12),
then press ( , ), the day digits start flashing.
Set the day (1~31) in the same way then press ( , ), the time appears on
the clock display and the hour digits start flashing.
Set the hour then press ( , ), the minute digits start flashing.
set the minutes then press ( , ), pay attention to the PM light
indicator status which is located on the local keypad:
oThe time is PM when the indicator is on.
oThe time is AM when the indicator is off.
Press ( , ) to switch between AM/PM then press ( , ), the clock will
operate normally and the prayer times and the sunrise time appear on the
displays.

5
Notes:
Make sure to adjust the time and date precisely (every three months)
because this affects the prayer and Iqama times.
Check the PM light indicator status; it should be ON when the time is PM
and OFF when the time is AM.
In case of setting a wrong value, press ( ) or reset ( ) to cancel the
adjustment process; then start it over.
In case of setting a wrong AM/PM, you can correct it without starting over
the adjustment as follows:
Press and hold ( / ) to switch between AM/PM.
Adjusting the Hijri date:
AL-Muakkita calculates the Hijri date equivalent to the Georgian date
automatically, so make sure to adjust the Georgian date accurately, in case of
mismatching between the calculated Hijri date and the actual one; you can adjust it
as follows:
When AL-Muakkita is in the normal operation mode press and hold the ( , )
key, AL-Muakkita will display three consecutive probabilities of the Hijri date (the
calculated Hijri date plus one day, the calculated Hijri date, and the calculated Hijri
date minus one day); release the ( , ) key at the actual Hijri date.
Adjusting the summer/winter time modes:
AL- Muakkita switches automatically between the summer/winter time at the
beginning of April and October (or November).
If it’s necessary to switch between summer/winter time manually (in a date different
from those mentioned above):
Press and hold the ( ) key on the local keypad till the switching occurs.
Or press and hold the ( ) key on the remote control till the switching occurs,
note that the time, the prayer times and the sunrise time increase/decrease by one
hour.
Adjusting the Iqama times:
When AL-Muakkita is in the normal operation mode, you can set the Iqama
times as follows:
Press and hold the Iqama key ( / ) until the preset Iqama times appear on
the prayer displays instead of the prayer times, release the Iqama key; the
Iqama time of AL-Fajr prayer will start flashing.
Use the increase/decrease key to set the Iqama time of AL-Fajr prayer to the
required value then press ( , ), the Iqama time of AL-Duhr prayer starts
flashing.
Repeat the last step to set the Iqama times for the other prayers.

6
As you have finished, press the Iqama key ( / ) to save changes and exit to
the normal operation mode, the prayer times and the sunrise time appear on
the displays.
The Iqama time is within the range from zero to 60 minutes, when you set the
Iqama time to zero; the remaining time for Iqama will be disabled.
The remaining time for Iqama display doesn't operate at AL-Duhr prayer on
Friday.
The advanced settings:
AL-Muakkita has several advanced settings which are already programmed and no need
to be changed except when it's necessary.
Warning:
Don't change these settings before you advise the technical support in your region and
before you read the following sections carefully, because this may cause defect to AL-
Muakkita.
The advanced settings table:
The following table lists these settings, their symbols, and their range.
symbol
Name
Range
Explain
A
The city number
1 …….. 28
B
the time difference in
minutes from a city
+60 …… -60
C
The time constant
It differs from one AL-Muakkita to another, it is set by the
manufacturer and written on the label at the back side of AL-
Muakkita
D
The time mode
12/24
See page 11 ( the number of displays)
E
Summer/winter
00
Always winter
01
Always summer
02
Switching summer/winter at the beginning of April and October
03
Switching summer/winter at the beginning of April and November
F
The Hijri/Georgian date
displaying mode
01
Hijri/Georgian every 5 seconds
02
Always Georgian
03
Always Hijri
H
AL-Isha prayer
00
Ordinary according to the authorized time
01
One hour and half after AL-Maghrib prayer
02
Two hours after AL-Magrib prayer in Ramadan only, one hour and
half in the other months (for Saudi Arabia)
P
Azan and Iqama
Takbirat (in case of
Azan sound circuit
presence)
00
Without sound of Azan and Iqama takbirat
01
Iqama takbirat sound only
02
Azan sound only
03
sound of Azan and Iqama takbirat
About some settings:
A, the city number:
This number is set by the manufacturer, sales agent or the authorized
maintenance agent.

7
The range of this number is from 1 to 28 maximum, it can be less than 28 in
some AL-Muakkita according to the number of cities stored in AL-Muakkita
memory.
In some cases; AL-Muakkita has prayer times for one city only, so /A/ equals to
/1/ and can't be changed.
B, the time difference in minutes from a city:
This is used for the regions (villages) that have constant time difference from the
main city which it's number has already set in the setting A.
C, The time constant (correction factor):
It is well-known that the specifications of the electronic elements change with
temperature, and since AL-Muakkita may operate in different countries with
different temperatures, this may cause the time in AL-Muakkita to be displaced,
so AL-Muakkita has a software adjustment mechanism to secure the time
accuracy inside AL-Muakkita.
The time constant /C/ -which is written on the label at the back side of AL-
Muakkita- defines the time displacement in seconds that may occur within one
week.
For instance, when the time constant value is /+3/, this means that AL-Muakkita
is three seconds late every week, so AL-Muakkita is going to add automatically
/3/ seconds to the time every week.
When the time constant value is /-5/, this means that AL-Muakkita is five
seconds advanced every week, so AL-Muakkita is going to subtract
automatically /5/ seconds from the time every week.
When the time constant value is more than /+7/ or less than /-7/, /+10/ for
instance, AL-Muakkita is going to add one second every day and /3/ seconds
every end of week.
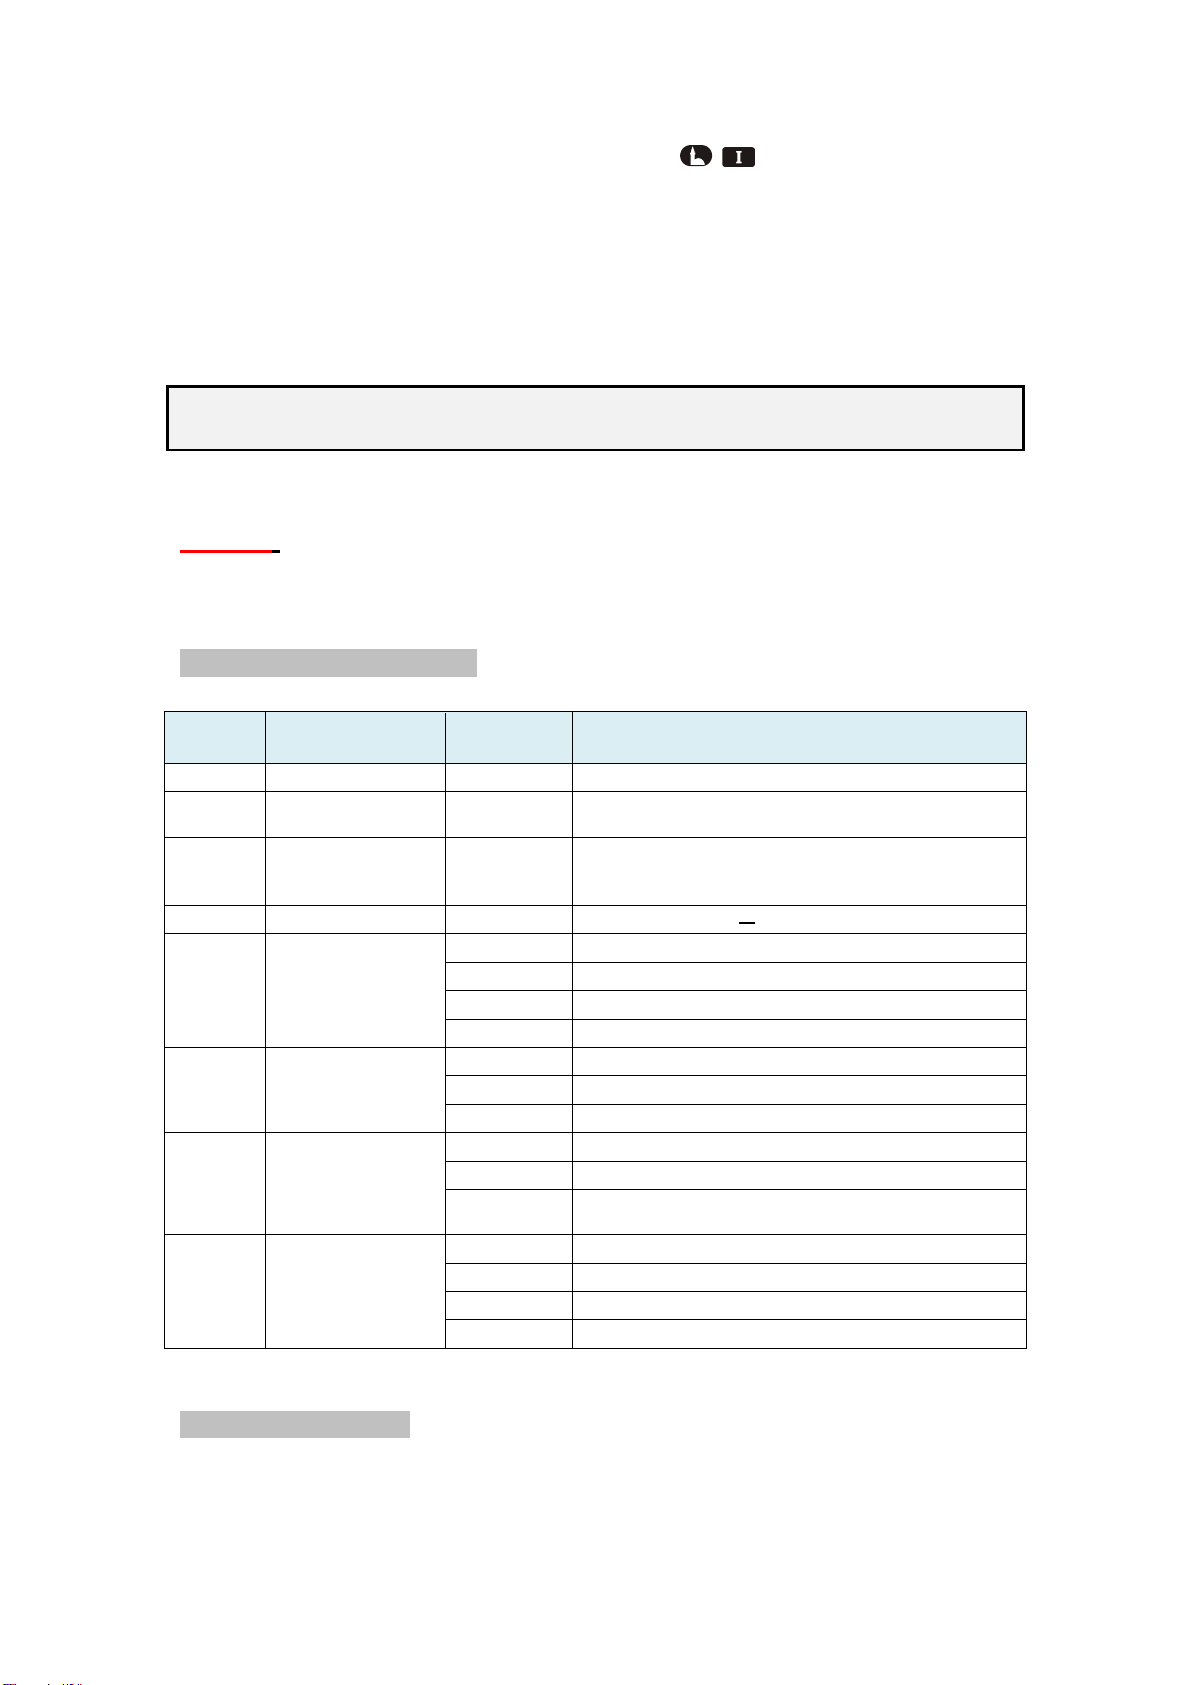
The correction principle can be summarized as follows:
To add/subtract the division result of C/7 every day
To add/subtract the division remainder of C/7 every week
If you noticed that AL-Muakkita time is not accurate, the time constant needs to
be corrected according to the time displacement within one week.
When you replace the settings memory, you need to set the time constant to
the written value on the label at the back side of AL-Muakkita.
P, Azan sound and Iqama Takbirat:
AL-Muakkita has not Azan sound circuit, so the /P/ setting has no effect.
The Azan sound circuit is installed under request, you can advise the sales agent or
the authorized maintenance agent to install this circuit and set /P/.
How to set the advanced settings:
1. Press and hold the programming key ( ) on the remote control until the
symbol (--) appears flashing on AL-Fajr display, release the ( ) key, the
number (00) will appear on the sunrise display.
Or press and hold the reset ( ) and ( ) keys on the local keypad
simultaneously, then release the reset key ( ) first while you are still pressing

8
the ( ) key, the symbol (--) appears flashing on AL-Fajr display, release the
() key, the number (00) appears on the sunrise display.
2. Use the increase/decrease keys to change the number (00) to (05) then
press ( , ).
3. The symbol (A) appears flashing on AL-Fajr display, and the city number appears
on the sunrise display, use the increase/decrease keys to set the city number
then press ( , ), the symbol (b) appears flashing.
4. Repeat the last step to set the other settings (B, C, D, E, F, H, and P).
5. Saving the settings:
As you have finished all the settings, the symbol (□□) appears flashing on AL-Fajr
display and the number (05) appears on the sunrise display, use the
increase/decrease key to set the number (03) then press ( , ), the settings
will be saved and the symbol (□□ ) will appear steadily on AL-Fajr display.
6. Press the reset ( /) key to return back to the normal operation mode.
When you are in step4, you can move to the saving stage (step5) at any time by
pressing the Iqama key ( / ).
At any stage of the advanced settings you can exit without saving changes by
pressing the ( ) or reset ( /) key.
You can browse the preset advanced settings for check only (the adjustment is
disabled) as follows:
oEnter the displays test mode (page 12).
oWhen AL-Muakkita starts the incremental count, press the decrease
key, the settings (A, B, C, D, E, F, H, and P) appear on the displays.
oTo exit after the settings check press the ( ) key or the reset
(/) key.
The number of the digit displays:
AL-Muakkita has ten displays; each one consists of several digit displays (each digit
display represents one decimal digit).
The number of these digit displays differs from one AL-Muakkita to another.
The date display consists of /8/ digit displays.
The time display consists of /6/ digit displays.
AL-Fajr and sunrise displays consist each of /3/ digit displays.
AL-Duhr display consists of /4/ digit displays.
AL-Asr, AL-Maghrib, and AL-Isha displays consist each of /3/ or /4/ digit displays.
The remaining time for Iqama and the temperature displays consist each of /2/ digit
displays.
The following table lists the features related to the digit displays number.
Number of digit displays
Notes
35
12 hours time mode
36
12 hours time mode and AL-Isha time may exceed 10PM
38
12/24 hours time mode

9
Note: the two digits display of temperature is not taken into account in the whole
number of the digit displays.
How to set the number of the digit displays:
The number of the digit displays is stored in the settings memory, so you need to
set this number whenever you replace the settings memory, this can be achieved as
follows:
Count the digit displays in AL-Muakkita except the temperature display.
Press the ( ) and ( ) keys simultaneously, release the ( ) key first and
continue pressing the ( ) key until the number /29/ is displayed on the Iqama
display.
Use the ( ) key to set the digit displays number then press ( ).
Press the ( ) key to return back to the normal operation mode.
The displays test:
The displays test mode is to check all the displays operation; you can enter to this mode
as follows:
Press the displays test key ( ) or.
Press the reset ( ) and ( ) key simultaneously, release the ( ) key first then
the ( ) key, AL-Muakkita starts the test program which is an incremental count (0…….
9) on all the displays.
You can pause the incremental count any time by pressing ( ) to check the
displays status, to resume the incremental count press ( ).
During the incremental count, press the Iqama key ( / ) to see the city file number
on AL-Duhr display.
Press ( /) or ( ) to return back to the normal operation mode.
If the numbers didn't appear correctly, contact the sales agent or the authorized
maintenance agent.
Table of contents