Alecto DBX-88 User manual

Owner’s Manual
DBX-88 (DRAFT)
1.8GHz DECT Baby Monitor, Talk Back,
Nightlight, Temperature, with Lullabies

2
TABLE OF CONTENTS
Safety Information
Getting Started
Unpacking
Baby Unit
Parent Unit
Charger
Basic Steps to Install
Belt clip
LCD Display
Power On/Off
Monitoring
Sensitivity
Adjusting Volume
Talk Back
Paging
Nightlight
Temperature
Setting the Temperature Range
Setting the Temperature Alert
Sound Alert
Lullaby
Playing the Lullaby
Temporarily Stopping the Lullaby Play
Stopping the Lullaby Playing
Out of Range
Low Battery
Charging the Battery
Restore to Default Setting
Appendix: Default Settings
Conformance To Regulation

3
Safety Information
•Avoid exposure of the units to moisture or liquid.
•Clean the units with a damp cloth.
•Do not expose the units to extreme heat or direct sunlight.
•To prevent electric shock, do not open the cabinets of the baby
unit, parent unit and charger.
•Avoid metallic contact (e.g. metal clips, keys) between the battery
contacts and charging conductors.
•Read the marking on the mains adapter for the mains supply
required for this baby monitor.
•Make sure the baby unit and mains adaptor cable are always out of
reach of the baby.
•Never place the baby unit inside your baby’s cot, bed or playpen.
•Never cover the units such as with clothes, towels or blankets.
•Follow the local regulations regarding the disposal of your packing
materials, exhausted batteries and used units. Wherever possible,
recycle those materials.
Getting Started
Unpacking
This package should contain the following:
1 Baby Unit
1 Parent Unit
1 Belt Clip
1 Charger with integrated adapter
1 mains adapter
2 Rechargeable Batteries – NiMH, 1.2V 1300mAh, AA size
1 Owner’s Manual
If any of these are missing, please contact…….
Baby Unit
Front View
Top View
On/Off
Button
Micro
p
hone
Link light LCD
Display
Pause
Ke
y
Play/ Stop
Key
Lullaby
Nightlight
Button
Page
Button
Volume
Up Button
Volume
Down Button
Room
Temperature
Senso
r
Batter
y
Doo
r
Battery Door Lock

4
Parent Unit
Charger
Basic Steps to Install
1. Connect the output plug of the mains adapter to the DC socket on
the side of the baby unit and the mains adapter to the wall mains
supply.
2. Plug the charger adaptor for the Parent Unit into the mains power
socket.
3. Remove the battery door on the Parent Unit by lifting the battery
door outward from the bottom.
4. Insert 2 x AA rechargeable batteries, observing their polarities, into
the battery compartment on the Parent Unit.
5. Replace the battery door on the Parent Unit.
6. Place the Parent unit on the charger to charge. The red Led on the
charger will turn on
7. Let the batteries charge for a full 16 hours before using for first time
installation.
Note: The baby unit also works on battery power. You can insert 4 x
1.5V AA Alkaline batteries in the battery compartment on the
Baby Unit. In case of power interruption, the baby unit continues
to work on battery power. If the baby unit is on battery power,
Battery is displayed, together with the battery icon and current
temperature, on idle mode.
Belt clip
User can also attach the belt clip to the Parent Unit.
To attach:
To remove:
Press the inner wall of the belt clip upward and lift the belt clip outward.
On/Off Button
LCD Display
Sound Sensitivity LEDs
Talk Key
Volume Up
Button
Volume
Down Button
Menu Key
Link LED
Tick Key
Char
g
e LED

5
CAUTION
Use only the mains adaptor and charger adaptor supplied with
baby monitor. Incorrect adaptor type can cause damage to the
unit.
Input: 230 VAC 50 Hz
Output: 9 VDC 300 mA
CAUTION
RISK OF EXPLOSION IF BATTERY IS REPLACED BY AN
INCORRECT TYPE. Never use non-rechargeable batteries; use
recommended type supplied with this telephone. NiMH batteries
must be disposed of in accordance with applicable waste disposal
regulations.
LCD Display
Icon Function
Indicates current battery level (display on Parent Unit
and when Baby Unit is on battery)
•Animated when charging.
•When the battery indicator displays 3 blocks, the
battery is fully charged.
•When the battery indicator displays no block, the
battery is almost empty, and requires charging.
The starry night light on Baby unit is currently on
Lullaby is currently playing on baby unit
Currently adjusting sensitivity level (display on Parent
Unit LCD only)
Power On/Off
Baby Unit
•When the unit is off, press and hold to turn on the unit.
Baby unit night
light active icon
7-segment
Temperature
display
Battery charging icon
Sensitivity icon

6
•All LEDs will turn on for about 2 seconds and then turn off, except
the LED for the nightlight button.
•The LCD will turn on. LED for the nightlight button will turn on.
•LINK LED starts to blink while unit searches for the parent unit &
becomes steadily lit when successfully links to the parent unit.
•To power off the unit again, press and hold . The power off tone
is heard. The LCD and all LEDs will turn off.
Parent Unit
•When the unit is off, press and hold to turn on the unit.
•All LEDs will turn on for about 2 seconds.
•The LCD will turn on.
•LINK LED starts to blink while unit searches for the baby unit &
becomes lit when successfully links to the baby unit.
•To power off the units again, press and hold . The power off
tone is heard. The LCD on the Parent Unit will turn off.
Note: The parent unit can be used on or off the charging cradle. When
on cradle, the batteries will be recharged at the same time.
However, the time it takes to charge the batteries to full will be
longer when the unit is charged and used at the same time.
When off cradle, the batteries will lose charge over the time, even
if the parent unit is turned off.
Monitoring
•Position the baby unit accordingly. It should be placed at least 1
meter away from the baby.
•Take the parent unit to monitor.
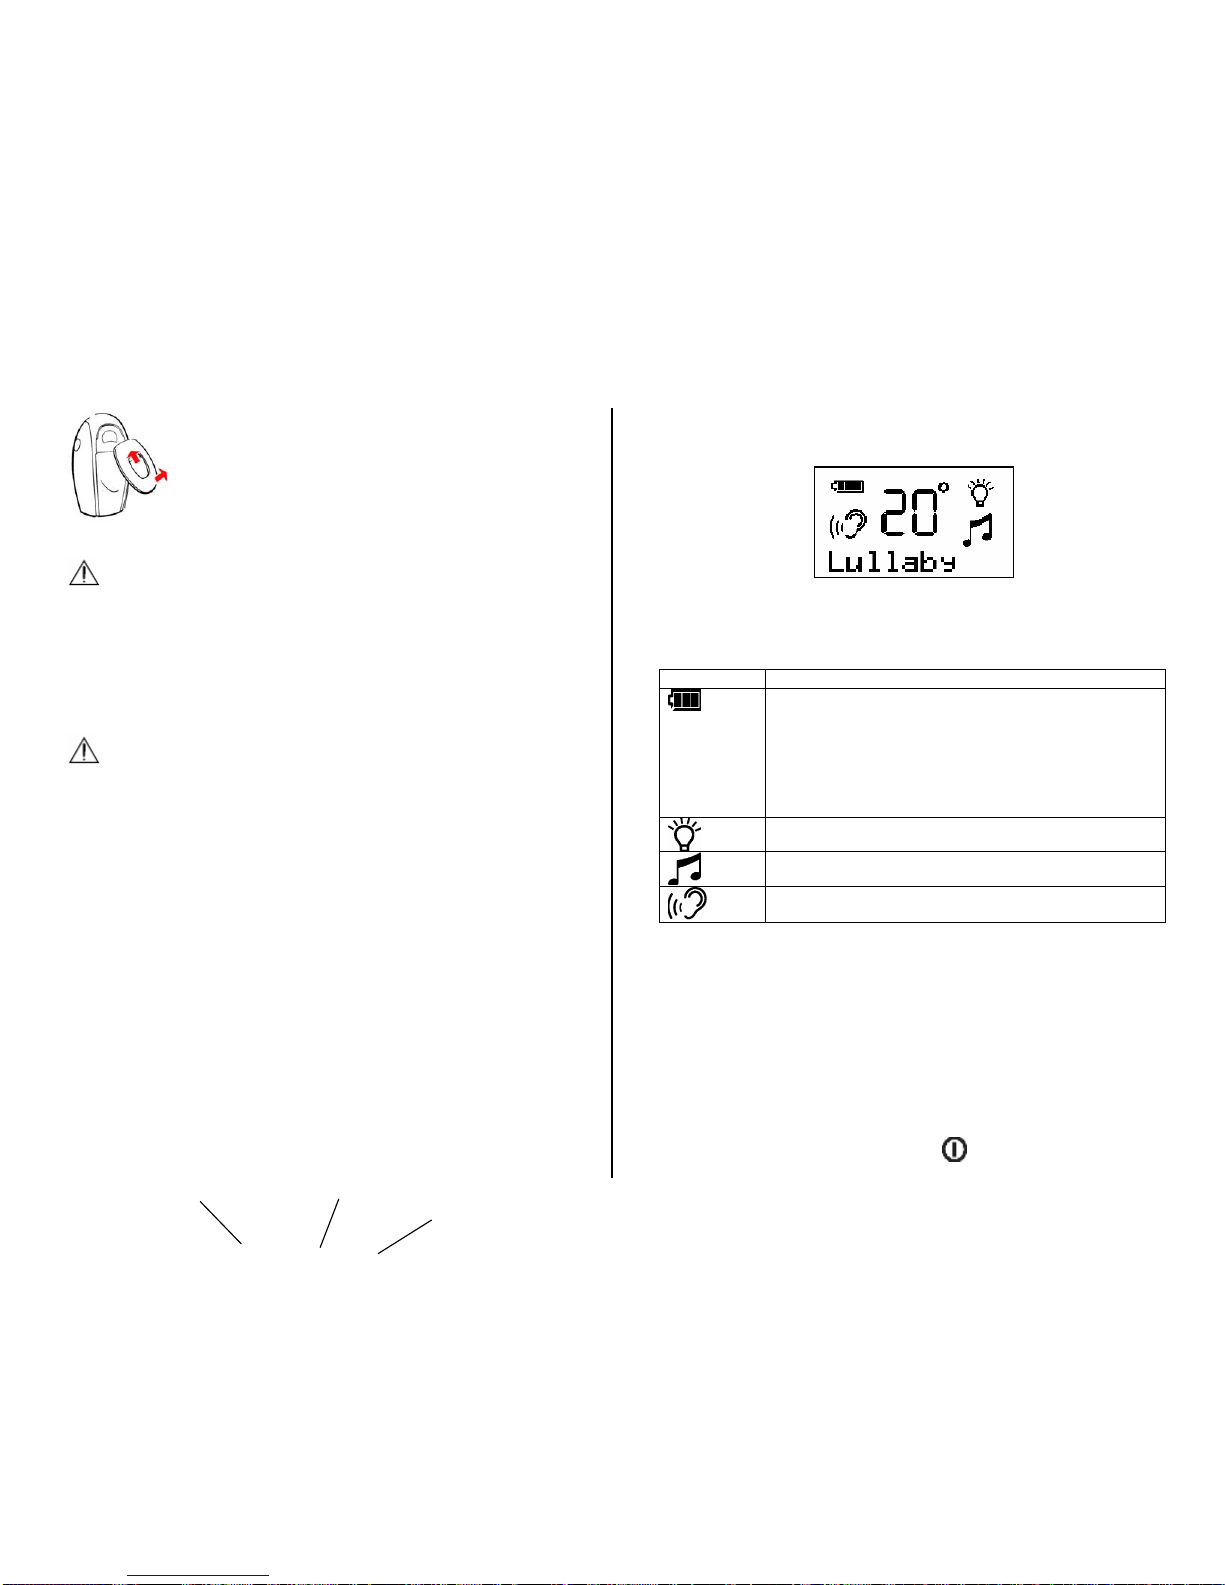
•Audio picked up by the baby unit microphone is depicted on the 8
LEDs on the parent unit (5 green and 3 red). The more audio is
picked up, the more LEDs will be lit. When no audio is picked up,
all 8 LEDs will be off.
•If the volume of the Parent Unit is turned off, an alert will be sound
when the audio picked up reach the second red led.
Note: Do not position the baby unit and the parent unit close to each
other as a high-pitched feedback noise may be generated.
Sensitivity
You can adjust the sensitivity of the Baby Unit’s microphone from the
Parent Unit. For example, if your baby is a particularly quiet sleeper,
you can increase the sensitivity levels so that you are sure to hear if
baby disturbs or becomes uncomfortable.
•Press . Use or button to scroll until Sensitivity is
displayed.
•Press .
•Use or button to select the sensitivity level. The display
shows the current sensitivity level. For example, Level .
•There are five levels of sensitivity, , , , , .
represents the highest sensitivity. represents the lowest
sensitivity.
•Press to confirm. The display reads Saved and then returns
to Sensitivity menu.
•Press to exit.
Adjusting Volume
There are 5 volume levels on each Unit and there is also an Off setting
on the Parent Unit.
On the units,
•Press the volume up button ( for Baby Unit, for Parent
Unit) to increase the volume or the volume down button( for
Baby Unit, for Parent Unit) to decrease the volume
Note: You cannot switch the volume off on the Baby Unit.
Changing the volume setting on the Baby Unit will also affect the
volume while talk back.
Talk Back
You can use the talk back feature to talk to your baby.

7
•Press and hold on the parent unit.
•The green link LED on both Units will flash.
•The LCD on the Parent Unit will display TALK.
•Talk into parent unit microphone.
•To hear your baby again, release .
Paging
If the Parent Unit is misplaced, you can use the page button on the
Baby Unit to locate the Parent Unit.
•Press . The Parent Unit will sound the paging alert.
•PAGING is displayed on the LCDs of both units.
•To stop the paging alert, press any button on the Parent Unit or
press again.
Note: If the volume is turned off, the Parent Unit will automatically reset
to medium volume level when being paged.
Nightlight
The nightlight on the baby unit can be turned on or off from either the
baby unit or the parent unit.
Baby Unit
If the nightlight is off,
•press and release to turn nightlight on.
•The icon is displayed on the LCD of both Baby & Parent Units
in idle mode and the nightlights on the Baby Unit will turn on.
If the nightlight is on,
•Press and release to turn nightlight off.
•The icon displayed on both units will turn off and the
nightlights on the Baby Unit dim and gradually turn off..
Parent Unit
•Press .
•If the nightlight on the baby unit is off,
•the display will read Light ON?.
•Press to confirm.
•The icon is displayed on both units in idle mode and the
nightlights on the Baby Unit will turn on.
•If the nightlight on the baby unit is on,
•the display will read Light Off?
•Press to confirm.
•The icon displayed on both units will turn off and the
nightlights on the Baby Unit dim and gradually turn off.
Temperature
You can monitor the temperature in the baby’s room. The room
temperature is constantly displayed in Celsius on both Units. Alert will
be sound when the room temperature is raised or dropped out of the
pre-set temperature range.
Setting the Temperature Range
You can select your own minimum and maximum room
temperatures. The minimum temperature can be anywhere
between 10˚C and 19˚C and the maximum temperature anywhere
between 22˚C and 30˚C.
•Press . Use or button to scroll until Temperature
is displayed.
•The current temperature is also displayed.
•Press .
•Use or to scroll until Range is displayed.
•Press . The minimum temperature setting is displayed.

8
•Use or to select the minimum temperature.
•Press to confirm. Saved is displayed for 2 seconds.
•The maximum temperature setting is displayed.
•Use or button to scroll and select the maximum
temperature for the room.
•Press . The display reads Saved and then returns to
Temperature menu.
•Press to exit.
Note: If the temperature goes beyond the minimum or maximum level,
“Low” or “High” indication displays and the current temperature
flashes in the displays of both Units. If the Temperature alert is
set to On, an alert will be sound at the Parent Unit. The alert
sound will goes off automatically when the temperature falls
within the pre-set range.
If the Temperature falls below 7˚C or rises above 33˚C, -- will be
flashing on the 7-segment.
Setting the Temperature Alert
•Press . Use or button to scroll until Temperature
is displayed.
•The current temperature will also display.
•Press . Use or button to scroll until Alert On/Off
is displayed.
•Press .
•If current temperature alert is off, Alert On? is displayed.
•If current temperature alert is on, Alert Off? is displayed.
•Press to confirm. Saved is displayed and then returns to
Temperature menu.
•Press to exit.
Note: Pressing any button can suppress the alert until temperature
goes beyond further 2 degrees.
Sound Alert
Sound alerts are played only on the Parent Unit. You can turn on/off
the sound alerts through the menu.
•Press . Use or button to scroll until Sound Alert is
displayed.
•Press .
•If the sound alert is currently off, Alert On? is displayed.
•If the sound alert is currently on, Alert Off? is displayed.
•Press to confirm. Saved is displayed and then returns to
Sound Alert menu.
•Press to exit.
Lullaby
There are 5 lullabies. Each lullaby last approximately 30 seconds and is
played repeatedly for 5 minutes.
There are five lullabies to choose from, Lullaby 1, Lullaby 2, Lullaby 3,
Lullaby 4 & Lullaby 5. You can also select Play All from the menu to
play for a medley of all 5 lullabies for 5 minutes.
Playing the Lullaby
Baby Unit
•Press . The name of the last played lullaby is displayed.
•Press again to select the lullaby you want to play.
•Press to play. Press again will stop the playing.
•Press to pause.
•During lullaby play, the name of the lullaby and the icon are
displayed.

9
Parent Unit
•Press . Use or button to scroll until Lullaby is
displayed.
•Press . Play? is displayed. Press . The last played
lullaby will be played and the icon will be displayed.
•If you want to play another lullaby,
•press or . The display will show Select New.
•Press to confirm. Use or button to select.
•Press to confirm and the lullaby selected will be
played.
•During lullaby play, you can still access to the Menu
•Press . The display will read StopLullaby?
•Use or button to scroll. The next menu item will
be displayed. For example, press the display will show
Light On?. Press the display Temperature.
•Press to enter into the menu.
Temporarily Stopping the Lullaby Play
You can stop the lullaby play temporarily.
Baby Unit
When lullaby is playing,
•Press to pause. Paused is displayed and the icon
flashes on both units.
•Press will resume the lullaby play.
•If lullaby play is not resumed within 60 seconds, lullaby will stop
automatically.
Parent Unit
When lullaby is playing,
•Press to pause. Paused is displayed and the icon
flashes on both units.
•Press will resume the lullaby play.
•If lullaby play is not resumed within 60 seconds, lullaby will stop
automatically.
Stopping the Lullaby Playing
Baby Unit
When lullaby is playing,
•Press will stop the lullaby play. The icon displayed on
both units will turn off.
Parent Unit
When lullaby is playing,
•Press . The display shows StopLullaby?.
•Press will stop the lullaby play. The icon displayed on
both units will turn off.
You can also stop the lullaby playing from the Lullaby menu.
•Press . The display shows StopLullaby?.
•Use or button to scroll until Lullaby is displayed.
•Press . The display will read Stop?
•Press to stop the lullaby playing.
Out of Range
When the baby and parent units have no link with each other (eg. Out
of range, parent unit or Baby unit is not powered on), the green Link
LED flashes. If there is no link for more than 30 seconds, Not Linked
will be displayed on both units. The link break alert will also be emitted
from the speaker of the Parent Unit every 30 seconds. The red Link
LED will flash. When the units are linked, the green Link LED will be
steadily lit.
Note: Link break alert cannot be manually set on or off, but it can be
suppressed for 3 minutes by pressing any button.

10
There is only visual alert shown on the Baby Unit.
Low Battery
Baby Unit
When the unit is running on battery power and reaches low battery
level, the display will show Low Battery and the battery icon flashes.
Once the low battery level is reach, the baby unit should still be able to
operate for an hour.
Parent Unit
When the batteries on the Parent Unit reach a low level, the display will
show Low Battery and the battery icon flashes. The low battery alert
tone will be emitted from the speaker every 60 seconds. Once the low
battery level is reached, the parent unit should still be able to operate
for an hour. The low battery alert message and alert tone will be turned
off when fully charged batteries are being replaced.
Note: Low battery alert can be suppressed by pressing any button.
Charging the Battery
Place the parent unit on its charge cradle to charge the battery. When
charging, the red LED on the charger will light steadily. The bars in the
battery icon on the Parent Unit will scroll. When the battery is full, the
battery icon shows three bars and stop scrolling.
Note: The Parent Unit must never be operated on the charging cradle
without batteries.
Restore to Default Setting
You can return the baby and parent units to factory default settings.
•Press and hold to turn on the unit.
•When the LEDs on the unit become lit. Press and hold volume
down button( for Baby Unit, for Parent Unit) immediately
until the display reads Reset.
•A tone will also be emitted from the speaker.
Note: If the volume down button( for Baby Unit, for Parent
Unit) is not pressed within 4 seconds, the unit returns to idle
mode.
If you want to restore the factory default settings on the baby
monitor, you will need to restore factory default setting on the
Baby Unit or on the Parent Unit individually.

11
Appendix: Default Settings
Baby Unit
Speaker Volume: Level 3
Lullaby: Lullaby 1
Temperature alert range: Min 14°C, Max 23°C
Parent Unit
Speaker Volume: Level 1
Speaker Sensitivity: Level 5
Sound alert: On
Temperature alert: Off
Conformance To Regulation
This product complies with the essential requirements for Radio and
Telecommunications Terminal Equipment.
CE Mark in accordance with:
EN 301 406
EN 301 489-1
EN 301 489-3
EN60950: 2001
Directive 1999/5/EC
Table of contents
Other Alecto Baby Monitor manuals

Alecto
Alecto DVM-70 User manual

Alecto
Alecto DBX-76 User manual

Alecto
Alecto DBX-68 User manual

Alecto
Alecto DBX-82 User manual

Alecto
Alecto DVM-260+ User manual

Alecto
Alecto DVM-701 User manual

Alecto
Alecto DBX-85 eco User manual

Alecto
Alecto DIVM-550 User manual

Alecto
Alecto DOS-150+ User manual

Alecto
Alecto DBX-98 User manual

Alecto
Alecto DBX-20 User manual

Alecto
Alecto DBX-112 User manual

Alecto
Alecto DVM-150 User manual

Alecto
Alecto DVM-73 User manual

Alecto
Alecto DBX-77 User manual

Alecto
Alecto Hesdo DBX-90 User manual

Alecto
Alecto DBX-115 User manual

Alecto
Alecto DBX-86 User manual

Alecto
Alecto IVM-180 User manual

Alecto
Alecto DBX-90 User manual