SEGURIDAD
VOLUMEN DE SUMINISTRO
1 x Cargador de batería Serie IC
1 x Línea de alimentación
SEGURIDAD
No debe exponerse el dispositivo a golpes mecánicos fuertes.
No debe exponerse el dispositivo a temperaturas extremas, a luz solar directa
o vibraciones fuertes.
Al cargar las baterías de plomo-ácido se genera gas hidrógeno; el gas
hidrógeno es explosivo. Asegúrese de que la batería esté ubicada en una
zona bien ventilada.
Las baterías deben mantenerse alejadas de llamas abiertas y chispas pues
podrían provocar explosiones.
Cuando está realizando la instalación, observe la magnitud y la polaridad de
entrada/salida.
Nunca abra la carcasa del dispositivo ni lo repare. En caso de dañarse, debe
reemplazarse el dispositivo.
ASPECTOS GENERALES
El cargador IC es adecuado para baterías de plomo-ácido tanto con Venti-
lación Libre (húmedas) como con Regulación por Válvula (secas).
El cargador funciona a altas frecuencias y debe conectarse a una red
estándar de 230V con conexión a tierra.
SICHERHEIT
INHALT
1 x IC-Serie Akku-Ladegerät
1 x Stromzuführung
SICHERHEIT
Das Gerät darf nicht zu schweren Erschütterungen ausgesetzt sein.
Das Gerät darf keinen extremen Temperaturen, direktem Sonnenlicht oder
starken Erschütterungen ausgesetzt ist.
Beim Laden von Blei-Säure-Batterien wird Wasserstoffgas erzeugt, Wasser-
stoffgas ist explosiv. Stellen Sie sicher, dass sich die Batterie in einem gut
belüfteten Raum befindet
Offene Flammen und Funken sollten von den Batterien fern gehalten werden,
da diese Explosionen verursachen können.
Beachten Sie die Größe und Polarität des Ein- /Ausgangs bei der Installation.
Weder öffnen oder reparieren Sie das Gerätegehäuse. Ist das Gerät bes-
chädigt, muss dies ersetzt werden.
ALLGEMEINES
Der IC-Ladegerät eignet sich sowohl für frei belüftete (nasse) und ven-
tilgeregelte (trockene) Blei-Säure-Batterien
Das Ladegerät arbeitet mit hohen Frequenzen und sollte mit einem Standard
230V-Stromanschluss mit Erdung verbunden werden.
ENSAMBLAJE
POSICION
El cargador IC es adecuado para uso en el interior y el exterior
Colóquelo en posición horizontal o vertical.
Coloque el cargador en una zona bien ventilada.
Cuando el cargador se instala sobre una pared o un vehículo, debe ser
ubicado en posición vertical para permitir su correcto enfriamiento.
CONEXIONES
Antes de conectar o desconectar la batería, desconecte el cargador. Si no lo
hace, se podrían producir chispas.
Conecte la unidad como se detalla abajo.
Conecte positivo + con positivo + y negativo –con negativo -
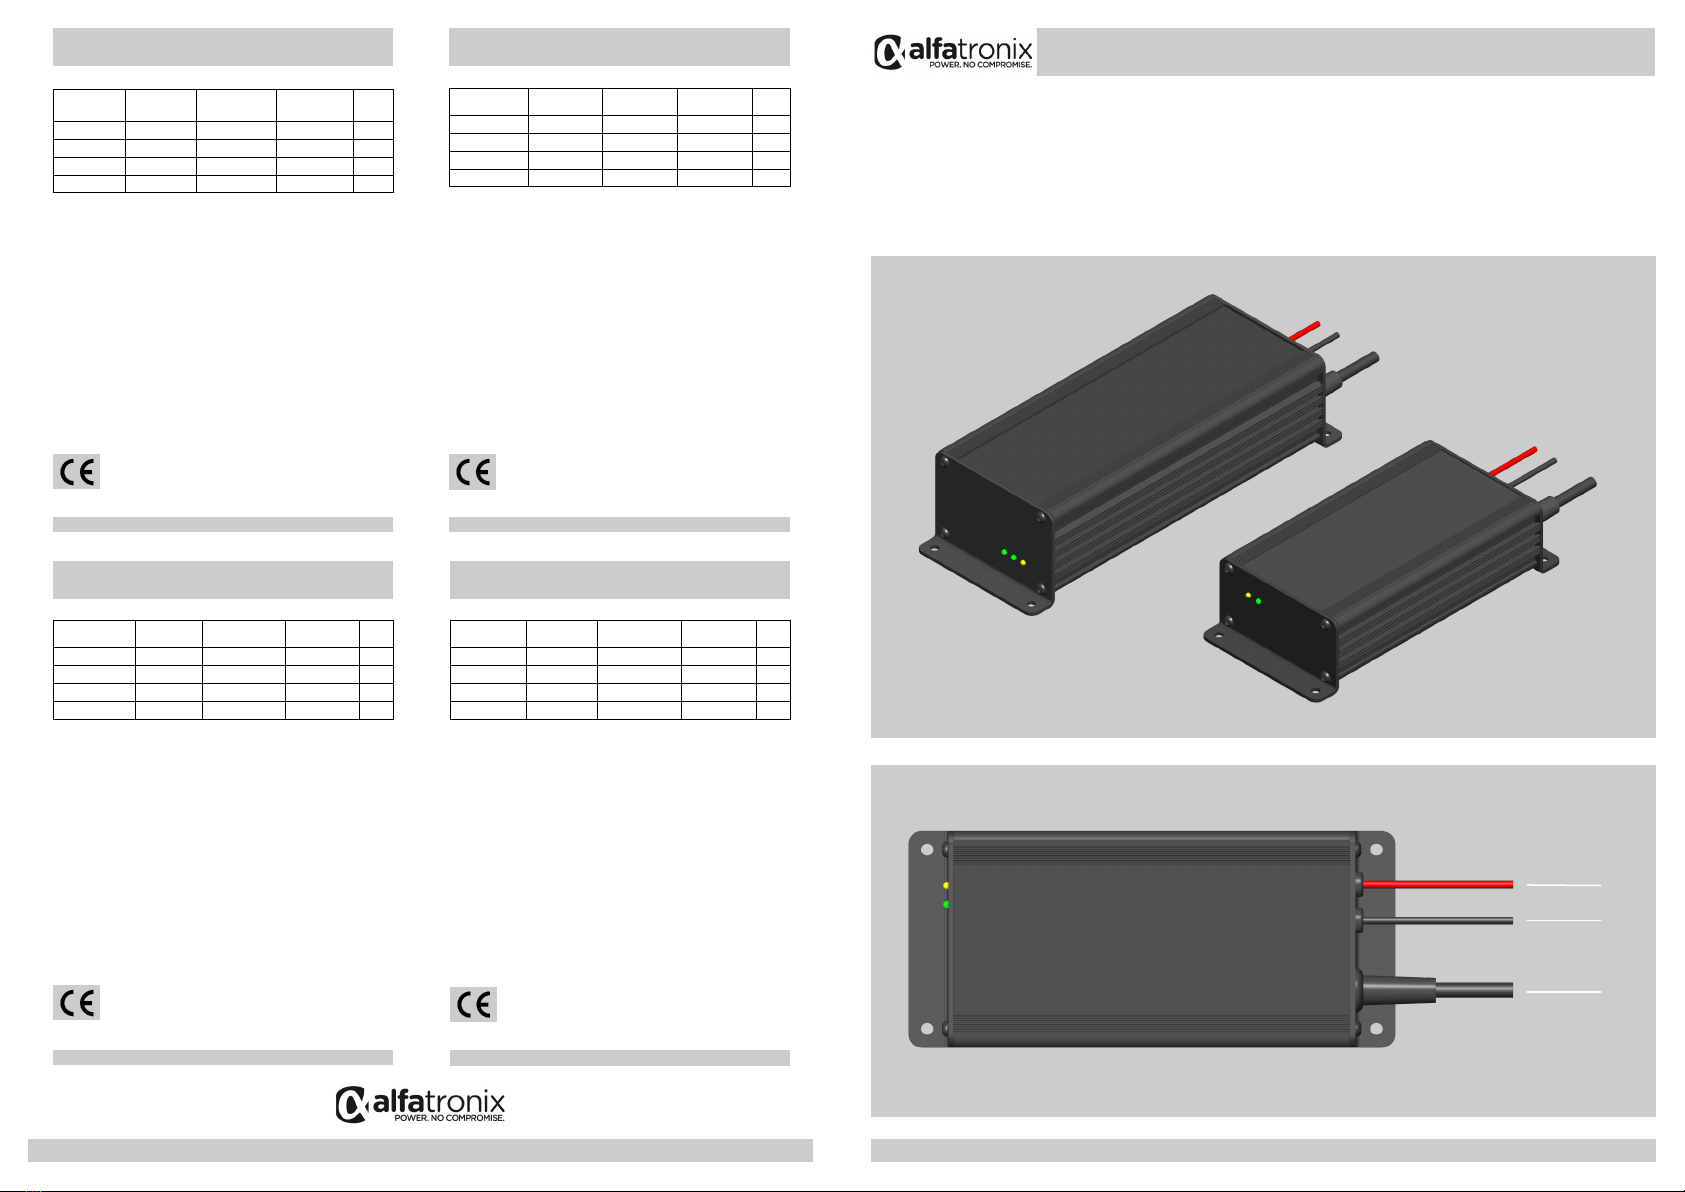
(1) - Entrada
(2) –Salida negativa (Negra)
(3) –Salida positiva (Roja)
ESPAÑOL
FUNCIÓN DE LOS LED
Una vez conectado, comienza a cargar al cabo de unos pocos segundos y se
enciende el LED amarillo. El LED amarillo permanecerá iluminado hasta que
la batería esté totalmente cargada.
Si el cargador está conectado a una batería totalmente cargada, el cargador
cargará durante 1 hora, que es el tiempo mínimo de carga. Durante esta
fase, el LED verde (primer LED verde en modelos 240 y 300) también estará
iluminado.
Cuando sólo está encendido el LED verde (primer LED verde en modelos 240
y 300), el cargador está en modo de carga de mantenimiento; el modo de
mantenimiento continuará mientras la batería siga conectada.
Los cargadores IC230-12 240 y IC230-24 300 vienen equipados con un
Segundo LED verde para indicar el modo de carga de mantenimiento. Este
segundo LED verde se iluminará cuando el tiempo de carga exceda las 20
horas y la corriente no caiga por debajo de 1 amperio. Para evitar la
sobrecarga, el cargador pasará después a carga de mantenimiento.
El cargador se reseteará no bien se lo apague o encienda o si se desconecta
la batería.
El tiempo de carga depende de la capacidad de la batería y de la magnitud
de descarga.
MONTAGE
POSITION
Der IC-Ladegerät eignet sich für Innen-und Außenbereiche.
Horizontale oder vertikale Position
Das Ladegerät ist in einem gut ventilierten Bereich aufzustellen.
Wenn das Ladegerät an einer Wand oder in einem Fahrzeug montiert wird,
sollte es vertikal zur optimalen Kühlung angebaut werden.
ANSCHLÜSSE
Schalten Sie das Ladegerät an, bevor die Batterie angeschlossen oder getrennt
werden. Andernfalls könnten sich Funken bilden.
Schließen Sie das Gerät wie unten beschrieben an.
Verbinden Sie Pluspol + mit Pluspol + und Minuspol - mit Minuspol -
(1) - Eingang
(2) - Ausgang Minuspol (Schwarz)
(3) - Ausgang Pluspol (Rot)
DEUTSCH
LED-FUNKTION
Nach dem Anschluss beginnt der Ladevorgang nach wenigen Sekunden und
die gelbe LED leuchtet. Die gelbe LED leuchtet so lange, bis der Akku vollstän-
dig geladen ist.
Wird das Ladegerät an eine voll aufgeladene Batterie angeschlossen, wird es
diese eine Stunde lang laden, was die minimale Ladezeit beträgt. Während
dieser Ladezeit leuchtet die grüne LED (erste grüne Led auf 240 & 300
Modellen).
Wenn nur die grüne LED leuchtet (erste grüne LED auf 240 & 300 Modellen),
befindet sich das Ladegerät in Erhaltungsladung und wird solange gehalten,
wie die Batterie angeschlossen ist.
Die IC230-12 240 und 24 300 IC230-Ladegeräte sind mit einer zweiten
grüne LED zur Anzeige der Erhaltungsladung ausgestattet. Diese zweite
grüne LED leuchtet, wenn die Ladezeit 20 Stunden überschreitet und die
aktuelle 1 Amp nicht unterschreitet. Das Ladegerät wird dann umschalten, um
mögliche Überspannungen zu vermeiden.
Das Ladegerät wird zurückgesetzt, sobald es aus- oder angeschaltet wird,
oder wenn die Batterie abgeklemmt wird.
Die Ladezeit ist abhängig von der Batteriekapazität und der Entladetiefe.
ASSEMBLY
POSITION
The IC charger is suitable for indoor and outdoor use.
Position horizontally or vertically
Position the charger in a well ventilated area.
When the charger is fitted on a wall or mounted in a vehicle it should be
vertically mounted for optimum cooling.
THE CONNECTIONS
Switch off the charger before the battery is connected or disconnected. Failure
to do so could produce sparks.
Connect the unit as detailed below.
Connect positive + to positive + and negative - to negative -.
(1) - Input
(2) - Output Negative (Black)
(3) - Output Positive (Red)
ENGLISH
LED FUNCTION
After connection, charging starts within a few seconds and the yellow LED is lit
up. The yellow LED will remain illuminated until the battery is fully charged.
If the charger is connected to a fully charged battery, the charger will charge
for one hour, this is the minimum charging time. During this phase the green
LED (first green LED on 240 & 300 models) will be illuminated as well.
When only the green LED (first green LED on 240 & 300 models) is lit up, the
charger is kept in maintenance charge mode, maintenance will continue as
long as the battery is connected.
The IC230-12 240 and IC230-24 300 chargers are equipped with a second
green LED for indicating maintenance charge mode,. This second green LED
will be illuminated if the charging time exceeds 20 hours and the current does
not drop below 1 Amp. The charger will then change to maintenance
charging in order to prevent over charge.
The charger will reset as soon as it is switched off and on, or if the battery is
disconnected.
Charging time depends on the capacity of the battery and depth of discharge.
SÉCURITÉ
CONTENU
1 x Chargeur de batterie Série IC
1 x Cordon d’alimentation
SECURITE
Ce dispositif ne doit pas être exposé à des chocs mécaniques importants.
Le dispositif ne doit pas être exposé à des températures extrêmes, à la lumière
directe du soleil ou à des vibrations fortes.
Le gaz hydrogène est produit quand on charge les batteries plomb-acide ; le
gaz hydrogène est explosif. Assurez-vous que la batterie est positionnée dans
une zone bien aérée.
Gardez toutes flammes et étincelles loin des batteries car celles-ci peuvent
causer des explosions
Observez l’amplitude et la polarité de la tension d’entrée/sortie au moment
de l’installation.
Ne jamais ouvrir le boîtier du dispositif et ne jamais tenter de le réparer. Le
dispositif doit être remplacé s’il est endommagé.
GENERALITES
Le chargeur IC convient aussi bien pour les batteries plomb-acide à soupape
(sèches) qu’à aération libre (humides)
Le chargeur fonctionne à de hautes fréquences et doit être connecté à une
alimentation secteur 230 V standard avec la terre.
ASSEMBLAGE
POSITION
Le chargeur IC convient aussi bien pour une utilisation en intérieur qu’en
extérieur
Positionnez horizontalement ou verticalement
Positionnez le chargeur dans une zone bien aérée.
Quand le chargeur est monté sur une paroi ou monté dans un véhicule, il
doit être monté verticalement pour obtenir le meilleur refroidissement
LA CONNEXION
Eteignez le chargeur avant de connecter ou déconnecter la batterie. Sinon, cela
pourrait produire des étincelles.
Connecter l’unité comme indiqué en détail ci-dessous.
Connectez le positif + au positif + et le négatif –au négatif -
(1) - Entrée
(2) –Négatif de sortie (Noir)
(3) –Positif de Sortie (Rouge)
FRANÇAIS
LA FONCTION DES LED
Après connexion, la charge commence dans les quelques secondes qui
suivent et la LED s’allume. La LED jaune reste allumée jusqu’à ce que la
batterie soit entièrement chargée.
Si le chargeur est raccordé à une batterie entièrement chargée, le chargeur
chargera pendant une heure, ce qui est le temps de charge minimum. Pendant
cette phase, la LED verte (première LED verte sur les modèles 240 et 300)
s’allume aussi.
Lorsque seule la LED verte (première LED verte sur les modèles 240 & 300) est
allumée, le chargeur est maintenu en charge d’entretien, et celle-ci se
poursuivra tant que la batterie est branchée.
Les chargeurs IC230-12 240 et IC230-24 300 sont équipés d’une seconde
LED verte indiquant le mode de charge d’entretien. Cette deuxième LED verte
s’allumera si le temps de charge dépasse 20 heures et que le courant ne
descend pas au-dessous de 1 A. Le chargeur passe alors à la charge
d’entretien afin d’éviter toute surcharge.
Le chargeur sera réinitialisé dès qu’il sera éteint puis rallumé, ou si la batterie
est déconnectée.
Le temps de charge dépend de la capacité de la batterie et de la profondeur
de décharge.
SAFETY
PACKING CONTENTS
1 x IC Series Battery Charger
1 x Power lead
SAFETY
The device must not be exposed to severe mechanical shocks.
The device must not be exposed to extreme temperature, direct sunlight or
vigorous vibration.
Hydrogen gas is be produced when charging lead acid batteries, hydrogen
gas is explosive. Ensure the battery is positioned in a well ventilated area.
Open flames and sparks should be kept away from batteries as these may
cause explosions.
Observe the magnitude and polarity of the input/output when installing.
Never open the device casing and never repair it. The device must be
replaced if it is damaged.
FEATURES
Small and compact, can therefore easily be fitted close to the battery.
The charging progress is displayed with the status indicator LED on the front
panel during charging.
Dust, water and impact resistant to IP65.
LED status indicators.
GENERAL
The IC charger is suitable for both Freely Ventilated (wet) and Valve Regulated
(dry) lead acid batteries.
The charger operates at high frequencies and should be connected to a
standard 230V mains connection with ground.
TROUBLE SHOOTING - IC230-12 108 & IC230-24 108
Yellow flashing LED May mean that the battery is not properly connected.
Check cables, connection terminals, plugs and other
connections to the battery.
Yellow and green LED The charging voltage is low, <1.8V/cell.
simultaneously flashing
Yellow and green LED Internal temperature is too high.
flashing alternately
DISPOSITIFS
Petit et compact, peut donc être facilement monté à proximité de la batterie.
La progression de la charge s’affiche avec la LED d’indicateur d’état sur le
tableau avant durant la charge.
Résistance à la poussière, à l’eau et aux chocs conforme à IP65.
Indicateurs d’état des LED.
DEPANNAGE - IC230-12 108 & IC230-24 108
LED jaune clignotante Peut signifier que la batterie n’est pas correctement
connectée. Vérifiez les câbles, les bornes de connex-
ion, les fiches et autres connexions avec la batterie
Les LEDs clignotant La tension de charge est faible, <1.8 V/cellule
simultanément
LEDs jaune et verte la température est trop élevée
clignotant alternativement
MERKMALE
Klein und kompakt, kann es einfach in Nähe der Batterie anzubringen.
Der Ladevorgang wird mit der LED-Statusanzeigen auf der Vorderseite
angezeigt.
Staub, Wasser und stoßfest nach IP65.
LED-Statusanzeigen.
FEHLERSUCHE - IC230-12 108 & IC230-24 108
Gelb blinkende LED Kann bedeuten, dass die Batterie nicht richtig
angeschlossen ist. Überprüfen Sie Kabel, An
schlussklemmen, Stecker und andere Anschlüsse an
der Batterie.
Gelbe und grüne LED Die Ladespannung ist gering, <1.8V/cell.
gleichzeitig blinken
Gelbe und grüne LEDs Interne Temperatur ist zu hoch.
blinken abwechselnd
CARACTERÍSTICAS
De tamaño pequeño y diseño compacto, por lo que puede instalarse fácil-
mente cerca de la bacteria.
El avance de la carga aparece en el LED indicador de estado que está en el
panel frontal.
Resistente al polvo, agua y golpes según norma IP65.
LEDS indicadores de estado.
RESOLUCIÓN DE PROBLEMAS - IC230-12 108 & IC230-24 108
LED amarillo destellando Podría significar que la batería no está conectada
correctamente. Verifique los cables, las terminales de
conexión, los enchufes y otras conexiones a la
batería.
LED amarillo y verde El voltaje de carga es bajo, pila de <1.8V
destellando simultáneamente
LED amarillo y verde temperatura interna demasiado alta
destellando alternadamente