manuals.online logo
Brands
  1. Home
  2. •
  3. Brands
  4. •
  5. AmazonBasics
  6. •
  7. Bathroom Fixture
  8. •
  9. AmazonBasics B0775ZMBDX User manual

AmazonBasics B0775ZMBDX User manual

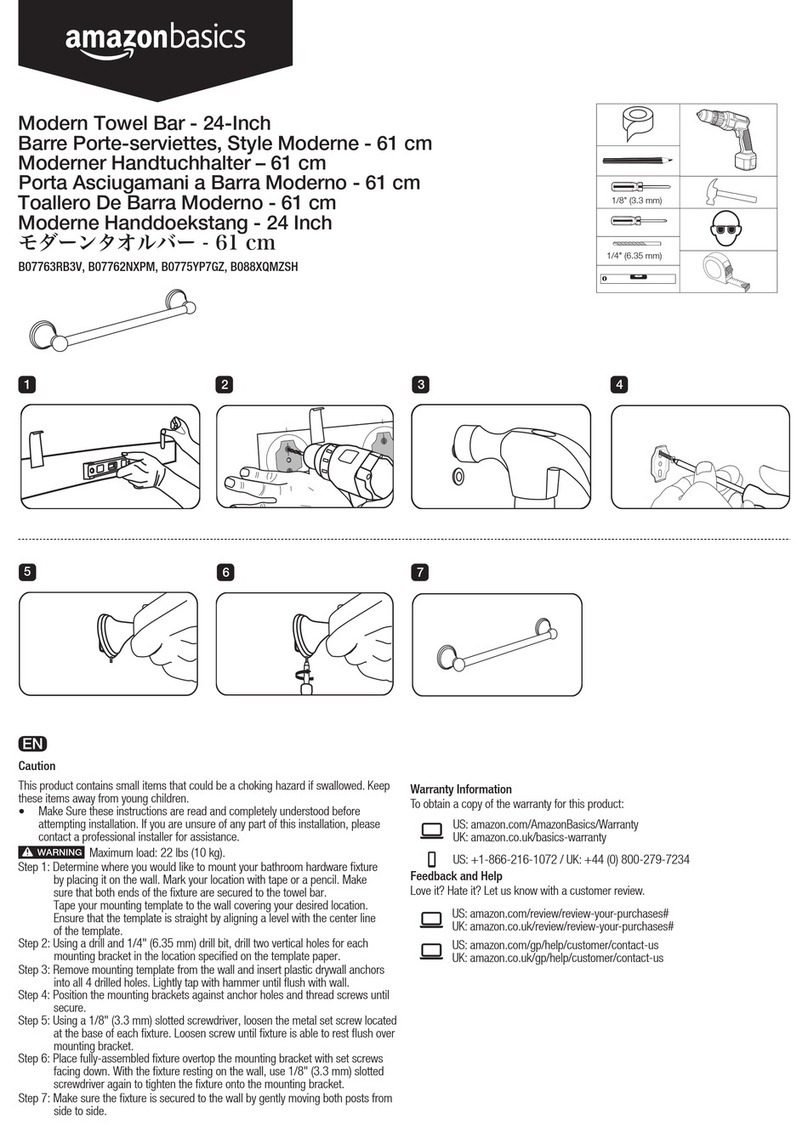
B0775ZMBDX, B07763QC7R, B0775Z9ZDK, B088XWV8ZF
Modern Towel Bar - 18-Inch
Barre Porte-serviettes, Style Moderne - 45,7 cm
Moderner Handtuchhalter – 45,7 cm
Porta Asciugamani a Barra Moderno - 45,7 cm
Toallero De Barra Moderno - 45,7cm
Moderne Handdoekstang - 18Inch
モダーンタオルバー-45.7cm
EN
WarrantyInformation
To obtain a copy of the warrantyfor this product:
US:amazon.com/AmazonBasics/Warranty
UK:amazon.co.uk/basics-warranty
US: +1-866-216-1072 / UK: +44(0) 800-279-7234
Feedback and Help
Love it? Hate it?Let us know with acustomer review.
US: amazon.com/review/review-your-purchases#
UK: amazon.co.uk/review/review-your-purchases#
US: amazon.com/gp/help/customer/contact-us
UK: amazon.co.uk/gp/help/customer/contact-us
1 2 3
5
Caution
This productcontains small items that could be a choking hazard if swallowed. Keep
these items away from young children.
• Make Sure these instructions are read and completely understood before
attempting installation. If you are unsure of any part of this installation, please
contact a professional installer for assistance.
Step 2: Using a drill and 1/4" (6.35 mm) drill bit, drill two vertical holes for each
mounting bracket in the location specified on the template paper.
Step 1: Determine where you would like to mount your bathroom hardware fixture
by placing it on the wall. Mark your location with tape or a pencil. Make
sure that both ends of the fixture are secured to the towel bar.
Tape your mounting template to the wall covering your desired location.
Ensure that the template is straight by aligning a level with the center
line of the template.
Step 3: Remove mounting template from the wall and insert plastic drywall anchors
into all 4 drilled holes. Lightly tap with hammer until flush with wall.
Step 4: Position the mounting brackets against anchor holes and thread screws until
secure.
Step 7: Make sure the fixture is secured to the wall by gently moving both posts from
side to side.
Maximum load: 22 lbs (10 kg).
WARNING
4
76
Step 5: Using the provided allen wrench, loosen the metal set screw located at the
base of each fixture. Loosen set screw until fixture is able to rest flush over
mounting bracket.
Step 6: With the fixture resting on the wall, use the provided allen wrench to tighten
the fixture onto the mounting bracket.
1/4" (6.35 mm)
DEFR
Informations Sur LaGarantie
Pour obtenirune copie de lagarantie portant sur ce produit :
FR : amazon.fr/basics-garantie
CA : amazon.ca/AmazonBasics/Warranty
FR : +33 (0) 800-947-715 / CA :+1-877-586-3230
Vos Avis et Aide
FR :amazon.fr/review/review-your-purchases#
CA : amazon.com/review/review-your-purchases#
FR :amazon.fr/gp/help/customer/contact-us
CA : amazon.ca/gp/help/customer/contact-us
DE
Gewährleistung
EineKopie der Gewährleistung für dieses Produkt erhalten Sieunter:
amazon.de/basics-garantie
DE:+49 (0) 800-363-8469 / AT: +430800-8866-3238
Feedback und Hilfe
Gefällt es Ihnen? Gefällt es Ihnen nicht? Dann bewerten Sie das Produkt auf unserer
Webseite!
amazon.de/review/review-your-purchases#
amazon.de/gp/help/customer/contact-us
IT
Informazioni Di Garanzia
Per ottenere una copia della garanzia del prodotto:
amazon.it/basics-garanzia +39 (0) 800-628-805
Feedback e Aiuto
Ti piace? Oppureno?Faccelo sapere scrivendo la tua recensione.
amazon.it/review/review-your-purchases#
amazon.it/gp/help/customer/contact-us
Attention
Ce produit contient de petites pièces susceptibles de constituer un risque d’étouffement
en cas d’ingestion. Maintenez ces pièces hors de la portée des jeunes enfants.
• Veillez à ce que ces consignes soient lues et bien comprises avant de procéder à
l'installation. En cas de doute concernant toute étape de l’installation, veuillez
prendre contact avec un installateur professionnel afin de recevoir de l’aide.
Étape 2 : À l’aide d’une perceuse et d’un foret de 1/4" (6,35 mm), percez deux
trous verticaux pour chaque support de montage à l’endroit indiqué sur
le modèle en papier.
Étape 1 : Déterminez l’endroit où vous souhaitez monter votre fixation pour salle de
bain en la plaçant sur le mur. Marquez l’emplacement à l’aide de ruban
adhésif ou d’un crayon. Assurez-vous que les deux extrémités de la
fixation sont solidement fixées sur la barre porte-serviettes.
Scotchez votre modèle de montage sur le mur en recouvrant l’emplacement
souhaité. Assurez-vous que le modèle est bien droit en alignant un niveau
sur la ligne centrale du modèle.
Étape 3 : Retirez le modèle de montage du mur, puis insérez les chevilles plastique
à cloison sèche dans les 4 trous percés. Tapotez légèrement à l’aide d’un
marteau jusqu’à ce qu’elles soient bien affleurantes au mur.
Étape 4 : Placez les supports de montage contre les trous des chevilles, puis vissez
les vis jusqu’à ce qu’elles soient bien serrées.
Étape 7 : Assurez-vous que la fixation est solidement fixée sur le mur en remuant
doucement chaque barre d’un côté à l’autre.
Charge maximale : 10 kg.
AVERTISS
Schritt 2: Bohren Sie mit einer Bohrmaschine mit 1/4" (6,35 mm) Bohrer zwei
vertikale Löcher für jeden Montagebügel an den durch die Schablone
festgelegten Positionen.
Schritt 1: Bestimmen Sie, wo Sie Ihr Badezimmerzubehör montieren möchten,
indem Sie es an der Wand positionieren. Markieren Sie die Position mit
Klebeband oder Bleistift. Achten Sie darauf, dass die beiden Enden der
Halterung fest am Handtuchhalter befestigt sind.
Kleben Sie Ihre Montageschablone an der gewünschten Position an
die Wand. Stellen Sie sicher, dass die Schablone gerade ist, in dem
Sie die Mittellinie der Schablone mit einer Wasserwaage ausrichten.
Schritt 3: Entfernen Sie die Montageschablone von der Wand und setzen Sie
Kunststoff-Dübel in alle 4 gebohrten Löcher ein. Klopfen Sie die Dübel
leicht mit einem Hammer fest, bis sie bündig mit der Wand sind.
Schritt 4: Positionieren Sie die Montagebügel an den Dübellöchern und befestigen
Sie die Bügel mit den Schrauben.
Schritt 7: Stellen Sie sicher, dass die Halterung sicher an der Wand befestigt ist,
indem Sie die beiden Stangen vorsichtig seitlich bewegen.
Maximale Belastbarkeit: 10 kg.
WARNUNG
Passo 2: Usando un trapano con punta da 1/4" (6,35 mm), praticare due fori verticali
per ogni staffa di montaggio nella posizione segnata sulla dima di carta.
Passo 1: Decidere dove montare l'accessorio metallico da bagno sulla parete.
Segnare la posizione con il nastro o una matita. Assicurarsi che ambo le
estremità dell'accessorio siano fissate al porta asciugamani a barra.
Fissare con nastro la dima sulla parete coprendo la posizione desiderata.
Assicurarsi che la dima sia diritta allineando una livella alla linea centrale
della dima stessa.
Passo 3: Rimuovere la dima dalla parete e inserire i tasselli per cartongesso in
plastica all'interno dei 4 fori. Martellare delicatamente fin quando i tasselli
sono a filo con la parete.
Passo 4: Posizionare le staffe di montaggio contro i fori dei tasselli e avvitare fino ad
assicurare.
Passo 7: Verificare che l'accessorio sia assicurato alla parete spostando delicatamente
ambo i supporti di lato.
Carico massimo: 10 kg.
AVVERTE
Vorsicht
Dieses Produkt enthält Kleinteile, die beim Verschlucken eine Erstickungsgefahr
darstellen können. Halten Sie diese Teile von Kleinkindern fern.
• Stellen Sie sicher, dass Sie diese Anweisungen gelesen und vollständig
verstanden haben, bevor Sie mit der Montage beginnen. Wenn Sie sich über
Teile dieser Montage im Unklaren sind, bitten Sie eine Fachkraft um Hilfe.
Attenzione
Questo prodotto contiene elementi di piccole dimensioni che potrebbero causare il
rischio di soffocamento se ingeriti. Tenere questi elementi fuori dalla portata dei
bambini.
• Assicurarsi che le presenti istruzioni siano state lette e comprese
completamente prima di tentare l'installazione. In caso di dubbi su qualsivoglia
parte dell'installazione, contattare un tecnico professionista per assistenza.
Étape 5 : À l'aide de la clé hexagonale fournie, desserrez la vis de blocage en métal
située sur la base de chaque fixation. Desserrez la vis de blocage jusqu’à
ce que la fixation affleure au support de fixation.
Étape 6 : Avec la fixation contre le mur, utilisez la clé hexagonale fournie pour serrer
la fixation sur le support de montage.
Schritt 5: Lösen Sie mit dem mitgelieferten Innensechskantschlüssel die
Metallstellschraube, welche sich an der Basis jeder Halterung befindet.
Lösen Sie die Stellschraube, bis die Halterung bündig über dem
Montagebügel sitzt.
Schritt 6: Ziehen Sie die an der Wand anliegende Halterung mit dem mitgelieferten
Innensechskantschlüssel am Montagebügel fest.
Passo 5: Utilizzando la chiave a brugola fornita, allentare la vite di fissaggio in metallo
situata alla base di ciascun dispositivo. Allentare la vite di fissaggio finché il
dispositivo non è in grado di poggiare a filo sulla staffa di montaggio.
Passo 6: Con il dispositivo appoggiato alla parete, utilizzare la chiave a brugola fornita
per fissare il dispositivo sulla staffa di montaggio.
Stap 1: Bepaal waar u uw de stang wilt monteren door deze op de muur te plaatsen.
Markeer de locatie met tape of een potlood. Zorg ervoor dat beide uiteinden
van de voet aan de handdoekstang zijn bevestigd.
Plak de montagesjabloon op de muur en bedek de gewenste locatie. Zorg
ervoor dat de sjabloon recht staat door een niveau uit te lijnen met de
middellijn van de sjabloon.
ES
JP
保証について
この製品の保証書のコピーを入手するには:
amazon.jp/AmazonBasics/Warranty
+81 (0) 120-899-276
フィードバックとサポート
気に入っていただけましたか?お気に召しませんでしたか?カスタ
マーレビューでお知らせください。
amazon.jp/review/review-your-purchases#
amazon.jp/gp/help/customer/contact-us
中国製
HECHO EN CHINA
GEMAAKT IN CHINA
PRODOTTOIN CINA
HERGESTELLT IN CHINA
FABRIQUÉ EN CHINE
MADE IN CHINA
NL
Garantie Informatie
Om een kopie van degarantie voordit product te krijgen:
amazon.nl/basics-garantie +31 8000227380
Feedback en Hulp:
Vind je het leuk? Vind je het niet leuk?Beoordeel het product dan op onze website!
amazon.nl/review/review-your-purchases#
amazon.nl/gp/help/customer/contact-us
Comentarios y Ayuda
¿Le encanta? ¿No legusta nada? Escriba una opinión como cliente.
ES: amazon.es/review/review-your-purchases#
MX:amazon.com.mx/review/review-your-purchases#
ES: amazon.es/gp/help/customer/contact-us
MX:amazon.com.mx/gp/help/customer/contact-us
ES: +34 (0) 900-803-711 / MX:+52(0) 442-348-9587
Información Sobre La Garantía
Para obtener una copia de la garantía de este producto:
ES: amazon.es/basics-garantiaステップ2:1/4インチ(6.35mm)ドリルを使って、テンプレート
ペーパーにテク呈されている位置どおりに、それぞれ
のマウンティングブラケット用に縦向きに2つの穴を
あけます。
ステップ1:壁に位置させてみることで、バスルームハードウェア
をどこに位置させたいかを決定します。テープまたは
鉛筆で位置に印をつけます。ホック部分の両側がタオ
ルバーにしっかり固定されていることを確認してく
ださい。
マウンティングプレートを、希望の位置をカバーする
ように、壁にテープでつけます。水準器をテンプレー
トの線の中央にあわせることでテンプレートが真っ直
ぐであることを確認してください。
ステップ3:マウンティングテンプレートを壁からはずし、ドリル
であけた四つの穴にプラスチック製の乾燥式壁用アン
カーを差し込みます。壁と同一平面に来るまで、ハ
ンマーで軽く叩きます。
ステップ4:マウンティングブラケットをアンカーの穴に合わせ、
しっかり留まるまでネジで締めこみます。
ステップ7:両方の支柱を軽く左右に押すことで壁にしっかり留ま
っていることを確認します。
最大積載量:10kg.
警告
Paso 1: Determine si desea montar el accesorio metálico de baño fijo en la pared.
Marque su posición con una cinta o un lápiz. Asegúrese de que ambos
extremos del accesorio estén asegurados al toallero de barra.
Pegue con cinta adhesiva la plantilla de montaje a la pared tapando la
ubicación deseada. Asegúrese de que la plantilla esté recta alineando
un nivel con la línea central de la plantilla.
Carga máxima: 10 kg.
ADVERTE
Paso 2: Con un taladro y una broca de 1/4" (6,35 mm), taladre dos orificios
verticales para cada soporte de montaje en el lugar especificado en el
papel de la plantilla.
Paso 3: Retire la plantilla de montaje de la pared e inserte los anclajes plásticos
ara placas de yeso en los 4 orificios perforados. Golpee suavemente con
un martillo hasta que quede al ras con la pared.
Paso 4: Coloque los soportes de montaje en los orificios del anclaje y apriete los
tornillos hasta que estén seguros.
Paso 7: Asegúrese de que el accesorio esté apretado en la pared moviéndolo
suavemente ambas barras de lado a lado.
Atención
Este producto incluye objetos pequeños que pueden suponer un peligro de asfixia
si se ingieren. Manténgalos alejados de los niños.
• Asegúrese de leer y comprender completamente estas instrucciones antes de
proceder a la instalación. Si no está seguro de alguno de los pasos de esta
instalación, contacte con un contratista profesional para que le ayude.
注意
この製品には、飲み込めば窒息する危険のある小さいパーツが含ま
れています。これらは小さいお子様から遠ざけてください。
• 取り付けを試みる前にこれらの指示をしっかり読み、完全に理
解してください。これらの指示の中で少しでも不確かな部分が
あれば、プロの取り付け業者にご連絡ください。
Voorzichtig
Dit product bevat kleine onderdelen die verstikking kunnen veroorzaken wanneer ze
worden ingeslikt. Houd deze onderdelen uit de buurt van kleine kinderen.
• Zorg ervoor dat deze instructies worden gelezen en volledig worden begrepen
alvorens over te gaan tot de installatie. Als u twijfels hebt bij een deel van deze
installatie, kunt u voor hulp contact opnemen met een professionele installateur.
Stap 2: Boor met behulp van een boormachine en een boor van 1/4inch (6,35mm)
twee verticale gaten voor elke montagebeugel op de locatie die wordt
aangegeven op het sjabloonpapier.
Stap 3: Verwijder de montagesjabloon van de muur en steek kunststof gipsplaatankers
in alle 4geboorde gaten. Klop er zachtjes met een hamer op tot ze gelijk met
de muur zitten.
Stap 4: Plaats de montagebeugels op de ankergaten en draadschroeven totdat ze
vastzitten.
Stap 7: Controleer of de voet stevig aan de muur is bevestigd door beide stangen
voorzichtig heen en weer te bewegen.
Maximale belasting: 22pond (10kg).
WAARSCHUWING
Paso 5: Con la llave hexagonal incluida, afloje el tornillo de fijación de metal situado
en la base de cada accesorio. Afloje el tornillo de fijación hasta que el
accesorio quede a ras del soporte de montaje.
Paso 6: Con el accesorio colocado en la pared, utilice la llave hexagonal incluida
para apretar el accesorio en el soporte de montaje.
Stap 5: Draai de metalen stelschroef op de basis van elke armatuur los met behulp
van de inbegrepen inbussleutel. Draai de stelschroef los totdat de armatuur
vlak op de montagebeugel zit.
Stap 6: Met de armatuur rustend tegen de wand, draai de armatuur vast op de
montagebeugel met behulp van de inbegrepen inbussleutel.
ステップ5:付属のアレンレンチを使用して、各固定具基部にある
金属セットネジを緩めます。固定具が取付ブラケット
に刺さる程度まで、セットネジを緩めます。
ステップ6:固定具が壁に向くように、付属アレンレンチで、固定
部を取付ブラケットに締め付けます。

This manual suits for next models

3

Other AmazonBasics Bathroom Fixture manuals

AmazonBasics B07763RB3V User manual

AmazonBasics

AmazonBasics B07763RB3V User manual

AmazonBasics B079LL22TC User manual

AmazonBasics

AmazonBasics B079LL22TC User manual

AmazonBasics B07FHBYWPY Operating and safety instructions

AmazonBasics

AmazonBasics B07FHBYWPY Operating and safety instructions

AmazonBasics B088Y221P7 User manual

AmazonBasics

AmazonBasics B088Y221P7 User manual

AmazonBasics B07F288Z1B User manual

AmazonBasics

AmazonBasics B07F288Z1B User manual

AmazonBasics B0792FZBDD User manual

AmazonBasics

AmazonBasics B0792FZBDD User manual

AmazonBasics B07FHBYWPY User manual

AmazonBasics

AmazonBasics B07FHBYWPY User manual

AmazonBasics B0775YFK36 User manual

AmazonBasics

AmazonBasics B0775YFK36 User manual

AmazonBasics B07RS44KQN Operating and safety instructions

AmazonBasics

AmazonBasics B07RS44KQN Operating and safety instructions

Popular Bathroom Fixture manuals by other brands

Exclusive Heritage BV-20036S Series installation guide

Exclusive Heritage

Exclusive Heritage BV-20036S Series installation guide

Kinedo Kinemagic Royal 2 DES1310NG-D installation instructions

Kinedo

Kinedo Kinemagic Royal 2 DES1310NG-D installation instructions

Fleurco NM272-40-79 installation manual

Fleurco

Fleurco NM272-40-79 installation manual

Artweger 9R2P Series Assembly instructions

Artweger

Artweger 9R2P Series Assembly instructions

Reece MILLI EXO TOILET ROLL HOLDER quick start guide

Reece

Reece MILLI EXO TOILET ROLL HOLDER quick start guide

DURAVIT Tempano 720187 Mounting instructions

DURAVIT

DURAVIT Tempano 720187 Mounting instructions

Better Bathrooms Zanda BeBa 28245 user manual

Better Bathrooms

Better Bathrooms Zanda BeBa 28245 user manual

Spectrum Brands Pfister Ashfield F-049-YW2 Quick installation guide

Spectrum Brands

Spectrum Brands Pfister Ashfield F-049-YW2 Quick installation guide

Kohler C3-430 installation guide

Kohler

Kohler C3-430 installation guide

Franke XINX616 Installation and operating instructions

Franke

Franke XINX616 Installation and operating instructions

Victorian Plumbing CHATSWORTH Fitting instructions

Victorian Plumbing

Victorian Plumbing CHATSWORTH Fitting instructions

Kohler BEITOU 72830T-L installation instructions

Kohler

Kohler BEITOU 72830T-L installation instructions

JohnsonSuisse CORSICA 1220 installation guide

JohnsonSuisse

JohnsonSuisse CORSICA 1220 installation guide

Franke F5ST2023 Installation and operating instructions

Franke

Franke F5ST2023 Installation and operating instructions

Black & Decker Price Pfister Professional PRO-PP83 quick start guide

Black & Decker

Black & Decker Price Pfister Professional PRO-PP83 quick start guide

Hans Grohe Pulsify 105 3jet Relaxation 24110 5 Series Assembly instructions

Hans Grohe

Hans Grohe Pulsify 105 3jet Relaxation 24110 5 Series Assembly instructions

Villeroy & Boch Universal Shower Set installation instructions

Villeroy & Boch

Villeroy & Boch Universal Shower Set installation instructions

Hewi 950.90B6009092 Installation and operating instructions

Hewi

Hewi 950.90B6009092 Installation and operating instructions

manuals.online logo
manuals.online logoBrands
  • About & Mission
  • Contact us
  • Privacy Policy
  • Terms and Conditions

Copyright 2025 Manuals.Online. All Rights Reserved.