manuals.online logo
Brands
  1. Home
  2. •
  3. Brands
  4. •
  5. AmazonBasics
  6. •
  7. Bathroom Fixture
  8. •
  9. AmazonBasics B079LL22TC User manual

AmazonBasics B079LL22TC User manual

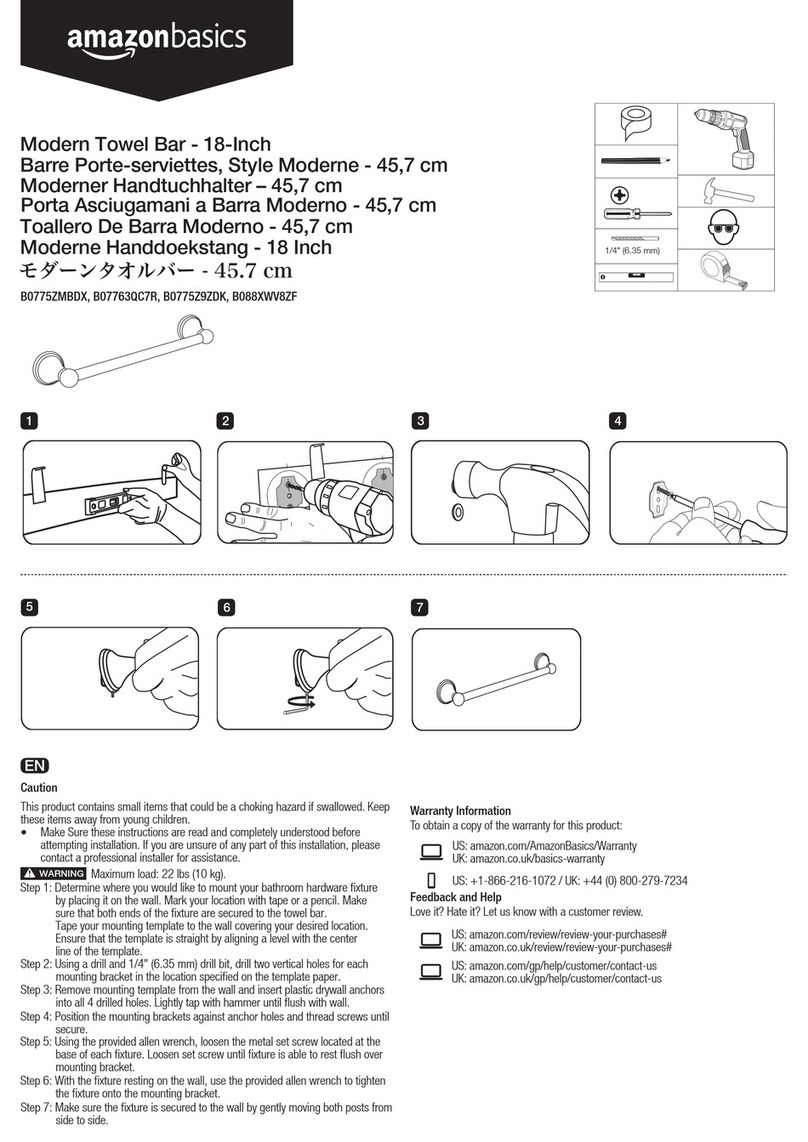
Use a stud finder to locate the center point of the stud.
Loosen the grab bar covers from the base by gently twisting and tapping
from the bottom of the mounting base.
The manufacture will not accept responsibility for any injury
or any damages cause by the lack of wall strength or improper installation.
EN
WarrantyInformation
To obtain a copy of the warrantyfor this product:
US:amazon.com/AmazonBasics/Warranty
UK:amazon.co.uk/basics-warranty
US: +1-866-216-1072 / UK: +44(0) 800-279-7234
Feedback and Help
Love it? Hate it?Let us know with acustomer review.
US: amazon.com/review/review-your-purchases#
UK: amazon.co.uk/review/review-your-purchases#
US: amazon.com/gp/help/customer/contact-us
UK: amazon.co.uk/gp/help/customer/contact-us
12
3 4 5
Caution
This productcontains small items that could be a choking hazard if swallowed. Keep
these items away from young children.
• Make Sure these instructions are read and completely understood before
attempting installation. If you are unsure of any part of this installation, please
contact a professional installer for assistance.
Step 2: Locate stud(s) and position grab bar. Using a level, place the grab bar on
the wall in your desired location. Ensure that the mounting holes are
positioned over a wood stud.
Step 3: Mark mounting location. Using a pencil, mark the screw mounting locations.
Step 5: Mount and secure the grab bar to the stud. Slide the grab bar covers back
over the mounting plates.
Step 4: Drill screw mounting holes. Place grab bar aside and drill pilot holes as
marked by your penciled locations.
Ensure holes are drilled into wood stud.
Step 1: Remove grab bar covers.
IMPORTANT
IMPORTANT
IMPORTANT
To reduce the risk of injury, thoroughly read and understand all
safety information and instructions provided in this manual. If you do not understand
any of the safety information or installation instructions contact a professional for
assistance before attempting to install.
B079LL22TC, B079LD8CRV, B079LLSFB2, B079LKHX1V, B079L7MRD9, B079LL4527, B079L9X9L4,
B079L7MXTK, B079LKQNWP, B079L9X9LJ, B079L7MRDY, B079L6LY1 V, B079LL452W, B079LJZF95,
B079LKNJT9, B079L9X9M4, B079L6LY25, B079L9TH6V
Bathroom Handicap Grab Bar
Wandbeugel voor Badkamer
Barre d'Appui de Salle de Bain
Badezimmer-Haltestange
Maniglione di Sostegno Per Bagno
Barra de Sujeción para Baño Adaptado
障害者用バスルームグラブバー
1/8" (3.3 mm)
A
A
BA
WARNING
Install in accordance with these instructions only. Do not attempt to
modify or alter this product. After installation, check your grab bar periodically to
ensure all screws are tight. Retighten if loose.
WARNING
All screws must be mounted directly and firmly into a wood
stud. Locate the middle of the stud by using a stud finder or other stud
finding method (Studs are usually 16" on center).
Follow instructions along with line drawings in the AmazonBasics
installation guide.
WARNING
Nur entsprechend diesen Anweisungen installieren. Versuchen Sie
nicht, das Produkt zu verändern. Überprüfen Sie Ihre Haltestange nach der Installation
regelmäßig, um sicherzustellen, dass alle Schrauben fest angezogen sind. Ziehen Sie
die Schrauben wieder fest, wenn sie locker sind.
DE
FR
Informations Sur LaGarantie
Pour obtenirune copie de lagarantie portant sur ce produit :
FR : amazon.fr/basics-garantie
CA : amazon.ca/AmazonBasics/Warranty
FR : +33 (0) 800-947-715 / CA :+1-877-586-3230
Vos Avis et Aide
FR :amazon.fr/review/review-your-purchases#
CA : amazon.com/review/review-your-purchases#
FR :amazon.fr/gp/help/customer/contact-us
CA : amazon.ca/gp/help/customer/contact-us
Gewährleistung
EineKopie der Gewährleistung für dieses Produkt erhalten Sieunter:
amazon.de/basics-garantie
DE:+49 (0) 800-363-8469 / AT: +430800-8866-3238
Feedback und Hilfe
Gefällt es Ihnen? Gefällt es Ihnen nicht? Dann bewerten Sie das Produkt auf unserer
Webseite!
amazon.de/review/review-your-purchases#
amazon.de/gp/help/customer/contact-us
Schritt 2: Finden Sie den/die Balken und positionieren Sie die Haltestange. Platzieren
Sie die Haltestange an der gewünschten Position an der Wand. Nutzen Sie
dazu eine Wasserwaage. Achten Sie darauf, dass die Befestigungslöcher
über einem Holzbalken liegen.
Schritt 3: Markieren Sie die Montageposition. Markieren Sie die Montagepositionen
der Schrauben mit einem Bleistift.
Schritt 4: Bohren Sie Löcher zur Montage der Schrauben. Legen Sie die Haltestange
beiseite und bohren Sie Löcher vor, deren Position Sie zuvor mit einem
Bleistift markiert haben.
Schritt 5: Montieren und sichern Sie die Haltestange am Balken. Schieben Sie die
Abdeckungen der Haltestange wieder über die Montageplatten.
Stellen Sie sicher, dass die Löcher in den Holzbalken gebohrt werden.
Attention
Ce produit contient de petites pièces susceptibles de constituer un risque d’étouffement
en cas d’ingestion. Maintenez ces pièces hors de la portée des jeunes enfants.
• Veillez à ce que ces consignes soient lues et bien comprises avant de procéder à
l'installation. En cas de doute concernant toute étape de l’installation, veuillez
prendre contact avec un installateur professionnel afin de recevoir de l’aide.
Afin de réduire le risque de blessure, lisez attentivement et
assurez-vous de bien comprendre toutes les informations et consignes de sécurité
fournies dans ce manuel. En cas de doutes concernant toute information relative à la
sécurité ou toute instruction d’installation, prenez contact avec un professionnel afin
d’obtenir de l’aide avant de commencer l’installation.
DE
IT
Utilizzare un rilevatore di montanti per localizzare il punto
centrale del montante. Allentare le coperture del maniglione di sostegno
dalla base ruotando e picchiettando delicatamente dal fondo della base
di montaggio.
Il produttore declina ogni responsabilità per qualsiasi lesione o
danno derivante dalla mancanza dello spessore murale adeguato o da
un’installazione impropria.
Seguire le istruzioni a fianco dei tratteggi nella guida all’installazione
AmazonBasics.
Attenzione
Questo prodotto contiene elementi di piccole dimensioni che potrebbero causare il
rischio di soffocamento se ingeriti. Tenere questi elementi fuori dalla portata dei bambini.
• Assicurarsi che le presenti istruzioni siano state lette e comprese del tutto prima
di tentare l’installazione. In caso di dubbi su qualsiasi parte dell’installazione,
contattare un tecnico professionista per richiedere assistenza.
Passo 1: rimuovere le coperture del maniglione di sostegno.
IMPORTANTE
IMPORTANTE
Per ridurre il pericolo di lesioni, leggere attentamente e comprendere
tutte le informazioni e istruzioni di sicurezza fornite nel presente manuale. In caso di
dubbi in merito a qualsiasi informazione di sicurezza o istruzione di installazione,
contattare un professionista per richiedere assistenza prima del montaggio.
Installare unicamente in conformità alle presenti istruzioni. Non tentare
di modificare o alterare il prodotto. Dopo l’installazione, controllare il maniglione di
sostegno periodicamente per assicurarsi che tutte le viti siano ben serrate. Stringere
di nuovo se allentate.
È necessario inserire tutte le viti direttamente e saldamente in
un montante di legno. Individuare il centro del montante utilizzando l’apposito
rilevatore o un altro metodo di rilevazione dei montanti (i montanti sono
generalmente di 16 pollici al centro).
Nutzen Sie einen Balkensucher, um den Mittelpunkt des
Balkens zu bestimmen. Lösen Sie die Abdeckungen der Haltestange durch
leichtes Drehen und Klopfen von der Unterseite der Montageplatte.
Der Hersteller übernimmt keine Haftung für Verletzungen oder
Schäden, die aufgrund zu geringer Wandstärke oder unsachgemäßer
Installation verursacht werden.
Vorsicht
Dieses Produkt enthält Kleinteile, die ein Erstickungsrisiko darstellen können, wenn
sie verschluckt werden. Halten Sie diese Teile von Kleinkindern fern.
• Stellen Sie sicher, dass Sie diese Bedienungsanleitung gelesen und vollständig
verstanden haben, bevor Sie mit der Montage beginnen. Falls Ihnen irgendein
Teil dieser Installation unklar ist, wenden Sie sich bitte an einen professionellen
Montagetechniker.
Schritt 1: Entfernen Sie die Abdeckungen der Haltestange.
WICHTIG
WICHTIG
WICHTIG
Um das Risiko von Verletzungen zu verringern, ist es unbedingt
erforderlich, alle in diesem Handbuch enthaltenen Sicherheitsinformationen und
Anweisungen gründlich zu lesen und zu verstehen. Wenn Sie die Sicherheitshinweise
oder Installationsanweisungen nicht verstehen, bitten Sie einen Fachmann um Hilfe,
bevor Sie mit der Installation beginnen.
Alle Schrauben müssen direkt und fest in einem Holzbalken
befestigt sein. Lokalisieren Sie die Mitte des Balkens mithilfe eines
Balkensuchers oder einer anderen Methode zum Finden von Balken
(Die Balken verlaufen üblicherweise in einem Abstand von 16 Zoll).
Folgen Sie den Anweisungen und den Linienzeichnungen in der
AmazonBasics Installationsanleitung.
WARNUNG
Utilisez un détecteur de matériaux pour localiser le point
central du montant. Déserrez les caches de la base de la barre d’appui en
les tournant et en les tapotant doucement à partir de la partie inférieure
de la base de montage.
Le fabricant décline toute responsabilité en cas de blessures
ou de dommages causés par le manque de résistance des murs ou une
installation incorrecte.
Étape 2 : Repérez le ou les montant(s) et positionnez la barre d'appui. À l’aide d’un
niveau, placez la barre d’appui contre le mur à l’endroit souhaité. Veillez à
ce que les trous de montage soient bien positionnés sur un montant en bois.
Étape 3 : Marquez les points de montage. À l’aide d’un crayon, marquez les
emplacements de montage des vis.
Étape 4 : Percez les trous de fixation des vis. Mettez la barre d’appui de côté, puis
percez les trous de guidage aux emplacements que vous avez marqués au
crayon.
Étape 5 : Montez et fixez la barre d'appui sur le montant. Glissez les caches de la
barre d'appui sur les plaques de montage.
Assurez-vous que les trous sont percés dans les montants en bois.
Étape 1 : Retirez les caches des barres d'appui.
IMPORTANT
IMPORTANT
IMPORTANT
Toutes les vis doivent être montées directement et
solidement dans un montant en bois. Localisez le centre du montant à
l’aide d’un détecteur de montants ou de toute autre méthode de détection
des montants (les centres des montants se situent généralement à 16
pouces au centre).
Suivez les instructions ainsi que les schémas du guide d’installation
AmazonBasics.
À installer conformément à ces consignes uniquement. Ne pas
tenter de modifier ou d’altérer le produit. Après l’installation, vérifiez régulièrement
l’état de votre barre d’appui afin de vous assurer que toutes les vis sont bien serrées.
Resserrez-les si elle sont desserrées.
AVERTISSEMENT
AVERTISSEMENT
AVERTISSEMENT
WARNUNG
WARNUNG
AVVERTENZA
AVVERTENZA
AVVERTENZA
El fabricante no aceptará la responsabilidad de ningún daño
o lesión provocado por una falta de resistencia de la pared o por una
instalación inadecuada.
Siga las instrucciones y los esquemas de la guía de instalación de
AmazonBasics.
Instale el producto solo de acuerdo con estas instrucciones de
montaje. No intenten modificar o alterar este producto. Después de la instalación,
compruebe su barra de sujeción periódicamente para asegurarse de que todos los
tornillos están apretados. Vuelva a apretarlos si están flojos.
ES
Informazioni Di Garanzia
Per ottenere una copia della garanzia del prodotto:
amazon.it/basics-garanzia +39 (0) 800-628-805
Feedback e Aiuto
Ti piace? Oppureno?Faccelo sapere scrivendo la tua recensione.
amazon.it/review/review-your-purchases#
amazon.it/gp/help/customer/contact-us
Comentarios y Ayuda
¿Le encanta? ¿No legusta nada? Escriba una opinión como cliente.
ES: amazon.es/review/review-your-purchases#
MX:amazon.com.mx/review/review-your-purchases#
ES: amazon.es/gp/help/customer/contact-us
MX:amazon.com.mx/gp/help/customer/contact-us
ES: +34 (0) 900-803-711 / MX:+52(0) 442-348-9587
Información Sobre La Garantía
Para obtener una copia de la garantía de este producto:
ES: amazon.es/basics-garantia
Passo 2: Localizzate il/i montante/i e posizionare il maniglione di sostegno. Usando
una livella, posizionare il maniglione di sostegno sulla parete nella posizione
desiderata. Assicurarsi che i fori di montaggio siano posizionati su un
montante di legno.
Passo 3: Marcare la posizione di montaggio. Usando una matita, segnare le posizioni
delle viti di montaggio.
Passo 5: Montare e fissare il maniglione di sostegno al montante. Rinfilare le
coperture del maniglione di sostegno sulle piastre di montaggio.
Passo 4: Praticare i fori di montaggio per le viti. Mettere da parte il maniglione di
sostegno e praticare i fori pilota nelle posizioni segnate con la matita.
Assicurarsi che i fori siano praticati nel montante di legno.
IMPORTANTE
Precaución
Este producto incluye objetos pequeños que pueden suponer un peligro de asfixia
si se ingieren. Manténgalos alejados de los niños.
• Asegúrese de leer y comprender completamente estas instrucciones antes de
proceder a la instalación. Si no está seguro de alguno de los pasos de esta
instalación, contacte con un contratista profesional para que le ayude.
NL
Voorzichtig
Dit product bevat kleine onderdelen die verstikking kunnen veroorzaken wanneer ze
worden ingeslikt. Houd deze onderdelen uit de buurt van kleine kinderen.
•Zorg ervoor dat deze instructies worden gelezen en volledig worden begrepen
alvorens over te gaan tot de installatie. Als u twijfels hebt bij een deel van deze
installatie, kunt u voor hulp contact opnemen met een professionele installateur.
Garantie Informatie
Om een kopie van degarantie voordit product te krijgen:
amazon.nl/basics-garantie +31 8000227380
Feedback en Hulp:
Vind je het leuk? Vind je het niet leuk?Beoordeel het product dan op onze website!
amazon.nl/review/review-your-purchases#
amazon.nl/gp/help/customer/contact-us
Paso 2: Localice el/los montante(s) y coloque la barra de sujeción. Con un nivel,
coloque la barra de sujeción en la pared, en la posición deseada. Asegúrese
de que los orificios de montaje están situados en un montante de madera.
Paso 3: Marque la ubicación de montaje. Con un lápiz, marque la posición de los
tornillos de montaje.
Paso 4: Perfore los orificios de los tornillos de montaje. Aparte la barra de sujeción y
taladre los orificios guía como se marcaron con el lápiz.
Paso 5: Monte y fije la barra de sujeción al montante. Vuelva a colocar las tapas de
la barra de sujeción en las placas de montaje.
Compruebe que los orificios se taladran en el montante de madera.
Utilice un detector de vigas para localizar el punto central del
montante. Afloje las tapas de la barra de sujeción desde la base, girando y
golpeando suavemente desde la parte inferior de la base de montaje.
Paso 1: Retire las tapas de la barra de sujeción.
IMPORTANTE
Para reducir el riesgo de lesiones, lea atentamente y comprenda toda
la información de seguridad y las instrucciones incluidas en este manual. Si no
comprende alguna información de seguridad o parte de las instrucciones de
instalación, contacte con un profesional para obtener ayuda antes de intentar la
instalación.
ADVERTENCIA
ADVERTENCIA
Todos los tornillos deben montarse directamente en un
montante de madera. Localice la mitad del montante con un detector de
vigas u otro método de detección (la distancia entre los centros de los
montantes es de unas 16 pulgadas del centro).
Stap 2: Zoek de balk(en) en plaats de wandbeugel op de gewenste positie. Breng de
wandbeugel op uw gewenste positie op de muur aan met behulp van een
waterpas. Zorg dat de montagegaten zich boven een houten balk bevinden.
Stap 3: Markeer de montageposities. Markeer de montageposities voor de schroeven
met behulp van een potlood.
Stap 4: Boor de montagegaten voor de schroeven. Leg de wandbeugel aan de kant
en boor gaten in de posities die met potlood zijn gemarkeerd.
Stap 5: Maak de wandbeugel stevig aan de balk vast. Schuif de afdekkappen
opnieuw terug over de montageplaten.
Zorg dat de gaten in een houten balk zijn geboord.
Gebruik een balkzoeker om het middelpunt van de balk te
vinden. Maak de afdekkappen van de basis van de wandbeugel los door
ze voorzichtig te draaien en vanaf de onderkant op de montagebasis te tikken.
De fabrikant is niet verantwoordelijk voor letsel of schade
veroorzaakt door een onvoldoende wandsterkte of verkeerde installatie.
Volg de instructies samen met de lijntekeningen in de AmazonBasics
installatiehandleiding.
Stap 1: Verwijder de afdekkappen van de wandbeugel.
Om het risico op letsel te beperken, lees en begrijp de volledige
veiligheidsinformatie en alle instructies die in deze handleiding zijn vermeld. Als u de
veiligheidsinformatie of installatie-instructies niet begrijpt, neem contact op met een
vakman voor hulp voordat u het product installeert.
Installeer het product alleen volgens deze instructies. Probeer niet
om dit product aan te passen of te wijzigen. Na installatie, controleer regelmatig of
alle schroeven van de wandbeugel nog stevig vast zitten. Draai de schroeven opnieuw
vast wanneer ze los zitten.
Alle schroeven moeten direct en stevig in een houten balk
worden vastgedraaid. Zoek het midden van de balk met behulp van een
balkzoeker of gebruik een andere zoekmethode (de balken bevinden zich
over het algemeen 16 inch van elkaar).
ADVERTENCIA
IMPORTANTE
IMPORTANTE
WAARSCHUWING
WAARSCHUWING
WAARSCHUWING
BELANGRIJK
BELANGRIJK
BELANGRIJK
保証について
この製品の保証書のコピーを入手するには:
amazon.jp/AmazonBasics/Warranty
+81 (0) 120-899-276
フィードバックとサポート
気に入っていただけましたか?お気に召しませんでしたか?カスタ
マーレビューでお知らせください。
amazon.jp/review/review-your-purchases#
amazon.jp/gp/help/customer/contact-us
ステップ2:スタッドを探し、グラブバーを配置します。水準器を
使用し、グラブバーを壁の望む場所に位置決めします。
マウンティング用の穴が間柱の上に来るように注意し
ます。
ステップ3:取付場所に印を付けます。鉛筆を使用し、ネジをねじ
込む位置に印をつけます。
ステップ4:ネジ取付穴をドリルで空けます。グラブバーを横に置
き、鉛筆で印をつけた位置に下穴をあけます。
ステップ5:ブラブバーをスタッドに取り付けて固定します。グラ
ブバーカバーを取付板にスライドさせて戻します。
穴が木製スタッドに空いているか確認してください。
JP
注意
本製品は飲み込めば窒息の危険性のある小さいパーツを含んでい
ます。これらは小さいお子様から遠ざけてください。
•取り付けを試みる前にこれらの指示をしっかり読み、完全に
理解してください。これらの指示の中で少しでも不確かな部分
があれば、プロの取り付け業者にご連絡ください。
中国製
HECHO EN CHINA
GEMAAKT IN CHINA
PRODOTTOIN CINA
HERGESTELLT IN CHINA
FABRIQUÉ EN CHINE
MADE IN CHINA
スタッドファインダーを使用して、スタッドの中心
点を探します。グラブバーカバーを静かに回し、マウンティング
ベースの下を軽くたたく事でベースから外します。
メーカーでは、壁の強度不足または不適切な取付が
原因の怪我あたは破損については責任を負いかねます。
指示と共に、Amazonベーシック設置ガイドの線画に従ってく
ださい。
ステップ1:グラブバーカバーを外します。
重要
重要
重要
怪我のリスクを抑えるため、本マニュアルに記載の
安全に関するお知らせおよび取扱方法は、よく読み理解してくだ
さい。安全情報や設置についての指示を全く理解できない場合は、
取り付ける前にプロに連絡し、助力を求めてください。
警告
これらの取扱方法のみにしたがって、取り付けてく
ださい。この製品を修正したり改造することはおやめください。
設置後は定期的にバーをチェックし、すべてのネジがしっかり
締まっていることを確認してください。緩んでいれば正してください。
ネジはすべて、木製スタッドに直接およびしっかり
取り付けてください。スタッドファインダーや他の間柱確認方法
を使って間柱の中心を突き止めます(間柱はそれぞれの中心が
16インチ離れているのが通常です)。
警告
警告

This manual suits for next models

17

Other AmazonBasics Bathroom Fixture manuals

AmazonBasics B07FHBYWPY Operating and safety instructions

AmazonBasics

AmazonBasics B07FHBYWPY Operating and safety instructions

AmazonBasics B07F288Z1B User manual

AmazonBasics

AmazonBasics B07F288Z1B User manual

AmazonBasics B0775YFK36 User manual

AmazonBasics

AmazonBasics B0775YFK36 User manual

AmazonBasics B07RS44KQN Operating and safety instructions

AmazonBasics

AmazonBasics B07RS44KQN Operating and safety instructions

AmazonBasics B0792FZBDD User manual

AmazonBasics

AmazonBasics B0792FZBDD User manual

AmazonBasics B0775ZMBDX User manual

AmazonBasics

AmazonBasics B0775ZMBDX User manual

AmazonBasics B088Y221P7 User manual

AmazonBasics

AmazonBasics B088Y221P7 User manual

AmazonBasics B07763RB3V User manual

AmazonBasics

AmazonBasics B07763RB3V User manual

AmazonBasics B07FHBYWPY User manual

AmazonBasics

AmazonBasics B07FHBYWPY User manual

Popular Bathroom Fixture manuals by other brands

Voda Plumbingware Pro 3 Series quick start guide

Voda Plumbingware

Voda Plumbingware Pro 3 Series quick start guide

IKEA VOXNAN 403.724.23 manual

IKEA

IKEA VOXNAN 403.724.23 manual

Anzzi SP-AZ076 install guide

Anzzi

Anzzi SP-AZ076 install guide

STIEBEL ELTRON MAE-K Operation and installation manual

STIEBEL ELTRON

STIEBEL ELTRON MAE-K Operation and installation manual

Fleurco ELERA EL05 installation manual

Fleurco

Fleurco ELERA EL05 installation manual

bauhaus Skargard Series installation guide

bauhaus

bauhaus Skargard Series installation guide

Conti+ CONSMART CONE4111221109 installation manual

Conti+

Conti+ CONSMART CONE4111221109 installation manual

Foremost MARINA BY-PASS installation manual

Foremost

Foremost MARINA BY-PASS installation manual

Pfister Deckard R89-1DA Quick installation guide

Pfister

Pfister Deckard R89-1DA Quick installation guide

Franke RODAN RODX605SL Installation and operating instructions

Franke

Franke RODAN RODX605SL Installation and operating instructions

Swiss Madison SM-VSF251 installation instructions

Swiss Madison

Swiss Madison SM-VSF251 installation instructions

daewon DIB-N800 Series user manual

daewon

daewon DIB-N800 Series user manual

DURAVIT B.1 Series Instructions for mounting and use

DURAVIT

DURAVIT B.1 Series Instructions for mounting and use

INDA A0415A Mounting instructions

INDA

INDA A0415A Mounting instructions

Held hilft Florida Manaul

Held hilft

Held hilft Florida Manaul

NORMBAU Inox Care 2053 030 Fixing instructions and directions for use

NORMBAU

NORMBAU Inox Care 2053 030 Fixing instructions and directions for use

METHVEN 439860 installation guide

METHVEN

METHVEN 439860 installation guide

CANTERBURY AGORA Z2328-45IN quick start guide

CANTERBURY

CANTERBURY AGORA Z2328-45IN quick start guide

manuals.online logo
manuals.online logoBrands
  • About & Mission
  • Contact us
  • Privacy Policy
  • Terms and Conditions

Copyright 2025 Manuals.Online. All Rights Reserved.