Ambiano MD 18763 User manual

XL 5.3 QUART
AIR FRYER
Freidora de aire XL de 5.3 cuartos
English ......... 03
Español ........ 27
User Manual
Manual
del usuario
18763 ML ALDI US Cover 5006 8208 final.indd 318763 ML ALDI US Cover 5006 8208 final.indd 3 13.07.2021 08:24:4313.07.2021 08:24:43

C
ontents
3
Contents
General information .............................................................................................5
Reading and storing the user manual.................................................................5
Proper use................................................................................................................5
Explanation of symbols..........................................................................................5
Safety .................................................................................................................. 6
General safety instructions.................................................................................... 7
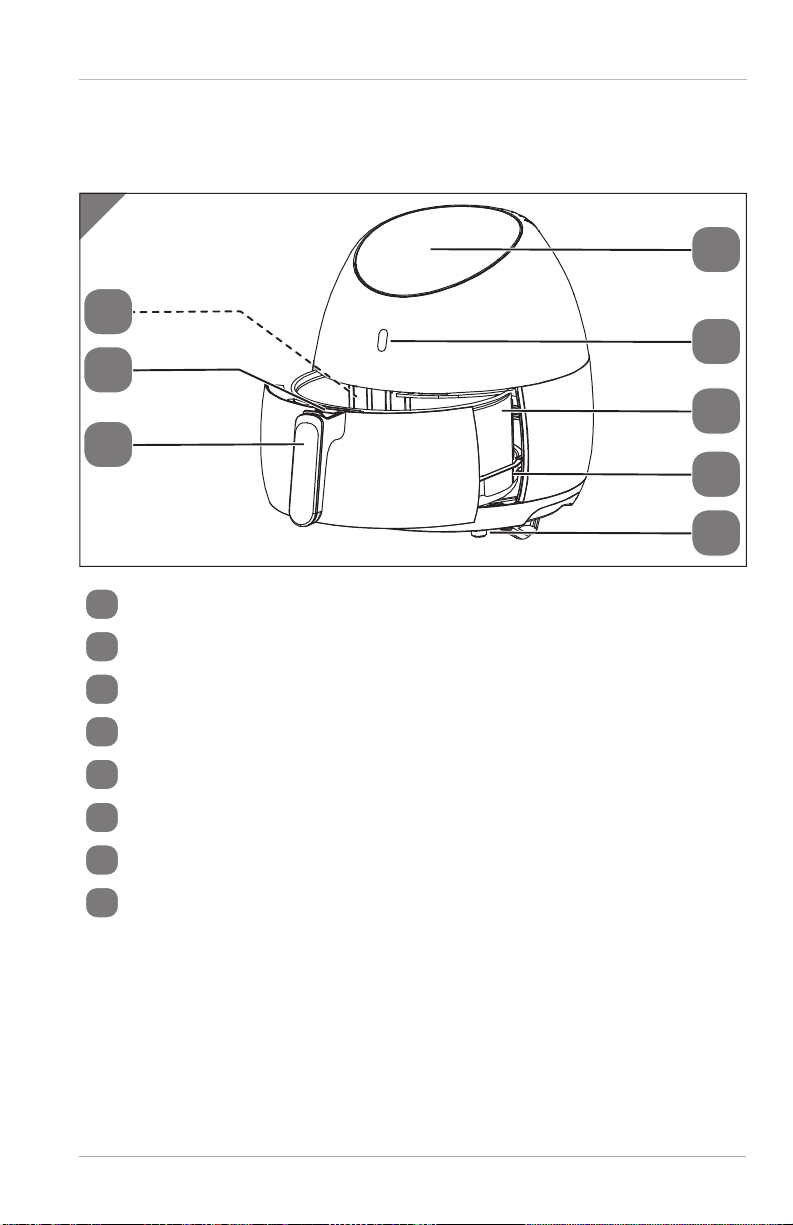
Overview..............................................................................................................11
Front view................................................................................................................ 11
Back view ................................................................................................................12
Display .....................................................................................................................13
First use...............................................................................................................14
Checking the product and package contents....................................................14
Basic cleaning.........................................................................................................14
Operation............................................................................................................14
Setting the cooking time and temperature ...................................................... 18
Suggested settings............................................................................................... 19
Setting the automatic programs.........................................................................20
Cleaning.............................................................................................................. 21
Storage................................................................................................................22
Troubleshooting .................................................................................................22
Technical specifications ......................................................................................24
FCC statement......................................................................................................24
Disposal...............................................................................................................25
Disposing of the packaging.................................................................................25
Disposing of the product......................................................................................25

4

General
i
nformat
i
on
5
General information
Reading and storing the user manual
This user manual accompanies this XL 5.3 quart air fryer (hereafter
referred to as the “product”), and contains important information
on setup and handling.
Before using the product, read the user manual carefully. This
particularly applies to the safety instructions. Failure to do so may
result in personal injury or damage to the product.
Store the user manual for further use. Make sure to include this
user manual when passing the product on to third parties.
Proper use
The product is exclusively designed for baking, cooking and grilling foods such
as vegetables, french fries and potato wedges - fresh or frozen - as well as
preparing fish, meat and poultry. It is only intended for personal household use
and is not suitable for commercial purposes.
Only use the product as described in this user manual. Any other use is
considered improper and may result in damage to property or persons.
The manufacturer is not liable for damages or injury incurred through
improper or incorrect use.
Explanation of symbols
The following symbols and signal words are used in this user manual.
WARNING! This signal symbol/word designates a hazard
with moderate risk, which may result in
death or severe injury if not avoided.
NOTICE! This signal word warns of possible damage
to property.
The following symbols are used in this user manual, on the product or on the
packaging.
This symbol provides you with useful additional information on
handling and use.

Sa
f
et
y
6SAVE THESE INSTRUCTIONS
The Federal Communications Commission (FCC) requires all
commercial electronic devices to comply to this norm (see
chapter “FCC statement”).
ETL Listed products are tested by Intertek and meets the minimum
requirements of U.S. electrical safety standards. It reflects a
manufacturers dedication to the safety and quality of their products.
Safety
IMPORTANT SAFEGUARDS
When using electrical appliances, basic safety precautions
should always be followed, including the following:
1. Read all instructions.
2. Do not touch hot surfaces. Use handles or knobs.
3. To protect against electrical shock do not immerse the cord,
plug, or housing in water or other liquid.
4. Close supervision is necessary when any appliance is used
by or near children.
5. Unplug from outlet when not in use and before cleaning.
Allow to cool before putting on or taking off parts.
6. Do not operate any appliance with a damaged cord or plug
or after the appliance malfunctions or has been damaged
in any manner. Please call the customer service center
to arrange to have the appliance examined, repaired or
adjusted.
7. The use of accessory attachments not recommended by
the manufacturer may cause injuries.
8. Do not use outdoors.
9. Do not let cord hang over edge of table or counter, or touch
hot surfaces.
10.Do not place on or near a hot gas or electric burner, or in a
heated oven.

S
afet
y
7
SAVE THESE INSTRUCTIONS
11. Extreme caution must be used when moving any
appliance containing hot oil or other hot liquids.
12.To disconnect the product, switch the product off and stop
the cooking process, then remove the power plug from the
power outlet.
13.Do not use appliance for other than intended use.
14.Save these Instructions.
SAVE THESE INSTRUCTIONS
General safety instructions
WARNING!
Risk of electric shock!
A faulty electrical installation, excessive line voltage, or incorrect
operation may result in an electric shock.
− This appliance has a polarized plug (one blade is wider
than the other). To reduce the risk of electric shock, this
plug is intended to fit into a polarized outlet only one way.
If the plug does not fit fully into the outlet, reverse the
plug. If it still does not fit, contact a qualified electrician. Do
not attempt to modify the plug in any way.
− Only connect the product if the voltage of the outlet
corresponds to the specification on the rating plate.
− Only connect the product to an easily accessible outlet so
that you can quickly disconnect it from the power source
in the event of a problem.
− This appliance is equipped with a flexible cord less than
4-1/2 feet in length:
a) A short power-supply cord is provided to reduce the risk
resulting from becoming entangled in or tripping over a
longer cord.

Sa
f
et
y
8SAVE THESE INSTRUCTIONS
b) Longer extension cords may be used if care is exercised
in their use.
c) If a longer extension cord is used:
1) The marked electrical rating of the cord or extension
cord should be at least as great as the electrical rating of
the appliance;
2) The cord should be arranged so that it will not hang
over the countertop or tabletop where it can be pulled on
by children or tripped over.
3) If the appliance is of the grounded type, the cord or
extension cord should be a grounding-type 3-wire cord.
− Do not open the housing; instead, have a qualified
professional perform repairs. Contact a qualified service
center for this. Liability and warranty claims are waived
in the event of repairs performed by the user, improper
connection or incorrect use.
− Only parts that comply with the original device data
may be used for repairs. This device contains electrical
and mechanical parts which are essential for providing
protection against sources of danger.
− Do not use the product with an external timer or separate
remote control system.
− Never touch the power cord with wet or damp hands.
− Do not pull the power cord out of the outlet by the cord;
instead, always pull it out by the plug itself.
− Never move, pull, or carry the product by its cord.
− Keep the product and the cord away from open flames
and hot surfaces.
− Lay the cord so that it does not pose a tripping hazard.
− Do not kink the cord and do not lay it over sharp edges.
− Do not place the product such that there is a risk of it
falling into a sink.

S
afet
y
9
SAVE THESE INSTRUCTIONS
− Never reach to retrieve an electrical device if it has fallen
into water. In such a case, immediately disconnect the
power plug.
− Never insert any objects into the housing.
WARNING!
Danger for children and persons with impaired physical,
sensory or mental capacities (e.g., partially disabled
persons, older persons with reduced physical and mental
capacities) or lack of experience and knowledge (e.g.,
older children).
− If they are supervised or have been instructed on how
to safely use the product and have understood the risks
associated with operating it, this product may be used
by children ages eight and over as well as persons with
impaired physical, sensory or mental capacities. Children
must not play with the product. Cleaning and user
maintenance must not be performed by unsupervised
children.
− Keep children under the age of eight away from the
product and cord.
− Do not leave the product unattended while in use.
− Make sure that children do not play with the plastic
wrapping. They could get caught in it when playing and
suffocate.
NOTICE!
Risk of damage!
Improper handling of the product may result in damage to the
product.
− Place the product on an easily accessible, level, dry, heat-
resistant and sufficiently stable work surface. Do not place
the product on the edge of the work surface.

Sa
f
et
y
10 SAVE THESE INSTRUCTIONS
− Avoid the build-up of heat by not placing the product
directly up against a wall or under cabinets or similar. The
steam that is emitted could damage furniture.
− Never attempt to clean the housing by immersing it
in water and do not use a steam cleaner to clean it.
Otherwise, you could damage the housing.
− Never place any parts of the product in the dishwasher.
They may be destroyed as a result.
− Stop using the product if its plastic parts exhibit cracks or
breaks or are deformed. Only replace damaged parts with
corresponding original spare parts.

O
verv
i
ew
11
Overview
Front view
A
7
8
6
1
2
3
4
5
1Control panel
2Power on indicator light
3Fryer basket
4Fryer pan
5Support feet
6Handle
7Protective tab and fryer basket unlock button
8Fryer basket divider

O
vervie
w
12
Back view
B
10
9
11
12
9Housing
10 Steam vent
11 Ventilation grille
12 Power cord

Overv
i
ew
13
Display
C
13
14
17
16
22
21
18
19
15
20
13 Automatic program indicator light (varies depending on the program set)
14 : Cooking temperature display
15 Increase cooking time / Decrease cooking time
16 : Cooking time display
17 : Program selection
18 : Switch device on/off, pause cooking process
19 : Cooking in process
20 Cooking temperature Increase/ Decrease
21 : Fan on indicator light
22 Display for cooking temperature/cooking time

Fir
st
use
14
First use
Checking the product and package contents
NOTICE!
Risk of damage!
If you are not cautious when opening the packaging with a
sharp knife or other pointed object, you may quickly damage
the product.
− For this reason, be very careful when opening it.
1. Take the product out of the packaging.
2. Check to make sure that all parts are included.
3. Check whether the product or individual parts are damaged. If this is the
case, do not use the product. Contact the manufacturer via the toll-free
telephone number indicated on the warranty card.
Basic cleaning
• Remove the packaging material and all plastic packaging.
• Clean all parts of the product before first use as described in the chapter
“Cleaning”.
Operation
WARNING!
Risk of injury!
Improper handling of the product may result in injury.
− Always use the fryer basket together with the fryer pan.
− Do not use the product if the handle is damaged.
− Connect the product only to a properly installed,
grounded and GFCI protected outlet. The supplied voltage
must correspond to the technical data of the product.

O
p
erat
i
on
15
− Place the product on a heat-resistant surface and
distribute the food with a wooden or plastic spoon or
spatula to ensure even cooking.
− Burn hazard! The accessible surfaces of the product can
be very hot. To remove food, hold only the handle. Do not
touch the accessible surfaces of the product with bare
hands after use. Use pot holders or gloves.
− Do not press the unlock button to detach the fryer basket
from the fryer pan while tossing food.
WARNING!
Risk of fire!
Oil and other liquids can catch fire due to the high temperatures
of the hot air.
− Do not fill the product with oil or other liquids.
− Extremely fatty foods, some types of sausages, are not
suitable for cooking with the product. The fat will drip into
the fryer pan and burn there.
− Do not overfill the fryer basket. Note the MAX fill line. We
recommend filling the fryer basket only ¾ full for easy
handling.
− When you first use the product, you may notice a slight odor
due to the burning off of manufacturing residues. This will
disappear after a few uses. Ensure there is adequate ventilation.
− Make sure the product always stands on its support feet 5.
− Make sure the steam vent 10 and ventilation grille 11 are
clear of objects.
− Refer to the chapter “Suggested settings” for the suitable
filling level and cooking setting.

O
p
erat
i
o
n
16
1. Pull the fryer pan 4out of the housing 9(see Fig. 1).
1
2. Pull the protective tab 7upwards and press the unlock button to remove
the fryer basket 3from the fryer pan (see Fig. 2).
2

O
p
erat
i
on
17
3. Fill the fryer basket with the food (see Fig. 3). If necessary, insert the fryer
basket divider 8into the groove of the fryer basket (see Fig. 4) if you
want to cook two foods at the same time.
3 4 8
4. Replace the fryer basket onto the fryer pan. Make sure the catch of the
handle 6fits into the recess on the fryer pan and snaps into place.
5. Push the fryer pan including the fryer basket completely into the housing 9
from the front using the handle (see Fig. 5).
5

O
p
erat
i
o
n
18
Setting the cooking time and temperature
− To achieve optimum cooking results, heat up the product for
at least 3 minutes beforehand.
− To pause the cooking process at any time to check the
cooking status or top up food, briefly press the button 18
or pull the fryer pan 4including the fryer basket 3using
the handle 6.
− To resume the cooking process, push the fryer pan including
the fryer basket back into the housing using the handle.
− To cancel the cooking process, press and hold the button
for a few seconds until the product switches off.
1. Plug the power cord 12 into the outlet.
2. Press and hold the button for a few seconds to turn on the product. The
power on indicator light 2will illuminate.
3. Use the or buttons 20 to set the desired cooking temperature in 10 °F
increments.
− To change the temperature faster, press and hold the or buttons.
− You can set the temperatures from 160 °F to 400 °F.
4. Use the or buttons 15 to set the desired cooking time in one minute
increments.
− To change the cooking time faster, press and hold the or buttons.
− You can set the cooking time to a maximum of 60 minutes.
5. Briefly press the button to start the cooking process. The icon 19 and
the indicator light 21 is shown during use.
− The set cooking temperature 14 and the remaining cooking time 16
are shown on the display for cooking temperature/cooking time 22 on the
control panel 1during use.
− If you are cooking food which needs to be tossed or mixed after half the
cooking time: Pause the cooking process and toss the food inside the frying
basket. Do not toss the food if the fryer basket divider 8is inserted in the
fryer basket.
− At the end of the cooking time, an audio tone sounds and the product
switches off. The fan will continue to run for a few minutes though and the
indicator light shows until the fan stops.
6. Unplug the product from the outlet.
7. Pull out the fryer pan including the fryer basket from the housing and place
them on a heat-resistant surface.
8. Release the fryer basket from the fryer pan and put the food in a bowl or a
plate. Avoid pouring the excess oil being collected in the pan over the food.

Operat
i
on
19
Suggested settings
Refer to the table below for recommended settings. The times given are for
reference only which can be varied according to the quantity, type of food
being fried and your own tastes and preferences.
Food Weight Time Temperature Toss the
food
Additional
information
Potatoes & French fries
Thin-cut
frozen French
fries
14–18 oz
(397–510 g)
18–20 min 400 °F Yes Shake several
times as
needed
Thick-cut
frozen French
fries
14–18 oz
(397–510 g)
20–25 min 400 °F Yes Shake several
times as
needed
Potato
au gratin
21 oz
(595 g)
20–25 min 400 °F Yes
Meat and poultry
Steak 4–21 oz
(113–595 g)
10–15 min 360 °F No
Pork chops 4–21 oz
(113–595 g)
10–15 min 360 °F No
Hamburger 4–21 oz
(113–595 g)
10–15 min 360 °F No
Sausage 4–21 oz
(113–595 g)
13–15 min 400 °F No
Chicken
drumsticks
4–21 oz
(113–595 g)
25–30 min 360 °F No
Chicken breast 4–21 oz
(113–595 g)
15–20 min 360 °F No
Snacks
Spring rolls 4–18 oz
(113–510 g)
8–10 min 400 °F Yes For oven-ready
items
Frozen chicken
nuggets
4–21 oz
(113–595 g)
6–10 min 400 °F Yes For oven-ready
items
Frozen fish
sticks
4–18 oz
(113–510 g)
6–10 min 400 °F No For oven-ready
items
Breaded
cheese sticks
4–18 oz
(113–510 g)
8–10 min 360 °F No For oven-ready
items

20
Food Weight Time Temperature Toss the
food
Additional
information
Vegetables 4–18 oz
(113–510 g)
10 min 320 °F No
Baking
Cakes 14 oz
(397 g)
20–25 min 320 °F No Use baking pan
Quiche 18 oz
(510 g)
20–22 min 360 °F No Use baking pan/
casserole dish
Muffins 14 oz
(397 g)
15–18 min 400 °F No Use baking pan
− The product is also ideal for warming up food: Heat the food
at 300 °F for 10 minutes.
− If you have not preheated the product, allow the food to
cook for an additional 3 minutes.
− Pans used for baking in the product are not included.
Setting the automatic programs
The automatic programs allow you to cook certain foods at a pre-set temperature and for
a preset cooking time. Choose among the following programs. The chosen program 13
will be shown on the display 22 :
Frozen french fries
Fried bacon
Chicken
Shrimp
Meat
Muffins/cakes
Vegetables
Fish
1. Press and hold the button 18 for a few seconds to switch the product on.
2. Press the button 17 to select the desired automatic program.
3. Briefly press the button to start cooking.
− Once the cooking time has elapsed, an audio tone sounds and the product
will switch off. The fan will continue to run for a few minutes though.
4. Unplug the product from the outlet.

C
lean
i
n
g
21
Cleaning
WARNING!
Burn hazard!
The product will get hot during use and may cause burns.
− Let the product cool off completely before each cleaning.
Remove the fryer pan and fryer basket from the product
so that the product can cool off faster.
NOTICE!
Risk of short circuit!
Water or other liquids that have penetrated the housing may
cause a short circuit.
− Make sure that no water or other liquids penetrate the
housing.
− Never immerse the housing in water or other liquids.
NOTICE!
Risk of damage!
Improper handling of the product may result in damage to the
product.
− Do not use any strong cleaners, brushes with metal or
nylon bristles, or sharp or metallic cleaning utensils such
as knives, hard scrapers and the like.
They could damage the surfaces.
− Do not put any parts of the product in the dishwasher, as
this will damage it.
1. Unplug the product before cleaning.
2. Let the product cool off completely.
This manual suits for next models
1
Table of contents
Languages:
Other Ambiano Fryer manuals

Ambiano
Ambiano FREIDORA CON MANGO FRIODE 8 TAZAS User manual

Ambiano
Ambiano AFOVEN-YULSS User manual

Ambiano
Ambiano MINI DEEP FRYER User manual

Ambiano
Ambiano DF-036 User manual

Ambiano
Ambiano GT-AF-02-US User manual

Ambiano
Ambiano MD 19780 User manual

Ambiano
Ambiano XL 5.3 QUART User manual

Ambiano
Ambiano TXG-DS13 User manual

Ambiano
Ambiano GT-DFM-01-US User manual