AMF REECE S-311 Quick start guide

MODEL S-311
ELECTRONIC EYELET BUTTONHOLE
MACHINE
PARTSAND SERVICE MANUAL
MACHINE SERIAL No.
PARTNUMBER 97. 1930.0.002
AMF is trademark of AMF Group, Inc.
This manual is valid fromthe machine serial No.:K190528
04/2007

S-311
Revised 04/2007
E-mail: service@amfreece.cz; parts@amfreece.cz; website: www.amfreece.com
Phones: +420 582 309 146 (Service), +420 582 309 286 (Spare Parts); Fax: +420 582 360 606 1-i
A - INTRODUCTION
1. Basic information ............................................................................................................................ 1-1
2. Safety labels and device ................................................................................................................. 1-2
3. General machine parts descriptions ................................................................................................. 1-3
4. Specification ................................................................................................................................... 1-4
5. Buttonhole description .................................................................................................................... 1-6
6. Instructions for operator safety and maintenance of the machine S-311......................................... 1-7
7. Special device................................................................................................................................. 1-9
7.1.Working light ................................................................................................................................. 1-9
7.2.Manual machine control ................................................................................................................ 1-9
7.3.Voltage guard - relay HRN 35....................................................................................................... 1-9
B - MACHINE ASSEMBLY
1. Content of the shipping box ........................................................................................................... 1-10
2. Table adjustment ............................................................................................................................ 1-10
3. Connection of the machine head with the control box ................................................................... 1-12
S-311 RDE - Pneumatic system connection ................................................................................. 1-13
S-311 AF - Pneumatic system connection ..................................................................................... 1-14
S-311 CT - Pneumatic system connection .................................................................................... 1-15
S-311 LTT - Pneumatic system connection .................................................................................. 1-16
4. Belt tension .................................................................................................................................... 1-17
5. Power and air connection ............................................................................................................... 1-18
6. Thread stand installation ................................................................................................................. 1-19
7. Lubrication ..................................................................................................................................... 1-20
C - PROPER APPLICATION
1. Power up / home position ................................................................................................................ 1-21
2. Needle installation ............................................................................................................................ 1-22
3. Threading ........................................................................................................................................ 1-23
D - MACHINE CONTROLS
1. Operation ....................................................................................................................................... 1-26
2. Display information ........................................................................................................................ 1-28
3. The buttonhole shape setting .......................................................................................................... 1-29
4. Buttonhole parameters adjustment ................................................................................................. 1-30
5. Buttonhole parameters adjustment ................................................................................................. 1-31
6. The sewing speed setting................................................................................................................ 1-32
7. Sewing speed setting for the round eye (AF, RDE) ....................................................................... 1-33
8. Cycle counters ............................................................................................................................... 1-34
TABLE OF CONTENTS

Revised 04/2007
E-mail: service@amfreece.cz; parts@amfreece.cz; website: www.amfreece.com
Phones: +420 582 309 146 (Service), +420 582 309 286 (Spare Parts); Fax: +420 582 360 606
S-311
1-ii
9. Setting the cutting ........................................................................................................................... 1-35
10. The round eye cutting setting ......................................................................................................... 1-36
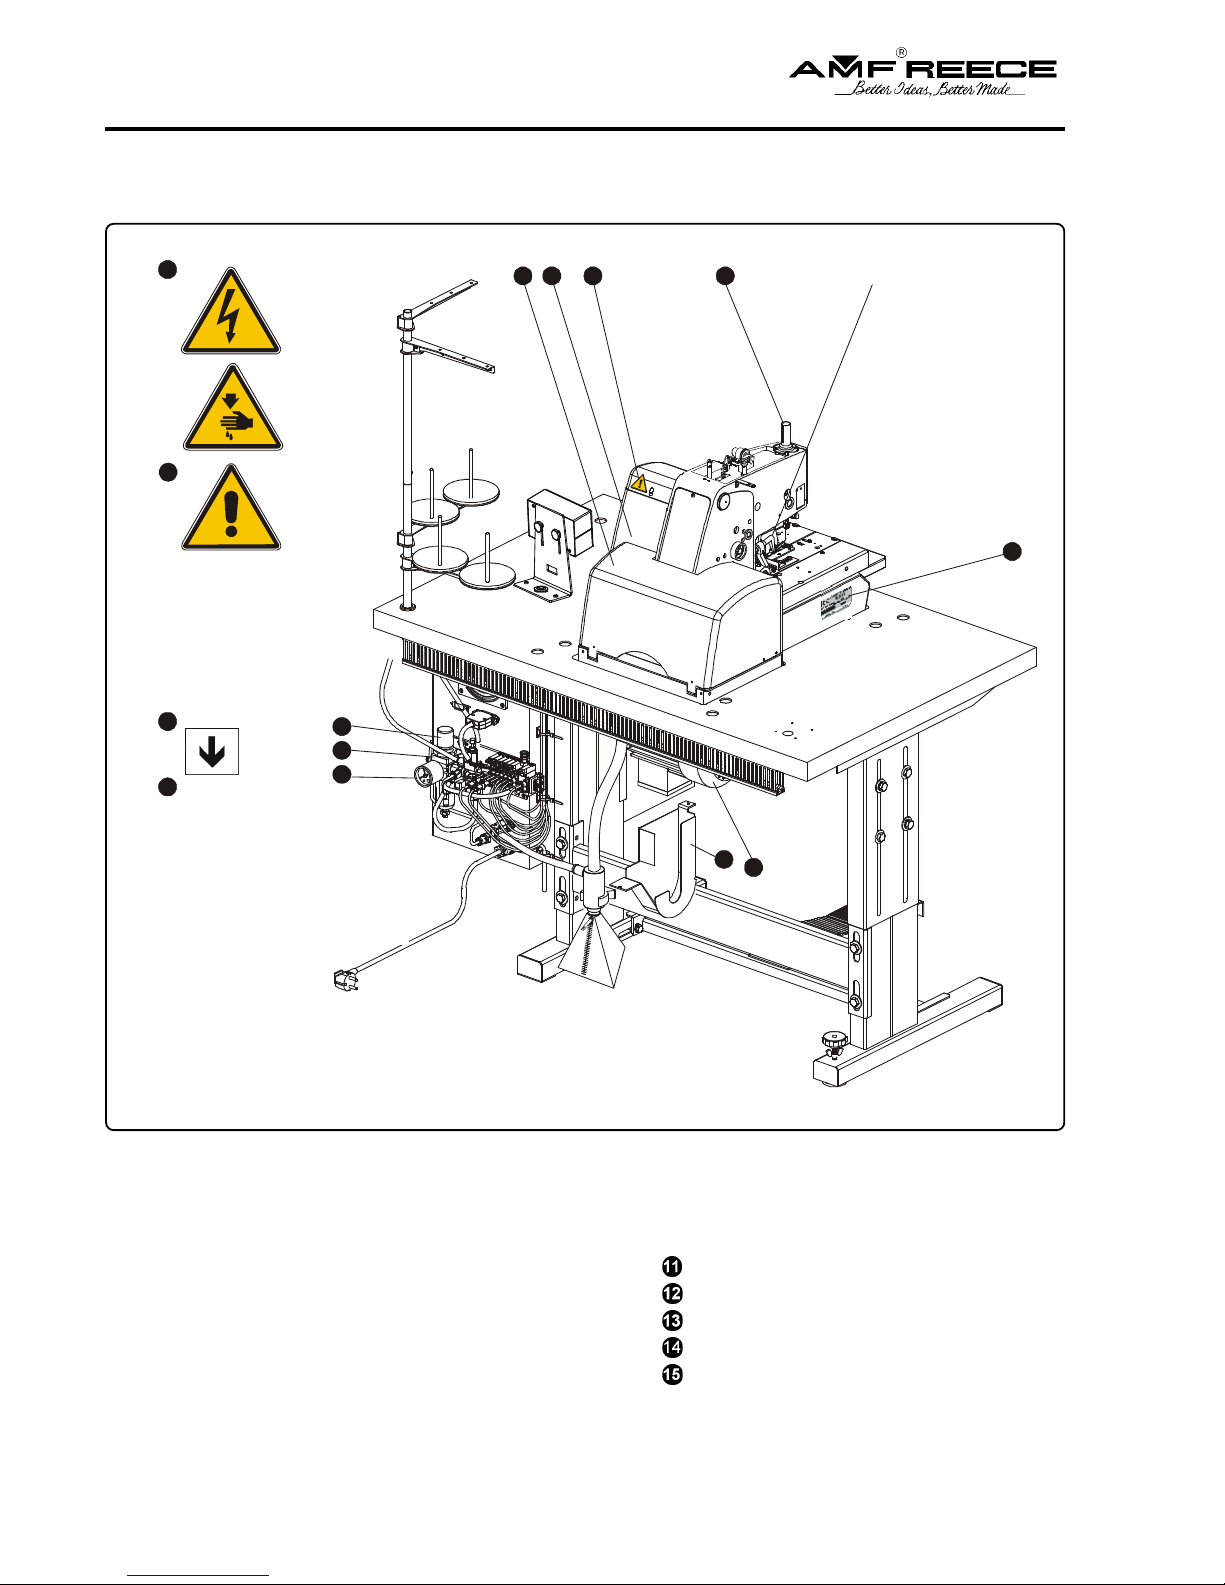
11. Service mode.................................................................................................................................. 1-37
12. Cycle mode .................................................................................................................................... 1-38
13. The buttonhole programming ......................................................................................................... 1-39
14. The electronic system error message .............................................................................................. 1-40
15. Manual cut mode ........................................................................................................................... 1-40
16. PLC adjustment by machine type .................................................................................................. 1-40
E - STANDARD MACHINE ADJUSTMENT
1. Standard buttonhole shapes set by the manufacturer ...................................................................... 1-41
2. The sewing drive sensor plates adjustment..................................................................................... 1-42
3. The bedplate home position adjustment.......................................................................................... 1-43
4. The race mechanism adjustment..................................................................................................... 1-44
5. The sewing mechanism height control............................................................................................ 1-45
6. Mechanism adjustment for material clamping ................................................................................. 1-46
7. Spreading of a material ................................................................................................................... 1-47
8. Adjustment of the cutting mechanism ............................................................................................. 1-48
9. Setting the needle bar height........................................................................................................... 1-51
10. Spreader and looper cam adjustment............................................................................................. 1-52
11. Loopers adjustment ........................................................................................................................ 1-52
12. Spreaders adjustment ..................................................................................................................... 1-53
13. Adjustment of the bite mechanism.................................................................................................. 1-54
14. Upper thread trimming mechanism - AF/LTT .............................................................................. 1-55
15. Adjustment of the upper thread pick-up height............................................................................... 1-56
16. Upper trimming and lower interception - CT .................................................................................. 1-57
17. Mechanismus adjusting for CT gimp .............................................................................................. 1-59
18. The trimming mechanism adjustment - LTT ................................................................................... 1-60
19. Setting the thread tension and thread draw off................................................................................ 1-63
20. Voltage guard ................................................................................................................................. 1-64
F - MACHINE MAINTENANCE
1. Cleaning and maintenance of the machine...................................................................................... 1-65
2. Periodic maintenance ...................................................................................................................... 1-67
3. Scheme of the lubrication distribution ............................................................................................. 1-68
4. Machine lubrication ........................................................................................................................ 1-69
5. Machine disposal ............................................................................................................................ 1-71
G - DOCUMENTATION
Pneumatic diagram ............................................................................................................................... 1-72
Electrical diagram ................................................................................................................................ 1-73
TABLE OF CONTENTS

e-mail:service@amfreece.cz;parts@amfreece.cz;website: www.amfreece.com
Phones: +420 582 309 146 (Service); +420 582 309 286 (Spare Parts); Fax: +420 582 360 606
Revised 04/2007
S-311
1-1
1. BASIC INFORMATION
Sewing machine S-311 is determined to sew buttonholes for outwears. Buttonholes type are listed on page
no. 1-6. The sewing machine S-311 is designed and produced to be simple for operation and very reliable.
Important design goals have been made to provide a safe machine that is simple and inexpensive to
maintain.
Sewing machine S-311 has four basic models:AF, CT, LTTand RDE.
Special electronic and mechanical safety devices protect the operator and the machine. There is a special
power lock out switch that permits the machine to be locked in the off position, so that it cannot be cycled
accidentally.There is a low air pressure detector that will not permit machine operation if air pressure is
dangerouslylow.
There are safety-warning labels on the machine in all areas that require special care. These must not
be removed. If they are lost replace them immediately.
You are the most important safety equipment of all. Be sure you understand the proper operation of
the machine. Never remove safety mechanisms or labels. We have made every effort to provide the
safest possible machine, but without complete knowledge of how this machine operates, and the use
of proper care by the operator, this machine can cause serious injury or death. That is why there are
safety warnings throughout these instructions that carry one of these messages.
Machine types are listed in the table on the manual page no. 1-4, 1-5.
DANGER! Possible loss of life.
WARNING! Possible serious injury or machine damage.
NOTICE! Possible injury or machine damage.
We recommend that service workers from AMF Reece oversee the installation and initial training of your
mechanics and operators.
The most effective safety precaution is a well-managed safety program. Be sure those who use this
machine are properly trained. Never disable safety equipment.
Always wear safety goggles when operating or servicing the machine.
A- INTRODUCTION
CA Cut After
CB Cut Before
AF Adjustable Flybar
CT Cord Trimming of all threads - short tail of lower thread
LTT Cord Trimming of allthreads - long tail oflower thread
RDE Round Eyelet
EXPLANATION OF ABBREVIATIONS IN THE MANUAL TEXT

S-311
e-mail:service@amfreece.cz;parts@amfreece.cz;website: www.amfreece.com
Phones: +420 582 309 146 (Service); +420 582 309 286 (Spare Parts); Fax: +420 582 360 606
Revised 04/2007
1-2
ÊWarning
ËDanger possible injury
ÌCovers removed possible injury
ÍSwitch
ÎGrounding
ÏRotational direction
ÐStandard label
2. SAFETY LABELS AND DEVICE
ÑNeedle bar cover
ÒEye guard
ÓDrive belt cover
Air pressure adjustment knob
Rear cover
Motor pulley cover
Foot pedal
Air pressure switch
A- INTRODUCTION
12
Ë
Í
Î
10 3 8
7
3
Ë
15
28
11
6
1
7
13
21
Ð

e-mail:service@amfreece.cz;parts@amfreece.cz;website: www.amfreece.com
Phones: +420 582 309 146 (Service); +420 582 309 286 (Spare Parts); Fax: +420 582 360 606
Revised 04/2007
S-311
1-3
3. GENERAL MACHINE PARTS DESCRIPTIONS
Display
Table
Control box
Hand wheel
Emergency Stop button
Motor
Table top
Thread stand
Main power switch
Cutting activation button
Air pressure regulator
A- INTRODUCTION
17
9
14
20 196 16 23
22
18
1
24
27

S-311
e-mail:service@amfreece.cz;parts@amfreece.cz;website: www.amfreece.com
Phones: +420 582 309 146 (Service); +420 582 309 286 (Spare Parts); Fax: +420 582 360 606
Revised 04/2007
1-4
A- INTRODUCTION
4. SPECIFICATION
* Note: If a customer uses thread size 100 and less, the manufacturer recommends to use the left looper 17.0069.4.019
If you use poor quality threads on the machine, the thread can burn at the needle (producer recommend
decrease machine´s speed).
** Gimp 10 - 30 → CT Throat Plate 10.4012.5.016
30 - 100 →CT Throat Plate 10.4012.1.016
10.4012.2.014
S-311 Elektronic buttonhole machine with chain stitch is possible to use for men`s and women`s wear.
Possible to use gimp thread, not in round eye.
Machine type/model
AF
10 to 50 mm
3,0 - 20,0 mm
4 to 8 mm
4 to 20
4 to 20 12 mm
in 8,0 mm
Cut before (CB), cut after (CA), no cut (OFF)
- 0,50 to +1,2 mm
See section D 3.3
4 to 6 mm
0,5 to 1,5 mm
No eye; 2,2 x 3,0 mm; 2,8 x 4,2 mm; 3,0 x 4,6 mm; 3,2 x 5,0 mm; 3,4 x 4,2 mm
2,1 mm (AF, LTT); 2,3 mm (CT) (± 0,3 mm electronic); 2,7 mm (± 0,3 mm electronic)
2,1 mm (AF, LTT); 2,3 mm (CT) (± 0,5 mm electronic); 2,7 mm (± 0,5 mm electronic)
± 1,5 mm
64 mm
02.0558.0.111 (Nm 100)
02.0558.1.112 (Nm 110)
80, 100, 120, gimp size 10-30 standard **
80, 100, 120, gimp size 30-100
L = 16 to 20 mm
L+L = 23 to 27 mm
1
L = 20 to 24 mm
L+L
1
= 27 to 31 mm
0,55 MPa = 80 PSI
530 mm (height) x 370 mm (width) x 560 mm (depth)
730 mm (height) x 1100 mm (width) x 700 mm depth) + 150 mm distance
64 kg
175 kg
1NPE~60Hz 230 V/TN/S; 1NPE~50Hz 230 V/TN/S
Min. 10A Characteristic C (EN60947-2)
L =86,9db; L =74,8 db; Noise measurement according to EN ISO 3746:1995
wA pfA
L = 24 to 28 mm
L+L
1
= 31 to 35 mm
according to IEC 364-3, IEC 364-5-51 temperature from +5°C to 40°C, relative air humidity from 30 to 8 0%
L = 28 to 32 mm
L+L
1
= 35 to 39 mm
16 to 20 mm 20 to 24 mm 24 to 28 mm 28 to 32 mm
1000 to 2000 stitches/min (500 to 1000 rev/min of the drive shaft)
0,5 to 2,0 mm (increments of 0,1mm)
Sewing speed
Stitch Density
Buttonhole style
Eye type
Flybar length
Length of the cross bar
Number of stitches in the eye
Number of stitches in the round end
Clamp foot height (max)
Maximum work thickness
Buttonhole Cutting Mode
Cutting Space
Cut position (Y axis)
Bedplate movement
Needle system
Recommended threads*
Upper thread trimming
Lower thread and gimp trimming
Cutting space
Operating Condition
Air pressure
Machine db Level
Machine Head Dimension
Machine Head Weight
Table Dimensions
Machine Weight
Electrical requirements
Line Circuit Breaker
Bite Range Elecctronic
Bite Range Elecctronic (???)
The length
of hole
CT 16 - 20 mm CT 20 - 24 mm CT 24 - 28 mm CT 28 - 32 mm
L = 3 to 7 mm
(Short ends)
max 3,5 mm
0,5 to 1,5 mm
Cross bar density

e-mail:service@amfreece.cz;parts@amfreece.cz;website: www.amfreece.com
Phones: +420 582 309 146 (Service); +420 582 309 286 (Spare Parts); Fax: +420 582 360 606
Revised 04/2007
S-311
1-5
A- INTRODUCTION
4 to 20
in 8,0 mm
Cut before (CB), cut after (CA), no cut (OFF)
See section D 3.3
0,55 MPa = 80 PSI
530 mm (height) x 370 mm (width) x 560 mm (depth)
730 mm (height) x 1100 mm (width) x 700 mm depth) + 150 mm distance
64 kg
175 kg
1NPE~60Hz 230 V/TN/S; 1NPE~50Hz 230 V/TN/S
Min. 10A Characteristic C (EN60947-2)
L =86,9db; L =74,8 db; Noise measurement according to EN ISO 3746:1995
wA pfA
according to IEC 364-3, IEC 364-5-51 temperature from +5°C to 40°C, relative air humidity from 30 to 8 0%
1000to 2000 stitches/min (500 to 1000 rev/min of the drive shaft)
0,5 to 2,0 mm (increments of 0,1 mm)
Sewing speed
Stitch Density
Buttonhole style
Eye type
Flybar length
Length of the cross bar
Number of stitches in the eye
Number of stitches in the round end
Clamp foot height (max)
Maximum work thickness
Buttonhole Cutting Mode
Cutting Space
Cut position (Y axis)
Bedplate movement
Needle system
Recommended threads*
Upper thread trimming
Lower thread and gimp trimming
Cutting space
Operating Condition
Air pressure
Machine db Level
Machine Head Dimension
Machine Head Weight
Table Dimensions
Machine Weight
Electrical requirements
Line Circuit Breaker
Bite Range Elecctronic
The length
of hole
L
= 3 to 7 mm
Cross bar density
8 to 60
1,5 to 2,5 mm
12 mm 5 mm
- 0,50 to +1,2 mm
4-6 mm 4-8 mm
0,5 - 1,5 mm
No eye; 2,2 x 3,0 mm; 2,8 x 4,2 mm;
3,0 x 4,6 mm; 3,2 x 5,0 mm; 3,4 x 4,2 mm
± 1,5 mm
64 mm 62,5 mm
0.0558.1.112 (Nm 110) 0.0558.0.111 (Nm 100)
80, 100, 120, gimp size 30-100 80, 100, 120
80, 100, 120, gimp size 10-30 standard **
16 to 36 mm
L =
L
10 to 36 mm16 to 32 mm
RDELTTCT 16 - 32 mm
(short ends)
(long ends)
2 to 7 mm
23 to 27 mm
27 to 31 mm
31 to 35 mm
35 to 39 mm
L +3 to 7 mm
Machine type/model
2,1 mm (AF, LTT); 2,3 mm (CT) (
± 0,3 mm electronic); 2,7 mm (± 0,3 mm electronic)
2,1 mm (AF, LTT); 2,3 mm (CT) (
± 0,5 mm electronic); 2,7 mm (± 0,5 mm electronic) Bite Range Elecctronic (???)
*** When sewing the round end buttonhole with the start in the eye, the machine has to be switched to the AF model and
trim med manualy.

S-311
e-mail:service@amfreece.cz;parts@amfreece.cz;website: www.amfreece.com
Phones: +420 582 309 146 (Service); +420 582 309 286 (Spare Parts); Fax: +420 582 360 606
Revised 04/2007
1-6
A- INTRODUCTION
5. BUTTONHOLE DESCRIPTION
ÊÊ
ÊÊ
Ê
ËË
ËË
Ë
The first row of stitches
The second row of stitches
Eye
Cutting space
Stitch density
Bite size
The length of a bar
The length of cutting
ÌÌ
Ì
Ì
Ì
ÍÍ
ÍÍ
Í
ÎÎ
ÎÎ
Î
ÏÏ
ÏÏ
Ï
The length of buttonhole
Fly bar AF
Cross bar CRB
Open End
Round End
Buttonhole width
Buttonhole lenght
ÐÐ
Ð
Ð
Ð
ÑÑ
ÑÑ
Ñ
ÒÒ
ÒÒ
Ò
ÓÓ
ÓÓ
Ó
1
5
2
3
4
6
8
7
9
14
15
7
10
11
12
13

e-mail:service@amfreece.cz;parts@amfreece.cz;website: www.amfreece.com
Phones: +420 582 309 146 (Service); +420 582 309 286 (Spare Parts); Fax: +420 582 360 606
Revised 04/2007
S-311
1-7
6. INSTRUCTIONS FOR OPERATOR SAFETY AND MAINTENANCE OF
THE MACHINE S-311
When installing the machine the manufacturer recommends the minimum clearance mentioned above
around the machine. Read all of the instructions that follow. DO NOT PUT THE MACHINE INTO
OPERATION UNTILYOUARE COMPLETELYFAMILIAR WITHALLINSTALLATIONAND
OPERATING INSTRUCTIONS.
DANGER!
-Before connecting the machine to the power supply, be positive that all safety covers are
correctly installed.
-Always engage the power lockout switch, and disconnect the main power supply, before
removing any safety covers.
-Never connect the machine to the power supply when any cover is removed.
-It is forbidden to disconnect all connectors when the machine is switched on and connected to
the power supply. The electrical components and motors can be damaged.
WARNING!
-Locate the Emergency Stop button. Be sure you know how to use it.
-Be sure that you have a reliable and uniform power supply.
-Be sure that all electrical cables are in good condition and have no signs of damage to avoid
electrical shock.
-If any covers become damaged, they must be repaired or replaced immediately.
-Do not touch moving parts of the machine while it is operating.
-Keep clear of the needle.
-Always switch off the main power before changing the needle.
-Before cleaning the machine or performing service to the machine, engage the power lock out
switch or disconnect the main power supply.
-When the machine is not in use engage the power lock out switch or disconnect the main
power supply.
A- INTRODUCTION

S-311
e-mail:service@amfreece.cz;parts@amfreece.cz;website: www.amfreece.com
Phones: +420 582 309 146 (Service); +420 582 309 286 (Spare Parts); Fax: +420 582 360 606
Revised 04/2007
1-8
-When this machine is used incorrectly, or is incorrectly maintained, it can be dangerous.
-Everyone who uses this machine, or maintains this machine, must be completely familiar with
this manual.
CAUTION!
-Perform all regular service as described in this manual.
-If there is any problem with the power supply, turn off the main power switch.
-Do not remove, paint over, damage or in any way change safety labels. If a safety label
cannot be easily read, replace it.
-Long hair and loose clothing may be dangerous near any machinery. Always contain long hair
and avoid loose clothing, so that it cannot be caught by machinery and cause injury.
-Never use this machine while under the influence of drugs or alcohol.
-If anything seems to be operating incorrectly in the machine call for maintenance assistance
immediately.
-Be sure that there is adequate light for safe operation. Anormal minimum light level is 750
lux.
A- INTRODUCTION

e-mail:service@amfreece.cz;parts@amfreece.cz;website: www.amfreece.com
Phones: +420 582 309 146 (Service); +420 582 309 286 (Spare Parts); Fax: +420 582 360 606
Revised 04/2007
S-311
1-9
A- INTRODUCTION
7.2.Manual machine control
-order number 03.5519.0.007
-allows to change the foot machine control for
manual by switch installation on the table and
changing the cables
7. SPECIAL DEVICE
7.1. Working light
-the customer can order the light
(order number 12.0008.4.875)
Warning — It is necessary to disconnect the machine
fromthe mainware before instaling the light.
7.3. Voltage control - relay HRN 35
-order number 06.1900.0.000
The machine operation is ensured when the power supply is in rangeAC 230V
± 10 % (EN 60204-1). The manufacturer recommends to equip the machine with the
relay HRN-35 in case of larger fluctuation of power supply.
It prevents the machine from damage and in case of large decrease of power supply, the
operator is informed by error message.
If the power supply range is exceeded - max 250V and min 190V the voltage guard - relay HRN-35 which
ensures that machine does not start.After the power supply is in required range, it is possible to start the
machine.

S-311
e-mail:service@amfreece.cz;parts@amfreece.cz;website: www.amfreece.com
Phones: +420 582 309 146 (Service); +420 582 309 286 (Spare Parts); Fax: +420 582 360 606
Revised 04/2007
1-10
2. TABLE ADJUSTMENT
2.1. After you will unpack the machine, move the machine to its appointed place. The machine is
supplied with the stand with standart height for working in seat. For another stand
implementation is necessary to make an agreement with the customer.The recommended height
of the stand (table) is 870 mm. Tighten the screws Ëvery well.
2.2. To stabilize the table, use the floor pads Ì, which are controlled by hand screw Í. Check the
levelness of the adjusted table.
2.3 Eliminate the shipping band Î, which holds the head in place. If transporting machine to a
different location, it is necessary to fasten the table to prevent shifting in transit.
1. CONTENT OF THE SHIPPING BOX
1.1. If it is not mentioned otherwise during ordering, the shipping
containerusuallycontains:
—assembled machine on the stand with
electroinstalation
—box with the accessories
(specification in the spare parts
section)
—dis-assembled thread stand ÊÊ
Ê
Ê
Ê
—operation manual with the spare parts
manual
1.2. When unpacking the container, follow labels which are on a cover.
CAUTION: If the container was damaged during the transport, inform the carrier. Check the contents
of the container with order. In the event of an error, immediately inform the manufacturer- late
notification of an error in shipment may result in loss of claim.
ÊÊ
ÊÊ
Ê
B- MACHINE ASSEMBLY

e-mail:service@amfreece.cz;parts@amfreece.cz;website: www.amfreece.com
Phones: +420 582 309 146 (Service); +420 582 309 286 (Spare Parts); Fax: +420 582 360 606
Revised 04/2007
S-311
1-11
B- MACHINE ASSEMBLY
8
7
0
m
m
Í
Ë
Ë

S-311
e-mail:service@amfreece.cz;parts@amfreece.cz;website: www.amfreece.com
Phones: +420 582 309 146 (Service); +420 582 309 286 (Spare Parts); Fax: +420 582 360 606
Revised 04/2007
1-12
3. CONNECTION OF THE MACHINE HEAD WITH THE CONTROL BOX
3.1. The control box Êcontains the control system, regulator Ëand valve terminal Ìfor
controlling the pneumatic cylinders.
B - MACHINE ASSEMBLY
3.2. The machine is connected from the plant. If disassembled, connect the machine as follows:
-blue pneumatic tubes J1A/B — J9A/B connect with equally marked electromagnetic valves.
-cables for stepping motors marked X, Y, R connected with equally marked cables.
-remaining cable is used for sensor and switches connection with box.
Ê
Ë
Ì

e-mail:service@amfreece.cz;parts@amfreece.cz;website: www.amfreece.com
Phones: +420 582 309 146 (Service); +420 582 309 286 (Spare Parts); Fax: +420 582 360 606
Revised 04/2007
S-311
1-13
B - MACHINE ASSEMBLY
S-311 RDE - PNEUMATIC SYSTEM CONNECTION
ÊÊ
ÊÊ
Ê clamp feet up/down
ÌÌ
ÌÌ
Ì upper thread draw-off
ÍÍ
ÍÍ
Í upper thread trimming
ÏÏ
ÏÏ
Ï cutting
ÑÑ
ÑÑ
Ñ suction air distribution
0, 1, 2 — X => distribution from a regulator
0, 1, 2 — X pneumatic cylinder identification (the first number is 0 but is not marked)
A; B; C
Tubes
identification JXXX
A
J6A
J6B
J1B
J4B
J4A
J3B
J3A
J0A
J8A2
J8A1
4 bar
6 bar
41
3
6
J0A
Ê
Ï
ÍÍ
ÍÍ
Í
ÌÌ
ÌÌ
Ì
ÑÑ
ÑÑ
Ñ

S-311
e-mail:service@amfreece.cz;parts@amfreece.cz;website: www.amfreece.com
Phones: +420 582 309 146 (Service); +420 582 309 286 (Spare Parts); Fax: +420 582 360 606
Revised 04/2007
1-14
B - MACHINEASSEMBLY
S-311 AF - PNEUMATIC SYSTEM CONNECTION
ÊÊ
ÊÊ
Ê clamp feet up/down
Ëclamp feet spreading
ÌÌ
ÌÌ
Ì upper thread draw-off
ÍÍ
ÍÍ
Í upper thread trimming
ÏÏ
ÏÏ
Ï cutting
ÑÑ
ÑÑ
Ñ suction air distribution
0, 1, 2 — X => distribution from a regulator
0, 1, 2 — X pneumatic cylinder identification (the first number is 0 but is not marked)
A; B; C
Tubes
identification JXXX
A
J6A
J6B
J1B
J4B
J4A
J3B
J2B
J3A
J0A
J8A2
J8A1
4 bar
6 bar
41
32
6
J0A
Ê
Ï
ÍÍ
ÍÍ
Í
ÌÌ
ÌÌ
Ì
ÑÑ
ÑÑ
Ñ
Ë

e-mail:service@amfreece.cz;parts@amfreece.cz;website: www.amfreece.com
Phones: +420 582 309 146 (Service); +420 582 309 286 (Spare Parts); Fax: +420 582 360 606
Revised 04/2007
S-311
1-15
B - MACHINE ASSEMBLY
S-311 CT - PNEUMATIC SYSTEM CONNECTION
ÊÊ
ÊÊ
Êclamp feet up/down
ËË
Ë
Ë
Ëclamp feet spreading
ÌÌ
ÌÌ
Ìupper thread draw-off
ÍÍ
ÍÍ
Íupperthread trimming
ÏÏ
ÏÏ
Ïcutting
ÐÐ
ÐÐ
Ðbottom thread trimming CT
ÑÑ
ÑÑ
Ñsuction
air distribution
0, 1, 2 — X => distribution from a regulator
0, 1, 2 — X pneumatic cylinder identification (the first number is 0 but is not marked)
A; B; C
Tubes
identification JXXX
A
J6A
J6B
J1B
J4B
J4A
J3B
J2B
J3A
J0A
J7B
J8A2
J8A1
4 bar
6 bar
47
1
32
6
J0A
Ð
Ê
Ï
ÍÍ
ÍÍ
Í
ÌÌ
ÌÌ
Ì
ÑÑ
ÑÑ
Ñ
Ë
Ð

S-311
e-mail:service@amfreece.cz;parts@amfreece.cz;website: www.amfreece.com
Phones: +420 582 309 146 (Service); +420 582 309 286 (Spare Parts); Fax: +420 582 360 606
Revised 04/2007
1-16
S-311 LTT - PNEUMATIC SYSTEM CONNECTION
air distribution
0, 1, 2 — X => distribution from a regulator
0, 1, 2 — X pneumatic cylinder identification
A; B; C
Tubes
identification JXXX
ÊÊ
ÊÊ
Êclamp feet up/down
ËË
ËË
Ëclamp feet spreading
Ì
Ì
ÌÌ
Ìupper thread draw-off
ÍÍ
Í
Í
Íupperthread trimming
Î ÒÎ Ò
Î ÒÎ Ò
Î Ò thread nipper
ÏÏ
ÏÏ
Ïcutting
ÐÐ
ÐÐ
Ðbottom thread trimming CT
ÑÑ
ÑÑ
Ñsuction
(the first number is 0 but is not marked)
B - MACHINEASSEMBLY
A
J6A
J6B
J1B
J4B
J4A
J3B
J2B
J3A
J0A
J8A2
J8A1
J5B
J5A J9B
4 bar
J7B
J7A
6 bar
4
7
1
3
59
2
6
J0A
Ð
Ñ
Ê
Ï
ÍÍ
ÍÍ
Í
ÌÌ
ÌÌ
Ì
ÑÑ
ÑÑ
Ñ
Ë
ÐÐ
ÐÐ
Ð
Ò
Î

e-mail:service@amfreece.cz;parts@amfreece.cz;website: www.amfreece.com
Phones: +420 582 309 146 (Service); +420 582 309 286 (Spare Parts); Fax: +420 582 360 606
Revised 04/2007
S-311
1-17
4. BELT TENSION
4.1. Lower belt Êof sewing mechanism drive is
installed on machine head pulley during the
transport. To access this pulley : loosen screw Ë
on drive belt cover Í, shift the cover aside and
remove the cover. Then loosen two screws Îand
screw Ïof the drive belt cover Ì.
4.2. To remove the cover Í, loosen the screw Ð. It
allows insertion of the panel Ñwith the
Emergency Stop button, inside the cover.
4.3. After loosening the screws Óof the tension
pulley , tighten the belt by moving the pulley.
Tighten the screws again.
4.4.Check the tension by pressure approximately
10 N above the plate. The deflection of the belt
should be approximately 10 mm.
4.5. After loosening the screws , it is possible to
stretch the upper drive belt using the pulley
.
4.6. Install the motor pulley cover and machine
covers Ì, Í. By turning the hand wheel
check, whether the belts are clear from all
covers.
B - MACHINE ASSEMBLY
Ë
Í
Ð
Ñ
Î
Ï
Ì
Ê
Ó
Other manuals for REECE S-311
2
Table of contents
Other AMF Sewing Machine manuals

AMF
AMF SERIES S104-130 Quick start guide

AMF
AMF DECO 2000 User manual

AMF
AMF S-4001 ISBH+I SM 30 Quick start guide

AMF
AMF S 4000 TKF Quick start guide

AMF
AMF S-4000 Quick start guide

AMF
AMF ES-505 Quick start guide

AMF
AMF Reece S-101 User manual

AMF
AMF S-4000 Quick start guide

AMF
AMF REECE S-311 Quick start guide

AMF
AMF Reece S-101 User manual