Angler CI-LR20 User manual

INSTRUCTIONS
circo 19"″ led ring light
CI-LR20

2
Introduction
Congratulations on purchasing the Angler Circo 19"LED ring light.
The Angler Circo CI-LR20 is a compact, lightweight, and portable
way to light your subject. It provides 360 degrees of even illumination,
ideal for enhancing facial features. It’s a great fit for fashion and beauty
photography and when used in combination with its diuser sock, which
provides softer lighting. The light also features silent operation, so it can
be used for video applications such as hair and make-up tutorial videos.
Precautions
Please read all instructions carefully before assembling and operating
this product.
To avoid damage to this product, be careful not to overtighten or
improperly thread any of the threaded fittings.
It is recommended to keep the diuser sock on the array at all times,
as the array is quite powerful at close distances without it.
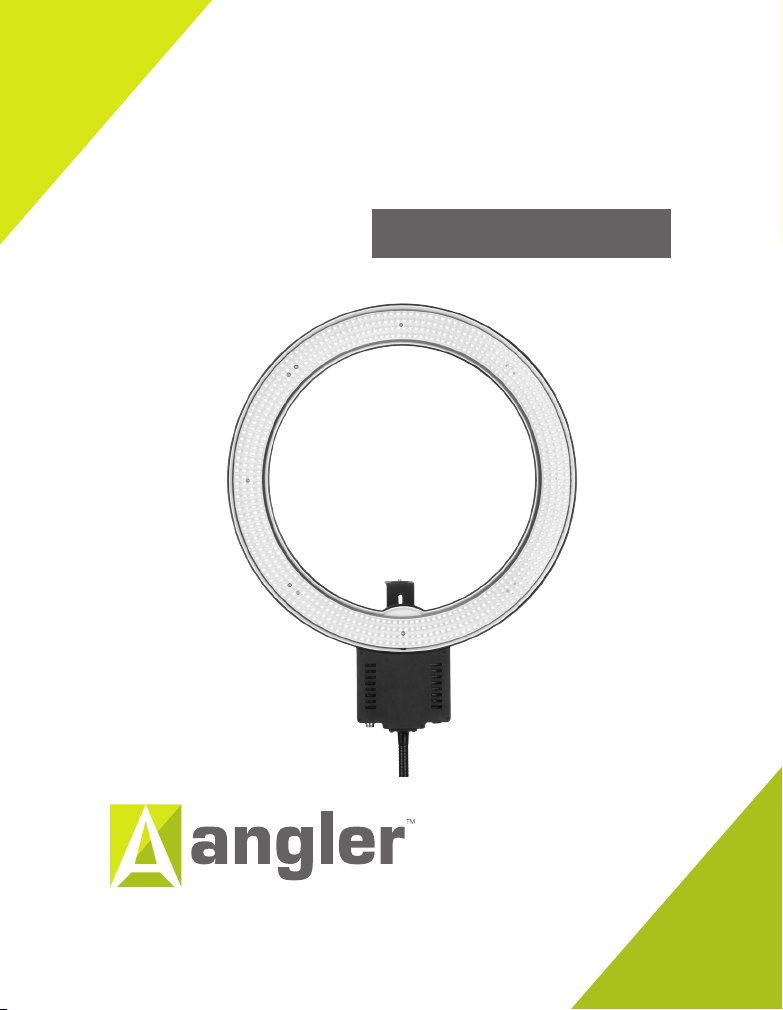
The camera bracket is designed to support cameras with small- to
mid-size lenses. It may not support the weight of lenses which re-
quire a tripod collar to mount.
Use this light with only the rated voltage on the power supply, as any
misuse could risk damage or malfunction.
Avoid using this light in any high-moisture environments, as this
could also cause damage or malfunction.

3
To prolong the life of the unit, turn the power o and unplug the
light when it is not in use.
Do not attempt to disassemble or repair this product. There are
components inside that can produce a hazardous electric shock.
Keep this product away from water and any flammable gases
or liquids.
Do not leave the device in a closed vehicle under the sun or in
other areas subject to very high temperatures.
Make sure this product is powered o when plugging it into a
power source.
Always remove the power cord by holding the plug—do not pull
the cord.
Do not stare at the light when it is powered on.
Handle this product with care.
Clean this product with only a soft, dry cloth.
Make sure everything is secure before proceeding.
Keep this product away from children.
Make sure that this product is intact and that there are no
missing parts.
All images are for illustrative purposes only.

4
Also included:
Carrying case
User manual
LED Array
1/4"-20
Camera set
screw
Flexible
Stand
Adapter
Power switch
Dimming knob
DC input
Phillips-head
screws
Front
Back

5
Diuser Sock
AC Power Supply
DC barrel
connector
1/4"-20
Camera set
screw
Flexible
Stand
Adapter Camera
Bracket
5/8"
receiver
Height
adjustment
thumb screws
Elastic band
AC power cord
Locking
knob
Touch-fastener
straps

6
Attaching the Diuser Sock
It is recommended that the diuser sock
is placed on the LED array before adding
any other accessories.
1.
Lay the LED array faceup on a flat,
clean surface.
2.
Look for the elastic band on the bottom
of the sock, and wrap it around the base
of the array. Fit the sock over the ring
light so that the dark fabric band is on
the inside of the ring. Stretch the elastic
edge of the sock over the outside of the
ring. Secure the sock with the attached
touch-fastener straps.
Note: When fitting the diuser sock
over the array, make sure the touch
fasteners are on the outside of the sock.
2

7
Attaching the Camera Bracket
The adjustable camera bracket attaches your
camera to the ring light for tripod-mounted
shooting. It connects to the bottom of the
LED array via two Phillips-head screws.
1.
Use a Phillips screwdriver (not included)
to remove the screws from the bottom
of the LED array. Do not remove the
larger screw in the middle—only the two
on the ends.
2.
Position the camera bracket behind the
LED array, and align the screw holes on
the bracket with the ones on the array.
3.
Insert the two Phillips screws, and fasten
them with the screwdriver.
4. Make sure the two thumbscrews in the
camera bracket are fully tightened.
Attach your camera to the camera
bracket via the stud on 1/4"-20 set
screw. Make sure your camera is secure
before continuing to the next step.
1
2
4

8
5.
If necessary, use the two thumbscrews
on the back of the camera bracket to
adjust the bracket’s height.
6.
For tripod-mounted shooting, use the
socket in the 1/4"-20 set screw to
mount the assembly to your tripod.
Make sure the assembly is securely
mounted to the tripod.
5
6

9
Attaching the Flexible Stand
Adapter
The flexible stand adapter incorporates
a gooseneck and 5/8"receiver to mount
the ring light on a light stand for easy
o-camera positioning. Like the camera
bracket, it connects to the bottom of the
LED array via two Phillips-head screws.
1.
Use a Phillips screwdriver (not included)
to remove the screws from the bottom
of the LED array. Do not remove the
larger screw in the middle—only the two
on the ends.
2.
Align the flexible stand adapter screw
holes with the ones on the array.
3.
Insert the two Phillips screws, and
fasten them with the screwdriver.
4.
Loosen the flexible stand adapter’s
locking knob. Carefully seat the
adapter’s 5/8"receiver onto your light
stand’s 5/8"stud, and tighten the
adapter’s locking knob until secure.
5.
Bend the adapter to position the light
as needed.
2
4
5

10
Powering and Dimming the LED
The power supply is rated for multivoltage
use at a range of 100–240 V and 50/60
Hz. Before connecting, make sure the array’s
power switch is set to O. Connect the AC
cord to the AC input on the DC barrel
connector. Plug the DC barrel connector
into the LED array’s DC input, and then plug
the power cord into an AC power socket.
Plug adapters (not included) may be required
in some countries.
The LED is turned on or o via the power
switch. Dimming is controlled via the
dimming knob, and the light can be dimmed
from 0%–100%. Turning the knob clockwise
increases brightness. The array is also
equipped with a remote socket covered by
a rubber cap.

11
SPECIFICATIONS
number of LED count's 640
Color temperature 5500 K
CRI 95
Dimming range 0%–100%
Camera weight rating 2 lb. (0.9 kg)
AC power supply
100–240 V AC at 50/60
Hz; conversion to DC
14.8–15 V, 1.5 A
Dimensions (H × W × D): 23" × 19" ×
1.75" (58.4 × 48.3 × 4.4 cm)
Diameter 19" (48.26 cm)
Weight 2.85 lb. (1.3 kg)

One-Year Limited Warranty
This Angler product is warranted to the original purchaser to be free from defects in
materials and workmanship under normal consumer use for a period of one (1) year from
the original purchase date or thirty (30) days after replacement, whichever occurs later.
The warranty provider’s responsibility with respect to this limited warranty shall be limited
solely to repair or replacement, at the provider’s discretion, of any product that fails
during normal use of this product in its intended manner and in its intended environment.
Inoperability of the product or part(s) shall be determined by the warranty provider. If the
product has been discontinued, the warranty provider reserves the right to replace it with
a model of equivalent quality and function.
This warranty does not cover damage or defect caused by misuse, neglect, accident,
alteration, abuse, improper installation or maintenance. EXCEPT AS PROVIDED
HEREIN, THE WARRANTY PROVIDER MAKES NEITHER ANY EXPRESS
WARRANTIES NOR ANY IMPLIED WARRANTIES, INCLUDING BUT NOT
LIMITED TO ANY IMPLIED WARRANTY OF MERCHANTABILITY OR FITNESS
FOR A PARTICULAR PURPOSE. This warranty provides you with specific legal rights,
and you may also have additional rights that vary from state to state.
To obtain warranty coverage, contact the Angler Customer Service Department to obtain
a return merchandise authorization (“RMA”) number, and return the defective product
to Angler along with the RMA number and proof of purchase. Shipment of the defective
product is at the purchaser’s own risk and expense.
For more information or to arrange service, visit www.anglerlights.com or call Customer
Service at 212-594-2353.
Product warranty provided by the Gradus Group.
www.gradusgroup.com
Angler is a registered trademark of the Gradus Group.
© 2016 Gradus Group LLC. All Rights Reserved.
ANGLER
A Gradus Group
Brand
TM
GG2
Table of contents
Other Angler Lighting Equipment manuals

Angler
Angler CL-24 User manual

Angler
Angler Sparta Series User manual

Angler
Angler Quick-Open Deep Parabolic Softbox V2 User manual

Angler
Angler BI-45W-RL User manual

Angler
Angler CatchLight User manual

Angler
Angler FastBox Series User manual

Angler
Angler QO-DP26 User manual

Angler
Angler RLB18LED User manual

Angler
Angler COL-1212 User manual

Angler
Angler Circo CI-LR21 User manual